โจทย์: เสียงผิดปกติคือของเสียที่มองไม่เห็นThe problem: an abnormal sound is a defect you cannot see
ลูกปืนที่เริ่มสึก ใบพัดที่เสียสมดุล ชิ้นส่วนที่ขันไม่แน่น หรือมอเตอร์ที่ผิดสเปก มักผ่านการตรวจด้วยตาและการทดสอบทางไฟฟ้าได้ แต่จะฟ้องออกมาเป็นเสียงที่ต่างจากเครื่องปกติ ถ้าเครื่องแบบนี้หลุดไปถึงลูกค้า ผลที่ตามมาคือการเคลม การส่งคืน และชื่อเสียงของแบรนด์A bearing starting to wear, an unbalanced impeller, a loose part or an out-of-spec motor often passes visual inspection and electrical tests, yet shows up as a sound that differs from a normal unit. When such a unit reaches the customer, the results are warranty claims, returns and damage to the brand.
หลายโรงงานจึงให้พนักงานฟังเสียงที่ปลายสายการผลิต ซึ่งมีข้อจำกัดชัดเจน:Many plants therefore have an operator listen at the end of the line, which has clear limits:
- ผลไม่คงที่: แต่ละคนได้ยินไม่เท่ากัน และคนเดียวกันก็ตัดสินต่างกันเมื่อล้า หรือเมื่อเสียงรอบข้างในโรงงานเปลี่ยนInconsistent: people hear differently, and the same person judges differently when tired or when the factory background changes.
- ไม่มีตัวเลข: บอกได้แค่ "เสียงแปลก" บอกไม่ได้ว่าผิดที่ความถี่ไหนและมากเท่าไร ฝ่ายวิศวกรรมจึงหาสาเหตุต่อได้ยากNo numbers: "it sounds odd" does not say at which frequency or by how much, so engineering has little to work with.
- ไม่มีหลักฐาน: เมื่อมีการเคลม ไม่มีข้อมูลยืนยันว่าเครื่องหมายเลขนั้นมีเสียงอย่างไรตอนออกจากโรงงานNo record: when a claim arrives, nothing shows how that serial number sounded when it left the factory.
- เกณฑ์เลื่อนได้: สิ่งที่ "ยอมรับได้" ค่อย ๆ เปลี่ยนไปตามเวลาโดยไม่มีใครสังเกตDrifting criteria: what counts as "acceptable" shifts over time without anyone noticing.
แนวคิด: สามขั้นตอนที่เข้าใจได้ในหนึ่งนาทีThe idea: three steps you can explain in a minute
หลักการของระบบนี้ตั้งใจให้เรียบง่าย เพื่อให้ทั้งฝ่ายผลิต ฝ่ายคุณภาพ และผู้บริหารเข้าใจตรงกัน:The principle is deliberately simple, so that production, quality and management all read it the same way:
- วัดเครื่องที่ดีเป็นค่าอ้างอิง บันทึกสเปกตรัมเสียงของเครื่องที่ยืนยันแล้วว่าปกติMeasure a good unit as the reference. Record the sound spectrum of units confirmed to be good.
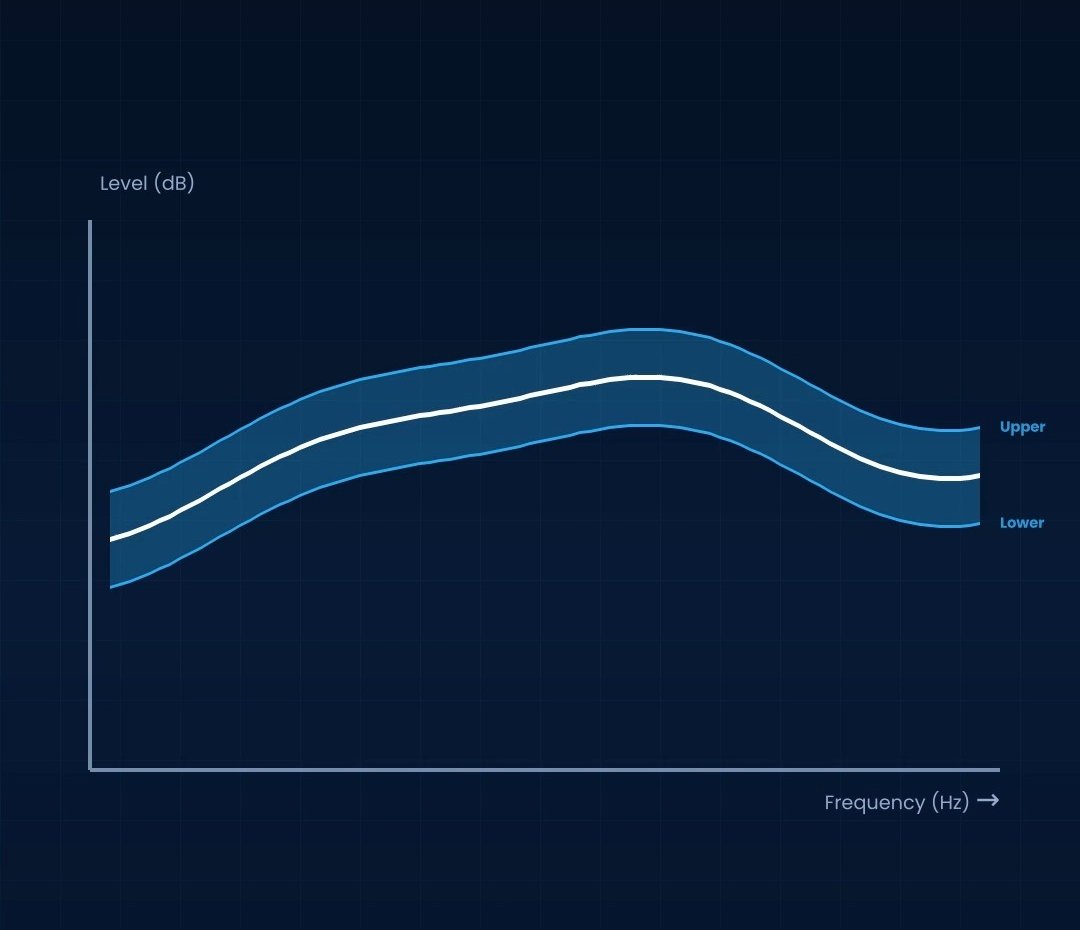
- กำหนดขอบเขตบนและล่าง รอบค่าอ้างอิง เกิดเป็นแถบที่เครื่องปกติควรอยู่ภายในSet an upper and a lower limit around the reference: the band a normal unit should stay inside.
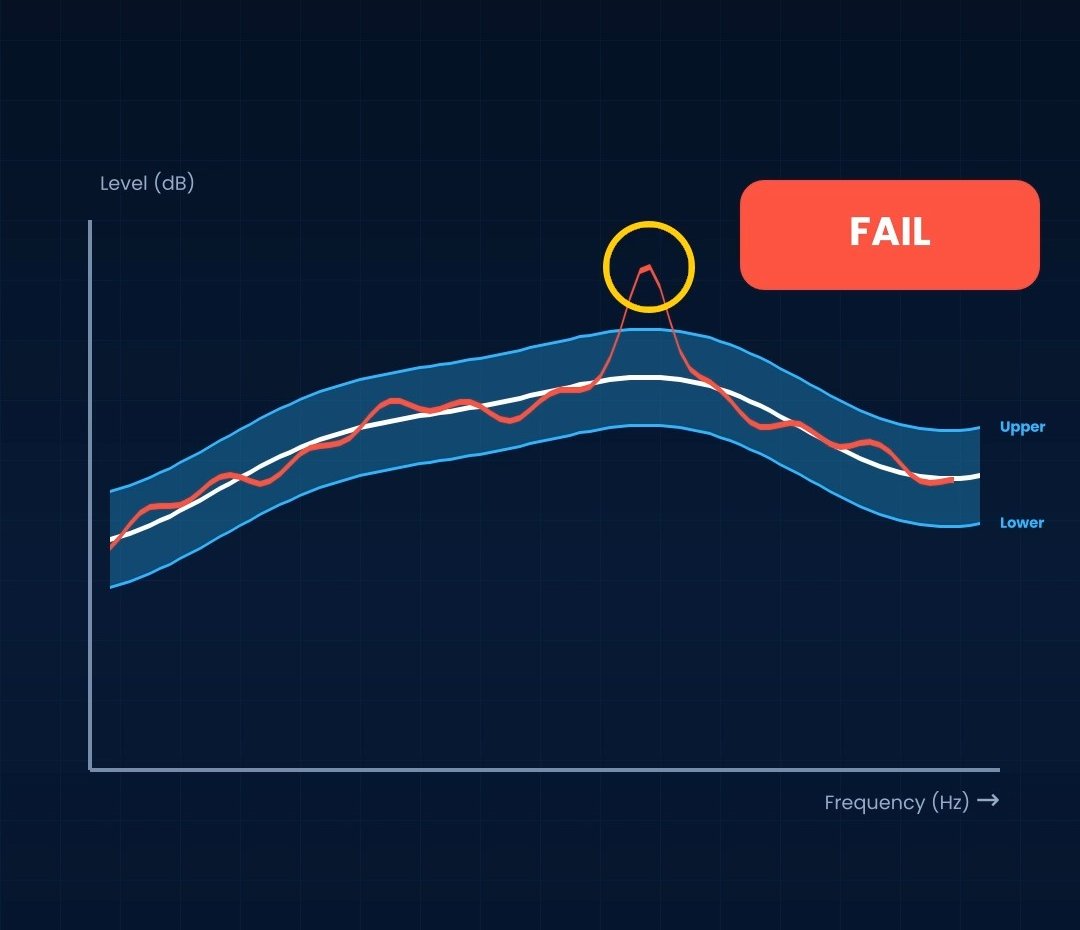
- เทียบทุกเครื่องกับขอบเขต อยู่ในแถบทุกความถี่ = PASS มีจุดใดหลุดออกนอกแถบ = FAILCompare every unit with the limits. Inside the band at every frequency = PASS; any point outside = FAIL.
ชุดเครื่องมือThe measuring set
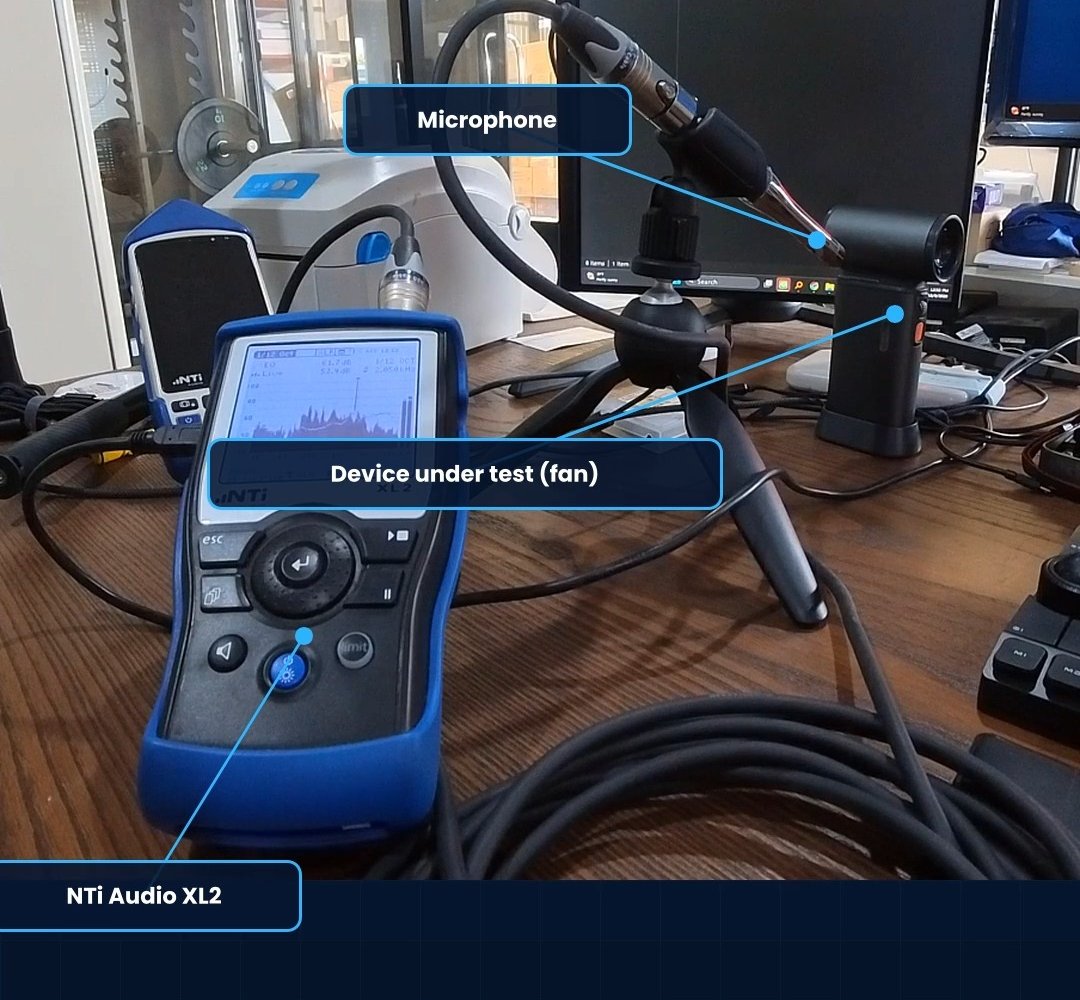
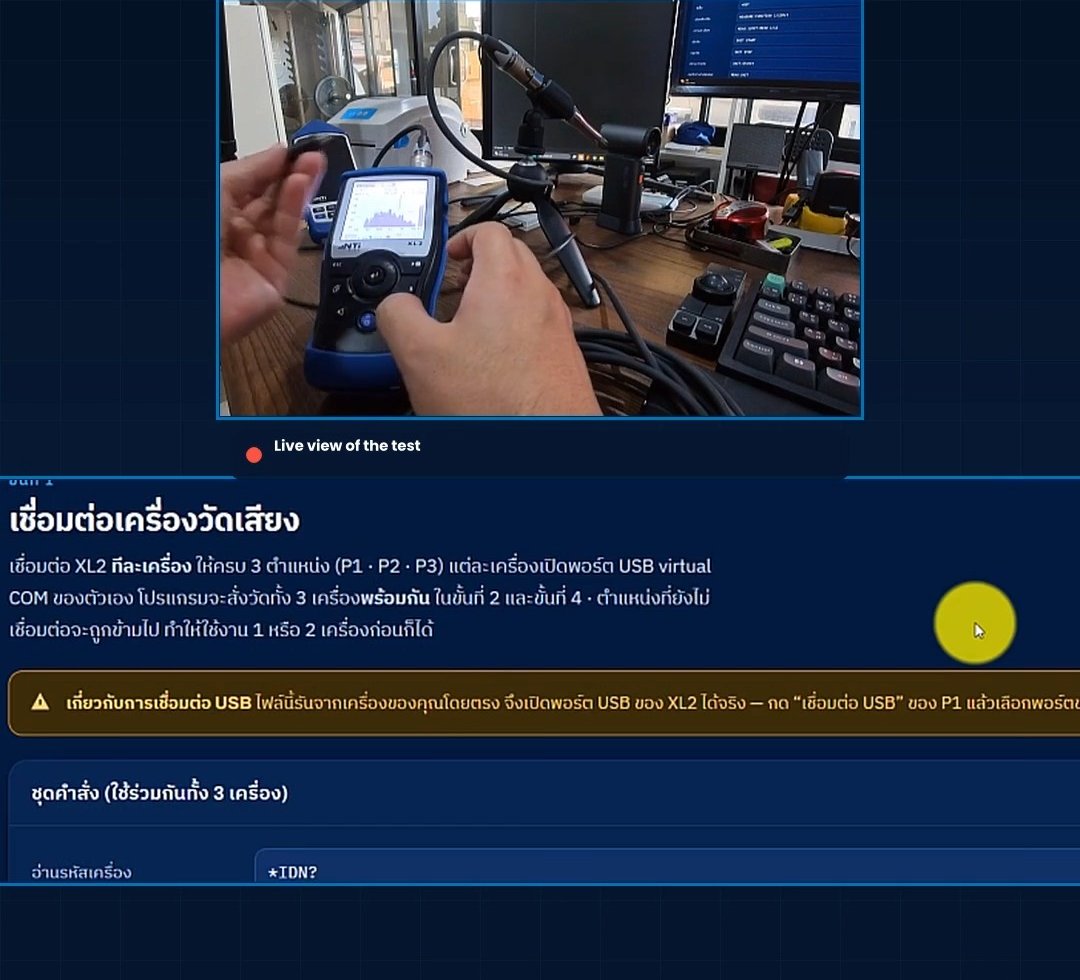
- NTi Audio XL2 เครื่องวิเคราะห์เสียงแบบพกพา ทำหน้าที่วัดสเปกตรัมเสียงThe NTi Audio XL2 handheld analyzer measures the sound spectrum.
- ไมโครโฟนวัดเสียง M2230 (Class 1) วางที่ตำแหน่งคงที่หน้าสินค้าที่ตรวจThe M2230 measurement microphone (Class 1) sits at a fixed position in front of the device under test.
- คอมพิวเตอร์ที่ติดตั้ง GBS Spectral Limit Software ต่อกับ XL2 ทาง USB ทำหน้าที่สั่งวัด เทียบกับขอบเขต แสดงผล และบันทึกข้อมูลA computer running GBS Spectral Limit Software, connected to the XL2 over USB, starts the measurement, compares it with the limits, shows the verdict and stores the data.
- ตำแหน่งวัดได้ถึง 3 ตำแหน่ง (P1, P2, P3) โดยใช้ XL2 ตำแหน่งละเครื่อง วัดพร้อมกัน สำหรับสินค้าที่ต้องฟังจากหลายด้าน ใช้ 1 หรือ 2 ตำแหน่งก็ได้Up to 3 measuring positions (P1, P2, P3), one XL2 per position, measured simultaneously, for products that must be checked from several sides. One or two positions also work.
ระบบนี้ออกแบบให้ผู้ปฏิบัติงานบนสายการผลิตไม่ต้องอ่านกราฟหรือปรับเครื่องวัดเอง ขั้นตอนตั้งค่าทำครั้งเดียวโดยฝ่ายวิศวกรรมหรือฝ่ายคุณภาพThe system is designed so that line operators never have to read a graph or adjust the analyzer; the set-up is done once by engineering or quality staff.
ขั้นตอนที่ 1: เชื่อมต่อเครื่องวัดStep 1: connect the analyzer
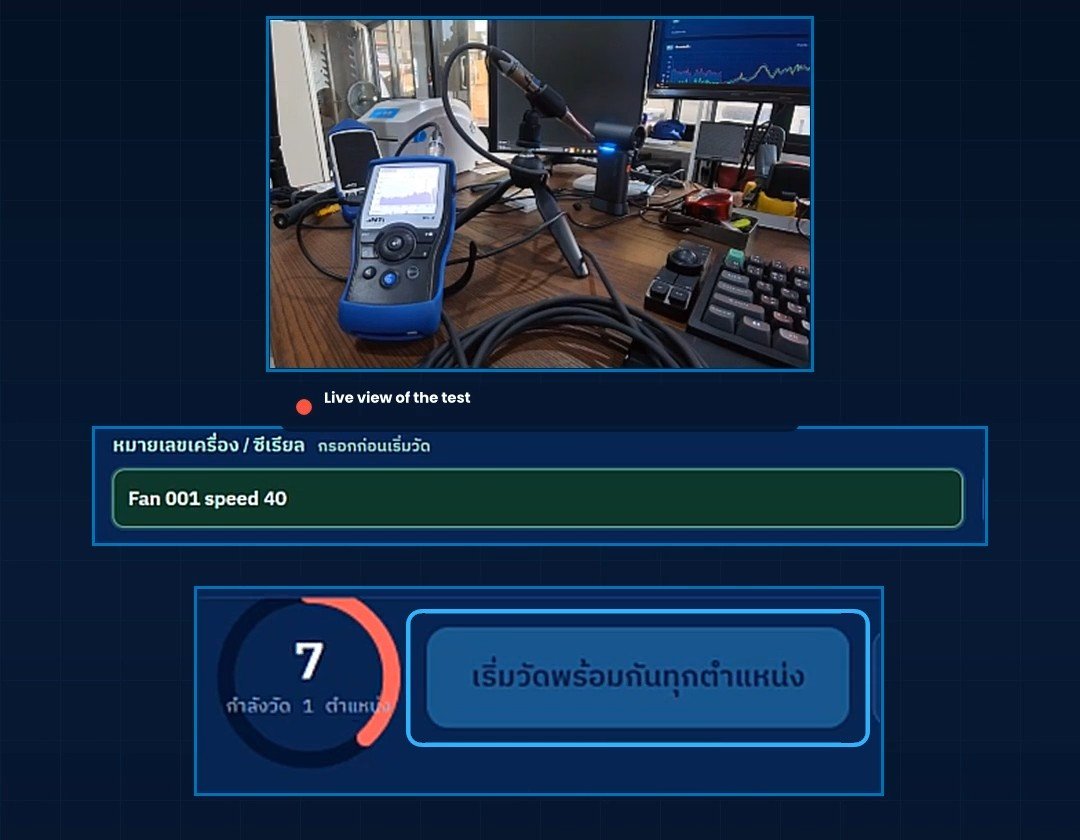
ต่อ XL2 เข้ากับคอมพิวเตอร์ด้วยสาย USB แล้วกดเชื่อมต่อในโปรแกรม ถ้าใช้หลายตำแหน่งวัด ให้ต่อทีละเครื่องจนครบ โปรแกรมกำหนดให้แต่ละเครื่องเป็นตำแหน่ง P1, P2 และ P3 ตามลำดับ หน้าจอมีภาพสดจากกล้องของจุดทดสอบ (Live view of the test) ให้ผู้ปฏิบัติงานเห็นการจัดวางตลอดเวลาConnect the XL2 to the computer with a USB cable and press connect in the software. With several positions, connect one analyzer at a time; the software assigns them to positions P1, P2 and P3 in turn. A live camera view of the test stand stays on screen so the operator always sees the set-up.
ขั้นตอนที่ 2: วัดเครื่องตัวอย่างที่ดีเป็นค่าอ้างอิงStep 2: measure good units as the reference
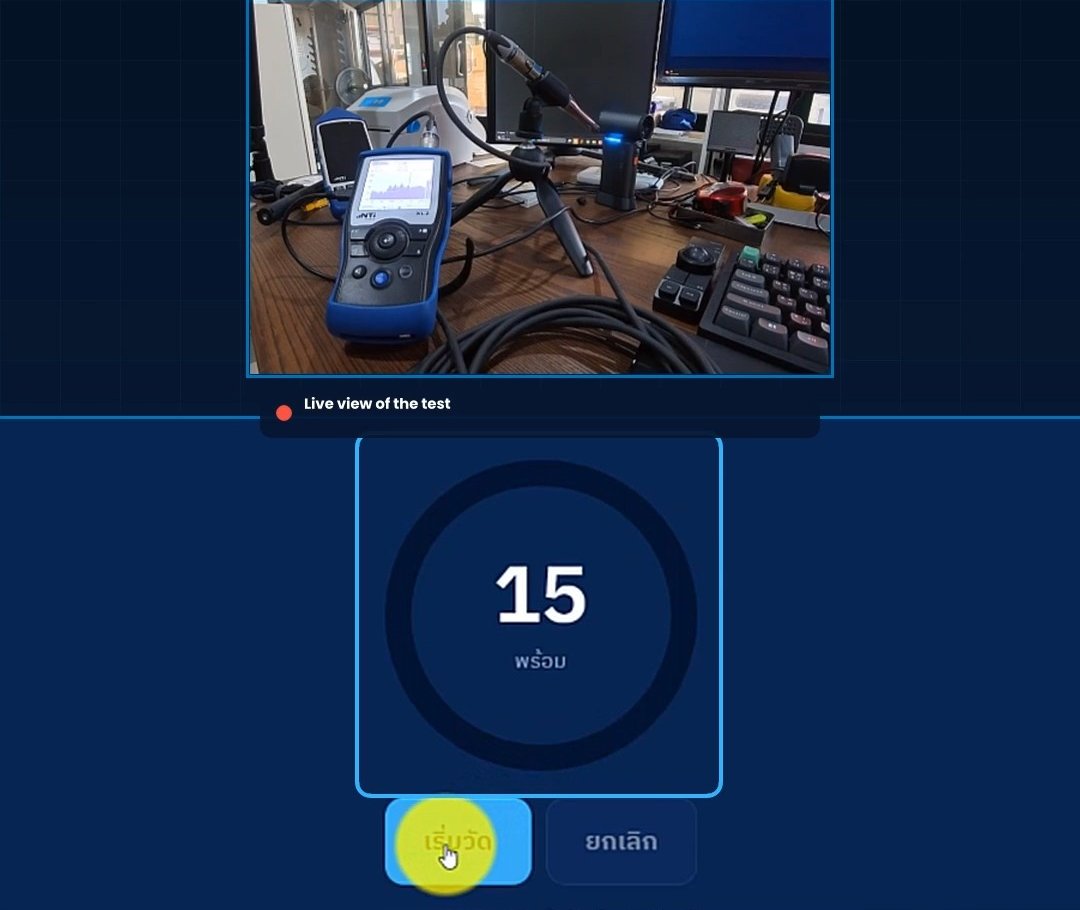
วางเครื่องตัวอย่างที่ยืนยันแล้วว่าดีในตำแหน่งทดสอบ กดเริ่ม โปรแกรมนับถอยหลังขณะที่ XL2 บันทึกสเปกตรัมเสียง ในการสาธิตนี้วัดซ้ำสามครั้ง เพื่อให้ค่าอ้างอิงครอบคลุมความแปรผันตามปกติของสินค้าและของการวัดPlace a unit confirmed as good on the test stand and press start; the software counts down while the XL2 records the sound spectrum. In this demonstration the reference was measured three times, so that it covers the normal spread of the product and of the measurement.
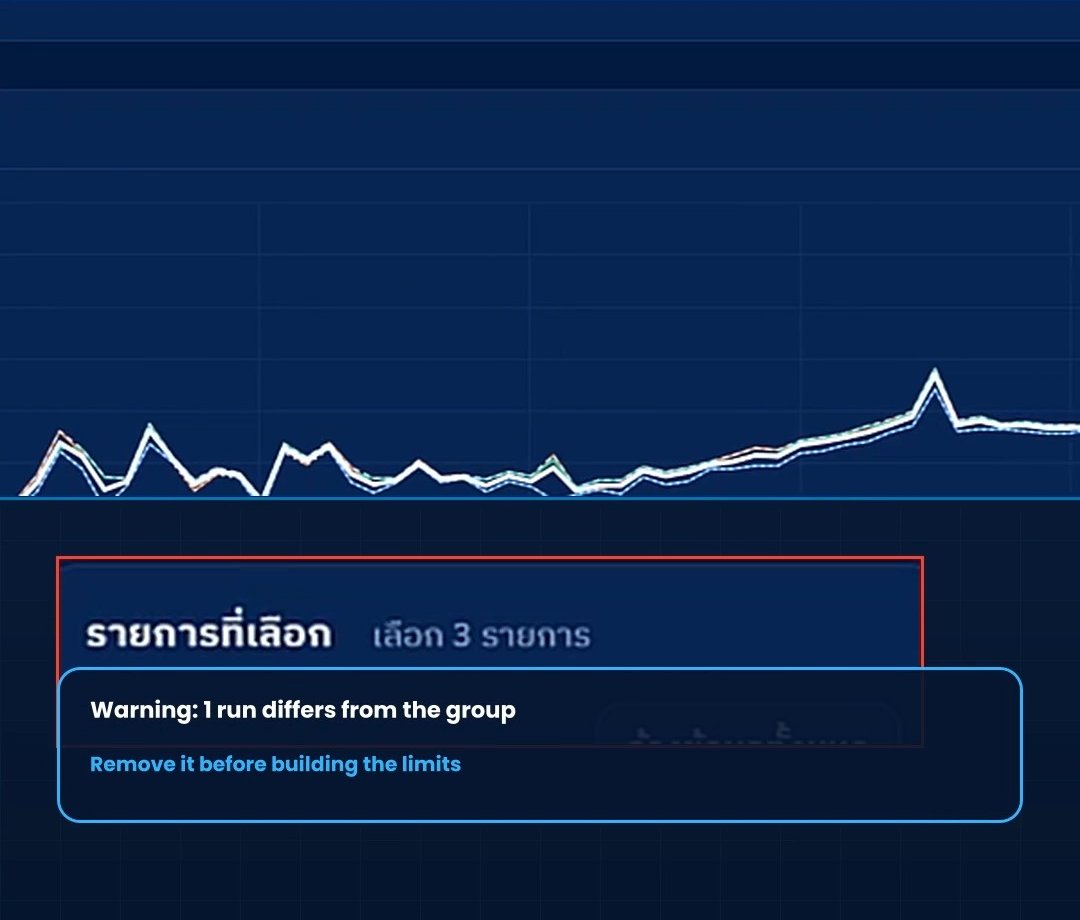
จากนั้นโปรแกรมวางเส้นของทุกครั้งที่วัดซ้อนกัน และเตือนเองเมื่อมีการวัดครั้งใดต่างจากกลุ่ม ในการสาธิต โปรแกรมแจ้งว่ามี 1 รายการต่างจากกลุ่มอย่างชัดเจน (ต่าง 7 แบนด์ มากที่สุดที่ 265 Hz ต่ำกว่ากลุ่ม 3.8 dB) และแนะนำให้เอาออกก่อนสร้างขอบเขต ขั้นตอนนี้ป้องกันไม่ให้ค่าอ้างอิงที่ผิดปกติกลายเป็นเกณฑ์ของทั้งสายการผลิตThe software then overlays the curves of all runs and warns by itself when one run differs from the group. In the demonstration it reported that 1 run clearly differed from the group (7 bands, the largest at 265 Hz, 3.8 dB below the group) and advised removing it before building the limits. This keeps an abnormal reference from becoming the criterion for the whole line.
ขั้นตอนที่ 3: สร้างขอบเขตบนและล่างStep 3: build the upper and lower limits
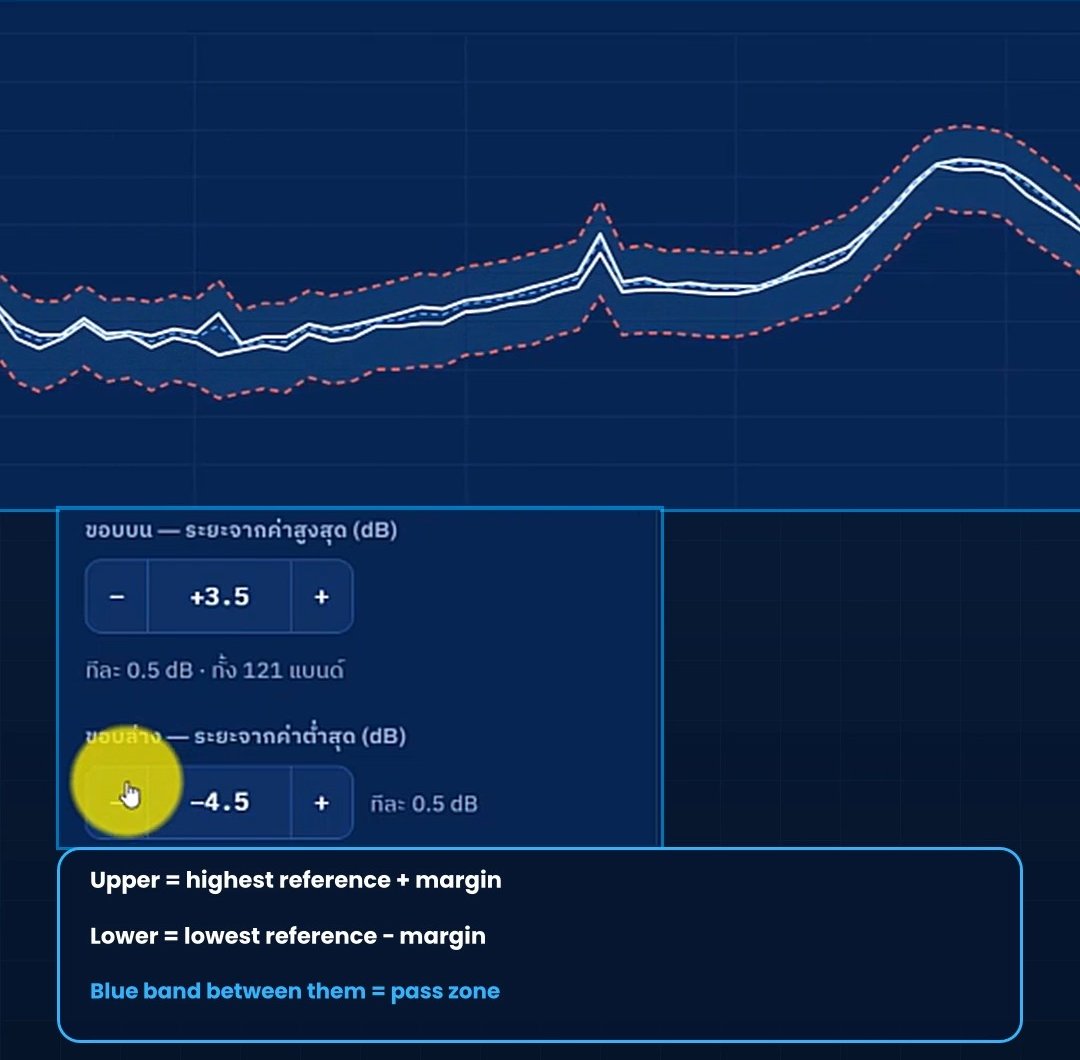
โปรแกรมสร้างขอบเขตจากค่าอ้างอิงโดยอัตโนมัติ ด้วยกฎที่อธิบายได้ในสองบรรทัด:The software builds the limits from the reference automatically, by a rule that fits in two lines:
- ขอบเขตบน = ค่าอ้างอิงสูงสุดในแต่ละแบนด์ + ระยะเผื่อ (Margin)Upper limit = the highest reference value in each band + a margin
- ขอบเขตล่าง = ค่าอ้างอิงต่ำสุดในแต่ละแบนด์ − ระยะเผื่อLower limit = the lowest reference value in each band − a margin
- แถบสีฟ้าระหว่างสองเส้น คือช่วงที่ผ่านThe blue band between them is the pass zone
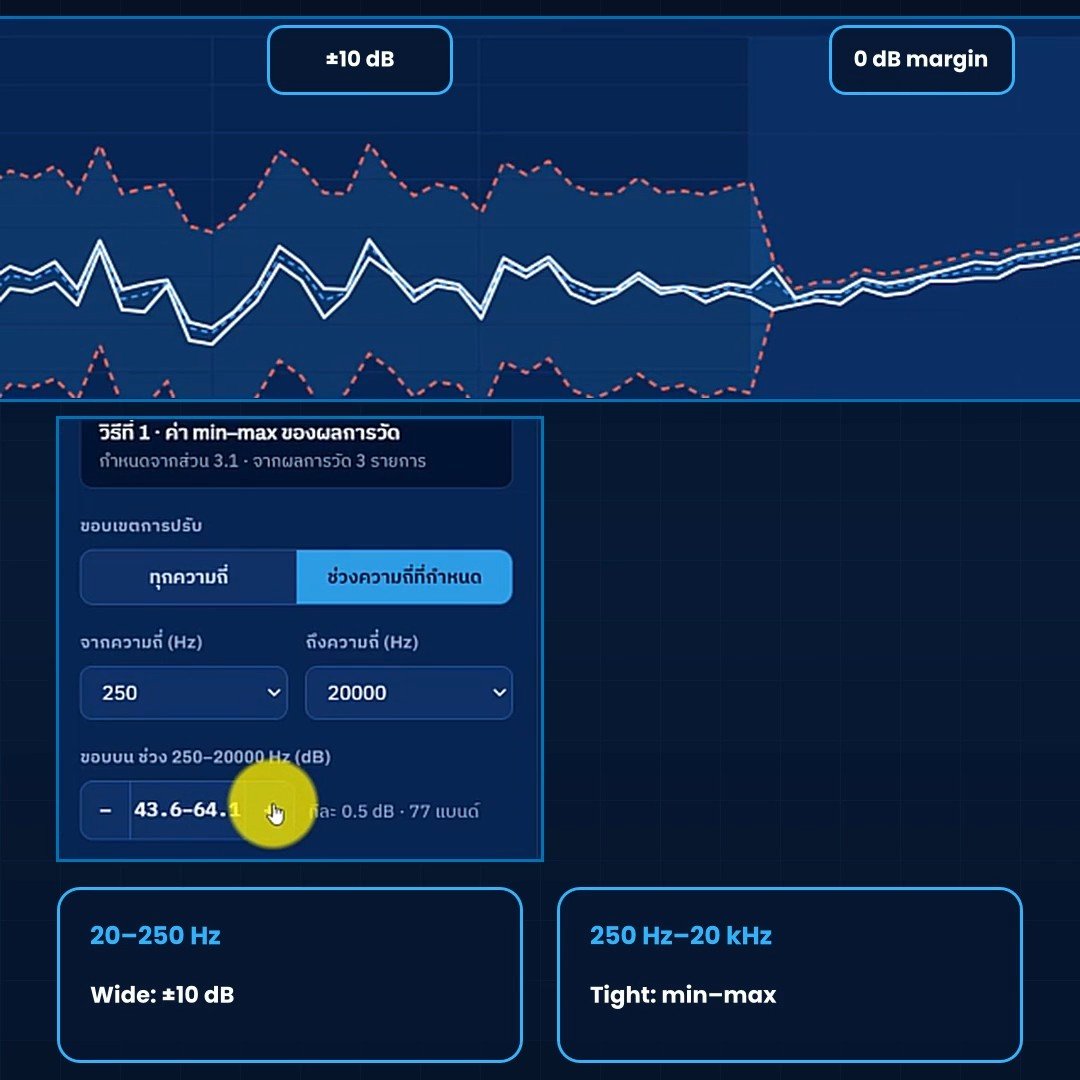
ระยะเผื่อปรับได้ทีละ 0.5 dB แยกกันระหว่างขอบบนและขอบล่าง ในการสาธิตตั้งขอบบนไว้ที่ +3.5 dB และขอบล่างที่ −4.5 dB ครอบคลุมทั้ง 121 แบนด์ ผู้ตั้งค่าเห็นแถบขยับบนกราฟทันทีที่ปรับ จึงตัดสินใจได้ว่าจะเข้มงวดแค่ไหนThe margin is adjustable in 0.5 dB steps, separately for the upper and the lower limit. In the demonstration the upper margin was +3.5 dB and the lower −4.5 dB, across all 121 bands. The band moves on the graph as you adjust, so you can decide how strict to be.
สินค้าจริงมักไม่ต้องการความเข้มงวดเท่ากันทุกความถี่ โปรแกรมจึงกำหนดขอบเขตแยกตามช่วงความถี่ได้ ตัวอย่างในการสาธิต: ช่วง 20 – 250 Hz ซึ่งได้รับผลจากเสียงรอบข้างในโรงงานมากกว่า ตั้งกว้างไว้ที่ ±10 dB ส่วนช่วง 250 Hz – 20 kHz ซึ่งเป็นช่วงที่บอกลักษณะเสียงของสินค้า ตั้งแคบตามค่าต่ำสุดและสูงสุดของค่าอ้างอิงReal products rarely need the same strictness at every frequency, so the software sets limits per frequency range. In the demonstration, 20 – 250 Hz, which is more affected by factory background noise, was set wide at ±10 dB, while 250 Hz – 20 kHz, the range that characterises the product's sound, was set tight to the minimum and maximum of the reference.
ขั้นตอนที่ 4: ตรวจบนสายการผลิตStep 4: test on the line
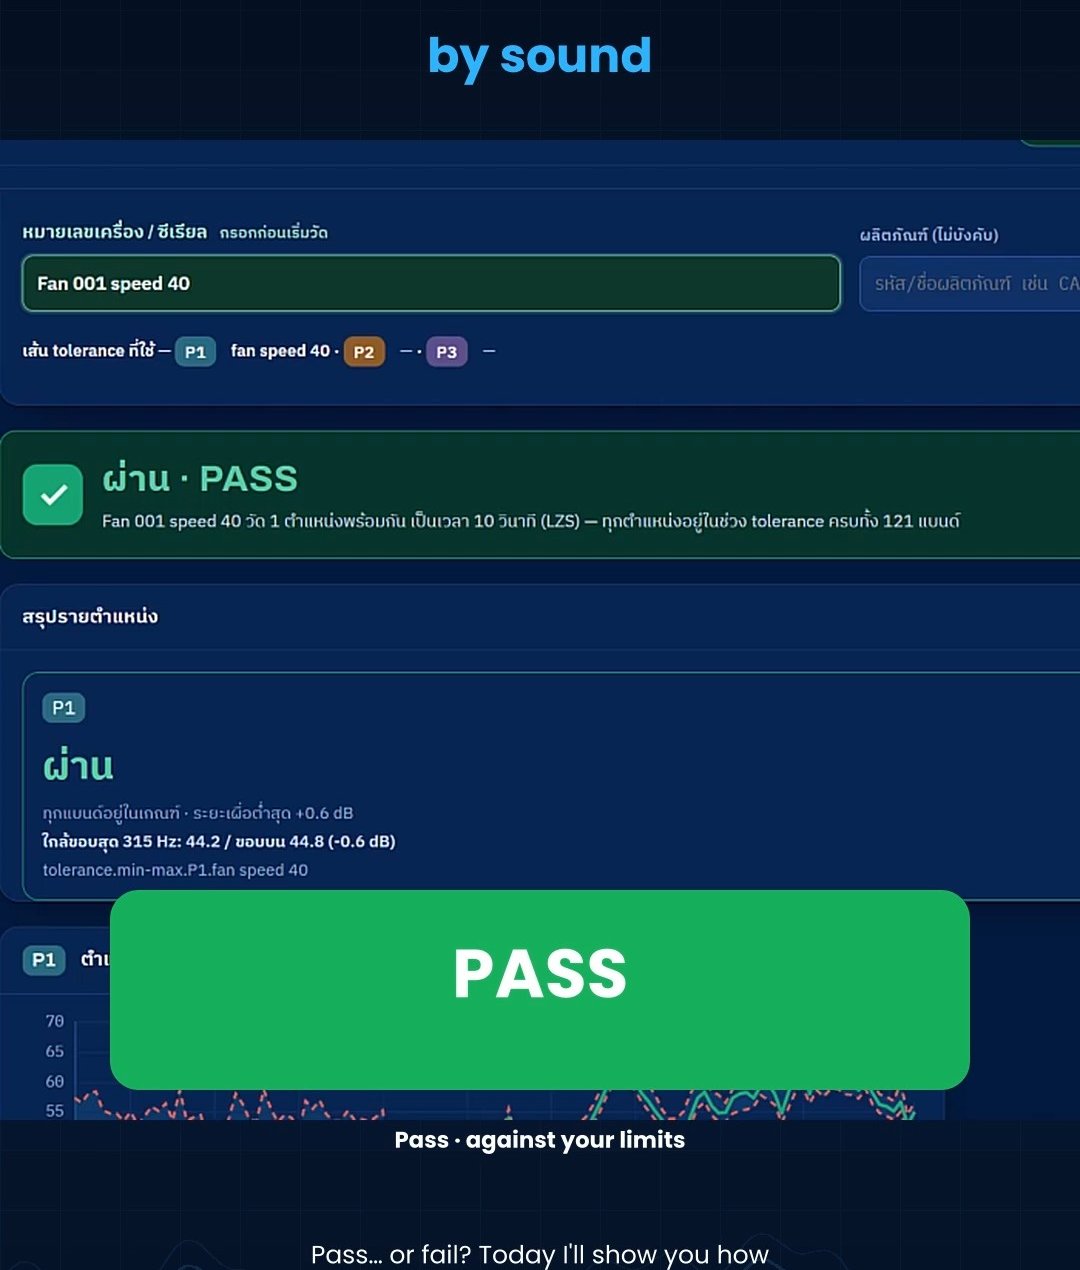
เมื่อตั้งค่าเสร็จ งานของผู้ปฏิบัติงานเหลือเพียงสองอย่าง: กรอกหมายเลขเครื่อง แล้วกดวัด โปรแกรมนับถอยหลังเวลาวัด 10 วินาที แล้วแสดงผลทันทีOnce set up, the operator has only two things to do: enter the serial number and press measure. The software counts down the 10-second measurement and shows the verdict straight away.
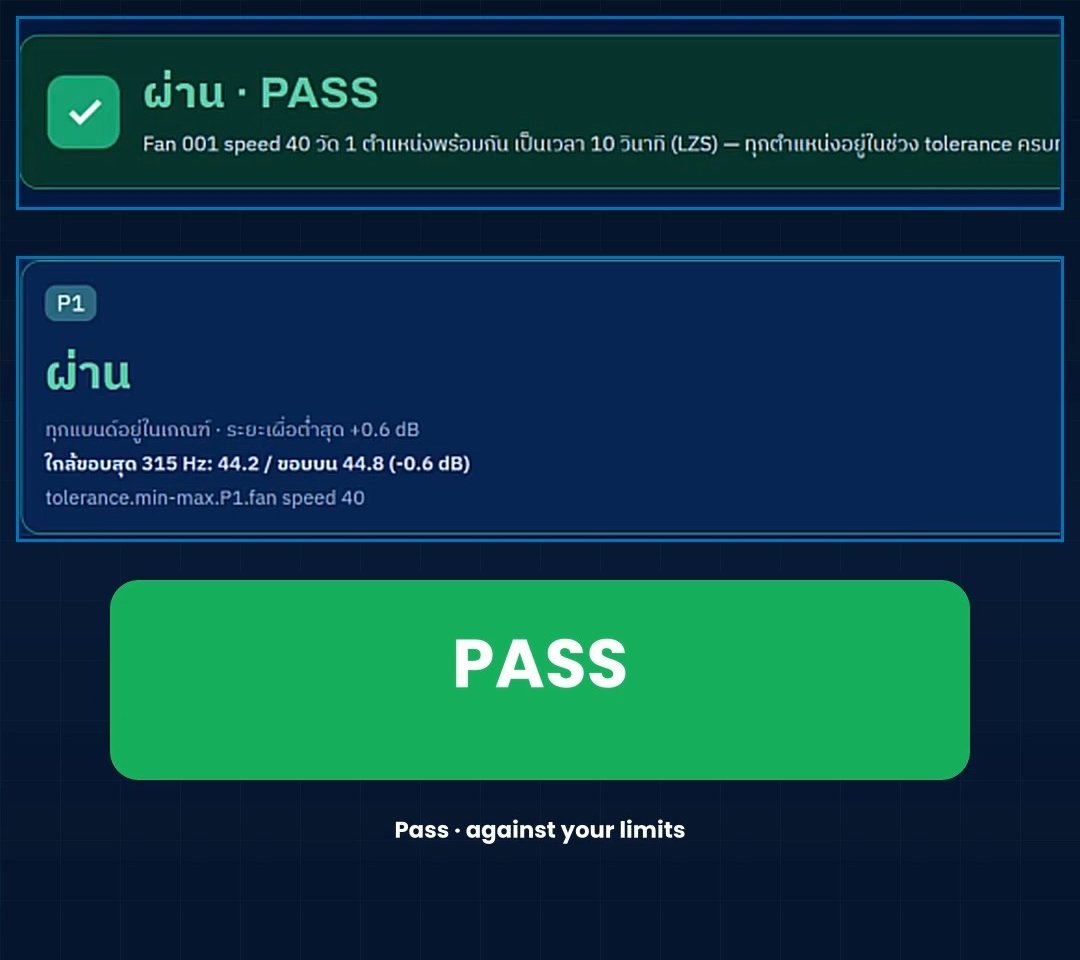
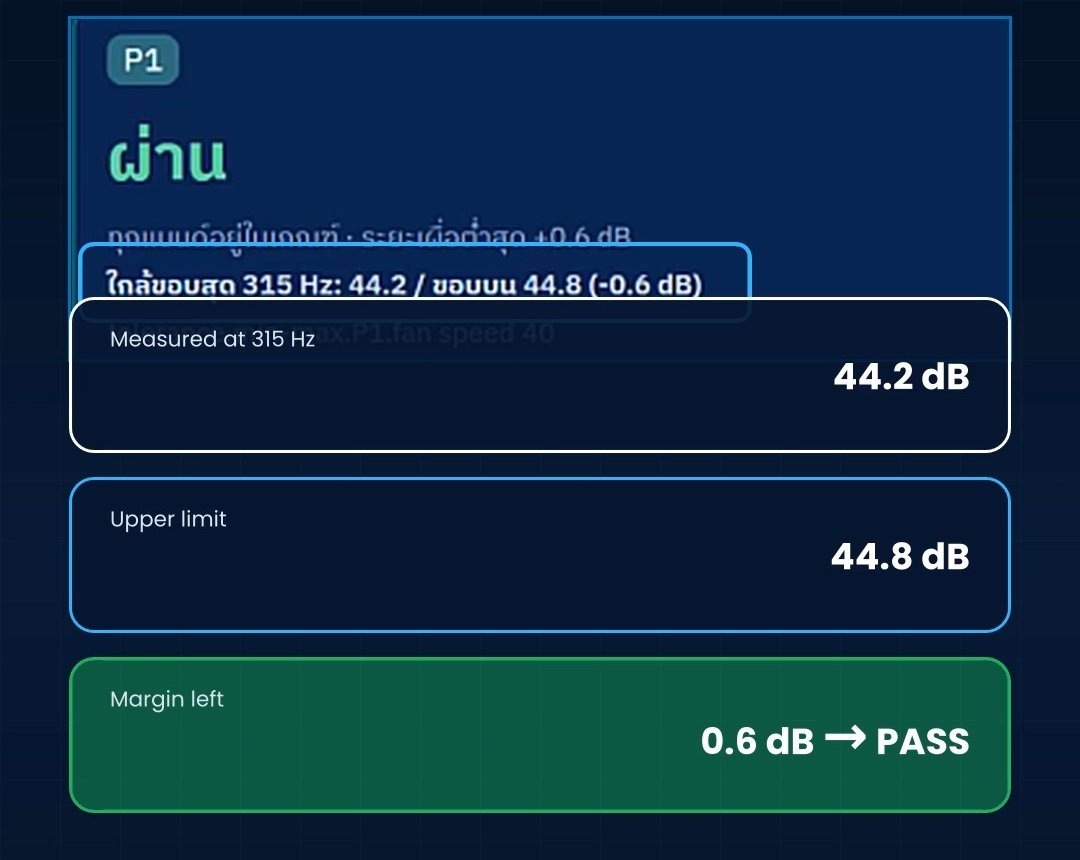
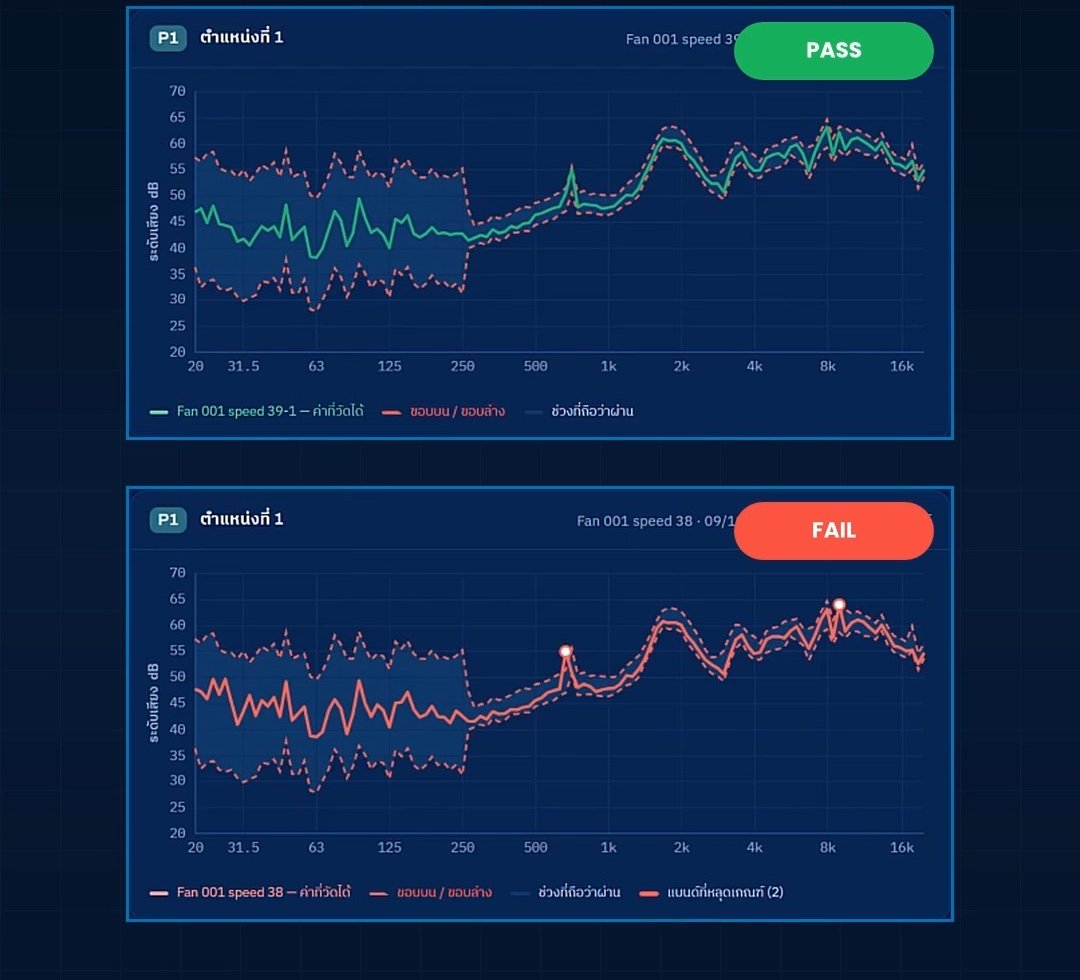
เครื่องที่ผ่าน ได้ป้าย PASS สีเขียวขนาดใหญ่ที่อ่านได้จากระยะไกล และโปรแกรมยังบอกด้วยว่าผ่านแบบเฉียดแค่ไหน ในการสาธิต เครื่องที่ผ่านมีจุดที่ใกล้ขอบเขตที่สุดที่ 315 Hz: วัดได้ 44.2 dB เทียบกับขอบบน 44.8 dB เหลือระยะห่าง 0.6 dB ข้อมูลนี้ทำให้ฝ่ายคุณภาพเห็นแนวโน้มก่อนที่สินค้าจะเริ่มไม่ผ่านA good unit gets a large green PASS that reads from across the line, and the software also shows how close the pass was. In the demonstration the passing unit's closest point was at 315 Hz: 44.2 dB measured against an upper limit of 44.8 dB, a margin of 0.6 dB. This lets quality staff see a trend before units start to fail.
ขั้นตอนที่ 5: เมื่อเครื่องไม่ผ่าน โปรแกรมบอกว่าผิดตรงไหนStep 5: when a unit fails, the software says where
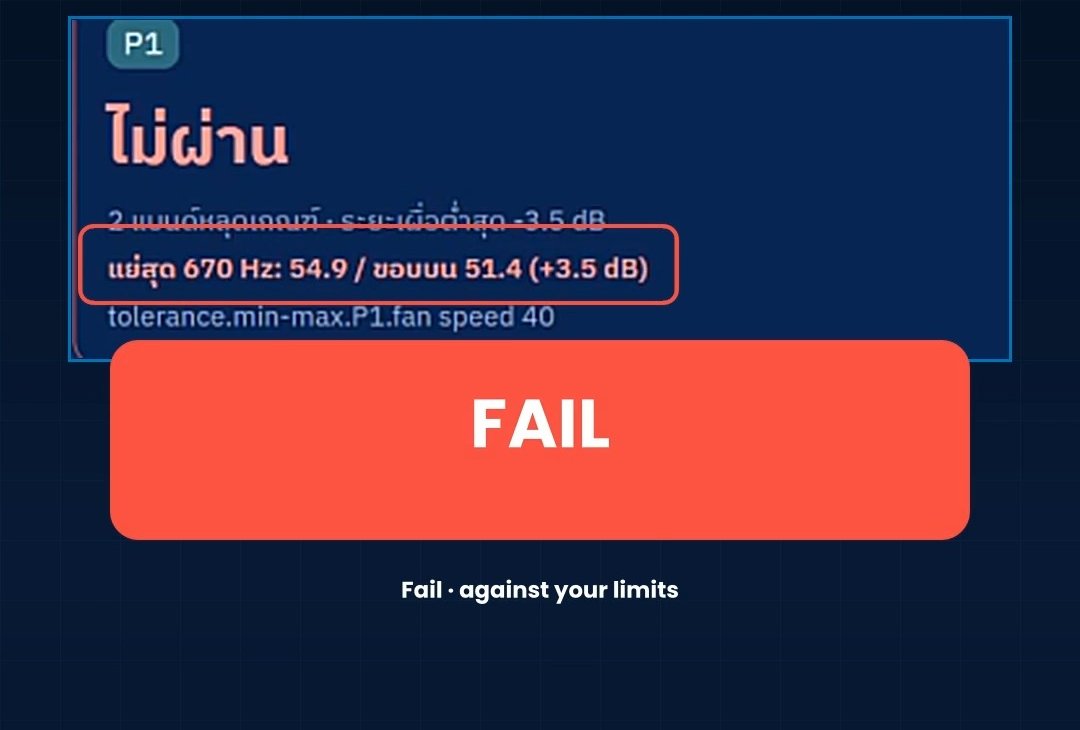
เครื่องที่ไม่ผ่าน ได้ป้าย FAIL สีแดง พร้อมข้อมูลที่ฝ่ายวิศวกรรมใช้ต่อได้ทันที ในการสาธิต เครื่องที่ไม่ผ่านมี 2 แบนด์ที่ดังเกินขอบเขต จุดที่แย่ที่สุดอยู่ที่ 670 Hz: วัดได้ 54.9 dB เทียบกับขอบบน 51.4 dB เกิน 3.5 dB บนกราฟ จุดสีแดงชี้ตำแหน่งของแบนด์ที่ไม่ผ่านบนสเปกตรัมA failing unit gets a red FAIL, with data engineering can use at once. In the demonstration the failing unit had 2 bands louder than the limit; the worst was at 670 Hz: 54.9 dB measured against an upper limit of 51.4 dB, 3.5 dB over. On the graph, red points mark the failed bands on the spectrum.
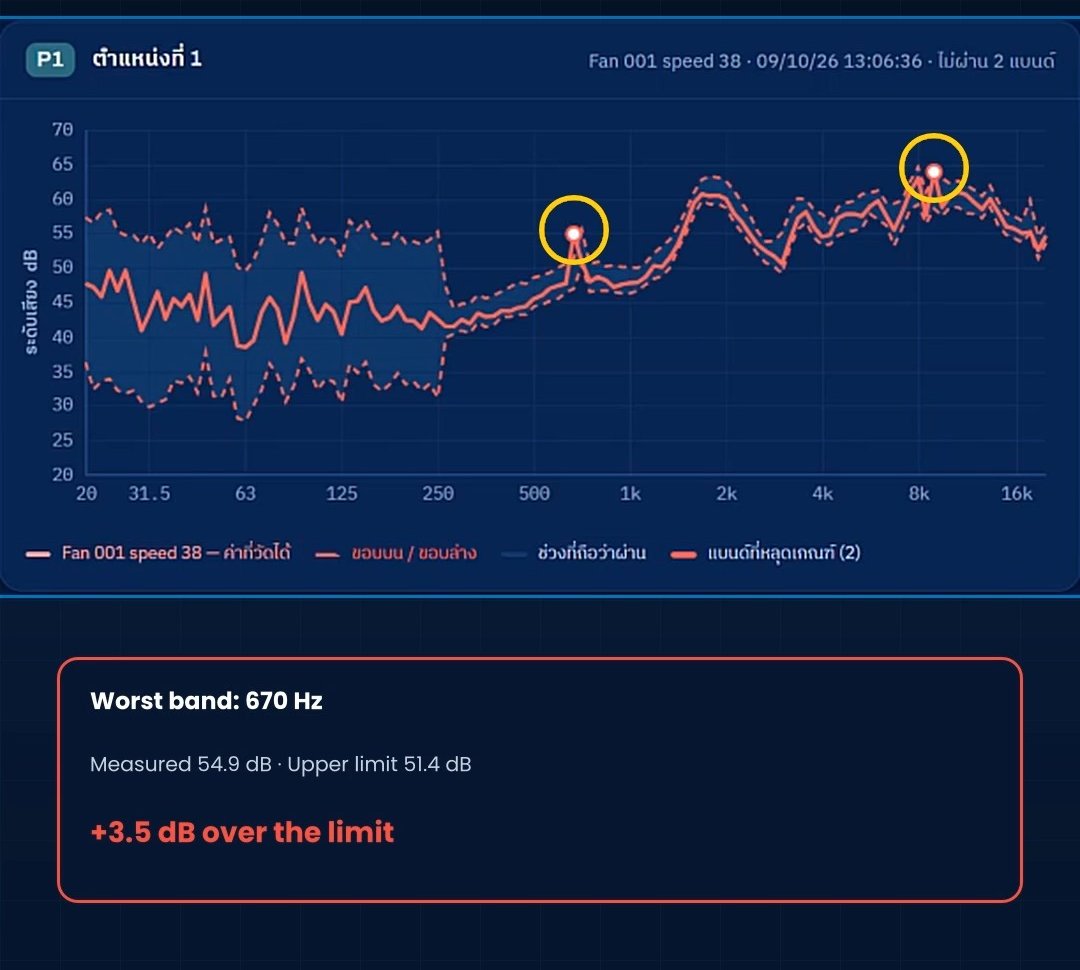
ความถี่ที่ผิดปกติเป็นเบาะแสของสาเหตุ เพราะชิ้นส่วนแต่ละชนิดให้เสียงในย่านความถี่ของตัวเอง การรู้ว่า "เกินที่ 670 Hz" จึงมีประโยชน์กว่าคำว่า "เสียงดังผิดปกติ" มากThe frequency of the deviation is a clue to the cause, because each kind of component produces sound in its own frequency range. Knowing "over the limit at 670 Hz" is far more useful than "it sounds too loud".
ขั้นตอนที่ 6: ทุกผลถูกบันทึก สอบย้อนกลับได้ทุกเครื่องStep 6: every result is recorded and traceable
ผลการตรวจของทุกเครื่องถูกบันทึกเป็นไฟล์ CSV ตามหมายเลขเครื่อง เปิดได้ด้วย Excel หรือนำไปใช้ต่อในระบบคุณภาพของโรงงาน เมื่อมีการเคลมในอนาคต คุณเปิดดูได้ว่าเครื่องหมายเลขนั้นมีเสียงอย่างไรในวันที่ผลิตEvery unit's result is saved to a CSV file under its serial number, ready for Excel or for use in your plant's quality system. When a claim arrives later, you can look up how that serial number sounded on the day it was built.
สิ่งที่โรงงานได้จากระบบนี้What a plant gains
| หัวข้อTopic | ฟังด้วยหูListening by ear | XL2 + GBS Spectral Limit Software |
|---|---|---|
| เกณฑ์ตัดสินCriterion | ฟังด้วยหูListening by earความรู้สึกของผู้ฟังThe listener's impression | XL2 + GBS Spectral Limit Softwareขอบเขตที่กำหนดเป็นตัวเลขในแต่ละความถี่Numeric limits at each frequency |
| ความคงที่Consistency | ฟังด้วยหูListening by earต่างกันตามคนและกะVaries by person and shift | XL2 + GBS Spectral Limit Softwareเกณฑ์เดียวกันทุกเครื่อง ทุกกะThe same criterion for every unit, every shift |
| เมื่อไม่ผ่านOn a fail | ฟังด้วยหูListening by ear"เสียงแปลก""It sounds odd" | XL2 + GBS Spectral Limit Softwareความถี่ที่เกิน และเกินกี่ dBThe frequency that is out, and by how many dB |
| หลักฐานRecord | ฟังด้วยหูListening by earไม่มีNone | XL2 + GBS Spectral Limit Softwareไฟล์ผลของทุกหมายเลขเครื่องA result file for every serial number |
| ทักษะของผู้ปฏิบัติงานOperator skill | ฟังด้วยหูListening by earต้องฝึกและมีประสบการณ์Needs training and experience | XL2 + GBS Spectral Limit Softwareกรอกหมายเลขเครื่อง แล้วกดวัดEnter the serial number, press measure |
- เหมาะกับสินค้าที่มีเสียงเป็นตัวบอกคุณภาพ เช่น พัดลม มอเตอร์ ปั๊ม คอมเพรสเซอร์ เครื่องใช้ไฟฟ้า ชุดเกียร์ และชิ้นส่วนยานยนต์Suited to products whose sound reveals their quality, such as fans, motors, pumps, compressors, household appliances, gear units and automotive components.
- ตั้งค่าให้เข้ากับสินค้าของคุณ ทั้งจำนวนตำแหน่งวัด (หนึ่งถึงสามตำแหน่ง) ระยะเผื่อของขอบบนและขอบล่าง และความกว้างของขอบเขตในแต่ละช่วงความถี่Set up around your product: the number of positions (one to three), the upper and lower margins and the width of the limits in each frequency range.
- ใช้เครื่องวัดระดับมืออาชีพ XL2 และ M2230 เป็นเครื่องมือวัดเสียงของ NTi Audio ที่สอบเทียบได้ ผลจึงเทียบกันได้ระหว่างสายการผลิตและระหว่างโรงงานBuilt on professional instruments: the XL2 and M2230 are NTi Audio measuring instruments that can be calibrated, so results compare between lines and between plants.
ข้อควรรู้ก่อนนำไปใช้What to know before you start
- เสียงรอบข้างมีผลต่อการวัด จุดทดสอบควรเงียบกว่าเสียงของสินค้าอย่างชัดเจน หรือใช้ตู้ครอบกันเสียงขนาดเล็ก ทีมของเราวัดเสียงพื้นหลังที่หน้างานให้ก่อนออกแบบจุดทดสอบBackground noise affects the measurement. The test point should be clearly quieter than the product, or use a small acoustic enclosure; our team measures the background on site before designing the test point.
- ตำแหน่งต้องคงที่ ระยะและมุมระหว่างไมโครโฟนกับสินค้าต้องเหมือนกันทุกครั้ง จึงควรมีจิ๊กจับยึดPositions must be fixed. The distance and angle between microphone and product must be the same every time, so a fixture is recommended.
- ค่าอ้างอิงต้องมาจากเครื่องที่ดีจริง และควรใช้หลายเครื่อง เพื่อให้ขอบเขตครอบคลุมความแปรผันตามปกติของการผลิตThe reference must come from genuinely good units, and from several of them, so the limits cover normal production spread.
- ระบบตัดสินตามขอบเขตที่คุณกำหนด การเลือกความกว้างของขอบเขตเป็นการตัดสินใจด้านคุณภาพของโรงงาน เราช่วยวิเคราะห์ข้อมูลเพื่อหาค่าที่เหมาะสมThe system judges against the limits you set. Choosing their width is the plant's quality decision; we help analyse the data to find suitable values.
ขอ Demo กับสินค้าของคุณBook a demo with your own product
วิธีที่ดีที่สุดในการประเมินระบบนี้คือดูมันทำงานกับสินค้าของคุณเอง ในการ Demo ทีมวิศวกรของ GET BEST SOUND จะ:The best way to judge this system is to watch it work on your own product. In a demo, the GET BEST SOUND engineers will:
- นำชุดเครื่องมือ XL2, M2230 และ GBS Spectral Limit Software ไปที่โรงงานของคุณ หรือรับตัวอย่างสินค้ามาทดสอบที่เราBring the XL2, M2230 and GBS Spectral Limit Software to your plant, or test your samples at our office.
- วัดเครื่องที่ดีและเครื่องที่คุณทราบว่ามีปัญหา เพื่อดูว่าสเปกตรัมเสียงแยกสองกลุ่มออกจากกันได้ชัดเพียงใดMeasure good units and units you know are faulty, to see how clearly the spectrum separates the two.
- สร้างขอบเขตตัวอย่างและแสดงผล PASS / FAIL ให้เห็นจริงBuild example limits and show real PASS / FAIL results.
- เสนอแนวทางจัดจุดทดสอบ จำนวนตำแหน่งวัด และการเชื่อมข้อมูลเข้ากับระบบของคุณPropose the test-point layout, the number of positions and how the data connects to your systems.
ติดต่อ GET BEST SOUND เพื่อนัดหมาย Demo โทร 062-195-1909 หรือ LINE @x2525 แจ้งชนิดสินค้าและปัญหาเสียงที่พบ เราจะเตรียมการสาธิตให้ตรงกับงานของคุณContact GET BEST SOUND to book a demo, call 062-195-1909 or LINE @x2525. Tell us the product and the sound problem you see, and we will prepare the demonstration around it.
คำถามที่พบบ่อยFrequently asked questions
ตรวจหนึ่งเครื่องใช้เวลานานเท่าไร?How long does one unit take?
ในการสาธิต เวลาวัดคือ 10 วินาทีต่อเครื่อง และผลแสดงทันทีหลังวัดเสร็จIn the demonstration the measurement took 10 seconds per unit, with the verdict shown straight after.
ผู้ปฏิบัติงานต้องมีความรู้ด้านเสียงไหม?Does the operator need acoustics knowledge?
ไม่ต้อง ขั้นตอนประจำวันคือกรอกหมายเลขเครื่อง กดวัด และอ่านผล PASS หรือ FAIL ส่วนการวัดค่าอ้างอิงและการตั้งขอบเขตทำครั้งเดียวโดยฝ่ายวิศวกรรมหรือฝ่ายคุณภาพNo. The daily routine is to enter the serial number, press measure and read PASS or FAIL. Measuring the reference and setting the limits is done once by engineering or quality staff.
ใช้กับสินค้าอื่นที่ไม่ใช่พัดลมได้ไหม?Does it work for products other than fans?
ได้ หลักการเดียวกันใช้กับสินค้าที่ให้เสียงคงที่ขณะทำงาน เช่น มอเตอร์ ปั๊ม คอมเพรสเซอร์ และเครื่องใช้ไฟฟ้า แต่ละสินค้ามีค่าอ้างอิงและขอบเขตของตัวเอง แนะนำให้ทดสอบกับสินค้าของคุณในการ Demo ก่อนYes. The same principle applies to products with a steady operating sound, such as motors, pumps, compressors and appliances. Each product has its own reference and limits; we recommend testing with your product in a demo first.
โรงงานมีเสียงดัง จะวัดได้ไหม?Our plant is noisy. Can it still measure?
ขึ้นกับว่าเสียงรอบข้างดังเทียบกับเสียงของสินค้าเพียงใด การตั้งขอบเขตแยกตามช่วงความถี่ช่วยได้ในย่านที่เสียงรอบข้างรบกวน และบางกรณีต้องใช้ตู้ครอบกันเสียง เราวัดเสียงพื้นหลังที่จุดทดสอบให้ก่อนเสนอแนวทางIt depends on how loud the background is compared with the product. Limits per frequency range help in the bands the background disturbs, and some cases need an acoustic enclosure. We measure the background at the test point before proposing a solution.
ข้อมูลผลการตรวจเอาไปใช้ต่อได้อย่างไร?How can the result data be used?
ทุกผลบันทึกเป็นไฟล์ CSV เปิดด้วย Excel ได้ทันที และนำไปใช้ต่อในระบบคุณภาพหรือฐานข้อมูลของโรงงานได้ หากต้องการรูปแบบข้อมูลเฉพาะ ปรึกษาทีมงานของเราได้Every result is saved as a CSV file that opens in Excel and can feed your quality system or database. If you need a specific data format, talk to our team.