มาตรฐานนี้คืออะไรWhat it is
เครื่องวัดระดับเสียงเปลี่ยนแปลงได้ตามเวลา ไมโครโฟนอาจได้รับแรงกระแทก ความชื้น หรือเสื่อมตามอายุ วิธีที่ง่ายที่สุดในการจับปัญหาคือป้อนเสียงที่รู้ค่าแน่นอนเข้าไปแล้วดูว่าเครื่องอ่านได้ตรงหรือไม่ IEC 60942 กำหนดว่าเครื่องที่ใช้สร้างเสียงอ้างอิงนี้ต้องแม่นยำและเสถียรแค่ไหนSound level meters can change over time: a microphone can be knocked, get damp or age. The simplest way to catch a problem is to feed in a sound of known level and see whether the meter reads it correctly. IEC 60942 sets how accurate and stable the device that produces this reference sound must be.
หน้านี้เป็นบทสรุปที่ GET BEST SOUND เขียนขึ้นเอง ไม่ได้คัดลอกเนื้อหาของมาตรฐาน ข้อกำหนดและค่าความคลาดเคลื่อนจริงต้องดูจากฉบับทางการที่ซื้อจาก IEC หรือหน่วยงานมาตรฐานแห่งชาติThis page is GET BEST SOUND’s own summary and does not reproduce the standard. For the actual requirements and tolerances, use the official copy bought from IEC or your national standards body.
ครอบคลุมอะไรบ้าง (ขอบเขตแบบภาษาง่าย)What it covers, in plain words
- สมรรถนะของเครื่องสอบเทียบ: ระดับเสียงที่สร้างได้ต้องตรงกับค่าที่ระบุ ความถี่ต้องถูกต้อง เสียงต้องสะอาด (ความเพี้ยนต่ำ) และคงที่ แม้อุณหภูมิ ความชื้น หรือความดันบรรยากาศจะเปลี่ยนCalibrator performance: the level must match the stated value, the frequency must be right, the sound must be clean (low distortion) and stable, even as temperature, humidity or air pressure change.
- สามคลาส: LS สำหรับงานในห้องแล็บ Class 1 และ Class 2 สำหรับงานภาคสนาม ขอบเขตที่ยอมรับได้แคบที่สุดใน LS และกว้างที่สุดใน Class 2Three classes: LS for laboratory work, Class 1 and Class 2 for the field. The acceptance limits are tightest for LS and widest for Class 2.
- การทดสอบตัวเครื่องสอบเทียบ: ทั้งการทดสอบแบบของรุ่นหนึ่ง ๆ และการทดสอบตามรอบของแต่ละเครื่องTesting the calibrator itself: both pattern evaluation of a model and periodic testing of each unit.
- ไม่ใช่: มาตรฐานนี้ไม่ได้กำหนดว่าต้องตรวจเครื่องวัดบ่อยแค่ไหน หรือค่าที่อ่านได้ต่างกันเท่าไรจึงยอมรับได้ในงานภาคสนาม เรื่องนั้นมาจากมาตรฐานวิธีวัดหรือข้อกำหนดของงานNot covered: it does not say how often to check a meter or how much drift is acceptable during field work; that comes from the method standard or the job specification.
แนวคิดและปริมาณสำคัญKey concepts and quantities
- ระดับความดันเสียงที่ระบุSpecified sound pressure level
- ระดับที่เครื่องสอบเทียบสร้างขึ้น ที่พบบ่อยคือ 94 dB (ประมาณ 1 Pa) และบางรุ่นมี 114 dB ด้วยThe level the calibrator produces; 94 dB (about 1 Pa) is the most common, and some models also offer 114 dB.
- ความถี่ที่ระบุSpecified frequency
- เครื่องสอบเทียบส่วนใหญ่ใช้ 1 kHz เพราะที่ความถี่นี้การถ่วงน้ำหนัก A, C และ Z ให้ค่าเท่ากัน จึงอ่านค่าได้ตรงไม่ว่าเครื่องวัดตั้งไว้แบบใดMost calibrators use 1 kHz, because A, C and Z weightings are equal there, so the reading is the same whichever weighting the meter is set to.
- คลาส LS, 1, 2Classes LS, 1, 2
- ระดับความแม่นยำของเครื่องสอบเทียบ โดยทั่วไปใช้เครื่องสอบเทียบคลาสเดียวกันหรือดีกว่าเครื่องวัด เช่น เครื่องวัด Class 1 ใช้กับเครื่องสอบเทียบ Class 1Accuracy classes of calibrators. In general the calibrator should be the same class as the meter or better, e.g. a Class 1 calibrator for a Class 1 meter.
- พิสตันโฟน (Pistonphone)Pistonphone
- เครื่องสอบเทียบแบบกลไกที่ใช้ลูกสูบสร้างเสียง มักใช้ความถี่ต่ำกว่า 1 kHz และค่าที่ได้ขึ้นกับความดันบรรยากาศ จึงต้องแก้ค่าตามความดันขณะใช้งาน ฉบับปี 2017 เพิ่มการกำหนดคลาสสำหรับพิสตันโฟนโดยเฉพาะ (LS/M และ 1/M)A mechanical calibrator that uses pistons to make the sound, often at a frequency below 1 kHz; its output depends on air pressure, so it needs a correction for the ambient pressure. The 2017 edition added specific class designations for pistonphones (LS/M and 1/M).
- การตรวจในสนาม (Field check)Field check
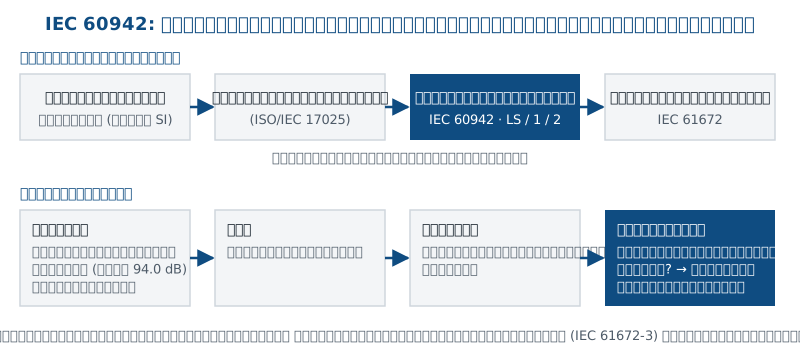
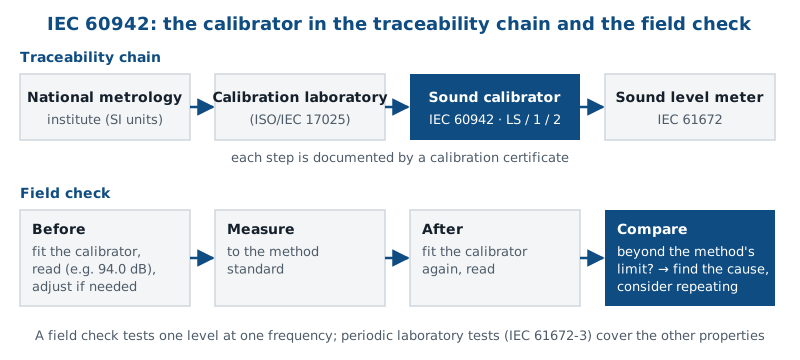
- การสวมเครื่องสอบเทียบบนไมโครโฟนก่อนและหลังการวัด เพื่อยืนยันว่าความไวของระบบไม่เปลี่ยนระหว่างการวัดFitting the calibrator to the microphone before and after a measurement to confirm the system sensitivity did not change in between.
- การสอบกลับได้ (Traceability)Traceability
- เครื่องสอบเทียบเองต้องถูกสอบเทียบกับมาตรฐานที่แม่นยำกว่าเป็นทอด ๆ จนถึงหน่วย SI โดยมีใบรับรองยืนยันThe calibrator itself must be calibrated against more accurate references in an unbroken chain up to SI units, documented by certificates.
ใครใช้ และใช้เมื่อไรWho uses it and when
- ผู้ตรวจวัดภาคสนาม: ใช้เครื่องสอบเทียบ Class 1 หรือ Class 2 ตรวจเครื่องวัดทุกครั้งก่อนและหลังการวัดField engineers: use a Class 1 or Class 2 calibrator to check the meter before and after every measurement.
- ห้องแล็บสอบเทียบ: ใช้เครื่องคลาส LS เป็นอ้างอิง และทดสอบเครื่องสอบเทียบของลูกค้าตามรอบCalibration laboratories: use LS-class devices as references and periodically test customers’ calibrators.
- ผู้เขียนข้อกำหนดงานและผู้ตรวจรายงาน: ระบุคลาสของเครื่องสอบเทียบที่ต้องใช้ และตรวจว่ารายงานบันทึกผลการตรวจไว้Specification writers and report reviewers: state the calibrator class required and check that the report records the checks.
โดยทั่วไปใช้อย่างไรHow it is typically used
- เลือกเครื่องสอบเทียบที่คลาสเหมาะกับเครื่องวัด และช่องสวมตรงกับขนาดไมโครโฟน (เช่น 1/2 นิ้ว หรือใช้อะแดปเตอร์สำหรับ 1/4 นิ้ว)Choose a calibrator whose class suits the meter and whose opening fits the microphone (e.g. 1/2 inch, or an adapter for 1/4 inch).
- ให้เครื่องสอบเทียบและไมโครโฟนปรับตัวเข้ากับอุณหภูมิหน้างานสักครู่ แล้วสวมให้แน่นสนิทLet the calibrator and microphone settle to the site temperature for a while, then fit it firmly and fully.
- เปิดเครื่องสอบเทียบ อ่านค่าเมื่อคงที่ และปรับความไวของเครื่องวัดตามขั้นตอนของผู้ผลิต (ถ้ามาตรฐานวิธีวัดอนุญาต)Switch on, read the value once stable, and adjust the meter’s sensitivity using the manufacturer’s procedure (where the method standard allows).
- ทำการวัด แล้วตรวจซ้ำหลังวัดเสร็จ ถ้าค่าต่างจากตอนเริ่มมากกว่าที่มาตรฐานวิธีวัดยอมให้ ต้องพิจารณาผลวัดช่วงนั้นใหม่Measure, then check again afterwards. If the value moved more than the method standard allows, the measurement must be reconsidered.
- บันทึกรุ่น หมายเลข และวันที่สอบเทียบของเครื่องสอบเทียบ พร้อมค่าก่อนและหลังการวัดในรายงานRecord the calibrator’s model, serial number and calibration date, plus the before and after readings, in the report.
การใช้งานจริง: มาตรฐานนี้มีความหมายอย่างไรต่องานวัดPractical use: what this means for a measurement job
ในงานภาคสนาม ค่าก่อนและหลังการวัดจะเชื่อถือได้เท่ากับเครื่องสอบเทียบที่ใช้ ประเด็นต่อไปนี้ช่วยให้การตรวจแต่ละครั้งใช้เป็นหลักฐานได้In field work, the before-and-after readings are only as reliable as the calibrator behind them. These points make each check usable as evidence.
- จับคู่ class: เครื่องวัด Class 1 ควรตรวจด้วยเครื่องสอบเทียบ Class 1 (หรือ LS) การใช้ Class 2 จะเพิ่มความไม่แน่นอนของการตรวจMatch the class: a Class 1 meter should be checked with a Class 1 (or LS) calibrator; a Class 2 calibrator adds uncertainty to the check.
- บันทึกทุกครั้ง: ค่าที่อ่านได้ก่อนวัด ค่าหลังวัด และเวลา ถ้ามีการปรับความไวของเครื่อง ให้บันทึกค่าก่อนปรับไว้ด้วยLog every check: the reading before, the reading after and the times; if you adjust the sensitivity, record the value before adjustment as well.
- งานวัดยาว: การเฝ้าระวังหลายวันควรวางแผนตรวจเป็นช่วง ๆ หรือใช้ระบบที่ผู้ผลิตระบุว่าตรวจตัวเองได้ และเก็บผลการตรวจไว้Long measurements: for multi-day monitoring, plan periodic checks or use a system with a manufacturer-stated self-check, and keep the check results.
- ความดันบรรยากาศและอุณหภูมิ: ถ้าวัดบนที่สูงหรือในที่ร้อนจัด ให้ดูคู่มือเครื่องสอบเทียบว่าต้องแก้ค่าหรือไม่ โดยเฉพาะ pistonphoneAir pressure and temperature: at altitude or in great heat, check the calibrator manual for corrections, especially for pistonphones.
ทีมวัดเสียงในโรงงานตั้งแต่เช้าถึงเย็น ตอนเช้าเครื่องอ่านค่าจากเครื่องสอบเทียบได้ 94.0 dB ตอนเย็นอ่านต่างไปมากกว่าที่มาตรฐานวิธีวัดยอมให้ วิศวกรจึงหาสาเหตุก่อนจะปรับค่าใด ๆ และพบว่าไมโครโฟนถูกกระแทกระหว่างวัน จึงระบุช่วงข้อมูลที่เชื่อถือไม่ได้และนัดวัดซ้ำA team measures in a factory from morning to evening. In the morning the meter reads 94.0 dB with the calibrator; in the evening the reading differs by more than the method standard allows. Before adjusting anything, the engineer looks for the cause and finds that the microphone was knocked during the day, marks the affected data as unreliable and schedules a repeat measurement.
มาตรฐานที่เกี่ยวข้องและความเชื่อมโยงRelated standards and how they connect
| มาตรฐานStandard | ความเชื่อมโยงกับ IEC 60942Link with IEC 60942 |
|---|---|
| IEC 61672IEC 61672 | ความเชื่อมโยงกับ IEC 60942Link with IEC 60942เครื่องวัดระดับเสียงที่ตรวจด้วยเครื่องสอบเทียบ และการทดสอบตามรอบของเครื่องวัดก็ใช้เครื่องสอบเทียบThe sound level meters checked with a calibrator; periodic tests of meters also use one |
| ISO/IEC 17025ISO/IEC 17025 | ความเชื่อมโยงกับ IEC 60942Link with IEC 60942ข้อกำหนดความสามารถของห้องแล็บที่สอบเทียบเครื่องสอบเทียบCompetence requirements for the laboratories that calibrate calibrators |
| มาตรฐานวิธีวัด (เช่น ISO 1996, ISO 9612)Method standards (e.g. ISO 1996, ISO 9612) | ความเชื่อมโยงกับ IEC 60942Link with IEC 60942มักกำหนดให้ตรวจก่อน/หลังการวัด และบางฉบับกำหนดความต่างที่ยอมรับได้ด้วยTypically call for before/after checks; some also set the acceptable difference |
ความเข้าใจผิดที่พบบ่อยCommon misunderstandings
- “ตรวจด้วยเครื่องสอบเทียบแล้ว เท่ากับสอบเทียบเครื่องวัดแล้ว” การตรวจในสนามเช็กเพียงระดับเดียวที่ความถี่เดียว ไม่แทนการทดสอบตามรอบในห้องแล็บที่ตรวจหลายคุณสมบัติ“A calibrator check means the meter is calibrated.” A field check covers one level at one frequency; it does not replace the laboratory periodic test that covers many properties.
- “เครื่องสอบเทียบไม่ต้องส่งสอบเทียบ” เครื่องสอบเทียบเองก็ต้องมีใบรับรองการสอบเทียบที่ยังไม่หมดอายุ ไม่เช่นนั้นการตรวจทั้งหมดก็ไม่มีหลักอ้างอิง“The calibrator never needs calibrating.” The calibrator needs its own valid certificate; otherwise every check lacks a reference.
- “ปรับเครื่องวัดให้ตรงกับเครื่องสอบเทียบเสมอ” ถ้าค่าต่างมากผิดปกติ อาจมีปัญหาที่ไมโครโฟนหรือเครื่องสอบเทียบ ควรหาสาเหตุก่อน ไม่ใช่ปรับค่าให้ตรงอย่างเดียว“Always adjust the meter to match.” A large, unusual difference may mean a faulty microphone or calibrator; find the cause first instead of just adjusting.
- “เครื่องสอบเทียบใช้กับไมโครโฟนทุกขนาด” ต้องใช้ช่องสวมหรืออะแดปเตอร์ที่ตรงกับไมโครโฟน การสวมไม่แน่นทำให้ค่าผิดได้“One calibrator fits every microphone.” The opening or adapter must match the microphone; a loose fit gives wrong readings.
เกี่ยวข้องกับเครื่องมือวัดอย่างไรHow this relates to instruments
ข้อกำหนดทั่วไป: เลือกคลาสของเครื่องสอบเทียบให้เหมาะกับคลาสของเครื่องวัดและข้อกำหนดของงาน ตรวจว่ามีใบรับรองการสอบเทียบจากห้องแล็บที่สอบกลับได้ และส่งสอบเทียบตามรอบที่ผู้ผลิตหรือระบบคุณภาพกำหนดGeneral requirements: match the calibrator class to the meter class and the job specification, make sure it has a traceable calibration certificate, and have it recalibrated at the interval the manufacturer or quality system sets.
ข้อมูลเฉพาะของ NTi Audio (ตามที่ NTi ระบุ): NTi Audio ระบุว่า Class 1 Sound Calibrator ของตนจัดเป็น Class 1 ตาม IEC 60942 ให้เสียง 94 dB ที่ 1 kHz สำหรับไมโครโฟน 1/2 นิ้ว และมีอะแดปเตอร์สำหรับไมโครโฟน 1/4 นิ้วเป็นอุปกรณ์เสริม นอกจากนี้ยังมีรุ่น Class 2 และ NTi Audio แนะนำให้ส่งเครื่องมือสอบเทียบในห้องแล็บปีละครั้งNTi Audio specifics (as stated by NTi): NTi Audio states that its Class 1 Sound Calibrator is classified Class 1 to IEC 60942 and produces 94 dB at 1 kHz for 1/2 inch microphones, with an optional adapter for 1/4 inch microphones. A Class 2 model is also offered, and NTi Audio recommends laboratory calibration of instruments once a year.
คำถามที่พบบ่อยFrequently asked questions
ต้องตรวจด้วยเครื่องสอบเทียบก่อนวัดทุกครั้งจริงไหมDo I really need a calibrator check before every measurement?
มาตรฐานวิธีวัดหลายฉบับ เช่น ISO 9612 และ ISO 1996-2 กำหนดให้ตรวจก่อนและหลังชุดการวัด เพราะเป็นวิธีที่ง่ายที่สุดในการแสดงว่าความไวของระบบไม่เปลี่ยนระหว่างวัด ถึงงานจะไม่ได้กำหนดไว้ ก็ควรทำเป็นกิจวัตร ใช้เวลาไม่ถึงนาทีแต่ช่วยป้องกันการวัดซ้ำทั้งวันMany method standards, such as ISO 9612 and ISO 1996-2, call for a check before and after each series of measurements, because it is the simplest way to show the system sensitivity did not change in between. Even where it is not required, it is good routine: it takes less than a minute and can save a whole day of repeat work.
94 dB กับ 114 dB ควรใช้ระดับไหน94 dB or 114 dB: which level should I use?
94 dB (ประมาณ 1 Pa) เป็นระดับที่ใช้ทั่วไป บางรุ่นมี 114 dB ด้วย ซึ่งมีประโยชน์เมื่อเสียงรอบข้างดังจนอาจรบกวนการตรวจ ให้ใช้ระดับที่คู่มือเครื่องวัดหรือมาตรฐานวิธีวัดแนะนำ และบันทึกว่าใช้ระดับใด94 dB (about 1 Pa) is the usual level; some models also offer 114 dB, which helps when surrounding noise is loud enough to disturb the check. Use the level recommended by the meter manual or method standard, and record which one you used.
เครื่องสอบเทียบต้องส่งสอบเทียบบ่อยแค่ไหนHow often should the calibrator itself be calibrated?
ตามรอบที่ระบบคุณภาพหรือผู้ผลิตกำหนด NTi Audio แนะนำให้สอบเทียบเครื่องมือในห้องปฏิบัติการปีละครั้ง ควรใช้ห้องปฏิบัติการที่ให้ผลสอบกลับได้ เช่น ที่ได้รับการรับรองตาม ISO/IEC 17025At the interval set by your quality system or the manufacturer; NTi Audio recommends laboratory calibration of instruments once a year. Use a laboratory whose results are traceable, e.g. one accredited to ISO/IEC 17025.