ทำไมเรื่องนี้สำคัญWhy this matters
NTi Audio อธิบายว่าผลการวัดที่ใช้ได้ต้องมีครบสามข้อ คือ ถูกวิธี (correct) หมายถึงวัดตามมาตรฐานที่เหมาะสม เลือกค่าพารามิเตอร์ ย่านความถี่ ระยะเวลา และตำแหน่งถูกต้อง มีความหมาย (meaningful) หมายถึงสรุปข้อมูลจำนวนมากให้เหลือสิ่งที่เกี่ยวข้อง และอธิบายค่าผิดปกติได้ และ แม่นยำ (accurate) หมายถึงตัวเลขใกล้ค่าจริงพอ ถ้าขาดข้อใดข้อหนึ่ง ผลการวัดก็ใช้ไม่ได้ การสอบเทียบคือสิ่งที่ทำให้ได้ข้อที่สามNTi Audio explains that a usable result needs three things at once. It must be correct: made to the right standard, with the right parameters, frequency bands, duration and positions. It must be meaningful: a large data set reduced to what matters, with outliers explained. And it must be accurate: the numbers close enough to the true value. Missing any one makes the result useless. Calibration is what delivers the third.
เครื่องวัดเสียงเปลี่ยนไปตามเวลาได้ ทั้งจากอายุการใช้งาน สภาพแวดล้อม อย่างความร้อนและความชื้น และแรงกระแทก ไมโครโฟนที่เคยตกพื้นอาจยังดูปกติ แต่อ่านค่าคลาดไปแล้ว ถ้าไม่ตรวจ ก็ไม่มีทางรู้Sound measuring equipment can change over time through ageing, the environment such as heat and humidity, and mechanical knocks. A microphone that has been dropped may look fine yet already read wrongly. Without checking, there is no way to know.
แนวคิดพื้นฐาน: สอบเทียบ ปรับแต่ง และการสอบกลับได้The basic idea: calibration, adjustment and traceability
- การสอบเทียบ (Calibration)Calibration
- การเปรียบเทียบค่าที่เครื่องของเราอ่านได้ กับค่าจากอุปกรณ์อ้างอิงที่รู้ว่าแม่นยำกว่า แล้วบันทึกผลต่างไว้Comparing what our instrument reads with a reference device of known, higher accuracy, and recording the difference.
- การปรับแต่ง (Adjustment)Adjustment
- การแก้ไขเครื่องให้อ่านค่าได้ถูกต้อง เช่น ปรับค่าความไวที่เครื่องใช้ การสอบเทียบกับการปรับแต่งจึงเป็นคนละขั้นตอนกันChanging the instrument so that it reads correctly, for example updating the sensitivity it uses. Calibration and adjustment are separate steps.
- การสอบกลับได้ (Traceability)Traceability
- สายการเปรียบเทียบที่ต่อกันไม่ขาดตอน จากเครื่องของเรา ผ่านอุปกรณ์อ้างอิงแต่ละชั้น ขึ้นไปจนถึงมาตรฐานสากล เช่น หน่วย SIAn unbroken chain of comparisons from our instrument, through each level of reference equipment, up to an international standard such as the SI units.
- ใบรับรองการสอบเทียบ (Calibration certificate)Calibration certificate
- เอกสารที่บันทึกผลการสอบเทียบ และรายละเอียดของอุปกรณ์อ้างอิงที่ใช้The document recording the calibration results and details of the reference equipment used.
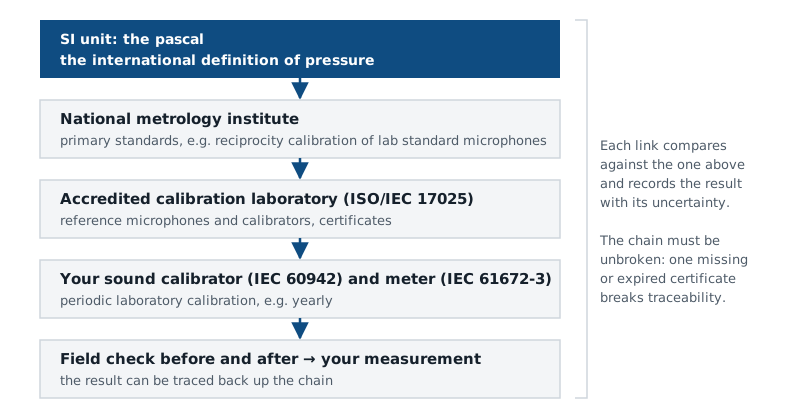
ที่ชั้นบนสุด สถาบันมาตรวิทยาแห่งชาติสอบเทียบไมโครโฟนมาตรฐานห้องปฏิบัติการด้วยวิธีปฐมภูมิ เช่น วิธี reciprocity ซึ่งหาความไวได้จากการวัดทางไฟฟ้าและมิติ โดยไม่ต้องอาศัยไมโครโฟนอ้างอิงตัวอื่น ค่าที่ได้ส่งต่อลงมาทีละชั้น ทุกชั้นเพิ่มค่าความไม่แน่นอนเล็กน้อย ความไม่แน่นอนที่ปลายสายจึงไม่มีทางต่ำกว่าชั้นที่อยู่เหนือขึ้นไปAt the top, the national metrology institute calibrates laboratory standard microphones with a primary method such as reciprocity, which determines sensitivity from electrical and dimensional measurements without relying on another reference microphone. The value is passed down one level at a time, and each level adds a little uncertainty, so the uncertainty at the end of the chain can never be lower than that of the levels above it.
ระดับที่ 1: ตรวจเช็กภาคสนามด้วยเครื่องสอบเทียบเสียงLevel 1: the field check with a sound calibrator
เครื่องสอบเทียบเสียง (sound calibrator) เป็นอุปกรณ์ขนาดพกพาที่สวมครอบหัวไมโครโฟนได้พอดี แล้วสร้างเสียงที่มีระดับและความถี่คงที่ซึ่งรู้ค่าแน่นอน โดยทั่วไปคือ 94 dB ที่ 1 kHz เมื่อสวมเข้ากับไมโครโฟน เครื่องวัดควรอ่านได้ตามค่านั้น ถ้าไม่ตรง แปลว่ามีบางอย่างในสายการวัดผิดปกติ หรือต้องปรับค่าความไวของระบบA sound calibrator is a portable device that fits snugly over the microphone head and produces a sound of known, stable level and frequency, typically 94 dB at 1 kHz. With the calibrator on the microphone, the meter should read that value. If it does not, something in the measurement chain is wrong, or the system's sensitivity needs to be adjusted.
ตัวเลขนี้ไม่ได้ถูกเลือกมาแบบสุ่ม 94 dB คือความดันเสียงประมาณ 1 ปาสกาล (1 Pa = 93.98 dB) และที่ 1 kHz การถ่วงน้ำหนักความถี่ A, C และ Z ต่างมีค่าเป็น 0 dB ค่าที่อ่านได้จึงเหมือนกันไม่ว่าจะตั้งการถ่วงน้ำหนักแบบใดThese values are not arbitrary. 94 dB is about 1 pascal of sound pressure (1 Pa = 93.98 dB), and at 1 kHz the A, C and Z frequency weightings are all 0 dB, so the reading is the same whichever weighting is selected.
- ปล่อยให้เครื่องวัด ไมโครโฟน และเครื่องสอบเทียบเสียงปรับตัวเข้ากับอุณหภูมิของสถานที่ก่อนLet the meter, microphone and calibrator settle to the temperature of the site first.
- เปิดหน้าจอการสอบเทียบบนเครื่องวัด และตั้งค่าระดับอ้างอิงตามเครื่องสอบเทียบและคู่มือ รวมถึงค่าแก้ไขถ้ามีOpen the calibration screen on the meter and set the reference level for the calibrator and manual, including any correction value.
- สวมเครื่องสอบเทียบเสียงให้แน่นสนิทจนสุด อย่าให้มีช่องว่าง แล้วเปิดเครื่องPush the calibrator fully and firmly onto the microphone, with no gap, and switch it on.
- รอให้ค่าคงที่ แล้วบันทึกหรือยืนยันผลบนเครื่องวัดWait for a steady reading, then record or confirm it on the meter.
- ทำซ้ำหลังการวัดเสร็จ ถ้าค่าก่อนและหลังต่างกันอย่างชัดเจน ต้องตั้งคำถามกับผลการวัดทั้งชุด และบันทึกทั้งสองค่าไว้ในรายงานRepeat after the measurement. If the before and after values differ noticeably, the whole data set is in question; record both values in the report.
การตรวจเช็กภาคสนามมีประโยชน์มาก เพราะตรวจ ทั้งสาย ตั้งแต่ไมโครโฟน ปรีแอมป์ สาย จนถึงเครื่องวัด ในสภาพที่ใช้งานจริง แต่ตรวจได้เพียง จุดเดียว คือระดับเดียวและความถี่เดียว จึงบอกไม่ได้ว่าเครื่องยังแม่นยำที่ความถี่อื่น ที่ระดับอื่น หรือในการถ่วงน้ำหนักแบบอื่นหรือไม่ ในภาษาพูด ขั้นตอนนี้มักถูกเรียกว่า “การคาลิเบรต” แต่ในทางมาตรวิทยาคือ การตรวจเช็ก (และอาจตามด้วย การปรับแต่ง ค่าความไวของระบบ) ไม่ใช่การสอบเทียบที่ให้ใบรับรองแบบสอบกลับได้The field check is very valuable because it tests the whole chain, microphone, preamplifier, cable and meter, as it is actually used. But it tests only one point, one level at one frequency, so it cannot tell you whether the system is still accurate at other frequencies, other levels or with other weightings. In everyday speech this step is often called “calibrating”, but in metrology terms it is a check (possibly followed by an adjustment of the system sensitivity), not a calibration that produces a traceable certificate.
ระดับที่ 2: การสอบเทียบในห้องปฏิบัติการLevel 2: laboratory calibration
การสอบเทียบในห้องปฏิบัติการทดสอบเครื่องวัดอย่างครบถ้วนด้วยอุปกรณ์อ้างอิงที่สอบกลับได้ สำหรับเครื่องวัดระดับเสียง ขั้นตอนนี้ทำตาม IEC 61672-3 ซึ่งเป็นวิธีทดสอบเป็นระยะ โดยห้องปฏิบัติการที่มีความสามารถตาม ISO/IEC 17025 (งานที่มีผลทางกฎหมายหรือตามสัญญามักต้องการห้องปฏิบัติการที่ได้รับการรับรองตามมาตรฐานนี้) ผลที่ได้คือใบรับรองการสอบเทียบ ซึ่งเป็นหลักฐานว่าเครื่องอยู่ในเกณฑ์ ณ วันที่ทดสอบLaboratory calibration tests the instrument thoroughly against traceable reference equipment. For sound level meters it follows IEC 61672-3, the periodic testing method, carried out by a laboratory competent to ISO/IEC 17025 (legal or contractual work often requires a laboratory accredited to it). The result is a calibration certificate, which is the evidence that the instrument was within its limits on the day of the test.
NTi Audio แนะนำให้สอบเทียบ ทุกปี หลังซื้อ บางงานอาจมีรอบที่กำหนดโดยมาตรฐานคุณภาพขององค์กรหรือข้อกำหนดของงานนั้น และอย่าลืมว่า เครื่องสอบเทียบเสียงเองก็ต้องได้รับการสอบเทียบเป็นระยะด้วย เพราะเป็นจุดอ้างอิงของการตรวจภาคสนามทุกครั้งNTi Audio recommends calibration every year after purchase; some work may have an interval set by the organisation's quality system or the job's requirements. And remember that the sound calibrator itself also needs periodic calibration, because it is the reference for every field check.
| หัวข้อTopic | ตรวจเช็กภาคสนามField check | สอบเทียบในห้องปฏิบัติการLaboratory calibration |
|---|---|---|
| ทำเมื่อไรWhen | ตรวจเช็กภาคสนามField checkก่อนและหลังการวัดทุกครั้งBefore and after every measurement | สอบเทียบในห้องปฏิบัติการLaboratory calibrationเป็นระยะ NTi Audio แนะนำทุกปีPeriodically; NTi Audio recommends yearly |
| ใครทำWho | ตรวจเช็กภาคสนามField checkผู้วัดเอง ณ จุดวัดThe person measuring, on site | สอบเทียบในห้องปฏิบัติการLaboratory calibrationห้องปฏิบัติการสอบเทียบA calibration laboratory |
| ตรวจอะไรWhat it checks | ตรวจเช็กภาคสนามField checkทั้งสายการวัด ที่ระดับเดียว ความถี่เดียวThe whole chain, at one level and one frequency | สอบเทียบในห้องปฏิบัติการLaboratory calibrationคุณสมบัติทั้งหมดตามมาตรฐาน เช่น IEC 61672-3All properties to a standard such as IEC 61672-3 |
| ผลลัพธ์Result | ตรวจเช็กภาคสนามField checkค่าที่อ่านได้ บันทึกไว้ในรายงานการวัดA reading, recorded in the measurement report | สอบเทียบในห้องปฏิบัติการLaboratory calibrationใบรับรองการสอบเทียบที่สอบกลับได้A traceable calibration certificate |
| ใช้แทนกันได้หรือไม่Can it replace the other? | ตรวจเช็กภาคสนามField checkไม่ได้No | สอบเทียบในห้องปฏิบัติการLaboratory calibrationไม่ได้No |
รายละเอียดเชิงวิศวกรรม: การปรับค่าความไวเปลี่ยนอะไรEngineering detail: what an adjustment actually changes
เมื่อสวมเครื่องสอบเทียบแล้วสั่งให้เครื่องวัด “ปรับ” เครื่องไม่ได้ไปแก้ไมโครโฟน แต่ คำนวณค่าความไวใหม่ ที่ใช้แปลงแรงดันไฟฟ้ากลับเป็นความดันเสียง ถ้าเครื่องใช้ความไวเดิม S เดิม แล้วอ่านได้ L อ่าน ขณะที่เครื่องสอบเทียบให้ L อ้างอิง ความไวที่แท้จริงคือ
S ใหม่ = S เดิม × 10^((L อ่าน − L อ้างอิง)/20)When you fit the calibrator and tell the meter to “adjust”, the meter does not change the microphone; it calculates a new sensitivity for converting voltage back into sound pressure. If the meter used sensitivity S old and read L read while the calibrator produces L ref, the actual sensitivity is
S new = S old × 10^((L read − L ref)/20)
ไมโครโฟนมีความไวที่บันทึกไว้ 20.0 mV/Pa เมื่อสวมเครื่องสอบเทียบ 94.0 dB เครื่องอ่านได้ 93.6 dB แปลว่าไมโครโฟนให้แรงดันต่ำกว่าที่เครื่องคาดไว้
ความไวจริง = 20.0 × 10^(−0.4/20) ≈ 19.1 mV/Pa หรือต่ำลงประมาณ 4.5 %
เครื่องจะใช้ 19.1 mV/Pa ต่อจากนี้ ค่าที่ต่างไป 0.4 dB อยู่ในระดับที่พบได้จากการเปลี่ยนแปลงเล็กน้อยของสภาพแวดล้อมและการสวมเครื่องสอบเทียบ แต่ถ้าค่าต่างไปมากผิดปกติเมื่อเทียบกับประวัติของไมโครโฟนตัวนั้น ไม่ควรปรับทันที ต้องหาสาเหตุก่อน (ตัวเลขเป็นตัวอย่างเพื่ออธิบายหลักการ)A microphone's stored sensitivity is 20.0 mV/Pa. With a 94.0 dB calibrator fitted, the meter reads 93.6 dB, which means the microphone gives less voltage than the meter expects.
Actual sensitivity = 20.0 × 10^(−0.4/20) ≈ 19.1 mV/Pa, about 4.5 % lower.
The meter will now use 19.1 mV/Pa. A 0.4 dB difference is the kind of change small environmental effects and calibrator seating can cause; but if the difference is unusually large compared with that microphone's history, do not simply adjust: find the cause first. (Illustrative numbers.)
การปรับค่าความไวซ่อนปัญหาได้ ถ้าไมโครโฟนเสียหายจนความไวลดลงมาก การปรับจะทำให้ค่าที่ 1 kHz ดูถูกต้อง แต่ผลตอบสนองที่ความถี่อื่นอาจผิดไปแล้ว จึงควรบันทึกค่าที่อ่านได้ ก่อนปรับ ทุกครั้ง และติดตามแนวโน้มของไมโครโฟนแต่ละตัวไว้Adjustment can hide a problem. If a microphone is damaged and its sensitivity has dropped a lot, adjusting makes the 1 kHz reading look right while the response at other frequencies may already be wrong. Always record the reading before adjusting, and track the trend of each microphone.
ก่อนวัดและหลังวัด: การเลื่อนของค่าและสิ่งที่ต้องทำBefore and after: drift and what to do about it
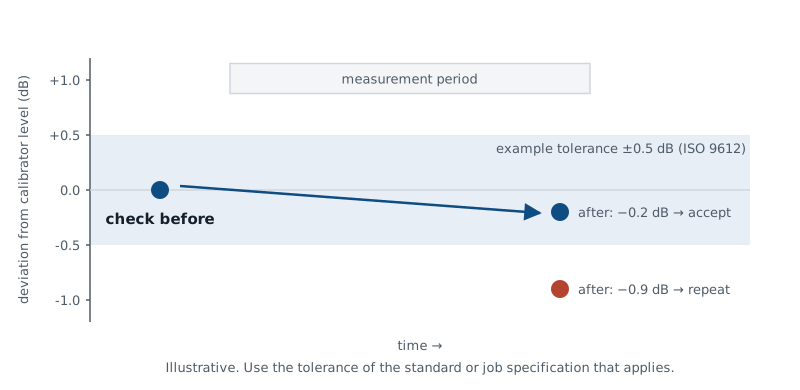
การตรวจก่อนวัดยืนยันว่าระบบพร้อม ส่วนการตรวจหลังวัดยืนยันว่าระบบ ยังคงพร้อม ตลอดช่วงที่วัด ความต่างระหว่างสองค่านี้เรียกว่าการเลื่อน (drift) ซึ่งอาจเกิดจากอุณหภูมิที่เปลี่ยน ความชื้น แบตเตอรี่ สายที่ถูกกระแทก หรือไมโครโฟนที่เสียหายระหว่างวัน การตรวจหลังวัดจะทำ โดยไม่ปรับค่า เพื่อให้เห็นการเลื่อนตามจริงThe check before measuring confirms the system is ready; the check after confirms it stayed ready throughout. The difference between the two is the drift, which can come from temperature change, humidity, batteries, a knocked cable or a microphone damaged during the day. The after-check is made without adjusting, so the real drift is visible.
มาตรฐานบางฉบับกำหนดเกณฑ์ไว้ชัดเจน เช่น ISO 9612:2009 (ฉบับเก่าที่ถูกแทนที่แล้ว) สำหรับการวัดเสียงในที่ทำงาน กำหนดว่าถ้าค่าที่ตรวจหลังวัดต่างจากก่อนวัดเกิน 0.5 dB ต้องทิ้งผลการวัดชุดนั้น (ตรวจเกณฑ์นี้กับฉบับปัจจุบัน ISO 9612:2025 ด้วย) งานอื่นให้ใช้เกณฑ์ของมาตรฐานหรือข้อกำหนดของงานนั้น และบันทึกทั้งสองค่าในรายงานเสมอSome standards set an explicit limit. ISO 9612:2009 (superseded), for occupational noise, requires the results to be discarded if the after-check differs from the before-check by more than 0.5 dB (confirm this criterion in the current edition, ISO 9612:2025). For other work, use the limit of the applicable standard or job specification, and always record both values in the report.
- เสียงรอบข้างต้องเบากว่าเสียงของเครื่องสอบเทียบมาก ถ้าหน้างานดังมาก ให้ตรวจในจุดที่เงียบกว่า หรือใช้เครื่องสอบเทียบที่ระดับสูงกว่าตามที่คู่มือรองรับThe surroundings must be much quieter than the calibrator. On a very loud site, check in a quieter spot, or use a higher calibrator level where the manual supports it.
- สวมให้สุดและตรงแนว ช่องว่างระหว่างเครื่องสอบเทียบกับไมโครโฟนทำให้เสียงรั่วและอ่านได้ต่ำกว่าจริงSeat it fully and straight. A gap between calibrator and microphone lets sound leak and gives a low reading.
- สภาพแวดล้อม ระดับเสียงที่เครื่องสอบเทียบสร้างขึ้นเปลี่ยนเล็กน้อยตามความดันบรรยากาศ อุณหภูมิ และความชื้น คู่มือของเครื่องสอบเทียบระบุช่วงที่ใช้งานได้ นอกช่วงนั้นอาจต้องใช้ค่าแก้ไขEnvironment. The level a calibrator produces changes slightly with static pressure, temperature and humidity. Its manual states the working range; outside it, corrections may be needed.
- ถอดฉากกันลมก่อน เว้นแต่คู่มือระบุวิธีตรวจแบบอื่น เช่น ชุดไมโครโฟนกลางแจ้งบางรุ่นRemove the windscreen first, unless the manual describes another method, as for some outdoor microphone kits.
ใบรับรองการสอบเทียบบอกอะไรWhat a calibration certificate tells you
ใบรับรองไม่ใช่แค่กระดาษยืนยันว่า “ผ่าน” ผู้ใช้ควรอ่านให้เข้าใจ เพราะเป็นหลักฐานที่จะถูกตรวจเมื่อผลการวัดถูกโต้แย้งA certificate is not just a piece of paper saying “passed”. Read it properly, because it is the evidence that will be examined if a result is ever challenged.
- อุปกรณ์ที่ถูกสอบเทียบ รุ่นและหมายเลขเครื่องของตัวเครื่อง ไมโครโฟน และปรีแอมป์ ต้องตรงกับชุดที่ใช้วัดจริงThe items calibrated: model and serial numbers of the meter, microphone and preamplifier must match the set actually used.
- ผลก่อนและหลังปรับ (as found / as left) ถ้ามีการปรับ ผลก่อนปรับบอกว่าเครื่องอยู่ในสภาพใดระหว่างการใช้งานที่ผ่านมาAs-found and as-left results: if an adjustment was made, the as-found result tells you what state the instrument was in during the period of use just ended.
- ค่าความไม่แน่นอนของการวัด และการอ้างอิงถึงมาตรฐานที่สอบกลับได้The measurement uncertainty and the traceable references used.
- ข้อความเรื่องความสอดคล้อง IEC 61672-3 ผูกการสรุปว่าเครื่องเป็นไปตาม IEC 61672-1 เข้ากับหลักฐานที่เปิดเผยว่ารุ่นนั้นผ่านการประเมินแบบ ถ้าไม่มีหลักฐานนี้ รายงานจะบอกได้เพียงผลของการทดสอบที่ทำThe conformance statement: IEC 61672-3 ties a statement of conformance with IEC 61672-1 to public evidence that the model passed pattern evaluation; without that evidence, the report can only state the results of the tests performed.
- วันที่และรอบถัดไป ตามระบบคุณภาพหรือข้อกำหนดของงานThe date and the next due date under your quality system or the job's requirements.
เครื่องสอบเทียบเสียง Class 1 และ Class 2Class 1 and Class 2 sound calibrators
เครื่องสอบเทียบเสียงมีมาตรฐานของตัวเองคือ IEC 60942 ซึ่งแบ่งเป็น Class 1 และ Class 2 เช่นเดียวกับเครื่องวัด ควรใช้เครื่องสอบเทียบที่ Class เหมาะกับระบบที่ตรวจ NTi Audio ระบุการใช้งานไว้ดังนี้Sound calibrators have their own standard, IEC 60942, which also defines Class 1 and Class 2. Use a calibrator whose class suits the system being checked. NTi Audio describes its calibrators as follows:
| รุ่นModel | สัญญาณที่สร้างOutput | ใช้กับIntended for |
|---|---|---|
| NTi Audio Class 1 Sound CalibratorNTi Audio Class 1 Sound Calibrator | สัญญาณที่สร้างOutput94 dB ที่ 1 kHz94 dB at 1 kHz | ใช้กับIntended forไมโครโฟนวัดเสียง Class 1 เครื่องวัดระดับเสียง และอุปกรณ์วัดเสียงอื่น ใช้กับไมโครโฟน 1/4″ ได้เมื่อใส่ 1/4″ Calibration AdapterClass 1 measurement microphones, sound level meters and other acoustic equipment; fits 1/4″ microphones with the 1/4″ Calibration Adapter |
| NTi Audio Class 2 Sound CalibratorNTi Audio Class 2 Sound Calibrator | สัญญาณที่สร้างOutput114 dB ที่ 1 kHz114 dB at 1 kHz | ใช้กับIntended forไมโครโฟนวัดเสียง Class 2 เครื่องวัดระดับเสียง และอุปกรณ์วัดเสียงอื่นClass 2 measurement microphones, sound level meters and other acoustic equipment |
สำหรับชุดเครื่องวัดที่ผ่านการรับรองแบบ (type approval) เครื่องสอบเทียบเสียงเป็นส่วนหนึ่งของชุดที่ได้รับการรับรองด้วย เช่น ชุด XL2-TA ระบุให้ใช้เครื่องสอบเทียบเสียง Class 1 ของ NTi AudioFor a type-approved measuring set, the calibrator is part of the approved configuration too; the XL2-TA set, for example, specifies the NTi Audio Class 1 sound calibrator.
ค่าแก้ไข (correction values)Correction values
ไมโครโฟนวัดเสียงของ NTi Audio เป็นแบบ free-field คือปรับชดเชยให้อ่านค่าเสียงที่เดินทางมาในที่โล่งได้ถูกต้อง แต่ภายในเครื่องสอบเทียบเสียง ไมโครโฟนอยู่ในช่องเล็ก ๆ ที่เป็น สนามความดัน (pressure field) สองสภาพนี้ต่างกันเล็กน้อย ผู้ผลิตจึงกำหนด ค่าแก้ไข ไว้ ซึ่งโดยทั่วไปมีขนาดเพียงเศษส่วนของเดซิเบล เพื่อให้การตั้งความไวของระบบแม่นยำที่สุดNTi Audio measurement microphones are free-field types, compensated to read correctly for sound arriving in open space. Inside a calibrator, however, the microphone sits in a small cavity that forms a pressure field. The two situations differ slightly, so the manufacturer specifies a correction value, typically only a fraction of a decibel, to make the sensitivity setting as accurate as possible.
ค่าแก้ไขขึ้นกับรุ่นของไมโครโฟน รุ่นของเครื่องสอบเทียบ และอุปกรณ์เสริมที่สวมอยู่ เช่น ฟองกันลมหรือชุดกันสภาพอากาศ ให้ใช้ค่าจากคู่มือของเครื่องวัดที่ใช้งานจริงเสมอ ตารางค่าแก้ไขสำหรับไมโครโฟน NTi Audio กับเครื่องสอบเทียบ Class 1 อยู่ในหน้าเครื่องสอบเทียบเสียงของเราThe correction depends on the microphone model, the calibrator model and any accessory fitted, such as a windscreen or weather protection. Always use the value from the manual of the instrument you are actually using. The correction table for NTi Audio microphones with the Class 1 calibrator is on our sound calibrator page.
ตัวอย่างในชีวิตจริงEveryday examples
ทีมวัดเสียงไปวัดเสียงรบกวนหน้าโรงงานทั้งวัน ตอนเช้าตรวจเช็กได้ตรงค่า แต่ตอนเย็นอ่านค่าต่างไปอย่างชัดเจน ภายหลังพบว่าสายไมโครโฟนถูกเหยียบระหว่างวัน เพราะมีการตรวจหลังการวัด ทีมจึงรู้ว่าต้องวัดใหม่ แทนที่จะส่งรายงานที่ผิดA team spends a day measuring noise outside a factory. The morning check is spot on, but in the evening the reading is clearly different. It turns out the microphone cable was stepped on during the day. Because they checked after measuring, they knew to repeat the work instead of issuing a wrong report.
ระบบเฝ้าระวังเสียงกลางแจ้งติดตั้งไว้หลายเดือน ไมโครโฟน M2340 มีระบบทดสอบตัวเอง (CIC) ที่ตรวจการทำงานจากระยะไกลได้ ส่วนการตรวจด้วยเครื่องสอบเทียบเสียงทำได้โดยถอดส่วนบนของชุดกันสภาพอากาศออกด้วยมือ แต่ทั้งสองอย่างก็ยังไม่แทนการส่งเครื่องสอบเทียบในห้องปฏิบัติการตามรอบAn outdoor noise monitor has been running for months. Its M2340 microphone has a CIC self-test that checks it remotely, and a manual check with a calibrator is possible by removing the top of the weather protection by hand. Neither of these replaces sending the equipment for its scheduled laboratory calibration.
ความเข้าใจผิดที่พบบ่อยCommon misunderstandings
- “ตรวจด้วยเครื่องสอบเทียบเสียงทุกวันแล้ว ไม่ต้องส่งสอบเทียบ” ไม่ถูก การตรวจภาคสนามตรวจเพียงจุดเดียว ส่วนการสอบเทียบในห้องปฏิบัติการตรวจคุณสมบัติทั้งหมดและให้ใบรับรองที่สอบกลับได้“I check with a calibrator every day, so I don't need lab calibration.” Wrong. A field check covers one point; laboratory calibration tests every property and gives a traceable certificate.
- “เครื่องสอบเทียบเสียงไม่ต้องสอบเทียบ” ไม่ถูก มันคือจุดอ้างอิงของทุกการตรวจภาคสนาม ถ้ามันคลาด ทุกการตรวจก็คลาดตาม“The calibrator never needs calibrating.” Wrong. It is the reference for every field check; if it drifts, every check drifts with it.
- “ตรวจก่อนวัดก็พอ” การตรวจหลังวัดคือสิ่งที่ยืนยันว่าระบบยังปกติตลอดการวัด“Checking before is enough.” The after-check is what confirms the system stayed healthy throughout.
- “ปรับให้ตรง 94.0 dB เสมอ ไม่ต้องสนใจค่าแก้ไข” สำหรับงานที่ต้องการความแม่นยำสูง ควรใช้ค่าแก้ไขตามคู่มือ“Always set exactly 94.0 dB and ignore corrections.” For high-accuracy work, apply the correction from the manual.
คำถามที่พบบ่อยFrequently asked questions
ทำไมต้องตรวจทั้งก่อนและหลังการวัดWhy check both before and after measuring?
การตรวจก่อนวัดยืนยันว่าเริ่มต้นถูกต้อง ส่วนการตรวจหลังวัดยืนยันว่าไม่มีอะไรผิดปกติเกิดขึ้นระหว่างวัด ถ้าไม่มีการตรวจหลังวัด ความเสียหายที่เกิดกลางวันจะไม่มีใครรู้ และผลทั้งชุดอาจผิดโดยไม่มีหลักฐานThe before-check shows you started correctly; the after-check shows nothing went wrong during the measurement. Without it, damage that happens mid-day goes unnoticed, and the whole data set could be wrong without anyone knowing.
ต้องส่งสอบเทียบในห้องปฏิบัติการบ่อยแค่ไหนHow often should the equipment go to a laboratory?
NTi Audio แนะนำทุกปี ส่วนรอบที่บังคับจริงขึ้นกับกฎหมาย ข้อกำหนดของงาน หรือระบบคุณภาพขององค์กร และควรส่งเครื่องสอบเทียบเสียงไปพร้อมกัน เพราะเป็นจุดอ้างอิงของการตรวจภาคสนามNTi Audio recommends yearly. The interval actually required depends on the law, the job's requirements or the organisation's quality system. Send the sound calibrator at the same time, because it is the reference for every field check.
การตรวจด้วยเครื่องสอบเทียบบอกได้ไหมว่าผลตอบสนองความถี่ยังดีDoes a calibrator check show that the frequency response is still good?
ไม่ได้ ตรวจได้เพียงระดับเดียวที่ความถี่เดียว โดยทั่วไปคือ 1 kHz ความผิดปกติที่ความถี่สูงหรือต่ำจะเห็นได้จากการสอบเทียบในห้องปฏิบัติการNo. It tests one level at one frequency, usually 1 kHz. Problems at high or low frequencies show up in laboratory calibration.
ASD อ่านค่าความไวให้แล้ว ยังต้องตรวจด้วยเครื่องสอบเทียบอีกไหมASD reads the sensitivity for me; do I still need a calibrator check?
ต้อง ASD อ่านค่าที่บันทึกไว้ในไมโครโฟน ซึ่งช่วยป้องกันการพิมพ์ผิด แต่ไม่ได้พิสูจน์ว่าไมโครโฟนในวันนี้ยังมีความไวเท่าค่าที่บันทึกไว้ การตรวจด้วยเครื่องสอบเทียบคือสิ่งที่ยืนยันข้อนี้Yes. ASD reads the value stored in the microphone, which prevents typing errors, but it does not prove the microphone still has that sensitivity today. The calibrator check is what confirms it.
ถ้าค่าที่ตรวจได้ต่างไป 2 dB ควรทำอย่างไรWhat should I do if the check is 2 dB off?
อย่าเพิ่งปรับ ตรวจการสวมเครื่องสอบเทียบ แบตเตอรี่ของเครื่องสอบเทียบ สาย ขั้วต่อ และการตั้งค่าระดับอ้างอิงก่อน ลองกับไมโครโฟนหรือเครื่องสอบเทียบอีกตัวถ้ามี ถ้ายังต่างอยู่ ให้หยุดใช้ชุดนั้นและส่งตรวจ ความต่างขนาดนี้มักบอกว่ามีบางอย่างผิดปกติ ไม่ใช่การเลื่อนตามปกติDo not adjust yet. Check the calibrator seating, its battery, the cable, the connectors and the reference-level setting. Try another microphone or calibrator if you have one. If the difference remains, stop using that set and have it inspected; a difference that large usually means a fault, not normal drift.
คำศัพท์สำคัญKey terms
- เครื่องสอบเทียบเสียง (Sound calibrator)Sound calibrator
- อุปกรณ์ที่สวมครอบไมโครโฟนและสร้างเสียงที่มีระดับและความถี่แน่นอน ใช้ตรวจเช็กระบบภาคสนามA device that fits over the microphone and produces a sound of known level and frequency, used for field checks.
- IEC 60942
- มาตรฐานสากลสำหรับเครื่องสอบเทียบเสียง กำหนด Class 1 และ Class 2The international standard for sound calibrators, defining Class 1 and Class 2.
- IEC 61672-3
- ส่วนของมาตรฐานเครื่องวัดระดับเสียงที่กำหนดวิธีทดสอบเป็นระยะในห้องปฏิบัติการThe part of the sound level meter standard that defines periodic laboratory testing.
- ISO/IEC 17025
- มาตรฐานด้านความสามารถของห้องปฏิบัติการทดสอบและสอบเทียบThe standard for the competence of testing and calibration laboratories.
- สนามความดัน (Pressure field)Pressure field
- สภาพที่ความดันเสียงเท่ากันทั่วช่องขนาดเล็ก เช่น ภายในเครื่องสอบเทียบเสียงA condition where the sound pressure is uniform throughout a small cavity, such as inside a calibrator.
- ค่าแก้ไข (Correction value)Correction value
- ค่าที่ผู้ผลิตกำหนดเพื่อชดเชยความต่างระหว่างสภาพในเครื่องสอบเทียบกับสภาพการใช้งานจริงA value set by the manufacturer to account for the difference between conditions in the calibrator and in real use.