QUICK STARTเริ่มใช้งานใน 5–10 นาทีUp and running in 5–10 minutes
เห็นหน้าจอ XL2 บนคอมพิวเตอร์ภายในไม่กี่นาทีSee the XL2 screen on your computer in a few minutes
เป้าหมายแรกคือทำให้หน้าจอ XL2 ขึ้นบนคอมพิวเตอร์แบบเรียลไทม์ ซึ่งใช้ได้ฟรีกับ XL2 ที่ลงทะเบียนแล้ว เมื่อเชื่อมต่อได้ ทุกฟังก์ชันที่เหลือต่อยอดจากตรงนี้The first goal is to get the XL2 screen onto the computer in real time, which is free for registered XL2s. Once the connection works, everything else builds on it.
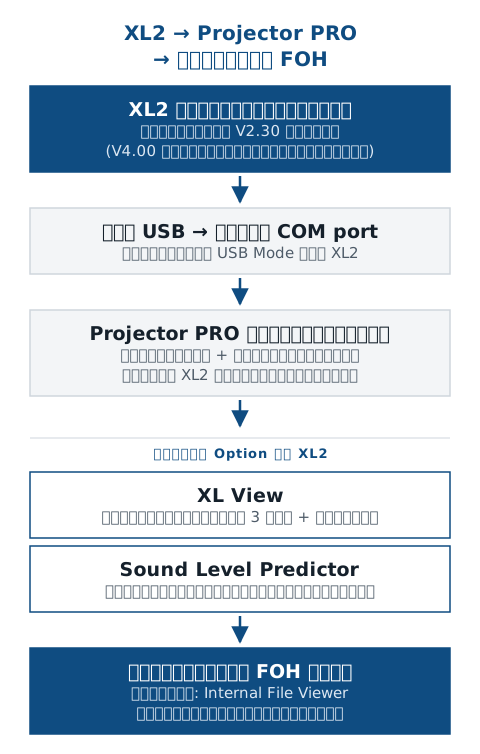
ต้องมีอะไรบ้างก่อนเริ่มWhat you need before you start
- เครื่อง XL2 ที่ลงทะเบียนที่ my.nti-audio.com แล้ว เฟิร์มแวร์อย่างน้อย V2.30 (แนะนำ V4.00 ขึ้นไปเพื่อใช้ได้ทุกฟังก์ชัน)An XL2 registered at my.nti-audio.com, firmware V2.30 or later (V4.00 or later recommended for every function)
- คอมพิวเตอร์ Windows 7, 8, 10 ขึ้นไป หรือ Mac OS 10.8 ขึ้นไปA computer with Windows 7, 8, 10 or later, or Mac OS 10.8 or later
- สาย USB สำหรับ XL2 และไมโครโฟนที่ต่อกับ XL2A USB cable for the XL2, and a microphone on the XL2
- ถ้าจะใช้ XL View หรือ Sound Level Predictor: Projector PRO Option (#600 000 439) หรือ XL2 Remote Measurement Option บน XL2For XL View or the Sound Level Predictor: the Projector PRO Option (#600 000 439) or the XL2 Remote Measurement Option on the XL2
- STEP1
ดาวน์โหลดและติดตั้งDownload and install
ลงชื่อเข้าใช้ my.nti-audio.com ด้วยบัญชีที่ลงทะเบียน XL2 ไว้ ดาวน์โหลด Projector PRO แล้วติดตั้งบนคอมพิวเตอร์ที่จะใช้แสดงผลLog in to my.nti-audio.com with the account the XL2 is registered to, download Projector PRO and install it on the computer that will show the display.
- STEP2
เปิด XL2 และเปิดโปรแกรมSwitch on the XL2 and start the program
เปิดเครื่อง XL2 ตามปกติ แล้วเปิด Projector PRO บนคอมพิวเตอร์Switch on the XL2 as usual, then start Projector PRO on the computer.
- STEP3
ต่อสาย USB แล้วเลือก COM portConnect USB and choose COM port
ต่อ XL2 กับคอมพิวเตอร์ด้วยสาย USB เมื่อ XL2 ถามโหมดการเชื่อมต่อ ให้เลือก COM port ไม่ใช่โหมดอื่นConnect the XL2 to the computer with the USB cable. When the XL2 asks for the connection mode, choose COM port, not another mode.
ในโปรแกรมIn the programบน XL2: COM portOn the XL2: COM port
ข้อควรระวังWatch outการเชื่อมต่อครั้งแรกอาจใช้เวลาสักครู่ระหว่างที่คอมพิวเตอร์ติดตั้งไดรเวอร์The first connection may take a moment while the computer installs the driver.
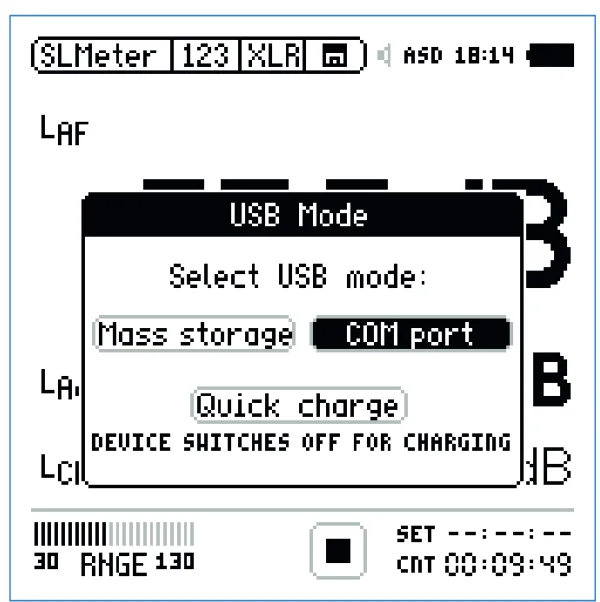
รูปที่ 2Figure 2 เมื่อต่อสาย USB หน้าจอ XL2 จะขึ้นหน้าต่าง USB Mode — เลือก COM port แล้วกด Enter (ภาพจากคู่มือ XL2 เวอร์ชัน 4.93.02)When USB is connected, the XL2 shows the USB Mode pop-up: choose COM port and press Enter (XL2 manual V4.93.02) - COM port: โหมดที่ Projector PRO ใช้คุยกับเครื่องขณะวัดCOM port: the mode Projector PRO uses to talk to the instrument while it measures
- STEP4
ตรวจสถานะการเชื่อมต่อCheck the connection status
ดูแถบสถานะด้านล่างของโปรแกรม ถ้าเชื่อมต่อสำเร็จจะเห็นข้อความว่าเชื่อมต่อแล้วพร้อมหมายเลขเครื่องของ XL2 และหน้าจอ XL2 จะแสดงบนคอมพิวเตอร์แบบเรียลไทม์Look at the status bar at the bottom of the program. When connected it reports the connection and shows the XL2's serial number, and the XL2 screen appears live on the computer.
ในโปรแกรมIn the programแถบสถานะ: “XL2 Analyzer is connected with online communication”Status bar: “XL2 Analyzer is connected with online communication”
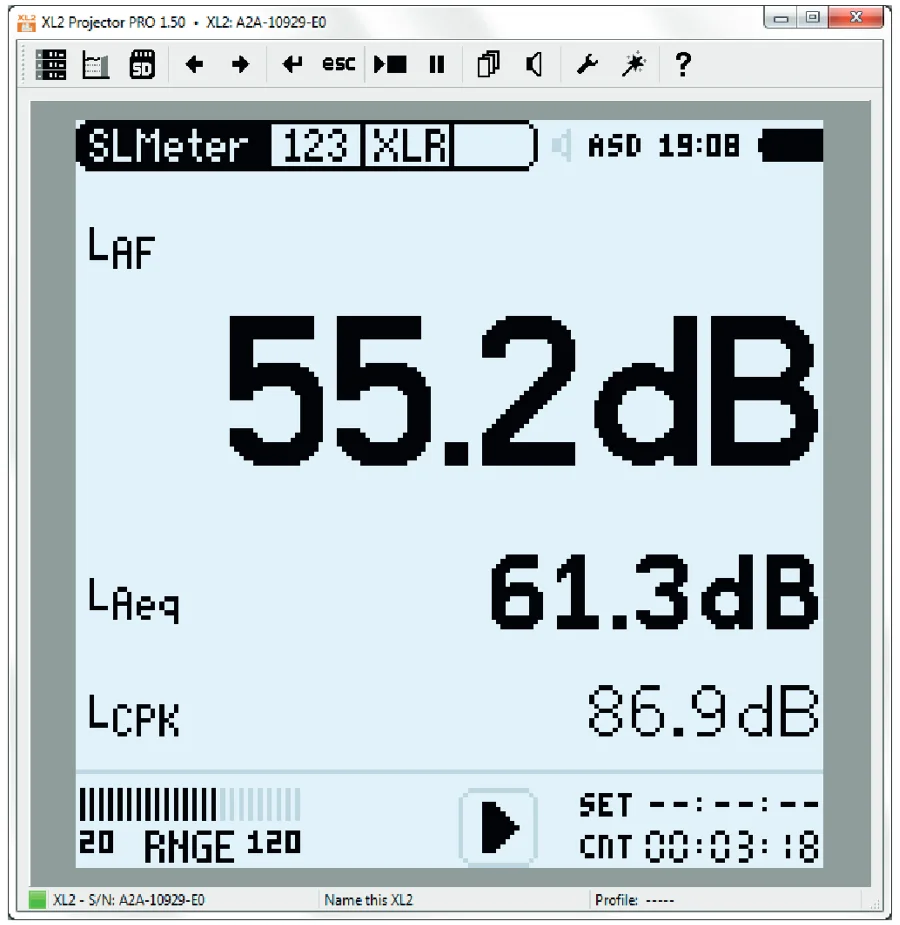
รูปที่ 3Figure 3 เมื่อเชื่อมต่อสำเร็จ หน้าจอ XL2 จะขึ้นบนคอมพิวเตอร์ (ภาพจากคู่มือ XL2 แสดง Projector PRO เวอร์ชัน 1.50)Once connected, the XL2 screen appears on the computer (XL2 manual picture showing Projector PRO 1.50) - แถบสถานะ: สี่เหลี่ยมสีเขียว = เชื่อมต่อแล้ว ตามด้วยหมายเลขเครื่อง (S/N) สีแดง = ไม่พบเครื่อง สีน้ำเงิน = ต่ออยู่แต่ไม่สื่อสาร ให้เปิดโปรแกรมใหม่Status bar: green square = connected, followed by the serial number (S/N); red = no XL2 found; blue = connected but no communication, restart the software
- หน้าจอ XL2 แบบเรียลไทม์The live XL2 screen
- แถบชื่อหน้าต่าง: เวอร์ชันโปรแกรมและ XL2 ที่ต่ออยู่Title bar: program version and the connected XL2
- STEP5
ลองควบคุมเครื่องจากคอมพิวเตอร์Try controlling the instrument from the computer
เปิด Virtual XL2 Keypad แล้วลองกดปุ่มบนจอ หน้าจอ XL2 จะเปลี่ยนตาม ปุ่มเสมือนนี้ควบคุมได้ทุกปุ่มยกเว้น Limit และปุ่มเปิด/ปิดOpen the Virtual XL2 Keypad and press a few on-screen keys: the XL2 screen follows. The virtual keypad covers every button except Limit and On/Off.
ในโปรแกรมIn the programVirtual XL2 KeypadVirtual XL2 Keypad
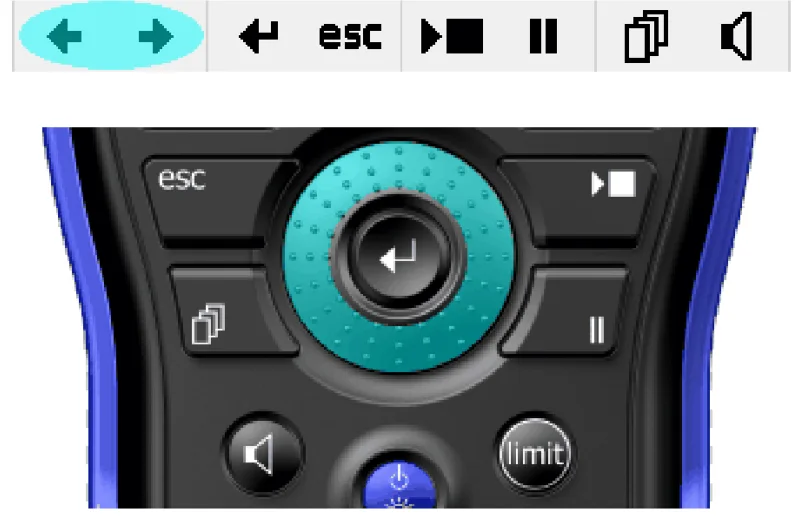
รูปที่ 4Figure 4 แถบปุ่มเสมือน (บน) ตรงกับปุ่มจริงของ XL2 (ล่าง) ยกเว้นปุ่ม limit และปุ่มเปิด/ปิด ใช้ปุ่ม Esc, Enter และลูกศรของคีย์บอร์ดแทนได้ (ภาพจากคู่มือ ปี 2019 แสดง Projector PRO เวอร์ชัน 1.20)The virtual keypad (top) matches the XL2's own keys (bottom) except limit and On/Off; the PC keyboard's Esc, Enter and arrow keys work too (manual picture from 2019 showing Projector PRO 1.20) ภาพ: NTi Audio — คู่มือ XL2 Projector PRO (Doc version 1.2.1, ส.ค. 2019) หน้า 19Image: NTi Audio — XL2 Projector PRO User Manual (Doc version 1.2.1, Aug 2019), p. 19 - STEP6
เริ่มวัดแล้วเปิด XL View (ถ้ามี Option)Start measuring and open XL View (with the option)
กด Start บน XL2 หรือบนปุ่มเสมือน ถ้าเครื่องมี Projector PRO Option หรือ XL2 Remote Measurement Option ให้เปิด XL View จะเห็นระดับเสียงเป็นตัวเลขขนาดใหญ่ที่อ่านได้จากระยะไกลPress Start on the XL2 or the virtual keypad. If the instrument has the Projector PRO Option or the XL2 Remote Measurement Option, open XL View to see the level as large numbers readable from a distance.
ในโปรแกรมIn the programปุ่ม Start แล้ว XL ViewStart button, then XL View
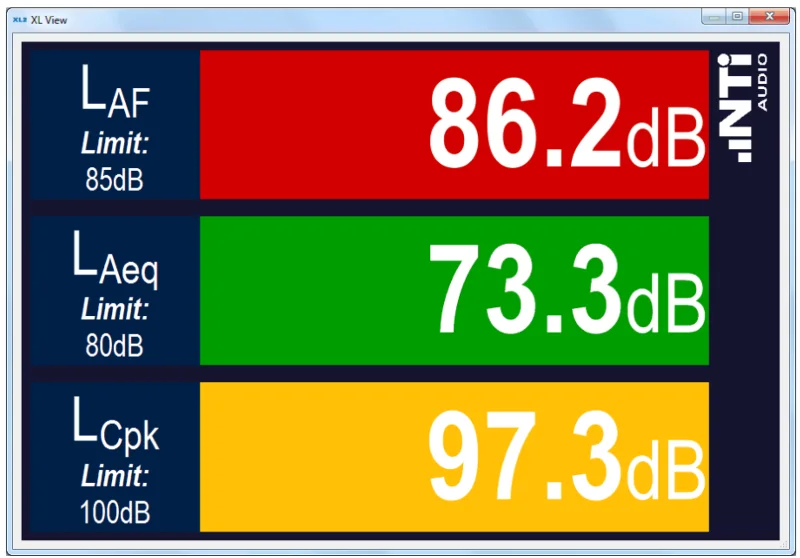
รูปที่ 5Figure 5 XL View: ค่าสูงสุด 3 ค่าตัวใหญ่ พร้อมขีดจำกัดของแต่ละค่า ในภาพ LAF เกินขีดจำกัด (แดง) LAeq ต่ำกว่าขีดเตือน (เขียว) LCpk ใกล้ขีดจำกัด (เหลืองอำพัน) (ภาพจากคู่มือ ปี 2019 แสดง Projector PRO เวอร์ชัน 1.20)XL View: up to three large values, each with its limit. Here LAF is over its limit (red), LAeq is below the warning (green) and LCpk is close to its limit (amber) (manual picture from 2019 showing Projector PRO 1.20) ภาพ: NTi Audio — คู่มือ XL2 Projector PRO (Doc version 1.2.1, ส.ค. 2019) หน้า 8Image: NTi Audio — XL2 Projector PRO User Manual (Doc version 1.2.1, Aug 2019), p. 8
ตอนนี้ XL2 กับคอมพิวเตอร์คุยกันได้แล้ว และคุณเห็นระดับเสียงสดบนจอ บทต่อจากนี้คือการตั้งค่าที่ทำให้จอนี้มีประโยชน์จริงในงาน: ขีดจำกัดกับสีเตือน ตัวทำนายของ Predictor การบันทึกข้อมูลเป็นหลักฐาน และ Profile สำหรับใช้ซ้ำThe XL2 and the computer are now talking, and you can see live levels on screen. The rest of this guide sets up what makes that screen useful at an event: limits and warning colours, the Predictor's forecast, logging for the record, and Profiles for reuse.
ต่อไป: ตรวจเฟิร์มแวร์และ Option →Next: check firmware and options →
01ติดตั้ง / เปิดโปรแกรมINSTALL / OPEN
ติดตั้งโปรแกรม ตรวจเฟิร์มแวร์และ OptionInstall the program, check firmware and options
Projector PRO ใช้ฟรี แต่ฟังก์ชันที่ใช้จริงในงานแสดงสดขึ้นกับสองอย่างบน XL2 คือเวอร์ชันเฟิร์มแวร์และ Option ตรวจสองเรื่องนี้ก่อนวันงานProjector PRO is free, but the functions you actually use at a live event depend on two things on the XL2: the firmware version and the options. Check both before the event day.
| เฟิร์มแวร์ XL2XL2 firmware | ฟังก์ชันที่ใช้ได้ (ตามตารางในคู่มือ)Functions available (per the manual's table) |
|---|---|
| V2.30 ขึ้นไปV2.30 or later | ฟังก์ชันที่ใช้ได้ (ตามตารางในคู่มือ)Functions available (per the manual's table)แสดงหน้าจอ XL2 บนคอมพิวเตอร์ (พื้นฐาน)Basic live display of the XL2 screen |
| V3.10 ขึ้นไปV3.10 or later | ฟังก์ชันที่ใช้ได้ (ตามตารางในคู่มือ)Functions available (per the manual's table)+ XL View และ Virtual XL2 Keypad+ XL View and the Virtual XL2 Keypad |
| V3.22 ขึ้นไปV3.22 or later | ฟังก์ชันที่ใช้ได้ (ตามตารางในคู่มือ)Functions available (per the manual's table)+ Sound Level Predictor และ Internal File Viewer+ Sound Level Predictor and Internal File Viewer |
| V4.00 ขึ้นไปV4.00 or later | ฟังก์ชันที่ใช้ได้ (ตามตารางในคู่มือ)Functions available (per the manual's table)+ Profiles+ Profiles |
เฟิร์มแวร์ล่าสุดของ XL2 ตามประวัติเฟิร์มแวร์ของ NTi คือ V4.94 (มี.ค. 2025) ถ้าเครื่องยังใช้เวอร์ชันเก่า การอัปเดตให้เป็นปัจจุบันจะเปิดทุกฟังก์ชันในตารางได้The latest XL2 firmware in NTi's firmware history is V4.94 (Mar 2025). If your instrument runs an older version, updating it makes every function in the table available.
| ฟังก์ชันFunction | ต้องมีอะไรบน XL2What the XL2 needs |
|---|---|
| แสดงหน้าจอ XL2, Virtual XL2 Keypad, Internal File Viewer, ProfilesLive display, Virtual XL2 Keypad, Internal File Viewer, Profiles | ต้องมีอะไรบน XL2What the XL2 needsไม่ต้องมี Option (ใช้ฟรีสำหรับ XL2 ที่ลงทะเบียน) แต่ต้องมีเฟิร์มแวร์ตามตารางด้านบนNo option (free for registered XL2s), but the firmware in the table above |
| XL View และ Sound Level PredictorXL View and Sound Level Predictor | ต้องมีอะไรบน XL2What the XL2 needsProjector PRO Option (#600 000 439) หรือ XL2 Remote Measurement Option ซึ่ง NTi ระบุว่ารวมความสามารถของ Projector PRO Option ไว้แล้วThe Projector PRO Option (#600 000 439) or the XL2 Remote Measurement Option, which NTi states includes the Projector PRO Option functionality |
ก่อนวันงาน ต่อ XL2 กับคอมพิวเตอร์ที่จะใช้จริงแล้วลองเปิด XL View และ Sound Level Predictor ถ้าเปิดได้ทั้งคู่ แปลว่าเฟิร์มแวร์และ Option พร้อมแล้วBefore the event, connect the XL2 to the computer you will really use and open XL View and the Sound Level Predictor. If both open, the firmware and option are ready.
ถ้าคุณใช้ XL3 ไม่ต้องใช้ Projector PRO เพราะ XL3 มี XL-View ในตัวเครื่อง ใช้ได้ฟรี เปิดดูผ่านเว็บเบราว์เซอร์ได้ทั้งผ่าน NTi Connect และผ่าน IP ของเครื่องในเครือข่ายภายใน คู่มือนี้ไม่ครอบคลุมขั้นตอนของ XL3 ดูภาพรวมที่หน้า XL3If you use an XL3, you do not need Projector PRO: the XL3 has a free built-in XL-View that opens in a web browser, through NTi Connect or through the instrument's IP address on a local network. This guide does not cover XL3 steps; see the XL3 page for an overview.
เรื่องเวอร์ชันเฟิร์มแวร์ของ Predictor ในคู่มือThe Predictor firmware version in the manual
ตารางในหน้าแรก ๆ ของคู่มือระบุว่า Sound Level Predictor ต้องใช้เฟิร์มแวร์ V3.22 ขึ้นไป แต่บทของ Predictor ในคู่มือเดียวกันเขียนว่า V3.10 ขึ้นไป ถ้าเครื่องของคุณอยู่ระหว่างสองเวอร์ชันนี้ ทางที่ปลอดภัยคืออัปเดตเฟิร์มแวร์ ส่วน Projector PRO Option เองถูกเพิ่มในเฟิร์มแวร์ XL2 V4.10 (ม.ค. 2019)The table near the start of the manual puts the Sound Level Predictor at firmware V3.22 or later, while the Predictor chapter of the same manual says V3.10 or later. If your instrument is between the two, the safe route is to update the firmware. The Projector PRO Option itself was added in XL2 firmware V4.10 (Jan 2019).
02ติดตั้งและเตรียมSET UP
เชื่อมต่อ XL2 และตั้งเวลาConnect the XL2 and set the clock
การเชื่อมต่อใช้สาย USB เส้นเดียว ปัญหาส่วนใหญ่ของมือใหม่เกิดจากการเลือกโหมด USB ผิดบน XL2The connection is a single USB cable. Most beginners' problems come from choosing the wrong USB mode on the XL2.
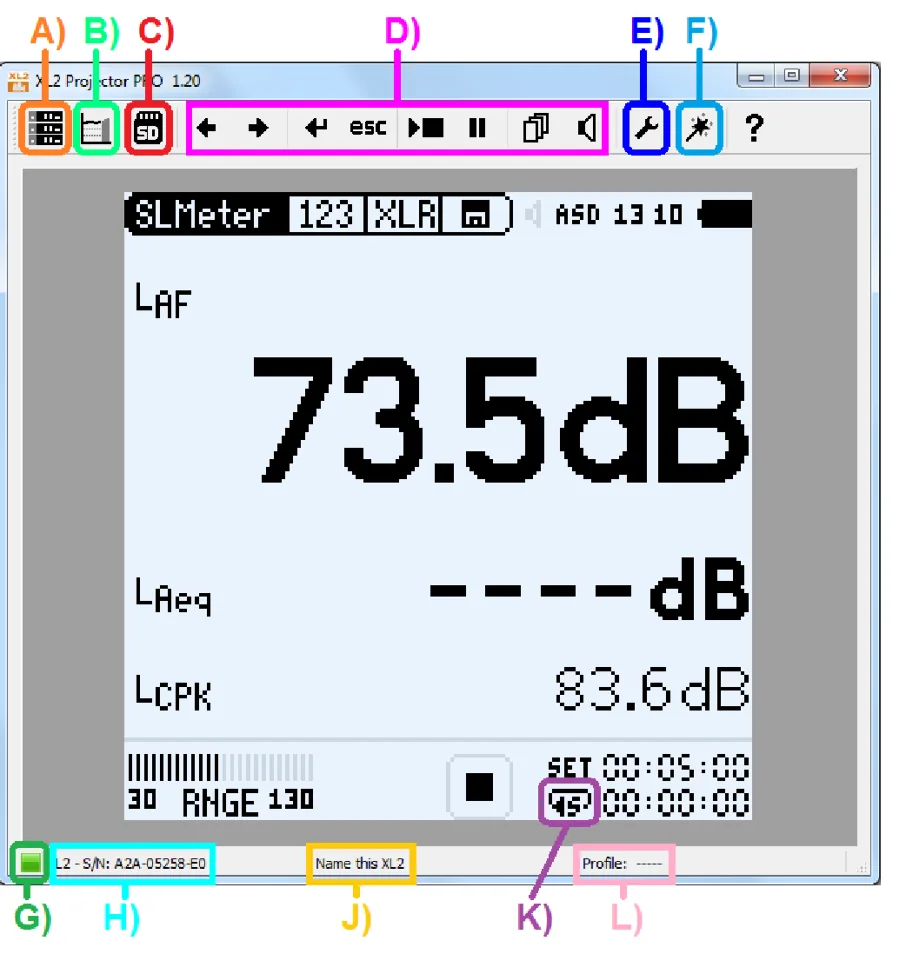
A) XL View · B) Sound Level Predictor · C) เข้าถึงการ์ด SD (Internal File Viewer) · D) Virtual XL2 Keypad · E) Preferences · F) ตั้งค่า Profile
G) สถานะการเชื่อมต่อ · H) หมายเลขเครื่อง XL2 · J) คลิกเพื่อตั้งชื่อ XL2 · K) โหมดตัวจับเวลา · L) Profile ที่เลือกThe program's main panel; the letters are NTi's own (manual picture from 2019 showing Projector PRO 1.20):
A) XL View · B) Sound Level Predictor · C) SD card access (Internal File Viewer) · D) Virtual XL2 Keypad · E) Preferences · F) Profile settings
G) connection status · H) XL2 serial number · J) click to name the XL2 · K) timer mode · L) selected profile ภาพ: NTi Audio — คู่มือ XL2 Projector PRO (Doc version 1.2.1, ส.ค. 2019) หน้า 7Image: NTi Audio — XL2 Projector PRO User Manual (Doc version 1.2.1, Aug 2019), p. 7
- STEP1
ต่อ USB และเลือก COM portConnect USB and choose COM port
ต่อ XL2 กับคอมพิวเตอร์ เมื่อ XL2 ขึ้นให้เลือกโหมดการเชื่อมต่อ ให้เลือก COM port โหมดนี้ทำให้โปรแกรมคุยกับเครื่องได้ขณะที่เครื่องยังวัดอยู่Connect the XL2 to the computer. When the XL2 asks for the connection mode, choose COM port: this mode lets the program talk to the instrument while it keeps measuring.
ในโปรแกรมIn the programบน XL2: COM portOn the XL2: COM port
- STEP2
อ่านแถบสถานะRead the status bar
แถบสถานะแสดงสถานะการเชื่อมต่อและหมายเลขเครื่องของ XL2 ที่ต่ออยู่ ถ้าขึ้นว่าไม่พบเครื่อง ให้ถอดสาย เสียบใหม่ แล้วเลือก COM port อีกครั้งThe status bar shows the connection state and the serial number of the connected XL2. If it reports that no instrument is found, unplug, reconnect and choose COM port again.
ในโปรแกรมIn the program“XL2 Analyzer is connected with online communication” / “No XL2 Analyzer found”“XL2 Analyzer is connected with online communication” / “No XL2 Analyzer found”
- STEP3
ตั้งชื่อเครื่องName the instrument
แผงหลักมีช่องให้คลิกเพื่อตั้งชื่อ XL2 เอง มีประโยชน์เมื่อใช้หลายเครื่องในงานเดียวกัน เช่น ตั้งชื่อตามตำแหน่ง FOH หรือขอบเวทีThe main panel lets you click to customise the XL2's name, which helps when several instruments are used at one event, e.g. named after the FOH or stage-edge position.
- STEP4
ให้ XL2 ใช้เวลาของคอมพิวเตอร์Let the XL2 take the computer's time
ใน Preferences ติ๊กตัวเลือก Set date & time ให้ XL2 ตั้งวันเวลาตามคอมพิวเตอร์ XL2 จะแสดงเขตเวลาเป็นค่าต่างจาก UTCIn Preferences, tick Set date & time so the XL2 takes its date and time from the computer. The XL2 then shows its time zone as an offset from UTC.
ในโปรแกรมIn the programPreferences › Set date & timePreferences › Set date & time
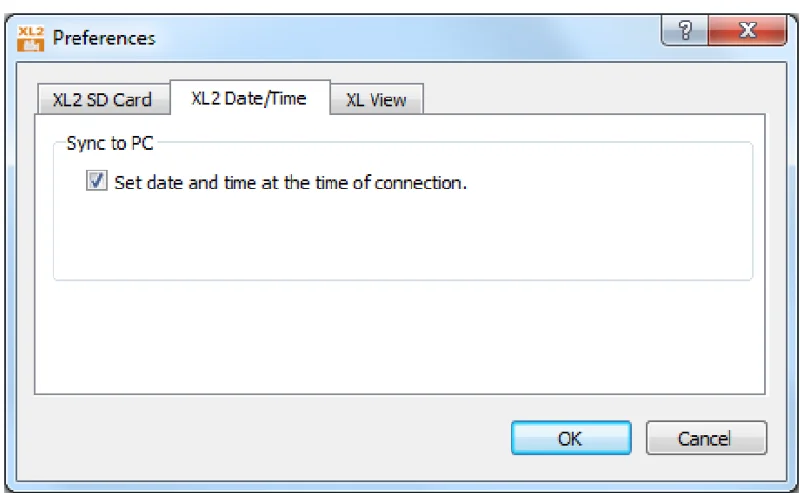
รูปที่ 7Figure 7 Preferences › แท็บ XL2 Date/Time — ติ๊กช่องนี้ XL2 จะตั้งวันเวลาตามคอมพิวเตอร์ทุกครั้งที่เชื่อมต่อ (ภาพจากคู่มือ ปี 2019 แสดง Projector PRO เวอร์ชัน 1.20)Preferences › XL2 Date/Time tab: with this ticked, the XL2 takes the computer's date and time at every connection (manual picture from 2019 showing Projector PRO 1.20) - Set date and time at the time of connectionSet date and time at the time of connection
เวลาในไฟล์ log ที่ตรงกับนาฬิกาจริงทำให้คุณเทียบช่วงที่ระดับสูงกับรายการเพลงหรือเหตุการณ์บนเวทีได้ภายหลัง และตอบคำถามจากผู้ตรวจได้ว่าเกิดอะไรขึ้นเมื่อไรLog times that match the real clock let you compare loud periods with the set list or stage events afterwards, and answer an inspector's question about what happened when.
เลือกโหมด USB อื่น (เช่น mass storage) บน XL2 โปรแกรมจะหาเครื่องไม่พบ ถ้าจะดึงไฟล์ระหว่างวัด ให้ใช้ Internal File Viewer ในโปรแกรมแทนChoosing another USB mode (e.g. mass storage) on the XL2: the program will not find the instrument. To retrieve files during a measurement, use the Internal File Viewer in the program instead.
03ตั้งค่าCONFIGURE
ตั้งค่าการวัดบน XL2Set up the measurement on the XL2
Projector PRO แสดงสิ่งที่ XL2 วัด การตั้งค่าบนเครื่องจึงเป็นตัวกำหนดว่าตัวเลขบนจอหมายถึงอะไร และข้อมูลที่เก็บไว้เป็นหลักฐานมีอะไรบ้างProjector PRO shows what the XL2 measures, so the instrument settings decide what the numbers on screen mean and what data is kept as a record.
- ค่าที่จะแสดง เช่น LAeq และค่าอื่นที่เกณฑ์ของงานกำหนดThe results to display, e.g. LAeq and whatever else the event's criteria require
- ย่านอินพุต (input range) ให้เหมาะกับระดับเสียงที่คาดในงานThe input range, to suit the levels expected at the event
- โหมดตัวจับเวลา: ต่อเนื่อง (continuous) หรือวนซ้ำ (repeated) ให้ตรงกับช่วงเวลาอ้างอิงของเกณฑ์Timer mode: continuous or repeated, to match the reference period of the criteria
- การบันทึกข้อมูล (logging) เพื่อเก็บเป็นหลักฐานหลังงานLogging, so there is a record after the event
- ถ้าต้องการ ขีดจำกัดสำหรับไฟ LED หรือพอร์ต digital I/O ของ XL2If needed, limits for the XL2's LED or digital I/O
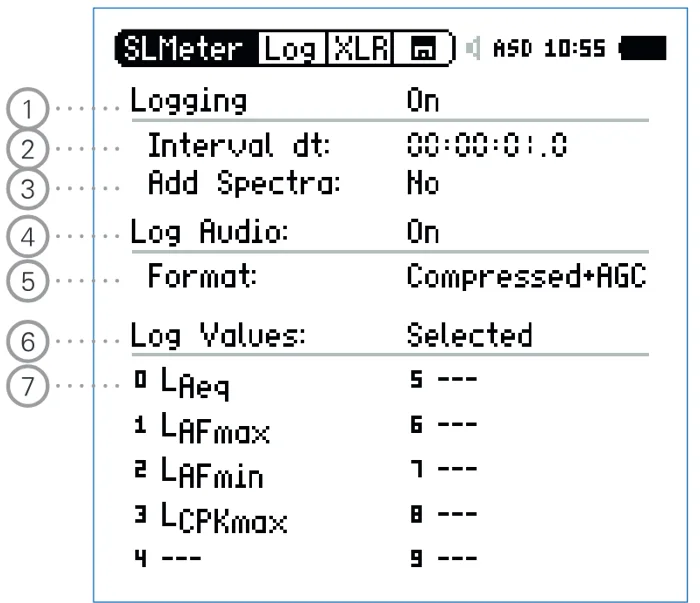
- Logging On: เปิดการบันทึกLogging On: logging switched on
- Interval dt: ช่วงบันทึกInterval dt: the log interval
- Add Spectra: บันทึกสเปกตรัม RTA ด้วยหรือไม่Add Spectra: whether RTA spectra are logged
- Log Audio: บันทึกเสียงเป็นไฟล์ WAVLog Audio: record audio as WAV
- Format: รูปแบบไฟล์เสียงFormat: the audio format
- Log Values: All หรือ SelectedLog Values: All or Selected
- รายการค่าที่เลือกบันทึกThe values selected for logging
คู่มือของ NTi แนะนำให้เริ่มจาก Profile สำเร็จรูปที่มีมาให้ (ชื่อขึ้นต้นด้วย #) แล้วค่อยปรับ แทนที่จะตั้งทุกอย่างเองตั้งแต่ศูนย์NTi's manual recommends starting from one of the predefined profiles (names starting with #) and adjusting it, rather than setting everything up from scratch.
โหมดตัวจับเวลาและช่วงเวลาอ้างอิงของ XL2 ถูกใช้โดย Sound Level Predictor ด้วย ถ้าตั้งไม่ตรงกับเกณฑ์ของงาน สิ่งที่ Predictor ทำนายก็จะไม่ตรงกับสิ่งที่ผู้ตรวจวัดThe XL2's timer mode and reference time are also used by the Sound Level Predictor. If they do not match the event's criteria, the Predictor forecasts something different from what the inspector will measure.
04ใช้งานUSE
XL View: ตัวเลขขนาดใหญ่พร้อมสีเตือนXL View: large numbers with warning colours
XL View คือหน้าจอที่ออกแบบมาให้คนในงานอ่านได้จากระยะไกลโดยไม่ต้องเพ่ง พื้นหลังสีบอกสถานะได้ทันทีโดยไม่ต้องอ่านตัวเลขXL View is the screen designed to be read from across the room. The background colour tells people the status before they even read the number.
- STEP1
เปิด XL ViewOpen XL View
เปิด XL View จากแผงหลักของโปรแกรม จะเห็นระดับเสียงได้สูงสุดสามค่าเป็นตัวเลขขนาดใหญ่Open XL View from the program's main panel: up to three levels appear as large numbers.
ในโปรแกรมIn the programXL ViewXL View
- STEP2
เลือกค่าและตั้งขีดจำกัดChoose the levels and set the limits
ดับเบิลคลิกที่ค่าเพื่อเปิดการตั้งค่า เลือกระดับที่จะแสดง (สูงสุด 3 ค่า) ใส่ขีดจำกัด (สีแดง) และขีดเตือน (สีเหลืองอำพัน) แล้วกด OKDouble-click a value to open its settings, choose the levels to show (up to three), enter the limit (red) and the warning limit (amber), then press OK.
ในโปรแกรมIn the programดับเบิลคลิกค่า › เลือกระดับ ขีดจำกัด ขีดเตือน › OKDouble-click a value › levels, limit, warning › OK
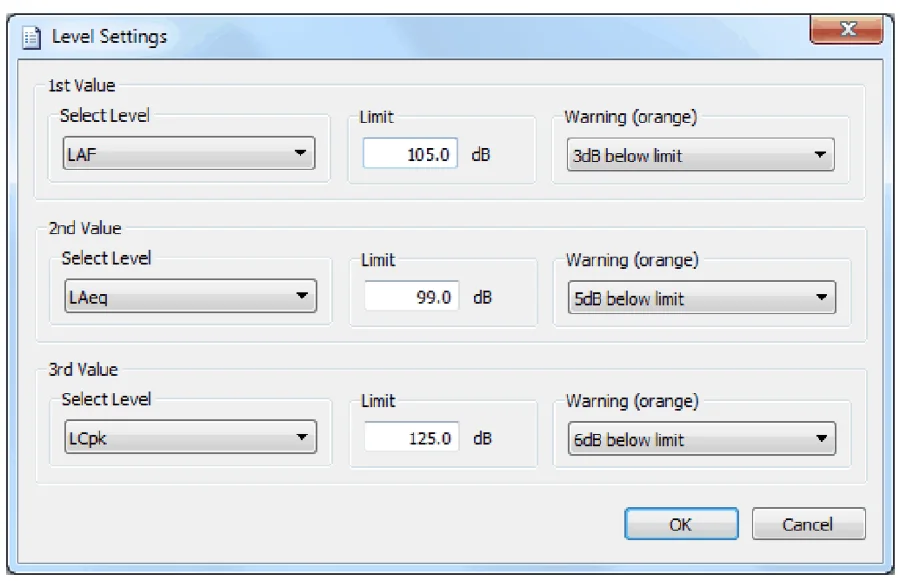
รูปที่ 9Figure 9 หน้าต่าง Level Settings ของ XL View (ดับเบิลคลิกที่ค่าเพื่อเปิด) — ทำตามลำดับหมายเลข (ภาพจากคู่มือ ปี 2019 แสดง Projector PRO เวอร์ชัน 1.20)The XL View Level Settings dialog (double-click a value to open it): work through the numbers in order (manual picture from 2019 showing Projector PRO 1.20) - Select Level: ค่าที่จะแสดง (1st, 2nd, 3rd Value)Select Level: the level to show (1st, 2nd, 3rd Value)
- Limit: ขีดจำกัด เกินแล้วเป็นสีแดงLimit: the limit; above it the value turns red
- Warning (orange): ขีดเตือน เช่น 3dB below limit เป็นสีเหลืองอำพันWarning (orange): the warning, e.g. 3dB below limit, shown amber
- OK ยืนยันOK to confirm
- STEP3
ปรับขนาดตัวเลขAdjust the number size
ขนาดของตัวเลขแถวบนตั้งได้ใน Preferences ปรับให้อ่านได้จากตำแหน่งที่คนดูจอยืนอยู่จริงThe size of the top display is set in Preferences; adjust it so it reads from where people actually stand.
ในโปรแกรมIn the programPreferences › XL View top display sizePreferences › XL View top display size
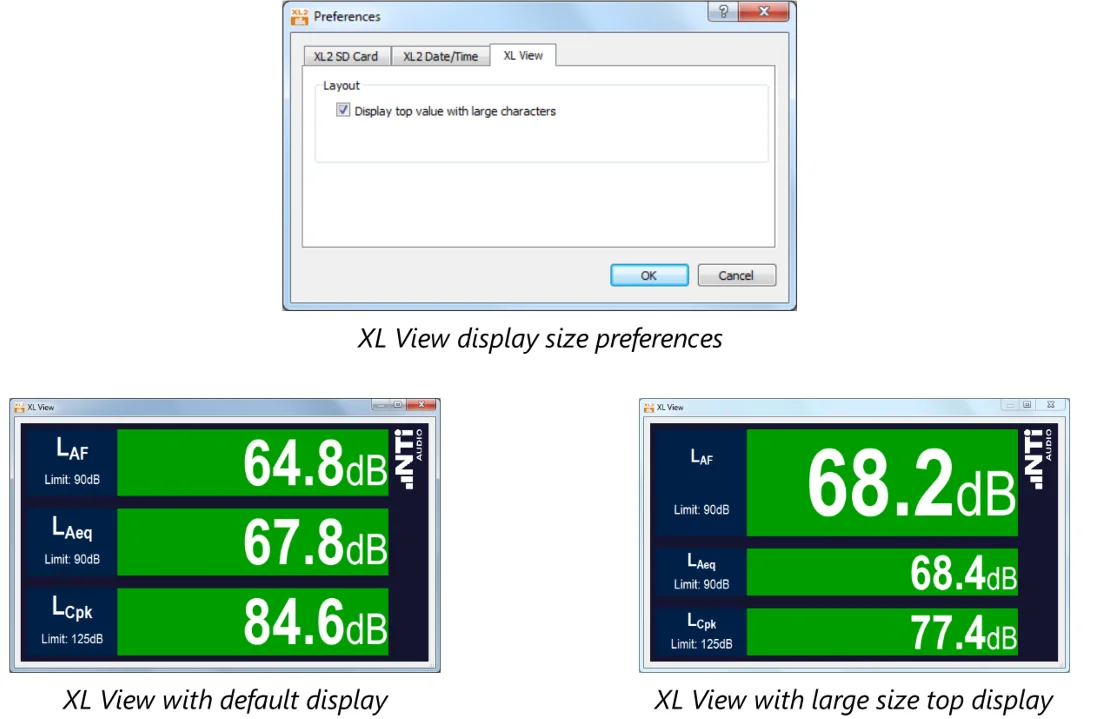
รูปที่ 10Figure 10 Preferences › แท็บ XL View › Display top value with large characters — ซ้ายล่างคือแบบปกติ ขวาล่างคือค่าบนสุดตัวใหญ่ (ภาพจากคู่มือ ปี 2019 แสดง Projector PRO เวอร์ชัน 1.20)Preferences › XL View tab › Display top value with large characters. Bottom left: default; bottom right: large top value (manual picture from 2019 showing Projector PRO 1.20) ภาพ: NTi Audio — คู่มือ XL2 Projector PRO (Doc version 1.2.1, ส.ค. 2019) หน้า 21Image: NTi Audio — XL2 Projector PRO User Manual (Doc version 1.2.1, Aug 2019), p. 21
| สีพื้นหลังBackground | ความหมายMeaning |
|---|---|
| เขียวGreen | ความหมายMeaningต่ำกว่าขีดเตือนBelow the warning limit |
| เหลืองอำพันAmber | ความหมายMeaningถึงขีดเตือนแล้ว ใกล้ขีดจำกัดWarning limit reached, close to the limit |
| แดงRed | ความหมายMeaningเกินขีดจำกัดLimit exceeded |
ตั้งขีดเตือนต่ำกว่าขีดจำกัดพอให้ทีมเสียงมีเวลาปรับก่อนเกิน ระยะห่างที่เหมาะขึ้นกับลักษณะเพลงและช่วงเวลาเฉลี่ยของเกณฑ์ ลองตั้งจากการซ้อมก่อนงานจริงSet the warning far enough below the limit to give the sound team time to react. The right margin depends on the music and the averaging period of the criteria; try it at rehearsal first.
05วิเคราะห์ANALYZE
Sound Level Predictor: ยังดังได้อีกเท่าไรSound Level Predictor: how much louder can it get?
เกณฑ์งานแสดงสดมักกำหนดเป็นค่าเฉลี่ยในช่วงเวลาหนึ่ง ตัวเลขที่เห็นตอนนี้จึงไม่พอ สิ่งที่วิศวกร FOH อยากรู้คือ ถ้าเล่นต่อระดับนี้ อีกกี่นาทีจะเกิน Predictor ตอบคำถามนั้นLive-event limits are usually an average over a period, so the number you see now is not enough. What the FOH engineer wants to know is: at this level, how many minutes until we exceed? The Predictor answers that.
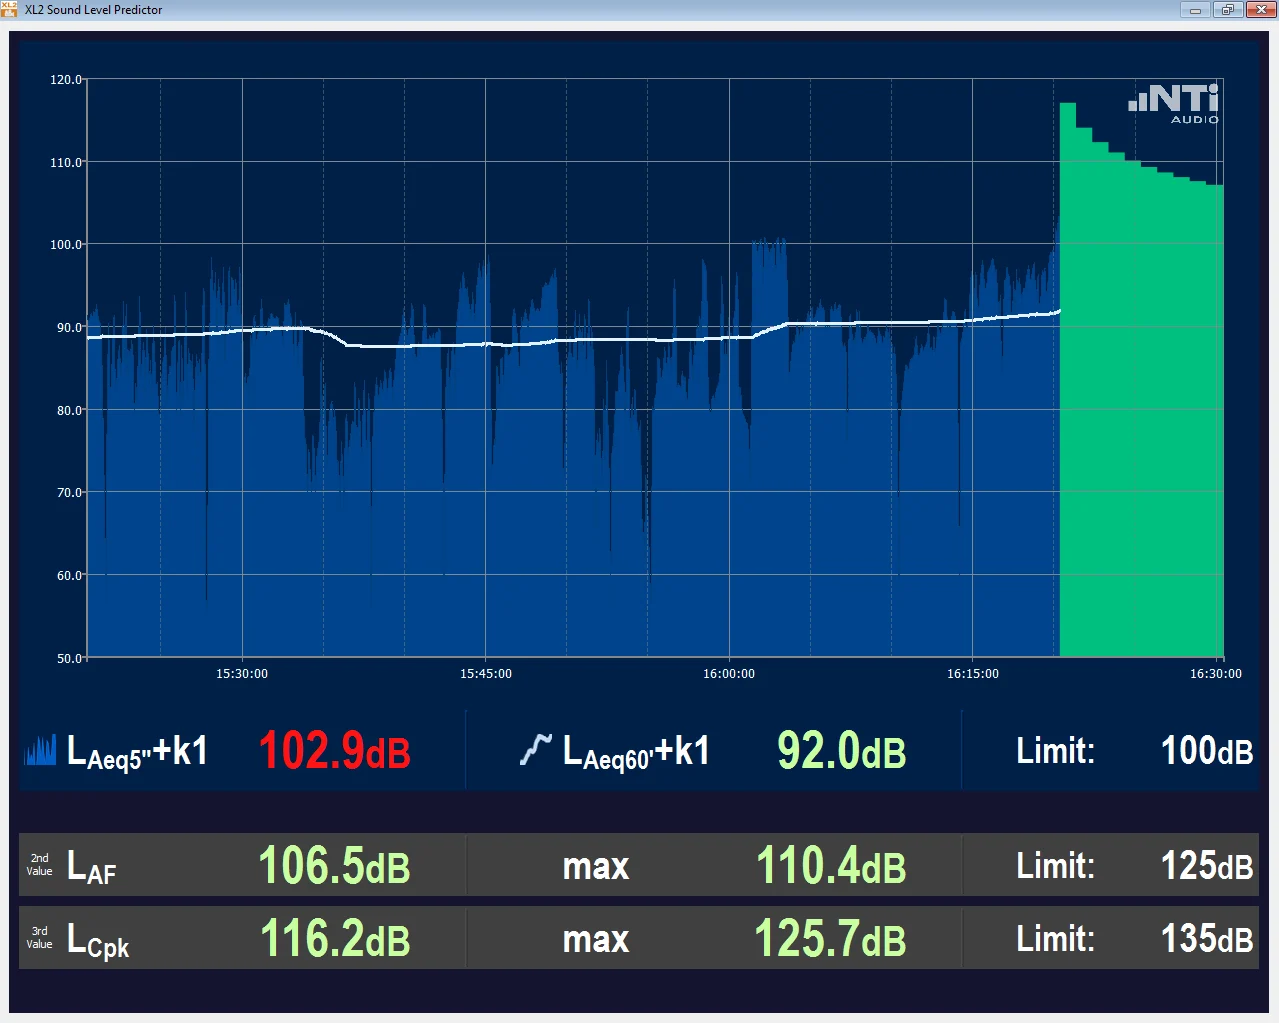
- ประวัติระดับเสียงของช่วงการวัดThe level history of the measurement period
- แท่งสีทำนาย (เขียว / เหลืองอำพัน / แดง)The forecast bars (green / amber / red)
- Chart Level พร้อม LimitThe chart level with its limit
- 2nd Value และ 3rd Value แสดงเป็นตัวเลขพร้อมค่า max และ Limit2nd and 3rd values, shown as numbers with max and limit
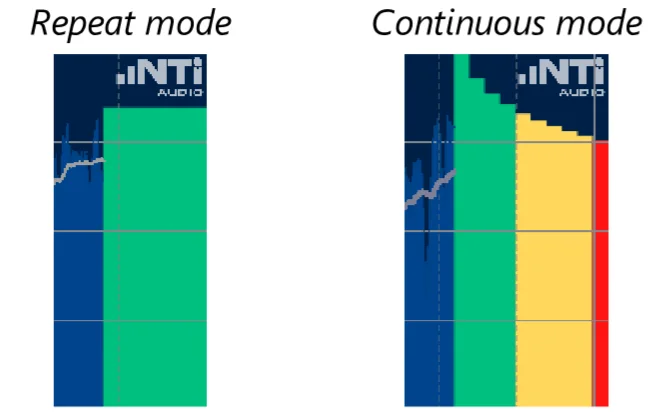
Predictor ใช้สองค่าในการทำนาย คือ LAeq ตั้งแต่เริ่มช่วงการวัดถึงตอนนี้ และ LAeq ของ 60 วินาทีล่าสุด แล้วแสดงแท่งสีขนาดใหญ่ (เขียว / เหลืองอำพัน / แดง) ทางขวาของกราฟประวัติระดับเสียงThe Predictor forecasts from two values: the LAeq from the start of the measurement period until now, and the LAeq of the last 60 seconds. It then shows a large coloured bar (green / amber / red) to the right of the level history.
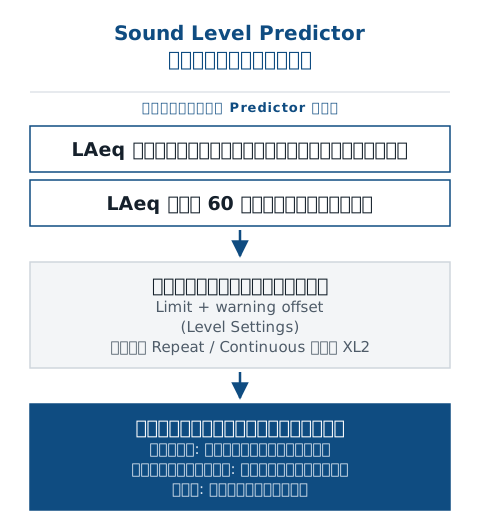
| โหมดตัวจับเวลาของ XL2XL2 timer mode | สิ่งที่ Predictor แสดงWhat the Predictor shows |
|---|---|
| RepeatRepeat | สิ่งที่ Predictor แสดงWhat the Predictor showsแท่งสี่เหลี่ยมแท่งเดียว ความสูงคือขีดบนของ LAeq ที่แนะนำสำหรับเวลาที่เหลือของช่วงนั้นA single rectangular bar whose height is the recommended upper LAeq for the rest of the interval |
| ContinuousContinuous | สิ่งที่ Predictor แสดงWhat the Predictor shows10 แท่ง แท่งละ 1 นาที แต่ละแท่งบอกระดับที่จะทำให้ LAeq ถึงขีดจำกัดภายใน 1…10 นาทีTen one-minute bars, each showing the level that would bring LAeq to the limit within 1…10 minutes |
- STEP1
ตั้ง Level SettingsSet the Level Settings
คลิกขวาที่หน้าต่าง Predictor เพื่อเปิด Level Settings ตั้ง Chart Level, 2nd Level และ 3rd Level แต่ละค่ามีขีดจำกัดและค่าเตือน (warning offset)Right-click the Predictor window to open the Level Settings: set the Chart Level, 2nd Level and 3rd Level, each with a limit and a warning offset.
ในโปรแกรมIn the programSound Level Predictor › คลิกขวา › Level SettingsSound Level Predictor › right-click › Level Settings
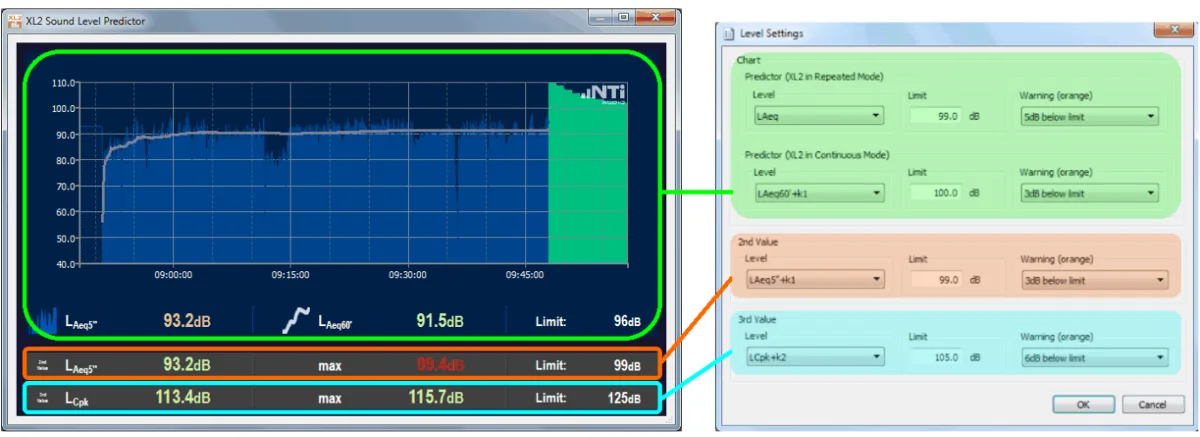
รูปที่ 14Figure 14 สีในภาพของคู่มือบอกว่าช่องไหนคุมส่วนไหน: เขียว = กราฟและแท่งทำนาย (ตั้งแยกสำหรับ XL2 ในโหมด Repeated และ Continuous) ส้ม = 2nd Value ฟ้า = 3rd Value (ภาพจากคู่มือ ปี 2019 แสดง Projector PRO เวอร์ชัน 1.20)The manual's colours show which field controls what: green = chart and forecast bar (set separately for the XL2 in Repeated and Continuous mode), orange = 2nd Value, cyan = 3rd Value (manual picture from 2019 showing Projector PRO 1.20) ภาพ: NTi Audio — คู่มือ XL2 Projector PRO (Doc version 1.2.1, ส.ค. 2019) หน้า 12Image: NTi Audio — XL2 Projector PRO User Manual (Doc version 1.2.1, Aug 2019), p. 12 - STEP2
เริ่มวัดStart the measurement
กด Start บน XL2 (หรือบน Virtual XL2 Keypad) เพื่อเริ่มบันทึกระดับเสียง Predictor จะเริ่มแสดงข้อมูลPress Start on the XL2 (or on the Virtual XL2 Keypad) to begin recording levels; the Predictor starts showing data.
ในโปรแกรมIn the programปุ่ม StartStart button
ขีดจำกัดใน Predictor ตั้งแยกจากขีดจำกัดของ XL2 เอง ถ้าคุณใช้ไฟ LED ของ XL2 หรือ Limit Light ด้วย ให้ตั้งทั้งสองที่ให้สอดคล้องกัน ไม่เช่นนั้นจอกับไฟจะบอกคนละเรื่องThe Predictor's limits are set separately from the XL2's own limits. If you also use the XL2's LED or a Limit Light, set both consistently, or the screen and the light will tell different stories.
ทำไมช่วงดังสั้น ๆ ถึงแก้ยากWhy a short loud passage is hard to undo
LAeq เป็นค่าเฉลี่ยแบบพลังงาน ช่วงที่ดังขึ้นไม่กี่ dB ในเวลาสั้น ๆ มีน้ำหนักมากกว่าช่วงที่เบาลงในเวลาเท่ากัน ถ้า LAeq ของช่วงสะสมเกือบถึงขีดจำกัดแล้ว การลดระดับลงเพื่อชดเชยต้องใช้เวลานาน นี่คือเหตุผลที่ Predictor ดูทั้ง LAeq สะสมและ LAeq 60 วินาทีล่าสุดLAeq is an energy average: a few dB louder for a short time weighs more than the same time a few dB quieter. Once the running LAeq is close to the limit, bringing it back down takes a long time. That is why the Predictor looks at both the running LAeq and the last 60 s.
06อ่านผลINTERPRET RESULTS
อ่านค่าบนจอให้เป็นRead the screen correctly
จอในงานต้องให้คนตัดสินใจได้ในไม่กี่วินาที รู้ว่าแต่ละค่ามาจากไหนแล้วจะตัดสินใจได้ถูกThe screen at an event must support a decision in seconds. Knowing where each value comes from is what makes the decision right.
LAeq ตั้งแต่เริ่มถึงตอนนี้LAeq so far LAeq · dB
- คืออะไรWhat it is
- ระดับเสียงเฉลี่ยแบบพลังงานตั้งแต่เริ่มช่วงการวัดถึงขณะนี้ เป็นค่าหนึ่งที่ Predictor ใช้The energy-average level from the start of the measurement period until now; one of the Predictor's inputs.
- ทำไมต้องสนใจWhy it matters
- บอกว่าใช้ “งบ” ของค่าเฉลี่ยในช่วงนั้นไปแล้วเท่าไรShows how much of the period's average “budget” is already used.
- เข้าใจผิดบ่อยCommon misunderstanding
- ค่านี้ขึ้นกับจุดเริ่มต้นของช่วงวัด ถ้าเริ่มวัดช้ากว่าเวลาที่เกณฑ์กำหนด ค่าบนจอจะไม่ตรงกับที่ผู้ตรวจวัดIt depends on when the period started; if you start later than the criteria's period, the screen will not match what an inspector measures.
LAeq ของ 60 วินาทีล่าสุดLAeq of the last 60 s LAeq60" · dB
- คืออะไรWhat it is
- ระดับเฉลี่ยแบบพลังงานในหนึ่งนาทีที่ผ่านมา เป็นอีกค่าที่ Predictor ใช้The energy-average level over the last minute; the Predictor's other input.
- ทำไมต้องสนใจWhy it matters
- บอกแนวโน้มของตอนนี้ ให้ทีมเสียงปรับได้ก่อนที่ค่าเฉลี่ยสะสมจะเกินShows the current trend so the sound team can react before the running average exceeds.
ขีดจำกัดและขีดเตือนLimit and warning dB
- คืออะไรWhat it is
- ค่าที่ทำให้พื้นหลังหรือแท่งเปลี่ยนเป็นสีแดง (เกิน) หรือเหลืองอำพัน (ใกล้)The values that turn the background or bars red (exceeded) or amber (close).
- ทำไมต้องสนใจWhy it matters
- ทำให้ทุกคนเห็นสถานะได้ทันทีLets everyone see the status at a glance.
- เข้าใจผิดบ่อยCommon misunderstanding
- ขีดจำกัดของ XL View, ของ Predictor และของ XL2 ตั้งแยกกัน ตรวจให้ตรงกันทุกที่The XL View, Predictor and XL2 limits are separate settings; check they agree.
| สิ่งที่เห็นWhat you see | ควรทำอะไรWhat to do |
|---|---|
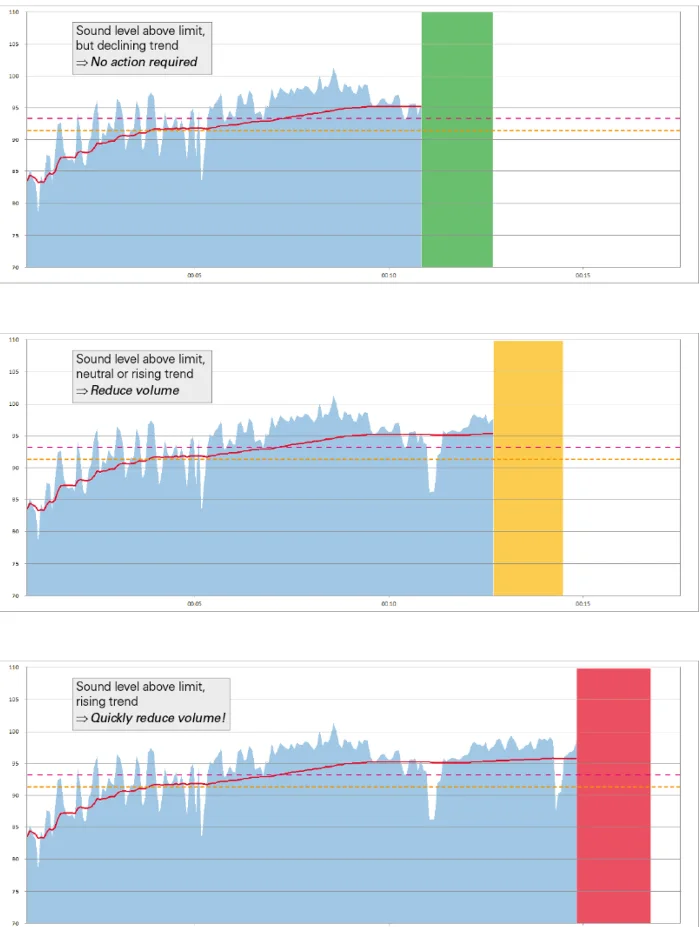
| แท่งเขียวสูงTall green bar | ควรทำอะไรWhat to doยังมีระยะเหลือ ระดับปัจจุบันไม่ทำให้ค่าเฉลี่ยเกินThere is headroom; the current level will not push the average over |
| แท่งเหลืองอำพันAmber bar | ควรทำอะไรWhat to doเริ่มใกล้ขีดจำกัด ระวังช่วงเพลงที่ดังขึ้นGetting close to the limit; watch the louder passages |
| แท่งแดงRed bar | ควรทำอะไรWhat to doต้องลดระดับที่ Mixing desk ถ้าไม่ต้องการให้ค่าเฉลี่ยเกินReduce the level at the mixing desk if the average must not exceed |
07ใช้ร่วมกับเครื่องมืออื่นWORKFLOWS
บันทึกการตั้งค่าเป็น ProfileSave the set-up as a Profile
เมื่อได้ชุดการตั้งค่าที่ใช้ได้ดีแล้ว เก็บเป็น Profile ไว้ งานครั้งต่อไปหรือการเฝ้าระวังรายวันจะเริ่มได้ในไม่กี่วินาทีและตั้งเหมือนเดิมทุกครั้งOnce you have a set-up that works, keep it as a Profile. The next event, or daily monitoring, starts in seconds and is set up the same way every time.
- การตั้งค่าเครื่องวัดระดับเสียง (SLMeter) ของ XL2The XL2's sound level meter (SLMeter) settings
- ระดับที่เลือกและขีดจำกัดใน Projector PROThe levels selected and limits set in Projector PRO
- หน้าต่างเริ่มต้น: XL View, Sound Level Predictor หรือ default ProjectorThe startup window: XL View, Sound Level Predictor or default Projector
- ตัวเลือก autostart measurement at software start ให้เริ่มวัดเองเมื่อเปิดโปรแกรมThe autostart measurement at software start option
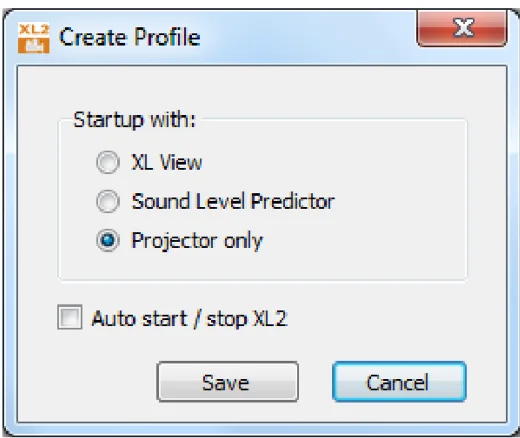
- Startup with: XL View, Sound Level Predictor หรือ Projector onlyStartup with: XL View, Sound Level Predictor or Projector only
- Auto start / stop XL2: เริ่มวัดเองเมื่อเปิด ProfileAuto start / stop XL2: start measuring when the Profile is activated
- Save บันทึก ProfileSave stores the Profile
Profile ต้องใช้เฟิร์มแวร์ XL2 V4.00 ขึ้นไป และสร้างได้เฉพาะตอนที่ต่อ XL2 อยู่ สำหรับงานเฝ้าระวังรายวัน เช่น ร้านที่อยู่ใกล้ชุมชน NTi อธิบายว่าการเฝ้าระวังเริ่มเองเมื่อเปิดคอมพิวเตอร์และหยุดเมื่อปิดเครื่อง จึงเก็บ XL2 ไว้ในที่ปลอดภัยได้โดยไม่ต้องมีคนกดปุ่มProfiles need XL2 firmware V4.00 or later and can only be created with an XL2 connected. For daily monitoring, such as a bar near a residential area, NTi describes monitoring that starts when the computer starts and ends at shutdown, so the XL2 can stay in a protected place with nobody pressing buttons.
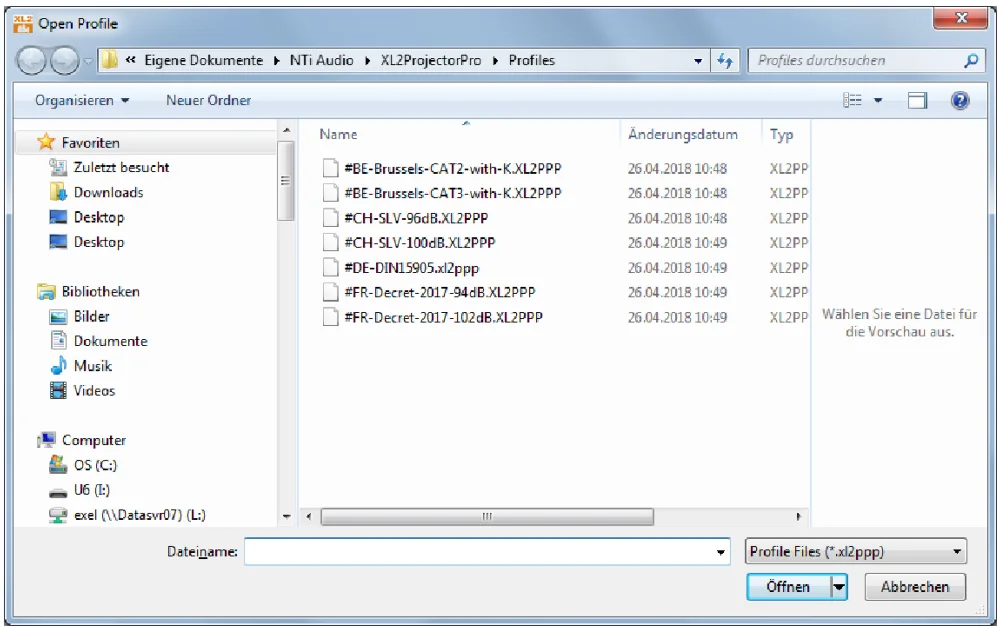
- Profile จากโรงงาน เช่น #DE-DIN15905, #CH-SLV-100dBFactory profiles, e.g. #DE-DIN15905, #CH-SLV-100dB
ตั้งชื่อ Profile ขึ้นต้นด้วย # (สงวนไว้สำหรับ Profile จากโรงงาน) หรือพยายามแก้การตั้งค่าขณะที่ Profile ยังทำงาน ระหว่างใช้ Profile จะแก้การตั้งค่าทั้งของ XL2 และ Projector PRO ไม่ได้จนกว่าจะออกจาก ProfileNaming a Profile with a leading # (reserved for factory profiles), or trying to change settings while a Profile is active. While a Profile runs, neither the XL2 nor the Projector PRO settings can be changed until you exit it.
ลบ Profile ที่ไม่ใช้แล้วได้ด้วยการคลิกขวาที่ชื่อ Profile แล้วเลือก DeleteDelete a Profile you no longer need by right-clicking it and choosing Delete.
08ส่งออกEXPORT
ดึงไฟล์ผลวัดโดยไม่หยุดการวัดRetrieve measurement files without stopping
ข้อมูลที่ XL2 บันทึกระหว่างงานคือหลักฐานว่าคุณอยู่ในเกณฑ์ Projector PRO ให้คุณคัดลอกไฟล์ออกมาได้ขณะที่เครื่องยังวัดต่อThe data the XL2 logs during the event is your evidence of compliance. Projector PRO lets you copy files off while the instrument keeps measuring.
- STEP1
เปิด Internal File ViewerOpen the Internal File Viewer
ใช้ Internal File Viewer คัดลอกไฟล์จากหน่วยความจำ XL2 มายังคอมพิวเตอร์ และลบไฟล์ใน XL2 ได้ โปรแกรมจะให้ทำเฉพาะสิ่งที่เครื่องอนุญาตในสถานะขณะนั้นUse the Internal File Viewer to copy files from the XL2's memory to the computer and to delete files on the XL2. The program only offers the actions the instrument allows in its current state.
ในโปรแกรมIn the programInternal File ViewerInternal File Viewer
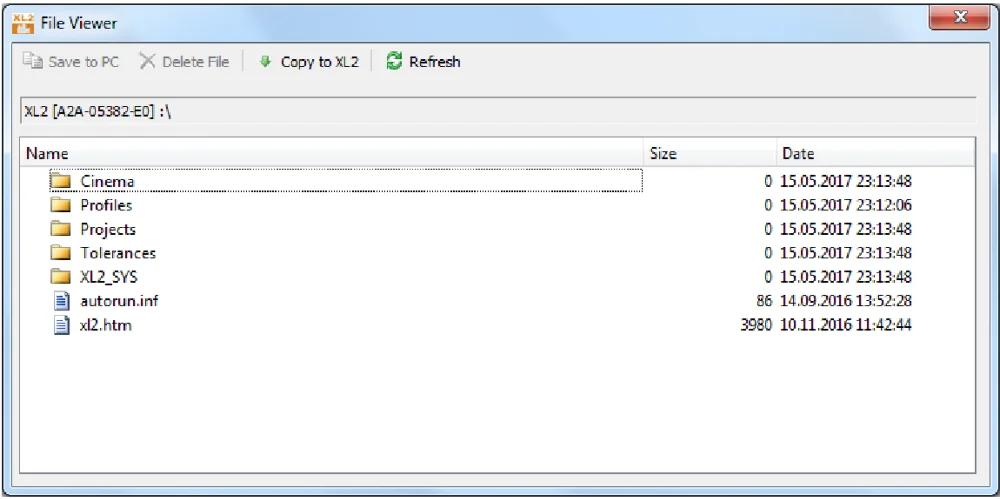
รูปที่ 18Figure 18 หน้าต่าง File Viewer (ปุ่ม C บนแผงหลัก) — ปุ่มที่เป็นสีเทาคือคำสั่งที่เครื่องยังไม่อนุญาตในสถานะนั้น เช่น ยังไม่ได้เลือกไฟล์ (ภาพจากคู่มือ ปี 2019 แสดง Projector PRO เวอร์ชัน 1.20)The File Viewer window (button C on the main panel). Greyed buttons are actions the instrument does not allow in its current state, e.g. no file selected yet (manual picture from 2019 showing Projector PRO 1.20) - Save to PC: คัดลอกไฟล์ไปคอมพิวเตอร์Save to PC: copy files to the computer
- Delete File: ลบไฟล์ใน XL2Delete File: delete files on the XL2
- XL2 ที่ต่ออยู่ (หมายเลขเครื่อง)The connected XL2 (serial number)
- โฟลเดอร์ Projects: ที่เก็บผลวัดThe Projects folder: where the measurements are
- STEP2
เลือกวิธีเข้าถึงการ์ด SDChoose the SD card access mode
ใน Preferences เลือกวิธีเข้าถึงการ์ด SD ได้ระหว่าง Internal File Viewer (แนะนำ) กับตัวจัดการไฟล์ของคุณเอง ซึ่งมีไว้สำหรับเฟิร์มแวร์ V2.30–V3.12In Preferences, choose the SD card access: the Internal File Viewer (recommended) or your own file explorer, which is meant for firmware V2.30–V3.12.
ในโปรแกรมIn the programPreferences › XL2 SD card access modePreferences › XL2 SD card access mode
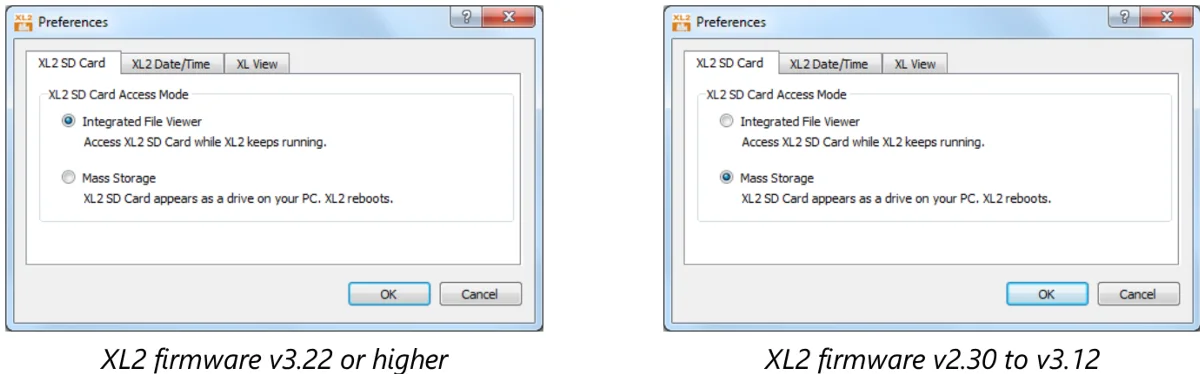
รูปที่ 19Figure 19 Preferences › แท็บ XL2 SD Card: ซ้าย Integrated File Viewer (เฟิร์มแวร์ V3.22 ขึ้นไป) เปิดการ์ด SD ได้ขณะ XL2 ยังวัดอยู่ ขวา Mass Storage (V2.30–V3.12) การ์ดขึ้นเป็นไดรฟ์และ XL2 จะรีบูต (ภาพจากคู่มือ ปี 2019 แสดง Projector PRO เวอร์ชัน 1.20)Preferences › XL2 SD Card tab. Left: Integrated File Viewer (firmware V3.22 or later) opens the SD card while the XL2 keeps running. Right: Mass Storage (V2.30–V3.12): the card appears as a drive and the XL2 reboots (manual picture from 2019 showing Projector PRO 1.20) ภาพ: NTi Audio — คู่มือ XL2 Projector PRO (Doc version 1.2.1, ส.ค. 2019) หน้า 20Image: NTi Audio — XL2 Projector PRO User Manual (Doc version 1.2.1, Aug 2019), p. 20
คัดลอกไฟล์ของแต่ละวันออกมาหลังจบงานทุกครั้ง และเก็บไว้คู่กับรายการเพลงหรือบันทึกเหตุการณ์ ถ้าต้องวิเคราะห์ละเอียดภายหลัง นำข้อมูลไปใช้กับซอฟต์แวร์วิเคราะห์ เช่น Data Explorer (ต้องมี License ของโปรแกรมนั้น)Copy each day's files off after every event and keep them with the set list or event notes. For detailed analysis later, use analysis software such as Data Explorer (which needs its own licence).
ลบไฟล์ใน XL2 ก่อนตรวจว่าคัดลอกมาครบ เปิดไฟล์ที่คัดลอกบนคอมพิวเตอร์ดูก่อนเสมอDeleting files on the XL2 before checking the copy is complete. Always open the copied files on the computer first.
09ใช้ร่วมกับเครื่องมืออื่นWORKFLOWS
ตัวอย่าง: แสดงระดับเสียงสดในคอนเสิร์ตกลางแจ้งExample: live level display at an outdoor concert
ตัวอย่างสมมติเพื่อให้เห็นลำดับงาน ไม่ใช่โครงการจริง ขีดจำกัดและช่วงเวลาเฉลี่ยในงานจริงให้ยึดตามเกณฑ์ที่ผู้จัดงานหรือหน่วยงานกำหนดAn illustrative scenario showing the sequence, not a real project. In real work, the limits and averaging period follow the criteria set by the organiser or the authority.
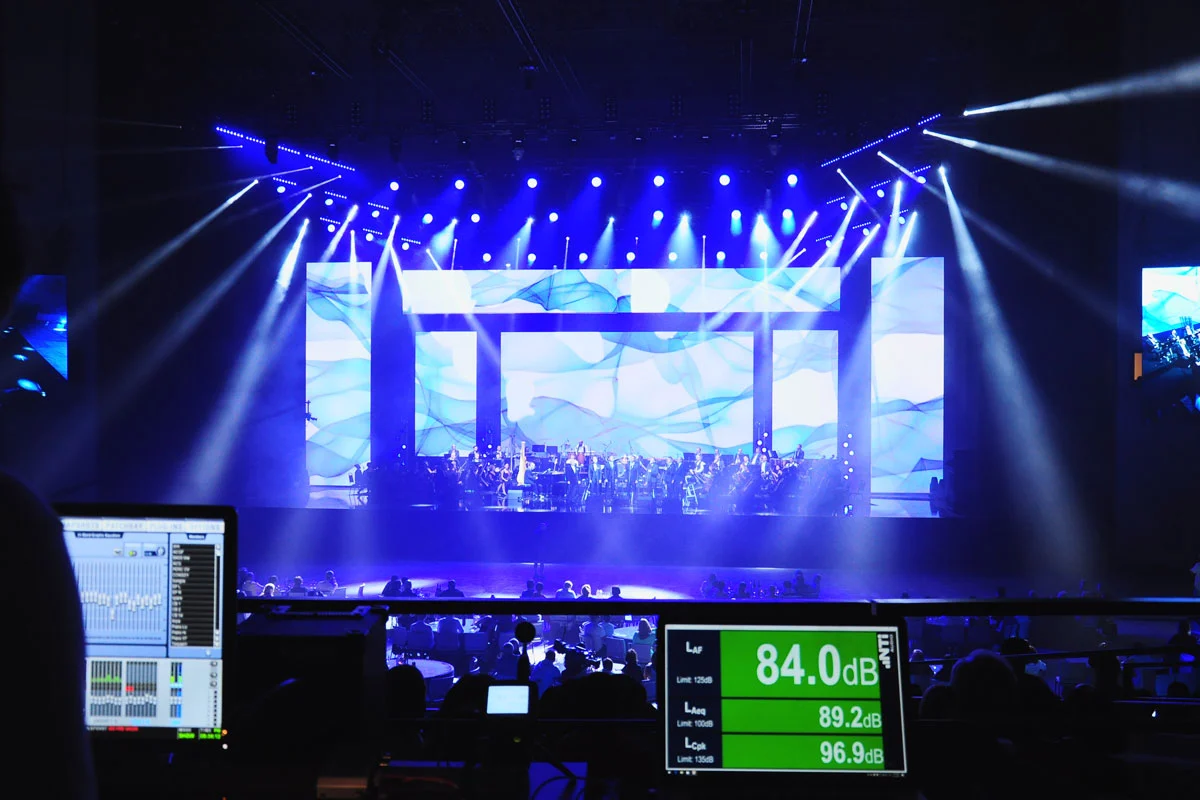
ผู้จัดคอนเสิร์ตกลางแจ้งได้รับเงื่อนไขว่า LAeq ในช่วงเวลาที่กำหนด ณ ตำแหน่ง FOH ต้องไม่เกินค่าที่ตกลงไว้ วิศวกรวาง XL2 ที่มี Projector PRO Option ใกล้ FOH ต่อ USB เข้าโน้ตบุ๊กที่วางหน้าคอนโซล และหันจอให้วิศวกรมิกซ์เห็นAn outdoor concert organiser has a condition that the LAeq over a set period at the FOH position must not exceed an agreed value. The engineer places an XL2 with the Projector PRO Option near FOH, connects it by USB to a laptop in front of the console, and turns the screen towards the mix engineer.
- ก่อนวันงาน: ตรวจเฟิร์มแวร์ (V4.00 ขึ้นไป) และ Option ลองเปิด XL View และ Predictor กับโน้ตบุ๊กที่จะใช้Before the day: check the firmware (V4.00 or later) and the option, and open XL View and the Predictor on the laptop you will use.
- ต่อ USB เลือก COM port บน XL2 และติ๊ก Set date & time ให้เวลาในไฟล์ตรงกับนาฬิกาจริงConnect USB, choose COM port on the XL2 and tick Set date & time so the file times match the real clock.
- เริ่มจาก Profile สำเร็จรูปแล้วปรับ ตั้งโหมดตัวจับเวลาและช่วงเวลาอ้างอิงของ XL2 ให้ตรงกับเงื่อนไขของงาน และเปิดการบันทึกข้อมูลStart from a predefined Profile and adjust it: set the XL2 timer mode and reference time to match the event's condition, and switch logging on.
- ใน Predictor ตั้ง Level Settings ให้ Chart Level เป็น LAeq ใส่ขีดจำกัดตามเงื่อนไขและค่าเตือนที่ทีมตกลงกันIn the Predictor, set the Level Settings with LAeq as the Chart Level, the limit per the condition and a warning offset agreed with the team.
- บันทึกทั้งหมดเป็น Profile ใหม่ เลือกหน้าต่างเริ่มต้นเป็น Sound Level Predictor เพื่อใช้ซ้ำในวันที่สองของงานSave everything as a new Profile with the Sound Level Predictor as the startup window, for reuse on day two.
- กด Start ก่อนเริ่มการแสดง ระหว่างงานวิศวกรมิกซ์ดูแท่งสี: เขียวเล่นต่อได้ เหลืองอำพันระวังช่วงที่ดังขึ้น แดงลดระดับที่คอนโซลPress Start before the show. During it the mix engineer follows the bars: green, carry on; amber, watch the louder passages; red, bring the level down at the console.
- หลังจบงาน ใช้ Internal File Viewer คัดลอกไฟล์ออก ตรวจว่าเปิดได้ครบ แล้วเก็บไว้คู่กับรายการเพลงเป็นหลักฐานAfter the show, copy the files with the Internal File Viewer, check they open, and keep them with the set list as the record.
การใช้ Predictor แทนการดูตัวเลขอย่างเดียวทำให้ทีมเสียงรู้ล่วงหน้าว่าช่วงดังของเพลงถัดไปยังทำได้หรือไม่ ซึ่ง NTi อธิบายว่าเป็นจุดประสงค์ของฟังก์ชันนี้: ให้วิศวกร FOH ใช้ช่วงที่ดังได้เต็มที่ภายใต้ขีดจำกัดตามกฎหมายUsing the Predictor rather than just the number tells the sound team in advance whether the next song's loud section will fit, which is the purpose NTi describes: letting FOH engineers make the most of loud passages while staying within legal limits.
10แก้ปัญหาTROUBLESHOOT
ปัญหาที่พบบ่อยและวิธีแก้Common problems and fixes
| อาการSymptom | สาเหตุที่เป็นไปได้Likely cause | วิธีแก้Fix |
|---|---|---|
| “No XL2 Analyzer found”“No XL2 Analyzer found” | สาเหตุที่เป็นไปได้Likely causeไม่ได้เลือก COM port บน XL2 หรือสาย USB หลวมCOM port not chosen on the XL2, or a loose USB cable | วิธีแก้Fixถอดสายแล้วต่อใหม่ เลือก COM port บน XL2Unplug, reconnect and choose COM port on the XL2 |
| เปิด XL View หรือ Predictor ไม่ได้XL View or Predictor unavailable | สาเหตุที่เป็นไปได้Likely causeไม่มี Projector PRO Option / XL2 Remote Measurement Option หรือเฟิร์มแวร์เก่ากว่าที่กำหนดNo Projector PRO Option / XL2 Remote Measurement Option, or firmware below the minimum | วิธีแก้Fixตรวจตารางในบทติดตั้ง อัปเดตเฟิร์มแวร์ หรือเพิ่ม OptionCheck the tables in the install chapter, update the firmware or add the option |
| สร้าง Profile ไม่ได้Cannot create a Profile | สาเหตุที่เป็นไปได้Likely causeไม่ได้ต่อ XL2 อยู่ หรือเฟิร์มแวร์ต่ำกว่า V4.00No XL2 connected, or firmware below V4.00 | วิธีแก้Fixต่อ XL2 ก่อน และอัปเดตเฟิร์มแวร์ถ้าจำเป็นConnect the XL2 first and update the firmware if needed |
| แก้การตั้งค่าไม่ได้Settings cannot be changed | สาเหตุที่เป็นไปได้Likely causeProfile กำลังทำงานอยู่A Profile is active | วิธีแก้Fixออกจาก Profile ก่อน แล้วค่อยแก้Exit the Profile first, then change them |
| จอกับไฟ LED / Limit Light สีไม่ตรงกันScreen and LED / Limit Light colours disagree | สาเหตุที่เป็นไปได้Likely causeขีดจำกัดของ Predictor ตั้งแยกจากขีดจำกัดของ XL2Predictor limits are separate from the XL2's limits | วิธีแก้Fixตั้งขีดจำกัดทั้งสองที่ให้สอดคล้องกันSet both limits consistently |
| ไม่มีปุ่ม Limit หรือเปิด/ปิดบนปุ่มเสมือนNo Limit or On/Off on the virtual keypad | สาเหตุที่เป็นไปได้Likely causeVirtual XL2 Keypad ไม่มีสองปุ่มนี้โดยออกแบบThe Virtual XL2 Keypad does not include them by design | วิธีแก้Fixใช้ปุ่มบนตัวเครื่องUse the buttons on the instrument |
| คอมพิวเตอร์รุ่นเก่าทำงานหนักHigh load on an older computer | สาเหตุที่เป็นไปได้Likely causeหน้าจอรีเฟรชทุก 100 ms ตามค่าเริ่มต้นThe screen refreshes every 100 ms by default | วิธีแก้Fixเปิดโปรแกรมด้วย command-line option -p เพื่อตั้งช่วงรีเฟรช 100–1000 msStart the program with the -p command-line option to set a 100–1000 ms refresh period |
| ใช้กับ XL3 ไม่ได้Does not work with an XL3 | สาเหตุที่เป็นไปได้Likely causeProjector PRO รองรับ XL2 เท่านั้นProjector PRO is for the XL2 only | วิธีแก้Fixใช้ XL-View ที่มีในตัว XL3 ผ่านเบราว์เซอร์Use the XL3's built-in XL-View in a browser |
Command-line options สำหรับการติดตั้งแบบถาวรCommand-line options for permanent installations
| ตัวเลือกOption | ผลEffect |
|---|---|
| -sk-sk | ผลEffectแสดงผลอย่างเดียว ใช้โปรแกรมควบคุม XL2 ไม่ได้View only: the XL2 cannot be operated from the software |
| -xk-xk | ผลEffectปิดการใช้ปุ่มและวงล้อบนตัว XL2Disables the XL2's buttons and wheel |
| -p xxx-p xxx | ผลEffectช่วงรีเฟรชหน้าจอ 100–1000 ms (ค่าเริ่มต้น 100 ms)Screen update period of 100–1000 ms (default 100 ms) |
ตัวเลือกเหล่านี้ใส่ต่อท้ายคำสั่งเปิดโปรแกรม XL2ProjectorPro.exe เช่น ในทางลัดของ Windows มีประโยชน์เมื่อตั้งจอไว้ให้คนทั่วไปเห็นและไม่ต้องการให้ใครแก้การตั้งค่าThese options are added after the program file XL2ProjectorPro.exe, e.g. in a Windows shortcut. They help when the screen is on public view and nobody should change the settings.