QUICK STARTเริ่มใช้งานใน 5–10 นาทีUp and running in 5–10 minutes
วัดระดับเสียงครั้งแรกด้วย XL2Your first sound level measurement with the XL2
เป้าหมายคือผลวัดหนึ่งไฟล์ที่ผ่าน Calibration และบันทึกลง SD card แล้วThe goal is one calibrated measurement saved on the SD card.
ต้องมีอะไรบ้างก่อนเริ่มWhat you need before you start
- XL2 ที่ชาร์จแบตเตอรี่ Li-Po เต็มแล้ว (แบตเตอรี่ใหม่มีไฟประมาณครึ่งเดียว) หรือถ่าน AA 4 ก้อนAn XL2 with a fully charged Li-Po battery (a new one is about half charged) or 4 AA cells
- SD card ในเครื่อง — XL2 จะไม่เปิดทำงานถ้าไม่มี SD cardAn SD card in the instrument: the XL2 will not run without one
- ไมโครโฟนวัดเสียงของ NTi เช่น M2230An NTi measurement microphone such as the M2230
- Sound Calibrator (เช่น NTi Class 1 ที่ 114 dB)A sound calibrator (e.g. NTi Class 1 at 114 dB)
- STEP1
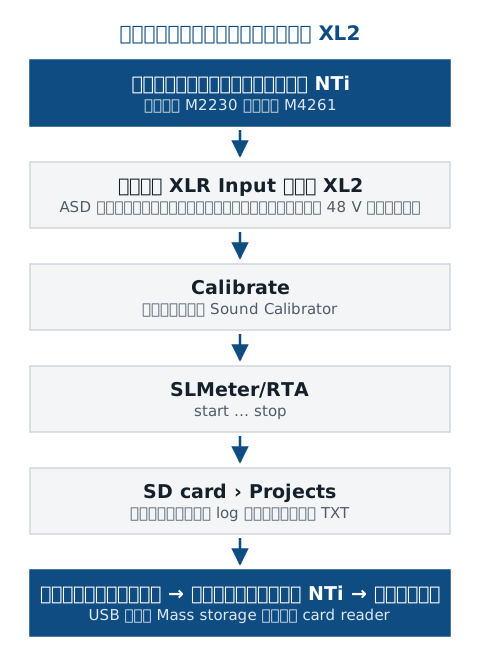
ต่อไมโครโฟนเข้าช่อง XLR InputConnect the microphone to the XLR Input
เสียบไมโครโฟนเข้าช่อง XLR Input (หมายเลข 1) ตรวจว่ามี SD card อยู่ในช่อง (หมายเลข 7) ไมโครโฟน NTi มีข้อมูล ASD เครื่องจะเปิดไฟ 48 V และอ่านความไวให้เองPlug the microphone into the XLR Input (number 1) and check that the SD card is in its slot (number 7). NTi microphones carry ASD data: the XL2 switches 48 V on and reads the sensitivity by itself.
ข้อควรระวังWatch outถ้าใช้สาย ASD อย่าจับตัวหัว XLR ขณะเครื่องกำลังอ่านข้อมูลไมโครโฟนWith an ASD cable, do not touch the XLR connector housing while the XL2 reads the microphone data.
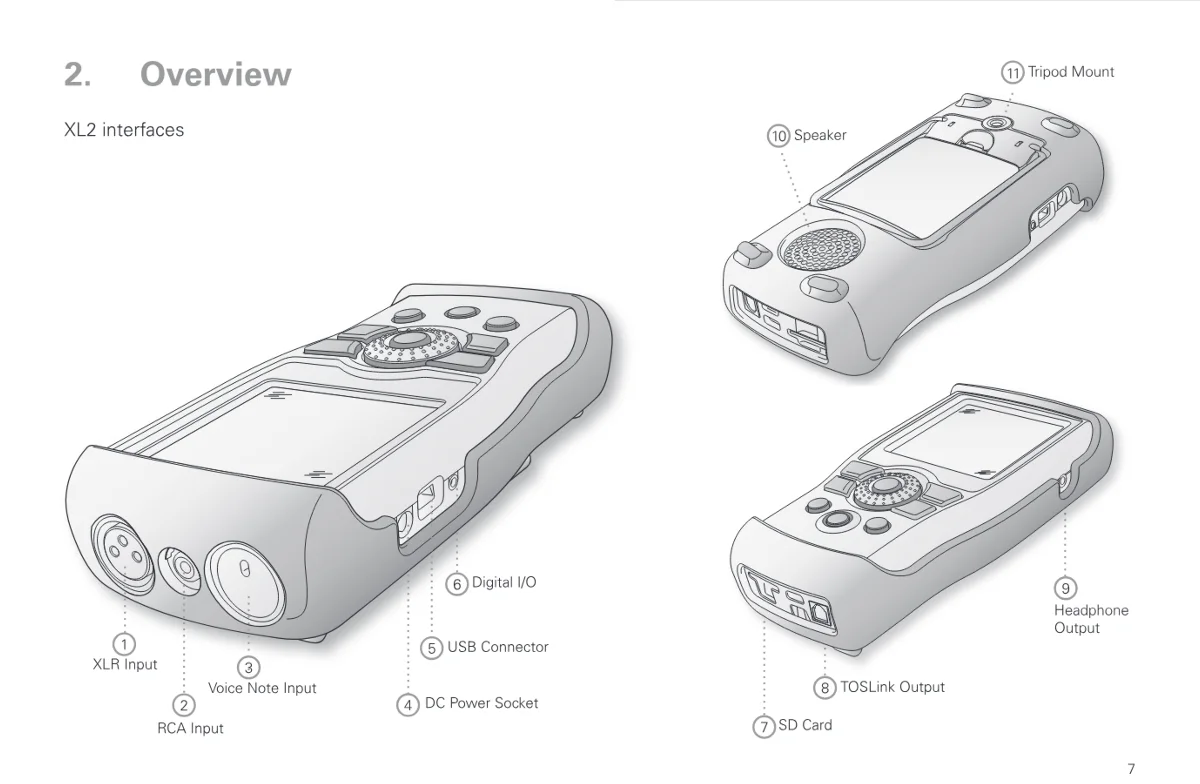
รูปที่ 2Figure 2 ช่องต่อของ XL2 (หมายเลขตามคู่มือ NTi) — 1 = XLR Input สำหรับไมโครโฟน, 7 = SD cardXL2 connectors (numbers as in NTi's manual): 1 = XLR Input for the microphone, 7 = SD card ภาพ: NTi Audio — XL2 Operating Manual V4.93.02 หน้า 7Image: NTi Audio — XL2 Operating Manual V4.93.02, p. 7 - STEP2
เปิดเครื่องSwitch on
กดปุ่ม power (หมายเลข 3) จะได้ยินเสียงรีเลย์สั้น ๆ และจอสว่าง ปิดเครื่อง: กดค้าง 1 วินาที มุมบนขวาของจอจะขึ้น ASD เมื่อเครื่องตรวจพบไมโครโฟน NTi และเปิดไฟ 48 V แล้วPress power (number 3): a short relay click and the display lights. To switch off, hold it for 1 s. ASD appears at the top right once an NTi microphone is detected and 48 V is on.
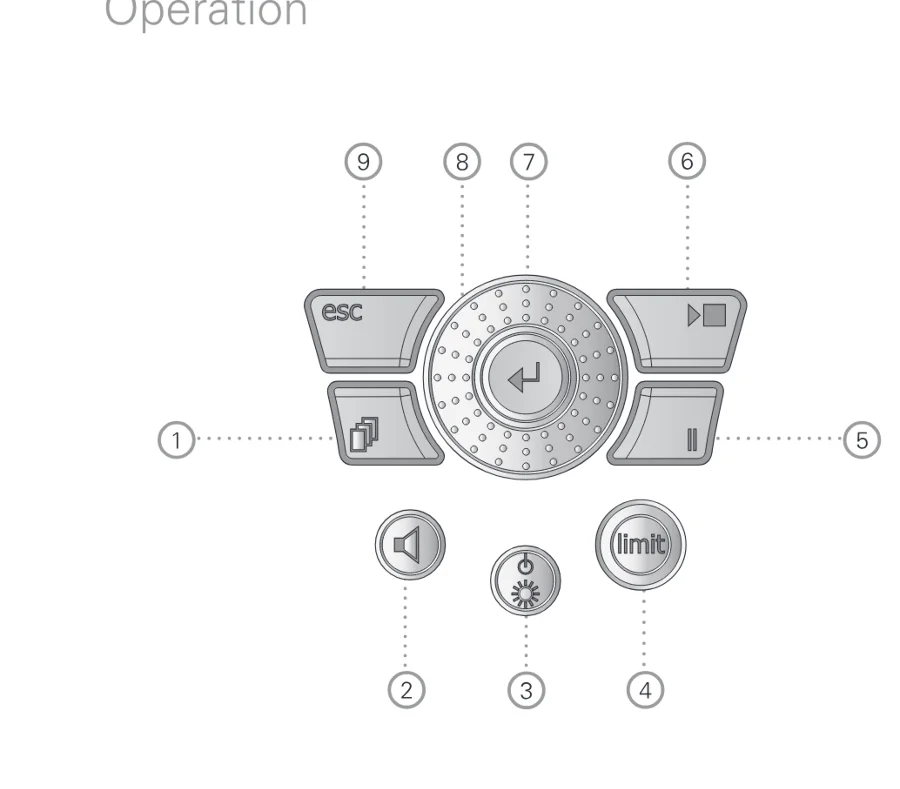
รูปที่ 3Figure 3 ปุ่มของ XL2 (หมายเลขตามคู่มือ NTi) ปุ่มบนเครื่องเป็นสัญลักษณ์ ชื่อด้านล่างคือชื่อที่คู่มือใช้XL2 keys (numbers as in NTi's manual). The keys carry symbols; the names below are the ones the manual uses - page เปลี่ยนหน้าของฟังก์ชันpage: switches the function's pages
- speaker กดสั้น = เปิด/ปิดลำโพงหรือหูฟัง กดค้าง = ปรับเสียงspeaker: short = speaker/headphone on/off; hold = volume
- power กด = เปิด กดค้าง 1 วินาที = ปิด กดสั้นระหว่างใช้ = ไฟจอpower: press = on, hold 1 s = off, short press in use = backlight
- limit ไฟ LED แสดงสถานะ Limitlimit: LED key showing the limit state
- pause หยุดชั่วคราวpause
- start/stop เริ่ม/หยุดวัด (กดค้าง 3 วินาที = Locked Run Mode)start/stop (hold 3 s = Locked Run Mode)
- enter ยืนยันenter confirms
- วงล้อ (rotary wheel) เลือกฟังก์ชันและค่าRotary wheel: selects functions and values
- escape (ESC) ยกเลิก กลับเมนูบน ปิดหน้าต่างescape (ESC): cancel, back to the top level, close
- STEP3
Calibrate กับ Sound CalibratorCalibrate with the sound calibrator
หมุนวงล้อไปที่แถบเมนูหลัก กด enter เลือก Calibrate หมุนไปที่ User Calibration กด enter แล้วตั้งระดับให้ตรงกับ Calibrator สวม Calibrator บนไมโครโฟน เปิดเครื่อง หมุนไปที่ RUN แล้วกด enter รอจนขึ้น Calibration: Successfully finished!Turn the wheel to the main menu bar, press enter, choose Calibrate. Turn to User Calibration, press enter and set the level to match your calibrator. Fit the calibrator on the microphone and switch it on, turn to RUN and press enter. Wait for Calibration: Successfully finished!
ข้อควรระวังWatch outใส่ค่าที่รวม free-field correction แล้ว เช่น M2230 กับ NTi Class 1 Calibrator ที่ 114.0 dB ให้ตั้ง 113.9 dBEnter the value including the free-field correction, e.g. M2230 with the NTi Class 1 calibrator at 114.0 dB → set 113.9 dB.
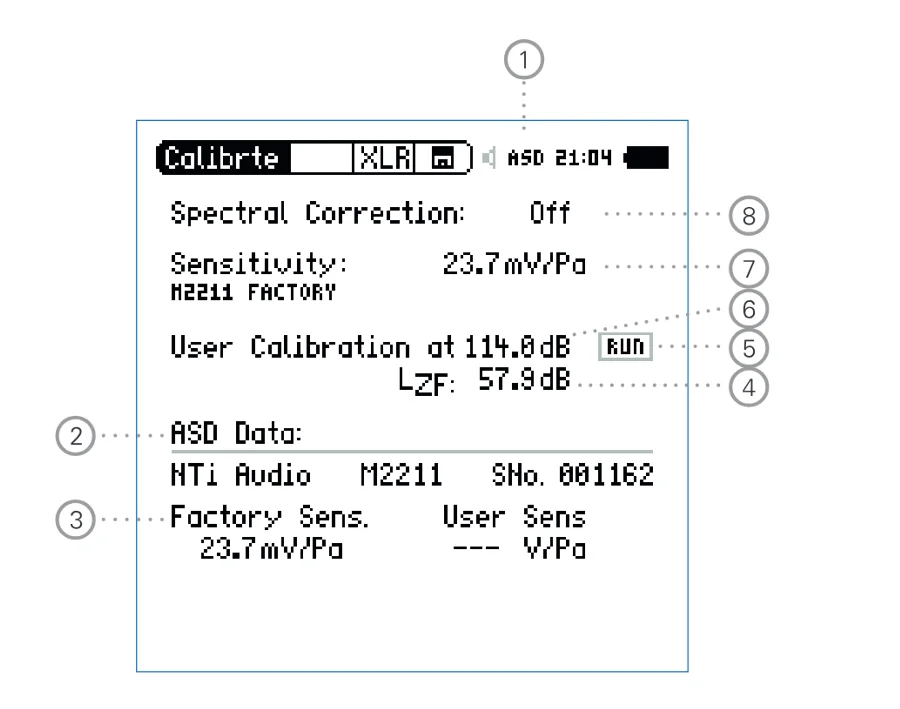
รูปที่ 4Figure 4 หน้าจอ Calibrate (หมายเลขตามคู่มือ NTi ภาพจากคู่มือสะกดหัวจอเป็น Calibrte)The Calibrate screen (numbers as in NTi's manual; the manual's screenshot spells the title Calibrte) - ไฟ Phantom: 48V / ASD / ปิดPhantom power: 48V / ASD / off
- ข้อมูล ASD ที่อ่านจากไมโครโฟนASD data read from the microphone
- ความไวจากโรงงานFactory sensitivity
- ระดับที่วัดได้ขณะ Calibrate (LZF หรือ LHP100F สำหรับกลางแจ้งที่มีลม)Level during calibration (LZF, or LHP100F outdoors in wind)
- RUN เริ่ม CalibrateRUN starts the calibration
- ระดับของ Calibrator (User Calibration)Calibrator level (User Calibration)
- Sensitivity ความไวที่ใช้อยู่Sensitivity in use
- Spectral Correction สำหรับชุดกันฝนหรือ diffuse fieldSpectral Correction for weather protection or diffuse field
- STEP4
เลือก SLMeter/RTAChoose SLMeter/RTA
หมุนวงล้อไปที่แถบเมนูหลัก กด enter หมุนไปที่ SLMeter/RTA แล้วกด enterTurn to the main menu bar, press enter, turn to SLMeter/RTA and press enter.
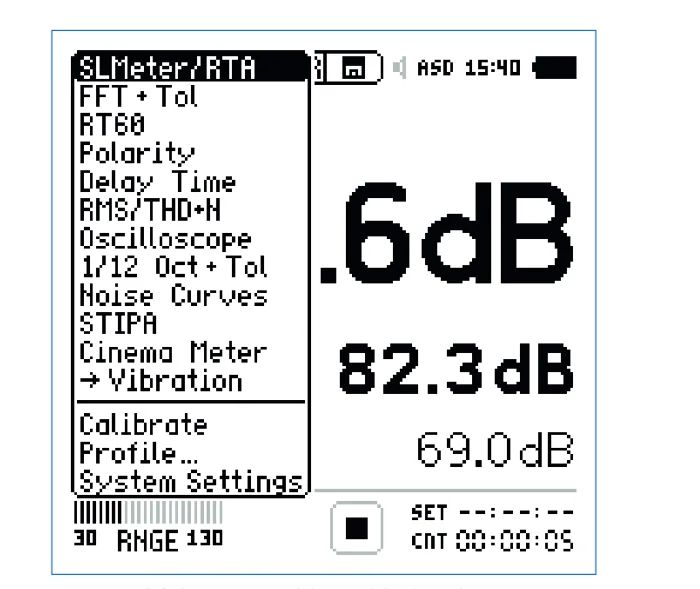
รูปที่ 5Figure 5 เมนูหลัก — ฟังก์ชันที่เห็นขึ้นกับ Option ที่ติดตั้ง (ภาพนี้คือเครื่องที่เปิด Option ครบ)Main menu: the functions shown depend on the installed options (this one has all options enabled) ภาพ: NTi Audio — XL2 Operating Manual V4.93.02 หน้า 20Image: NTi Audio — XL2 Operating Manual V4.93.02, p. 20 - STEP5
กด start แล้วดูหน้าจอPress start and watch the screen
กด start/stop ไอคอนสถานะจะเป็น RUN (หรือ LOG ถ้าเปิด Logging) เวลาเดินที่มุมล่างขวา ค่า LAeq คือค่าเฉลี่ยตั้งแต่เริ่มวัด ส่วน LAF คือค่าขณะนั้นPress start/stop: the status shows RUN (or LOG with logging on) and the time runs at the bottom right. LAeq is the average since the start; LAF is the current value.
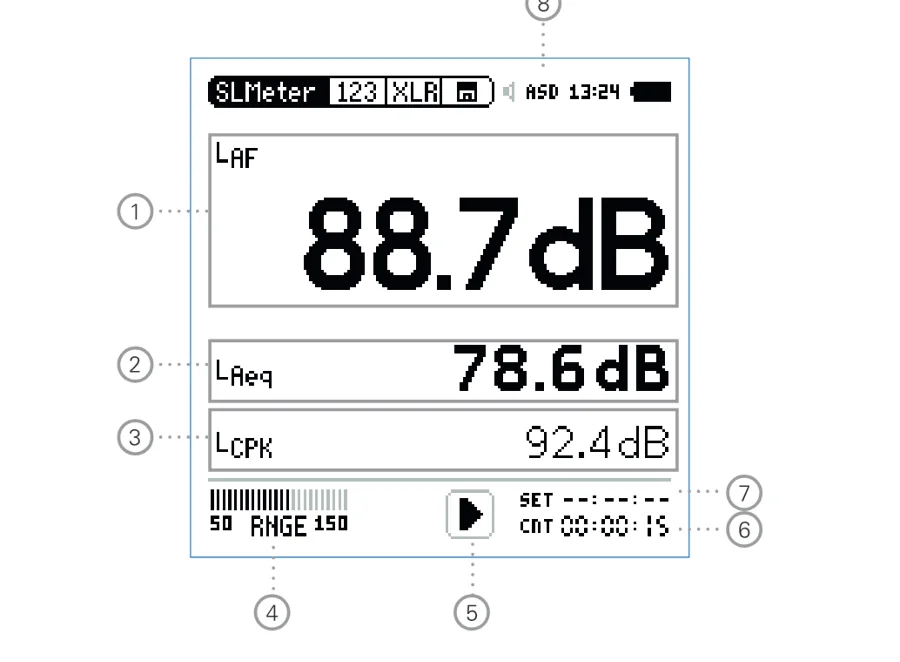
รูปที่ 6Figure 6 หน้าตัวเลข 123 SLMeter (หมายเลขตามคู่มือ NTi) — ระหว่างวัดดูว่าสถานะ (5) กำลังวัดและเวลา (6) เดินอยู่The 123 SLMeter page (numbers as in NTi's manual): while measuring, check the run status (5) and the time (6) - ผลที่ 1 (ตัวใหญ่) เลือกได้ว่าแสดงค่าอะไรResult 1 (large): you choose which value
- ผลที่ 2 และ 3Results 2 and 3
- ผลที่ 4 และ 5 (เมื่อใช้ตัวอักษรเล็ก)Results 4 and 5 (with smaller fonts)
- RNGE ช่วงอินพุตRNGE input range
- สถานะ: กำลังวัด / หยุดชั่วคราว / หยุดRun indication: running / paused / stopped
- เวลาที่วัดไปแล้วActual measurement time
- เวลาที่ตั้งไว้ (โหมด Single/Repeat)Preset measurement time (Single/Repeat)
- ไฟ Phantom / ASDPhantom power / ASD
- STEP6
กด stop แล้วบันทึกPress stop and save
กด start/stop อีกครั้งเพื่อหยุด แล้วกด enter ยืนยัน ข้อมูลถูกเก็บเป็นไฟล์ข้อความลง SD card การตั้ง Autosave ในเมนูหน่วยความจำบอกว่าเครื่องบันทึกเอง ถามก่อน (Assisted) หรือให้บันทึกเอง (Off)Press start/stop again to stop and enter to confirm: the data are stored on the SD card as text files. Autosave in the memory menu decides whether saving is automatic, asks first (Assisted) or is manual (Off).
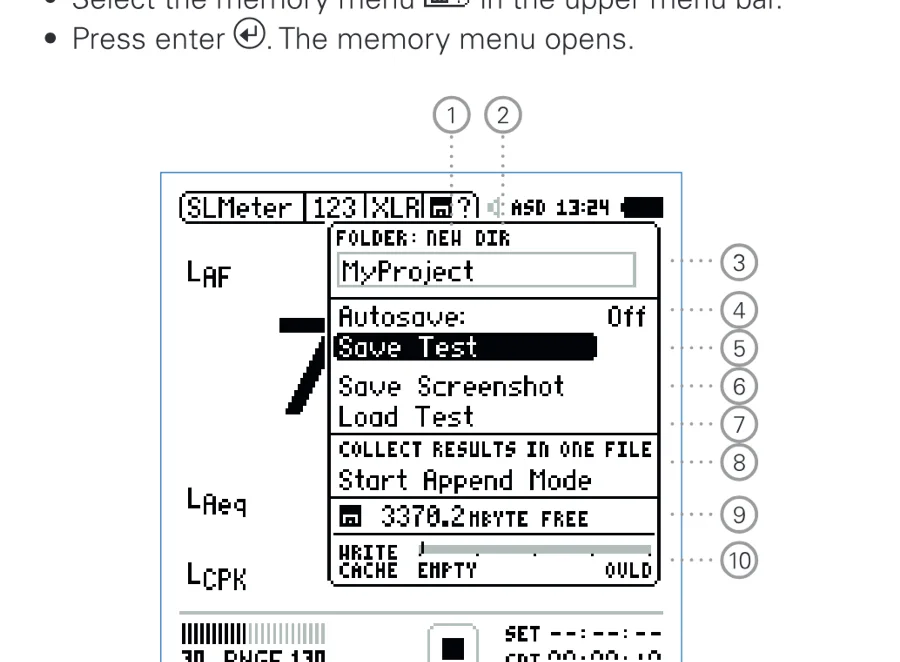
รูปที่ 7Figure 7 เมนูหน่วยความจำ (ไอคอนแผ่นดิสก์บนแถบบน) — หมายเลขตามคู่มือ NTiThe memory menu (disk icon in the top bar), numbers as in NTi's manual - สร้างโฟลเดอร์โปรเจกต์ใหม่ (ชื่อไม่เกิน 16 ตัวอักษร)Create a new project folder (max 16 characters)
- เลือกโฟลเดอร์โปรเจกต์Select the project folder
- ชื่อโฟลเดอร์ที่กำลังใช้Current project folder
- Autosave: On / Off / AssistedAutosave: On / Off / Assisted
- Save Test บันทึกเองSave Test: save by hand
- Save ScreenshotSave Screenshot
- Load Test เปิดผลที่บันทึกบนเครื่องLoad Test: reopen a saved result on the instrument
- Append Mode รวมหลายผลในไฟล์เดียวAppend Mode: several results in one file
- หน่วยความจำว่างFree memory
- Write Cache (XL2 Extended Acoustic Pack)Write Cache (XL2 Extended Acoustic Pack)
คุณมีผลวัดที่ผ่าน Calibration อยู่ใน SD card โฟลเดอร์ Projects แล้วYou now have a calibrated measurement in the SD card's Projects folder.
ต่อไป: รู้จักหน้าจอและการตั้งค่า →Next: the screen and settings →
01รู้จักเครื่องGET TO KNOW
รู้จักหน้าจอและการใช้งานวงล้อThe screen and the wheel
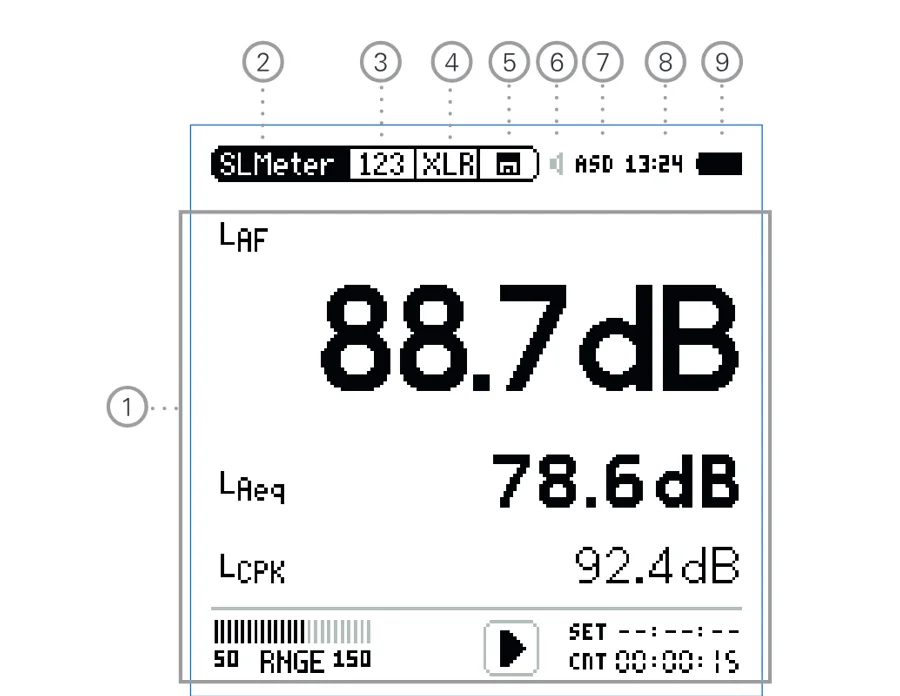
- ผลการวัดMeasurement results
- เมนูหลัก (เลือกฟังก์ชัน)Main menu (function)
- เลือกหน้าของฟังก์ชัน (หรือกดปุ่ม page)Page selector (or the page key)
- เลือกอินพุต XLR หรือ RCAInput selector: XLR or RCA
- เมนูหน่วยความจำ และสถานะ RUN / LOG / AUDMemory menu and RUN / LOG / AUD status
- ลำโพง/หูฟังSpeaker / headphone
- ไฟ Phantom: 48V / ASD / ปิดPhantom power: 48V / ASD / off
- นาฬิกาClock
- แบตเตอรี่Battery
- เลือกฟังก์ชัน: หมุนวงล้อไปที่แถบเมนูหลัก กด enter เลื่อนไปที่ฟังก์ชัน กด enterChoose a function: turn to the main menu bar, enter, scroll to the function, enter
- ตั้งค่า: หมุนไปที่ค่า (จะเป็นแถบดำ) กด enter (ค่ากะพริบหรือเปิดรายการ) หมุนเลือก แล้วกด enterSet a value: turn to it (it turns black), enter (it flashes or opens a list), turn to choose, enter
- เปลี่ยนหน้า: กดปุ่ม pageChange page: the page key
- การตั้งค่าหลายอย่างถูกล็อกระหว่างวัด เช่น ช่วงอินพุตและเวลาที่ตั้ง ให้หยุดวัดก่อนเปลี่ยนMany settings are locked while measuring (e.g. input range, preset time): stop first
ความคมชัดจอ: กด escape ค้างแล้วหมุนวงล้อDisplay contrast: hold escape and turn the wheel.
02ติดตั้งและเตรียมSET UP
เตรียมเครื่อง: ไฟ SD card เวลา และเฟิร์มแวร์Set up: power, SD card, time and firmware
| เรื่องItem | สิ่งที่ต้องรู้What to know |
|---|---|
| แบตเตอรี่Battery | สิ่งที่ต้องรู้What to knowLi-Po 3.7 V ใช้ได้มากกว่า 4 ชั่วโมง ชาร์จเต็มก่อนใช้ครั้งแรก ชาร์จด้วยอะแดปเตอร์ขณะปิดเครื่องประมาณ 6 ชั่วโมง ใช้และชาร์จที่ 0–45 °C ปิดเครื่องก่อนเปิดฝาแบตเตอรี่Li-Po 3.7 V, more than 4 h. Charge fully before first use; with the adapter and the XL2 off about 6 h. Use and charge at 0–45 °C; switch off before opening the battery cover |
| อะแดปเตอร์Mains adapter | สิ่งที่ต้องรู้What to knowใช้อะแดปเตอร์แบบ linear ของ NTi อะแดปเตอร์แบบสวิตชิงทำให้ THD+N แย่ลงราว 3 dB กับอินพุตไม่บาลานซ์Use NTi's linear adapter; switching supplies worsen THD+N by about 3 dB on unbalanced inputs |
| SD cardSD card | สิ่งที่ต้องรู้What to knowต้องมีเสมอ ใช้การ์ดของ NTi หรือการ์ดที่ทดสอบแล้ว การ์ดทั่วไปบางรุ่นหยุดเขียนนานกว่า 10 วินาทีจนข้อมูลหาย ฟอร์แมตด้วย SDFormatterAlways needed; use NTi or tested cards (some retail cards pause >10 s and lose data); format with SDFormatter |
| วันที่และเวลาDate and time | สิ่งที่ต้องรู้What to knowSystem › หน้า Set: Time Zone, DST, Date, TimeSystem › Set page: Time Zone, DST, Date, Time |
| ลำโพงหลังเครื่องRear speaker | สิ่งที่ต้องรู้What to knowNTi แนะนำให้ปิด (System › Speaker) ในงานวัดเสียงเพื่อกันเสียงหอนNTi recommends disabling it (System › Speaker) for acoustic measurements to avoid feedback |
| เฟิร์มแวร์Firmware | สิ่งที่ต้องรู้What to knowดูที่ System › หน้า Inf อัปเดตโดยคัดลอกไฟล์ XL2Vxxx.xx ลง root ของ SD card ผ่าน Mass storage แล้วเปิดเครื่อง การอัปเดตคืนค่าการตั้งทั้งหมดเป็นค่าโรงงานSystem › Inf page. Update by copying XL2Vxxx.xx to the SD card root over Mass storage and switching on; updating resets all settings to factory default |
อย่าเดาเวอร์ชันเฟิร์มแวร์ "ล่าสุด" จากคู่มือ ให้เปิดไฟล์ XL2.htm ใน SD card (หน้า XL2 Instrument Status) แล้วใช้ลิงก์ Look for FW Updates เพื่อเทียบกับหน้า support ของ NTiDo not take a "latest" firmware number from the manual: open XL2.htm on the SD card (XL2 Instrument Status) and use Look for FW Updates to compare with NTi's support page.
03ตรวจสอบCHECK
Calibration และไมโครโฟนCalibration and the microphone
NTi แนะนำให้ตรวจกับ Sound Calibrator ทุกวันก่อนวัด และสอบเทียบเครื่องพร้อมไมโครโฟนปีละครั้งNTi recommends a calibrator check every day before measuring and an annual calibration of the XL2 with its microphone.
- STEP1
ให้เครื่องปรับตัวกับสภาพแวดล้อมLet the equipment acclimatise
รอประมาณ 10 นาทีหลังอุณหภูมิเปลี่ยน 10 °C หรือความชื้นเปลี่ยน 30 % ขณะ Calibrate ที่ 114 dB เสียงรอบข้างต้องต่ำกว่า 89 dB กลางแจ้งที่มีลมเลือก Level Type เป็น LHP100F เพื่อกรองเสียงความถี่ต่ำWait about 10 minutes after a 10 °C temperature or 30 % humidity change. At 114 dB the background must be below 89 dB. Outdoors in wind, set the level type to LHP100F to suppress low-frequency noise.
- STEP2
ใส่ระดับ Calibrator ที่ถูกต้องEnter the correct calibrator level
ค่ามาตรฐานของเครื่องคือ 114 dB ตั้งได้ 0–200 dB ใส่ระดับตาม Calibrator ของคุณรวม free-field correction เช่น M2230/M2340/M2211/M2215 กับ NTi Class 1 Calibrator ใช้ −0.1 dB (114.0 → 113.9 dB)The reference is 114 dB, settable 0–200 dB. Enter your calibrator's level including the free-field correction, e.g. M2230/M2340/M2211/M2215 with the NTi Class 1 calibrator: −0.1 dB (114.0 → 113.9 dB).
- STEP3
RUN แล้วรอข้อความสำเร็จRUN and wait for success
เลือก RUN กด enter หน้าต่าง Calibration running ... จะเปลี่ยนเป็น Successfully finished! ค่าความไวใหม่ถูกเขียนลงข้อมูล ASD ของไมโครโฟน และวันที่ Calibrate จะอยู่ในหัวไฟล์รายงานทุกไฟล์Select RUN, press enter: Calibration running ... changes to Successfully finished! The new sensitivity is written into the microphone's ASD data, and the calibration date appears in every report header.
ถ้าเครื่องขึ้นข้อความ Measured sensitivity to far ... ความไวต่างจากค่าโรงงานเกิน ±1.5 dB (Class 1) หรือ ±3 dB (Class 2) ให้ตรวจระดับ Calibrator ที่ใส่และไมโครโฟน อย่าวัดต่อIf the XL2 shows Measured sensitivity to far ..., the sensitivity differs from factory by more than ±1.5 dB (Class 1) or ±3 dB (Class 2): check the calibrator level and the microphone before measuring.
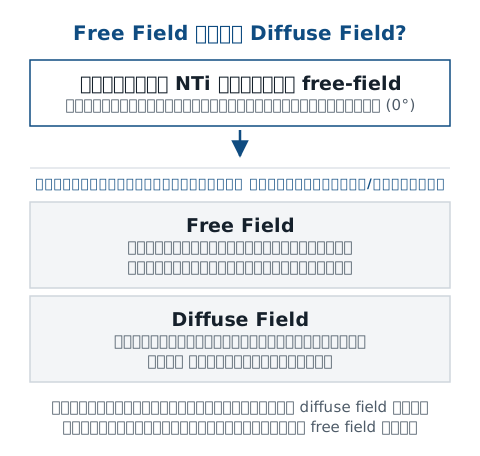
Spectral Correction (ชุดกันฝน WP30/WP40 หรือ diffuse field) จะเห็นในหน้าจอ Calibrate ก็ต่อเมื่อเปิด System › Show Spec. Corr. ก่อน ชื่อ Community ใช้กับเสียงที่เข้าแนวนอน ส่วน Aircraft ใช้กับเสียงที่มาจากด้านบนSpectral Correction (WP30/WP40 weather protection or diffuse field) only appears on the Calibrate screen after System › Show Spec. Corr. is enabled. Community is for horizontal sound incidence, Aircraft for sound from above.
04วัดMEASURE
วัดด้วย SLMeter/RTAMeasuring with SLMeter/RTA
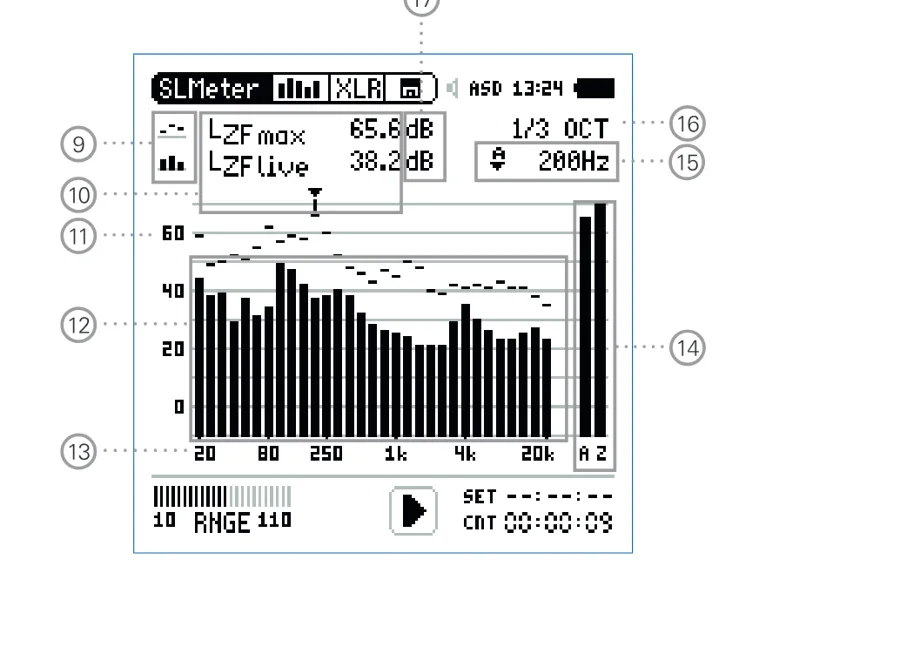
XL2 วัดและบันทึกทุกค่าพร้อมกัน (A/C/Z, F/S, Leq, Lmax, Lmin, Lpeak และสเปกตรัม) สิ่งที่คุณเลือกบนจอคือค่าที่จะ "แสดง" เท่านั้นThe XL2 measures and logs everything at once (A/C/Z, F/S, Leq, Lmax, Lmin, Lpeak and spectra); what you choose on screen is only what is displayed.
- STEP1
เลือกช่วงอินพุตให้ถูกChoose the right input range
ตั้ง RNGE เป็นช่วงต่ำสุดที่ยังครอบคลุมระดับสูงสุดที่คาดไว้ ตัวอย่าง M2230 (42 mV/Pa): Low 0–100, Mid 20–120, High 40–140 dBSPL ถ้าขึ้น `<` แปลว่าต่ำกว่าช่วงเชิงเส้น ถ้าขึ้น OVR แปลว่าเกินช่วงSet RNGE to the lowest range that still covers the loudest expected level, e.g. M2230 (42 mV/Pa): Low 0–100, Mid 20–120, High 40–140 dBSPL. `<` means below the linear range; OVR means overload.
- STEP2
เลือกค่าที่แสดงChoose the displayed values
หมุนไปที่ค่า กด enter แล้วเลือกตามลำดับ FREQ WEIGHTING → TIME WEIGHTING → PARAMETER (live, max, min …) → CORRECTION กด enter 1, 2 หรือ 3 ครั้งบนค่าเพื่อเปลี่ยนขนาดตัวอักษรTurn to a value, press enter and choose FREQ WEIGHTING → TIME WEIGHTING → PARAMETER (live, max, min …) → CORRECTION. Press enter 1, 2 or 3 times on a value to change its font size.
- STEP3
ตั้ง TimerSet the timer
เลือก continuous (วัดจนกดหยุด), single (หยุดเองเมื่อครบเวลา) หรือ repeat (วัดเป็นรอบ) เวลาวัดสั้นสุด 1 วินาทีChoose continuous (until stopped), single (stops after the preset time) or repeat (cycles). Minimum integration time 1 s.
บันทึก log ระหว่างวัดLogging during the measurement
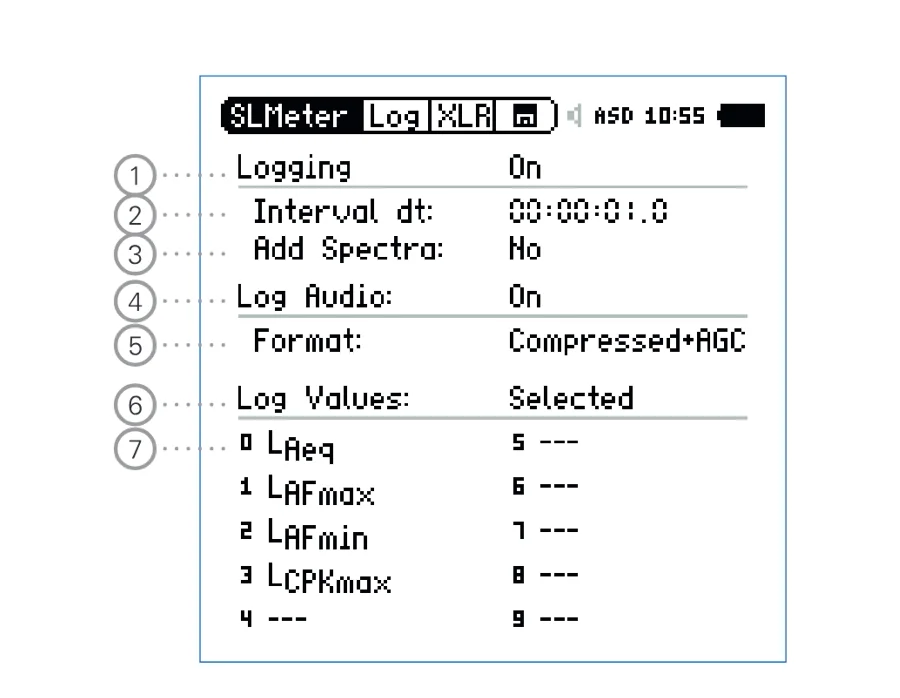
- Logging On/OffLogging On/Off
- Interval dt (ค่าเริ่มต้น 1 s; 100 ms ต้องมี XL2 Extended Acoustic Pack)Interval dt (default 1 s; 100 ms needs the XL2 Extended Acoustic Pack)
- Add Spectra บันทึกสเปกตรัมใน logAdd Spectra in the log
- Log Audio Off / On / Events OnlyLog Audio: Off / On / Events Only
- Format ไฟล์เสียง (24 bit ต้องมี XL2 Extended Acoustic Pack)Audio Format (24 bit needs the XL2 Extended Acoustic Pack)
- Log Values ALL หรือ SelectedLog Values: ALL or Selected
- รายการค่าที่เลือก (สูงสุด 10)Selected values (up to 10)
ปุ่ม pause ระหว่าง logging: log ยังเดินต่อและช่วงหยุดถูกบันทึกไว้ใน logpause while logging: the log keeps running and the paused stretch is marked in it.
การเลือก Fast หรือ Slow ขึ้นกับลักษณะเสียง วัตถุประสงค์ และมาตรฐานหรือข้อกำหนดที่ใช้ ถ้ามาตรฐานระบุค่าเช่น LAFmax ให้ใช้ตามนั้นก่อน อ่านเพิ่ม: Fast, Slow, ImpulseFast or Slow depends on the sound, the purpose and the applicable standard or requirement; if a standard names a quantity such as LAFmax, follow it first. More: Fast, Slow, Impulse.
05บันทึกSAVE
บันทึกผล ไฟล์ และโฟลเดอร์Saving, files and folders
| Autosave | หลังกด stopAfter stop |
|---|---|
| OnOn | หลังกด stopAfter stopตั้งชื่อและบันทึกลงโฟลเดอร์ที่เลือกให้เองNamed and saved automatically in the selected folder |
| AssistedAssisted | หลังกด stopAfter stopถามทุกครั้งว่าจะเก็บหรือลบAsks each time: keep or delete |
| OffOff | หลังกด stopAfter stopมีเครื่องหมาย ? ที่แถบบน ต้องบันทึกเองด้วย Save TestA ? appears in the top bar; save by hand with Save Test |
ไฟล์อยู่ใน SD card › Projects › โฟลเดอร์ของคุณ (ค่าเริ่มต้น MyProject) ชื่อไฟล์เป็นแบบ ชื่อ_ฟังก์ชัน_เลขลำดับ เช่น MyTest_SLM_000_123_Report.txt (รายงาน) และ MyTest_SLM_000_123_Log.txt (log) ไฟล์เป็นข้อความคั่นด้วย tab เปิดด้วย Excel ได้ ห้ามแก้ไขโฟลเดอร์ XL2_SYSFiles are in SD card › Projects › your folder (default MyProject), named name_function_number, e.g. MyTest_SLM_000_123_Report.txt (report) and MyTest_SLM_000_123_Log.txt (log). They are tab-separated text for Excel. Never edit the XL2_SYS folder.
ถ้าไฟดับระหว่าง logging ข้อมูลถึงจุดนั้นจะอยู่ในโฟลเดอร์ RESTORE_AFTER_POWERFAIL NTi แนะนำให้สำรองข้อมูลลง PC ทุกวันIf power fails while logging, data up to that point are in RESTORE_AFTER_POWERFAIL. NTi recommends backing up to a PC every day.
06โอนข้อมูลTRANSFER
โอนข้อมูลเข้าคอมพิวเตอร์Transferring data to a computer
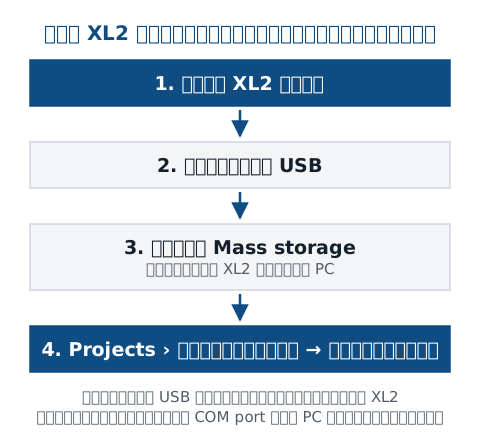
- Mass storage: PC เห็น SD card เป็นไดรฟ์ ใช้คัดลอกรายงาน อัปเดตเฟิร์มแวร์ และติดตั้ง OptionMass storage: the PC sees the SD card as a drive (reports, firmware, options)
- COM port: สำหรับ Projector PRO และ XL2 Remote Measurement Option (Scheduler ก็สลับเป็น COM port เอง)COM port: for Projector PRO and the XL2 Remote Measurement Option (the Scheduler also switches to COM port)
- ทางเลือกที่เร็วกว่า: ถอด SD card ใส่ card readerFaster alternative: remove the SD card and use a card reader
- ถ้า PC ไม่เห็นไฟล์บางไฟล์: คลิกขวาที่ไดรฟ์ NTi Audio XL2 › Properties › Check Now (Windows)If files are missing on the PC: right-click the NTi Audio XL2 drive › Properties › Check Now (Windows)
07รายงานREPORT
วิเคราะห์และทำรายงานAnalysis and reports
| งานJob | โปรแกรม / สิ่งที่ต้องมีProgram / needs |
|---|---|
| log ระดับเสียง markers รายงานSound level logs, markers, reports | โปรแกรม / สิ่งที่ต้องมีProgram / needsData Explorer — Data Explorer Option หรือ Data Explorer 365Data Explorer: Data Explorer Option or 365 |
| การกันเสียงSound insulation | โปรแกรม / สิ่งที่ต้องมีProgram / needsSound Insulation Reporter — XL2 Sound Insulation Option หรือ SIR 365 (RT 1/3 ออกเตฟต้องมี XL2 Extended Acoustic Pack)Sound Insulation Reporter: XL2 Sound Insulation Option or SIR 365 (1/3-octave RT needs the XL2 Extended Acoustic Pack) |
| เวลาเสียงก้องReverberation time | โปรแกรม / สิ่งที่ต้องมีProgram / needsRoom Acoustics Reporter — Room Acoustics Option หรือ RAR 365Room Acoustics Reporter: Room Acoustics Option or RAR 365 |
| กำลังเสียงSound power | โปรแกรม / สิ่งที่ต้องมีProgram / needsSound Power Reporter — Sound Power Option หรือ SPR 365Sound Power Reporter: Sound Power Option or SPR 365 |
| แสดงผลบนจอใหญ่Big-screen display | โปรแกรม / สิ่งที่ต้องมีProgram / needsProjector PRO ผ่าน USB แบบ COM portProjector PRO over USB in COM port mode |
| STIPASTIPA | โปรแกรม / สิ่งที่ต้องมีProgram / needsSTI Reporting Tool (Excel) สำหรับผู้ที่ลงทะเบียนเครื่องSTI Reporting Tool (Excel) for registered users |
08ใช้ร่วมกับเครื่องมืออื่นWORKFLOWS
วัดเวลาเสียงก้อง (RT60)Reverberation time (RT60)
RT60 แบบออกเตฟมีในเครื่องมาตรฐาน แบบ 1/3 ออกเตฟต้องมี XL2 Extended Acoustic Pack วิธีวัดคือ T20 หรือ T30Octave RT60 is standard; 1/3 octaves need the XL2 Extended Acoustic Pack. Method: T20 or T30.
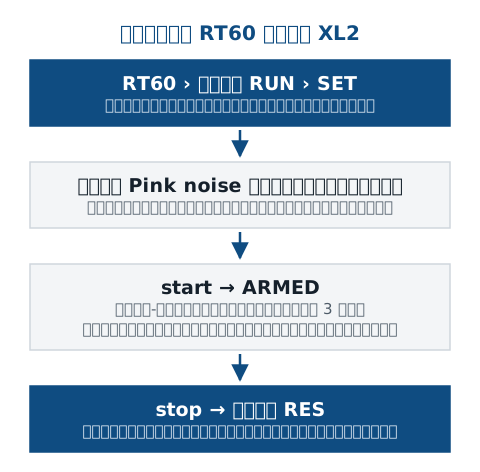
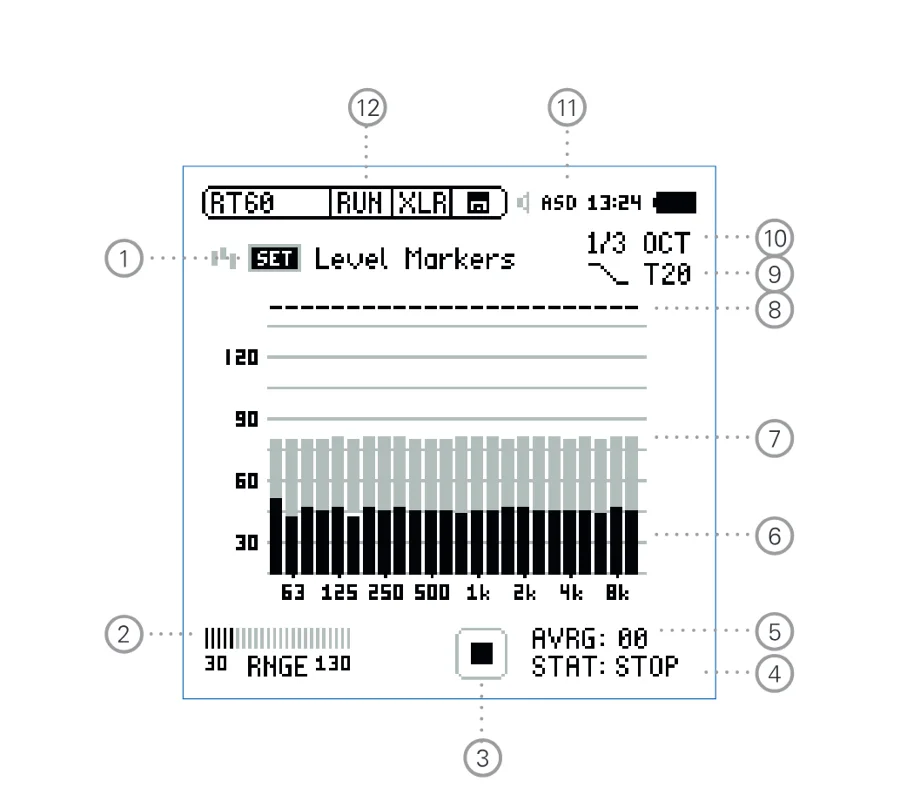
- SET วัดเสียงพื้นหลังเพื่อสร้าง Level MarkersSET measures the background to create the level markers
- ช่วงอินพุตInput range
- สถานะการวัดRun indication
- STAT: ARMED / NOISE / DECAY / PAUSE / STOPSTAT: ARMED / NOISE / DECAY / PAUSE / STOP
- AVRG จำนวนรอบที่เฉลี่ยAVRG: cycles averaged
- สเปกตรัมปัจจุบันActual real-time spectrum
- เครื่องหมายระดับLevel markers
- สถานะแต่ละย่านBand status
- วิธี T20 / T30Method T20 / T30
- ความละเอียด 1/1 หรือ 1/3 OCTResolution 1/1 or 1/3 OCT
- ไฟ PhantomPhantom power
- เลือกหน้าPage selector
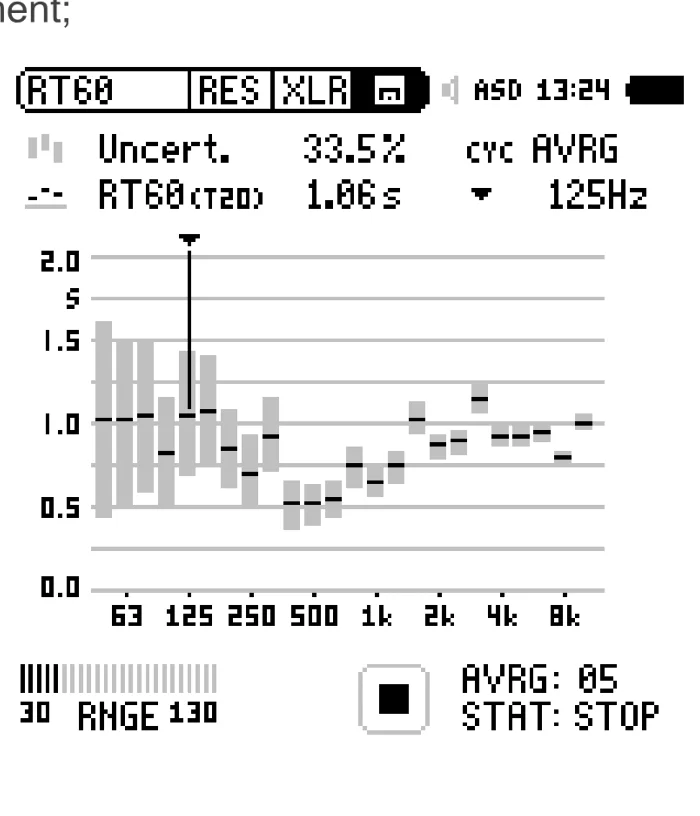
สวมอุปกรณ์ป้องกันการได้ยินขณะเปิด Pink noise ถ้าขึ้น LOW LEVL สัญญาณเบาเกินหรือช่วงสลายตัวใต้เครื่องหมายสั้นเกิน ถ้าขึ้น T>18S มักเป็นเพราะเลือกช่วงผิดหรือมีเสียงพื้นหลัง ให้ SET ใหม่Wear hearing protection with pink noise. LOW LEVL = signal too low or too little decay below the markers; T>18S usually means a wrong range or background noise: SET again.
09ใช้ร่วมกับเครื่องมืออื่นWORKFLOWS
STIPA (ต้องมี XL2 STIPA Option)STIPA (XL2 STIPA Option)
- เลือก STIPA ทำให้บริเวณเงียบ ไม่มีคนพูดใกล้ไมโครโฟนChoose STIPA; keep the area quiet, nobody talking near the microphone.
- เล่นสัญญาณ STIPA ต้นฉบับของ NTi (TalkBox, MR-PRO หรือเครื่องเล่นที่ความเร็วถูกต้อง) ที่ระดับการประกาศจริงPlay the original NTi STIPA signal (TalkBox, MR-PRO or a player at the correct speed) at the real announcement level.
- กด start วัด 15 วินาที สถานะเป็น RUNNING แล้ว FINISHED ผลถูกบันทึกเอง กด enter ยืนยันPress start: 15 s, RUNNING then FINISHED, saved automatically; press enter.
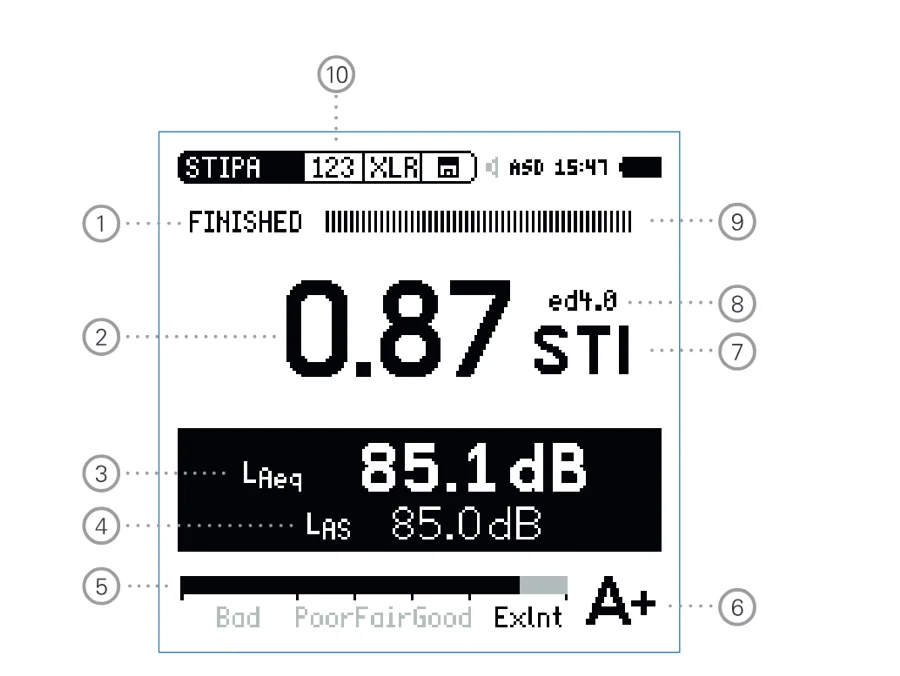
- สถานะ (RUNNING / FINISHED)Run indication (RUNNING / FINISHED)
- ผล STISTI result
- LAeqLAeq
- LASLAS
- แถบผลการทดสอบResult bargraph
- ระดับคุณภาพ A+ … UQualification scale A+ … U
- หน่วย STI หรือ CISUnit STI or CIS
- ฉบับของ IEC 60268-16Edition of IEC 60268-16
- แถบความคืบหน้าProgress bar
- เลือกหน้าPage selector
ถ้าผลกะพริบเป็น ?.?? การวัดใช้ไม่ได้ ถ้ามี ? ที่ย่านใด แปลว่าสัญญาณหาย มีเสียงรบกวนเปลี่ยนแปลง หรือเสียงกระแทก ให้หาสาเหตุแล้ววัดใหม่A flashing ?.?? means the measurement is invalid; a ? on a band means missing signal, changing or impulsive noise: find the cause and repeat.
10ใช้ร่วมกับเครื่องมืออื่นWORKFLOWS
Polarity และ Delay Time ร่วมกับ MR-PROPolarity and delay time with the MR-PRO
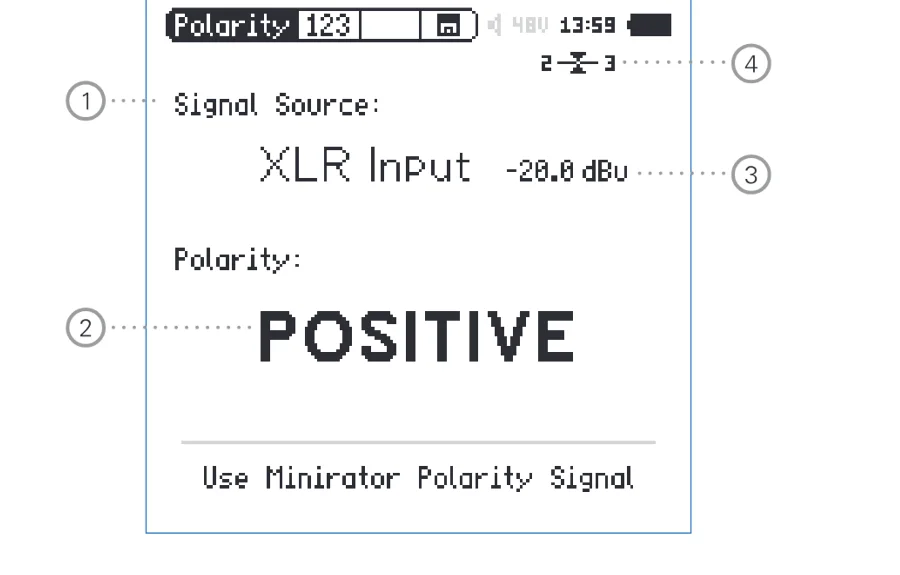
- เลือกแหล่งสัญญาณ (Voice Note Mic, XLR Input, RCA Input)Signal source (Voice Note Mic, XLR Input, RCA Input)
- ผล: POSITIVE / NEGATIVE / ???Result: POSITIVE / NEGATIVE / ???
- ระดับ RMSRMS level
- ตัวบอกบาลานซ์Balance indicator
- Polarity: ป้อนสัญญาณ Polarity ของ Minirator เข้าลำโพงข้างเดียว วัดและบันทึกภาพหน้าจอ แล้วทำกับอีกข้างเทียบกัน ลำโพงหลายทางอาจมีขั้วต่างกันในตัวได้โดยตั้งใจPolarity: feed the Minirator polarity signal to one cabinet, measure and save a screenshot, then the other and compare. Drivers in one cabinet may legitimately differ.
- Delay Time: ใช้ไมโครโฟน Voice Note ในเครื่องเท่านั้น (ไม่ต่อไมโครโฟนวัด) ต่อ Minirator เข้ากับ XL2 ให้ซิงก์จนแถบเต็มแล้วถอดสาย วัดลำโพง A แล้ว Store วัดลำโพง B เครื่องคำนวณผลต่างให้Delay Time: uses the internal Voice Note microphone only (no measurement microphone). Connect the Minirator to sync until the bar is full, unplug, measure speaker A and Store, then B: the difference is calculated.
ขั้นตอนฝั่ง MR-PRO อยู่ใน คู่มือการใช้งาน MR-PROThe MR-PRO side is in the MR-PRO user guide.
11ใช้ร่วมกับเครื่องมืออื่นWORKFLOWS
งานกันเสียงในอาคารBuilding acoustics (sound insulation)
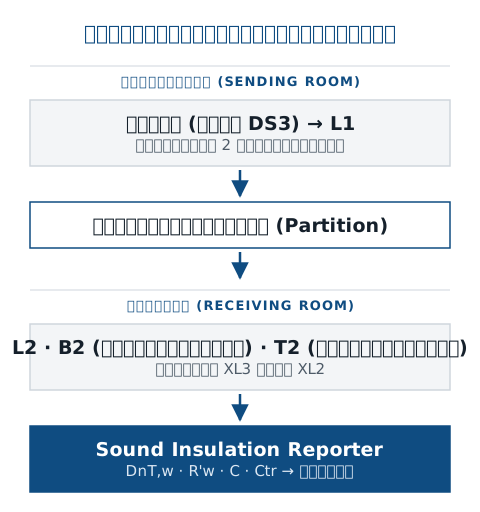
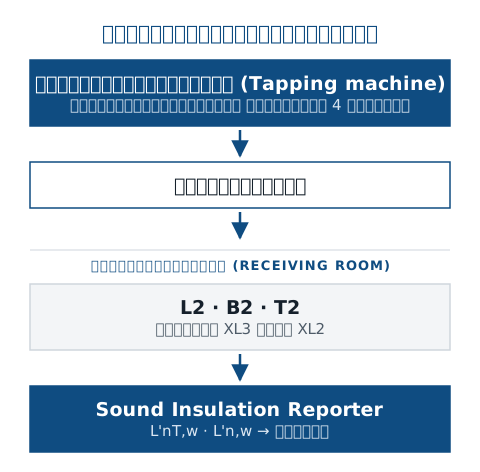
บน XL2 วัดระดับด้วย SLMeter หน้า RTA แบบ 1/3 ออกเตฟ ถ่วงน้ำหนัก Z และวัด T2 ด้วย RT60 แบบ 1/3 ออกเตฟ บันทึกด้วย Save Test › Sound-Insul ขั้นตอนเต็มอยู่ใน คู่มือ Sound Insulation ReporterOn the XL2 measure levels with SLMeter, RTA page, 1/3 octave, Z-weighted, and T2 with RT60 in 1/3 octaves; save with Save Test › Sound-Insul. Full procedure: Sound Insulation Reporter guide.
12ใช้ร่วมกับเครื่องมืออื่นWORKFLOWS
วัดการสั่นสะเทือน (XL2 Vibration Option)Vibration (XL2 Vibration Option)
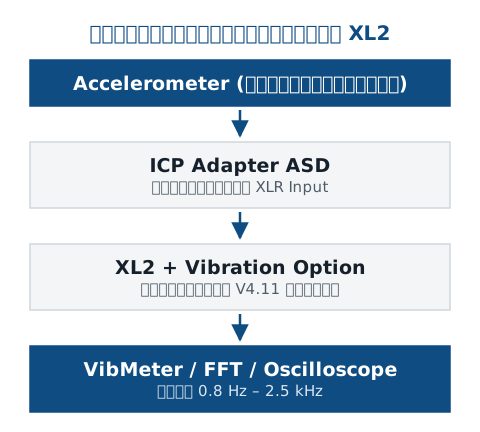
รายละเอียดการวัดการสั่นสะเทือนด้วย XL2 อยู่ในหน้า XL2 Vibration MeterDetails of vibration measurement with the XL2 are on the XL2 Vibration Meter page.
13แก้ปัญหาTROUBLESHOOT
ปัญหาที่พบบ่อยและวิธีแก้Common problems and fixes
| อาการSymptom | สาเหตุ / วิธีแก้Cause / fix |
|---|---|
| Missing SD-Card / เครื่องไม่ทำงานMissing SD-Card / will not run | สาเหตุ / วิธีแก้Cause / fixใส่ SD cardInsert an SD card |
| SD-Card is not FAT formatted / SD-Card is fullSD-Card is not FAT formatted / SD-Card is full | สาเหตุ / วิธีแก้Cause / fixฟอร์แมตด้วย SDFormatter / คัดลอกข้อมูลออกแล้วลบFormat with SDFormatter / copy the data off and empty the card |
| PC เห็นเป็น COM port ไม่เห็นไฟล์PC shows COM port, no files | สาเหตุ / วิธีแก้Cause / fixเปิด XL2 ก่อน แล้วค่อยเสียบ USB เลือก Mass storageSwitch the XL2 on first, then plug in USB and choose Mass storage |
| เครื่องเปิดมาแบบฟังก์ชันจำกัดStarts with limited functions | สาเหตุ / วิธีแก้Cause / fixมี Profile ใช้งานอยู่: EXIT Profile หรือรีเซ็ตเป็นค่าโรงงาน (ปิดเครื่อง กด escape ค้างแล้วกด power)A profile is active: EXIT Profile, or factory reset (off, hold escape and press power) |
| ขึ้น < หรือ OVR< or OVR shown | สาเหตุ / วิธีแก้Cause / fixเปลี่ยนช่วงอินพุตให้ต่ำลง (<) หรือสูงขึ้น (OVR)Choose a lower (<) or higher (OVR) input range |
| Error 900 / 901Error 900 / 901 | สาเหตุ / วิธีแก้Cause / fixรีเซ็ตเป็นค่าโรงงาน ถ้าเกิดบ่อยให้แจ้ง NTi หรือเราFactory reset; report to NTi or us if frequent |
| วันที่และเวลาหายหลังปิดเครื่องDate/time lost after switching off | สาเหตุ / วิธีแก้Cause / fixแบตเตอรี่นาฬิกาภายใน (อายุราว 8–9 ปี) ส่งเข้ารับบริการInternal clock battery (about 8–9 years): return for service |
| เสียงหอนขณะวัดFeedback while measuring | สาเหตุ / วิธีแก้Cause / fixปิดลำโพงหลังเครื่อง System › SpeakerDisable the rear speaker: System › Speaker |