QUICK STARTเริ่มใช้งานใน 5–10 นาทีUp and running in 5–10 minutes
ลองโปรแกรมด้วยข้อมูลตัวอย่างของ NTiTry the program with NTi's demo data
ก่อนวัดเครื่องจริง ให้ลองเส้นทางทั้งหมดกับข้อมูลตัวอย่างก่อน ภายในไม่กี่นาทีคุณจะเห็นว่าโปรแกรมแยกเสียงเครื่องกับเสียงพื้นหลังอย่างไร ค่าแก้ K1 K2 อยู่ตรงไหน และตัวเลข LWA มาจากไหนBefore you test a real machine, walk the whole path with demo data. In a few minutes you will see how the program separates machine noise from background, where the K1 and K2 corrections sit and where the LWA figure comes from.
ต้องมีอะไรบ้างก่อนเริ่มWhat you need before you start
- PC ที่ใช้ Windows (หน้าผลิตภัณฑ์ของ NTi ระบุ Windows Vista, 7, 8.x, 10, 11)A Windows PC (NTi's product page lists Windows Vista, 7, 8.x, 10, 11)
- ไฟล์ติดตั้ง Sound Power Reporter และไฟล์ Demo Data จากหน้าผลิตภัณฑ์ของ NTi Audio (ตัวโปรแกรมใช้ได้ฟรี ส่วนการนำเข้าข้อมูลจากเครื่องของคุณต้องมี License)The Sound Power Reporter installer and the Demo Data file from NTi Audio's product page (the program is free; importing your own instrument data needs a licence)
- การเชื่อมต่ออินเทอร์เน็ต สำหรับดาวน์โหลดและการตรวจ License ตอนนำเข้าข้อมูลของคุณเองภายหลังAn internet connection, for the downloads and, later, the licence check when you import your own data
- STEP1
ติดตั้งแล้วเปิดโปรแกรมInstall and open the program
ดาวน์โหลดไฟล์ติดตั้งจากหน้า Sound Power Reporter ของ NTi Audio ติดตั้งตามขั้นตอนปกติของ Windows แล้วเปิดโปรแกรมDownload the installer from NTi Audio's Sound Power Reporter page, install it the usual Windows way and start the program.
ข้อควรระวังWatch outติดตั้งได้หลายเครื่อง จะลงทั้งเครื่องสำนักงานและโน้ตบุ๊กหน้างานก็ได้It can be installed on several computers, so the office PC and the site laptop can both have it.
- STEP2
เตรียมข้อมูลตัวอย่างGet the demo data ready
ดาวน์โหลดไฟล์ Demo Data (ไฟล์ .zip) จากหน้าผลิตภัณฑ์ แตกไฟล์ไว้ในโฟลเดอร์ที่หาเจอง่าย แล้วเปิดดูว่าข้างในมีอะไรDownload the Demo Data (.zip) from the product page, unzip it into a folder you can find easily and look at what is inside.
- STEP3
สร้างโปรเจกต์ใหม่Create a new project
ในโปรแกรมนี้ หนึ่งโปรเจกต์คือเครื่องที่ทดสอบหนึ่งเครื่อง เลือกมาตรฐาน (ถ้าไม่แน่ใจว่าข้อมูลตัวอย่างวัดตามฉบับใด เริ่มจาก ISO 3744 ซึ่งเป็นตัวอย่างในภาคผนวกของคู่มือ) ความละเอียดความถี่ ช่วงความถี่ ผลที่ต้องการ และหน่วย แล้วกด OKIn this program one project is one device under test. Choose the standard (if you are not sure which one the demo used, start with ISO 3744, the example in the manual's appendix), the frequency resolution, frequency range, results and unit, then press OK.
ในโปรแกรมIn the programFile › New... › Standard, Resolution, Frequency Range, Results, Unit › OKFile › New... › Standard, Resolution, Frequency Range, Results, Unit › OK
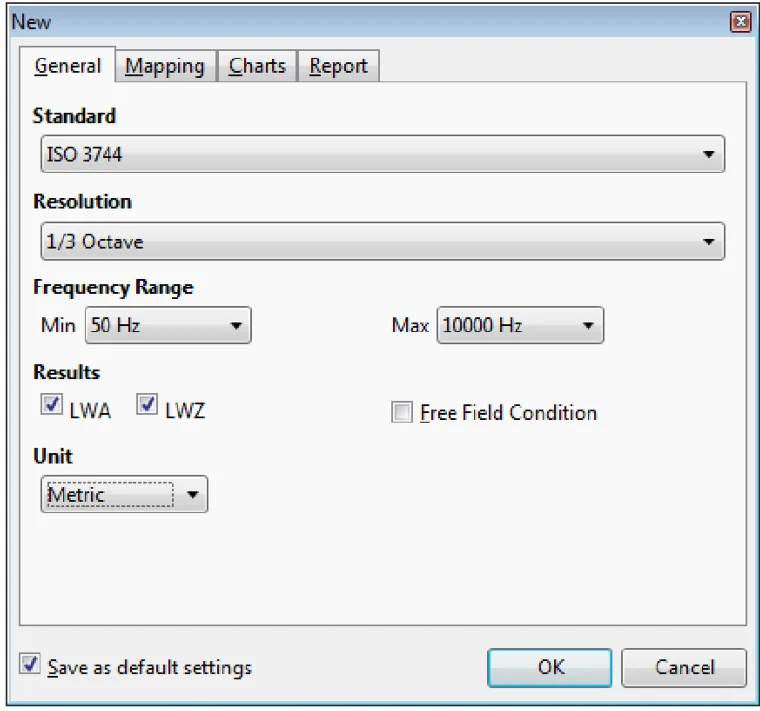
รูปที่ 2Figure 2 หน้าต่าง New: เลือก Standard, Resolution, Frequency Range, Results และ Unit แล้วกด OK — หนึ่งโปรเจกต์คือหนึ่งเครื่องที่ทดสอบ (ภาพจากคู่มือ V1.10.00 หน้าจอโปรแกรมรุ่น 1.0.4)The New dialog: choose Standard, Resolution, Frequency Range, Results and Unit, then OK. One project is one device under test (from manual V1.10.00; program screen version 1.0.4) ภาพ: NTi Audio — คู่มือ Sound Power Reporter for XL2 V1.10.00 (พ.ค. 2020) หน้า 10Image: NTi Audio — Sound Power Reporter for XL2 — User Manual V1.10.00 (May 2020), p. 10 - STEP4
นำข้อมูลเข้าBring the data in
ถ้าข้อมูลตัวอย่างเป็นโฟลเดอร์ผลวัด (ไฟล์ .txt กับ .xl2) ให้ลากทั้งโฟลเดอร์ไปวางในช่องนำเข้าของมุมมอง Measurements ถ้าเป็นไฟล์โปรเจกต์ *.xlsp ให้เปิดด้วยคำสั่ง Open แทนIf the demo data is a measurement folder (.txt and .xl2 files), drag the whole folder onto the drop field of the Measurements view. If it is a *.xlsp project file, open it with the Open command instead.
ในโปรแกรมIn the programลากลงช่องนำเข้า หรือ File › Open...Drag onto the drop field, or File › Open...
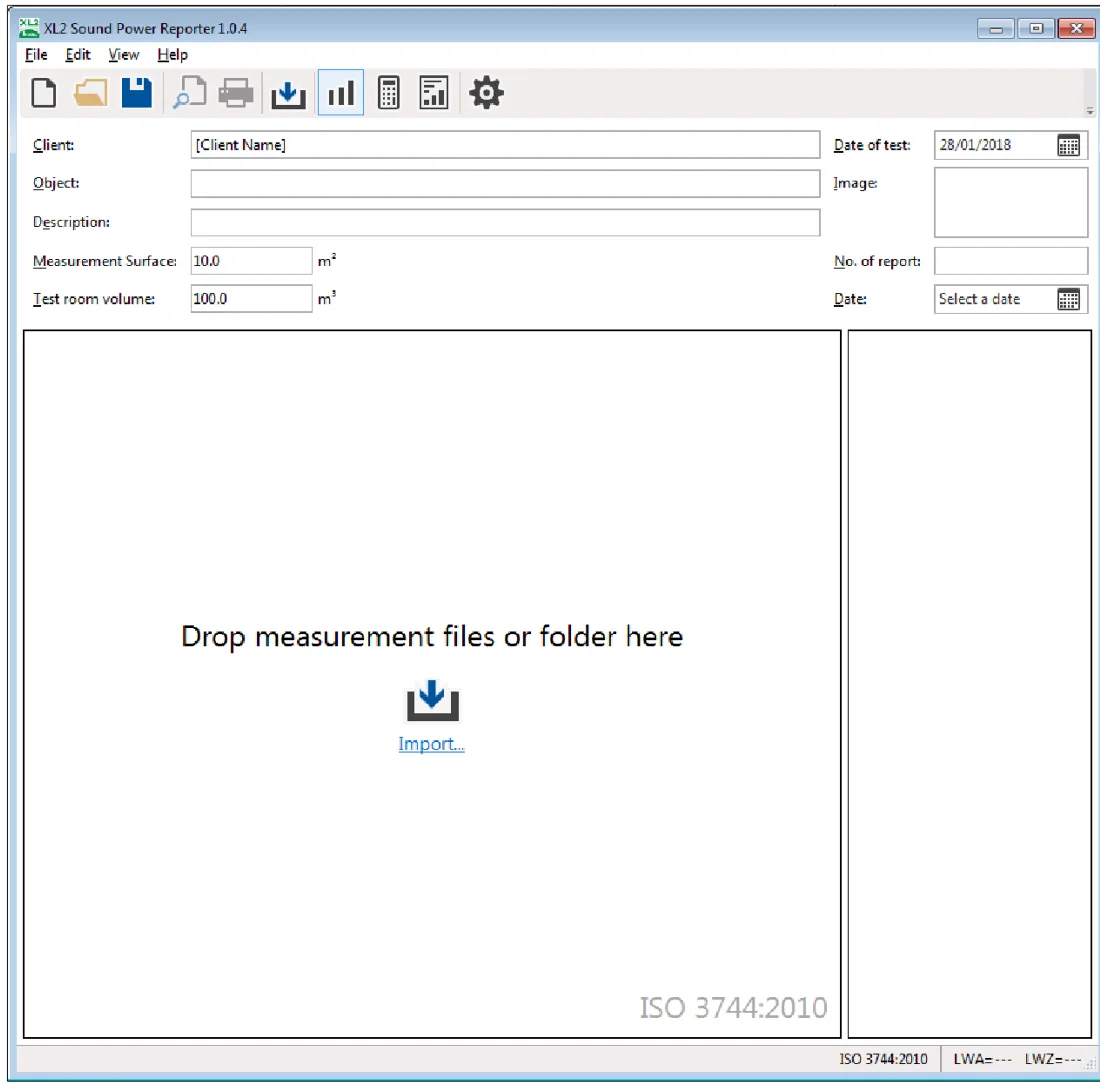
รูปที่ 3Figure 3 หลังกด OK จะเห็นมุมมอง Measurements ที่ยังว่าง — โฟลเดอร์ต้องมีไฟล์ RTA, RT60 และไฟล์ระบบ *.xl2 ครบ (ภาพจากคู่มือ V1.10.00 หน้าจอโปรแกรมรุ่น 1.0.4)After OK you see the empty Measurements view. The folder must hold the RTA files, the RT60 files and the *.xl2 system files (from manual V1.10.00; program screen version 1.0.4) - ช่อง Drop measurement files or folder here — ลากโฟลเดอร์เครื่องมาวางที่นี่Drop measurement files or folder here: drag the device folder onto it
- STEP5
ดูค่าเฉลี่ยและค่าแก้Look at the averages and corrections
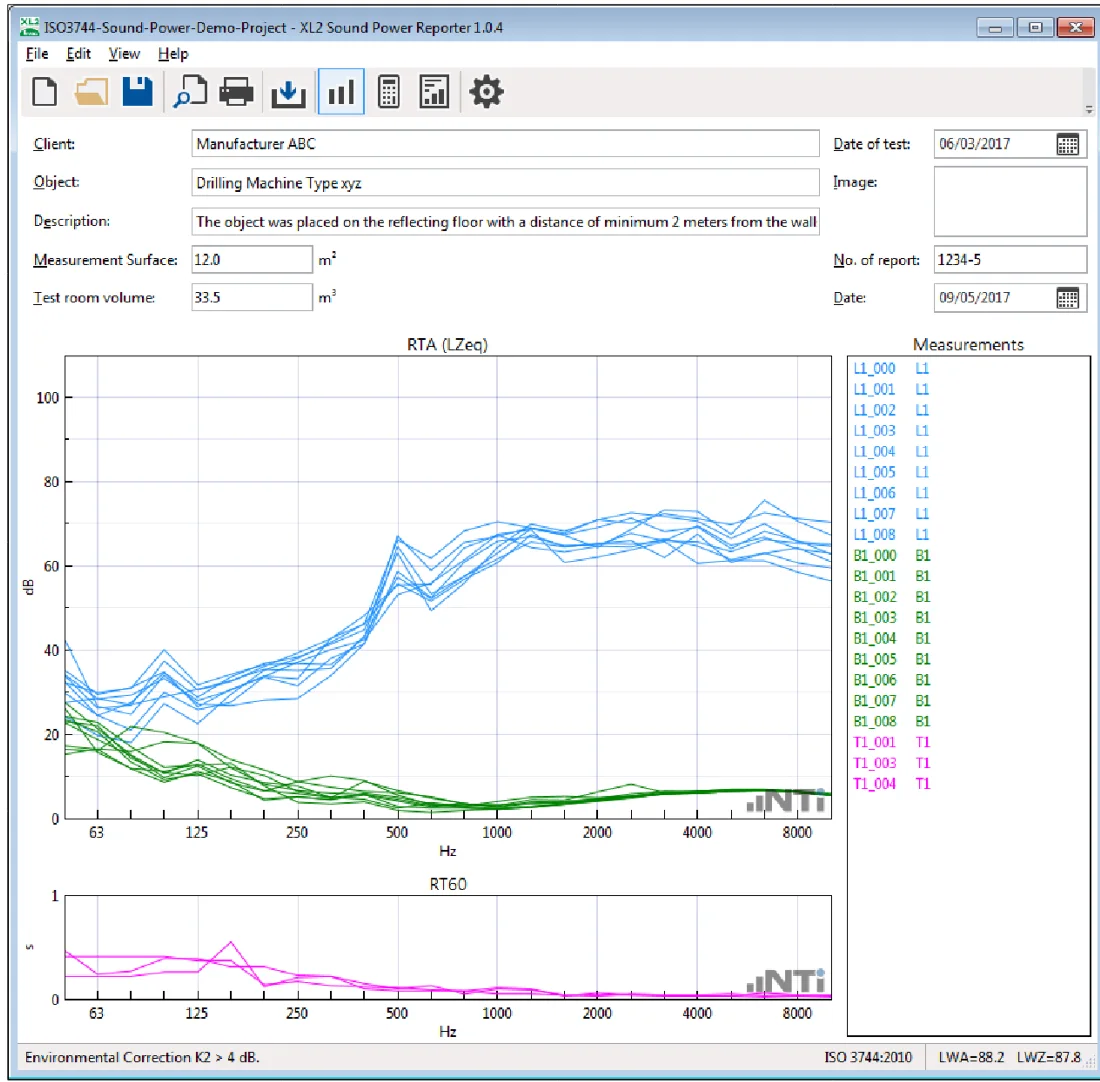
มุมมอง Calculations แสดงค่าเฉลี่ยของเสียงเครื่อง เสียงพื้นหลัง และเวลาเสียงก้อง พร้อมค่าแก้ K1 และ K2The Calculations view shows the averaged machine noise, background noise and reverberation time, with the K1 and K2 corrections.
ในโปรแกรมIn the programView › CalculationsView › Calculations
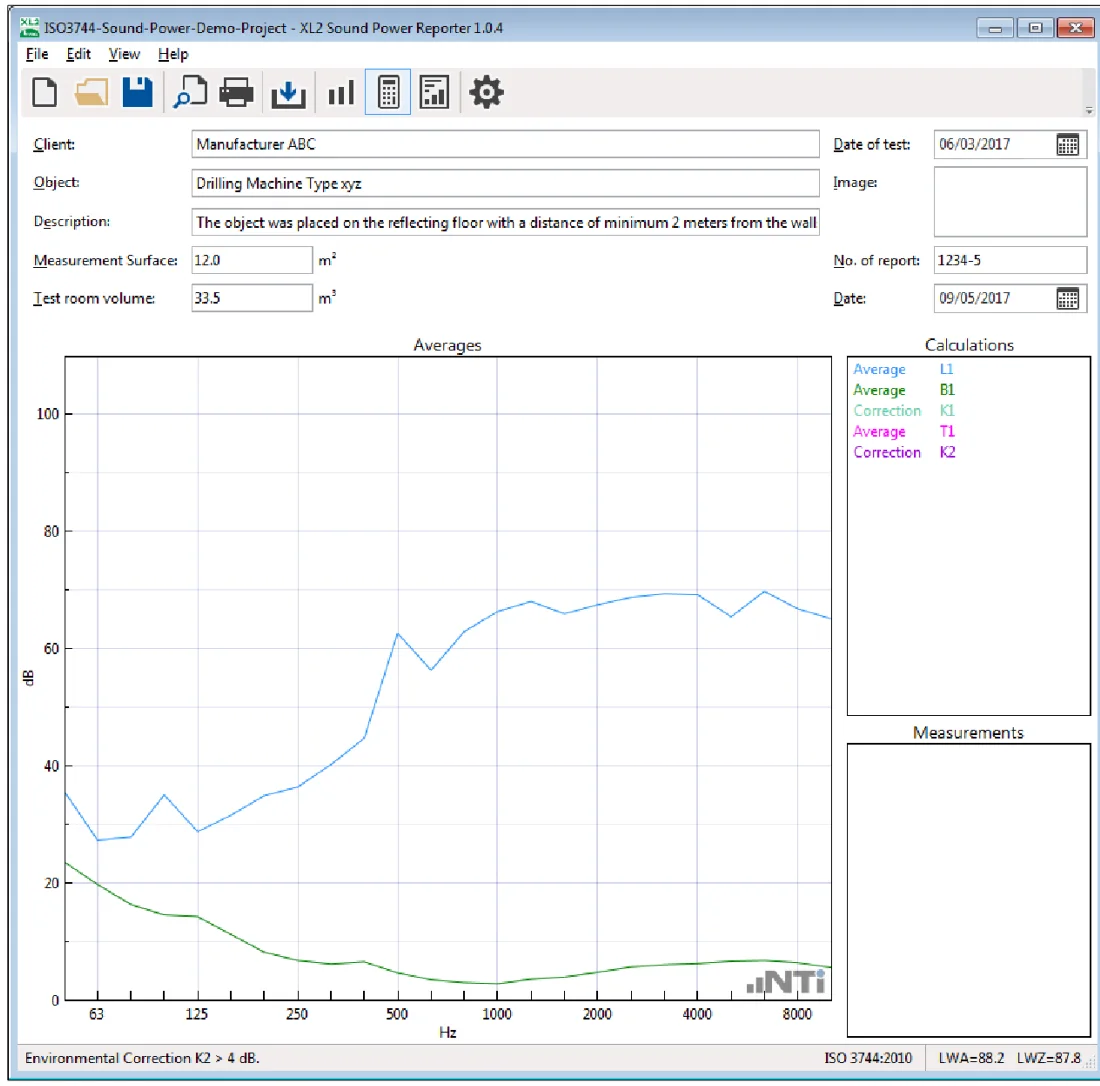
รูปที่ 4Figure 4 มุมมอง Calculations — เส้นฟ้าคือค่าเฉลี่ย L1 (เสียงเครื่อง) เส้นเขียวคือค่าเฉลี่ย B1 (เสียงพื้นหลัง) ยิ่งห่างกันมากยิ่งดี (ภาพจากคู่มือ V1.10.00 หน้าจอโปรแกรมรุ่น 1.0.4)The Calculations view: blue = average L1 (machine noise), green = average B1 (background). The further apart, the better (from manual V1.10.00; program screen version 1.0.4) ภาพ: NTi Audio — คู่มือ Sound Power Reporter for XL2 V1.10.00 (พ.ค. 2020) หน้า 13Image: NTi Audio — Sound Power Reporter for XL2 — User Manual V1.10.00 (May 2020), p. 13 - STEP6
อ่านผลกำลังเสียงRead the sound power
มุมมอง Results แสดงตารางและกราฟกำลังเสียงรายย่าน และตัวเลขเดียว LWA หรือ LWZ สังเกตย่านที่มีเครื่องหมาย * ซึ่งหมายถึงใช้ค่าแก้เสียงพื้นหลังแบบคงที่The Results view shows the sound power table and chart per band and the single number LWA or LWZ. Note any band marked *, meaning a fixed background correction was applied.
ในโปรแกรมIn the programView › ResultsView › Results
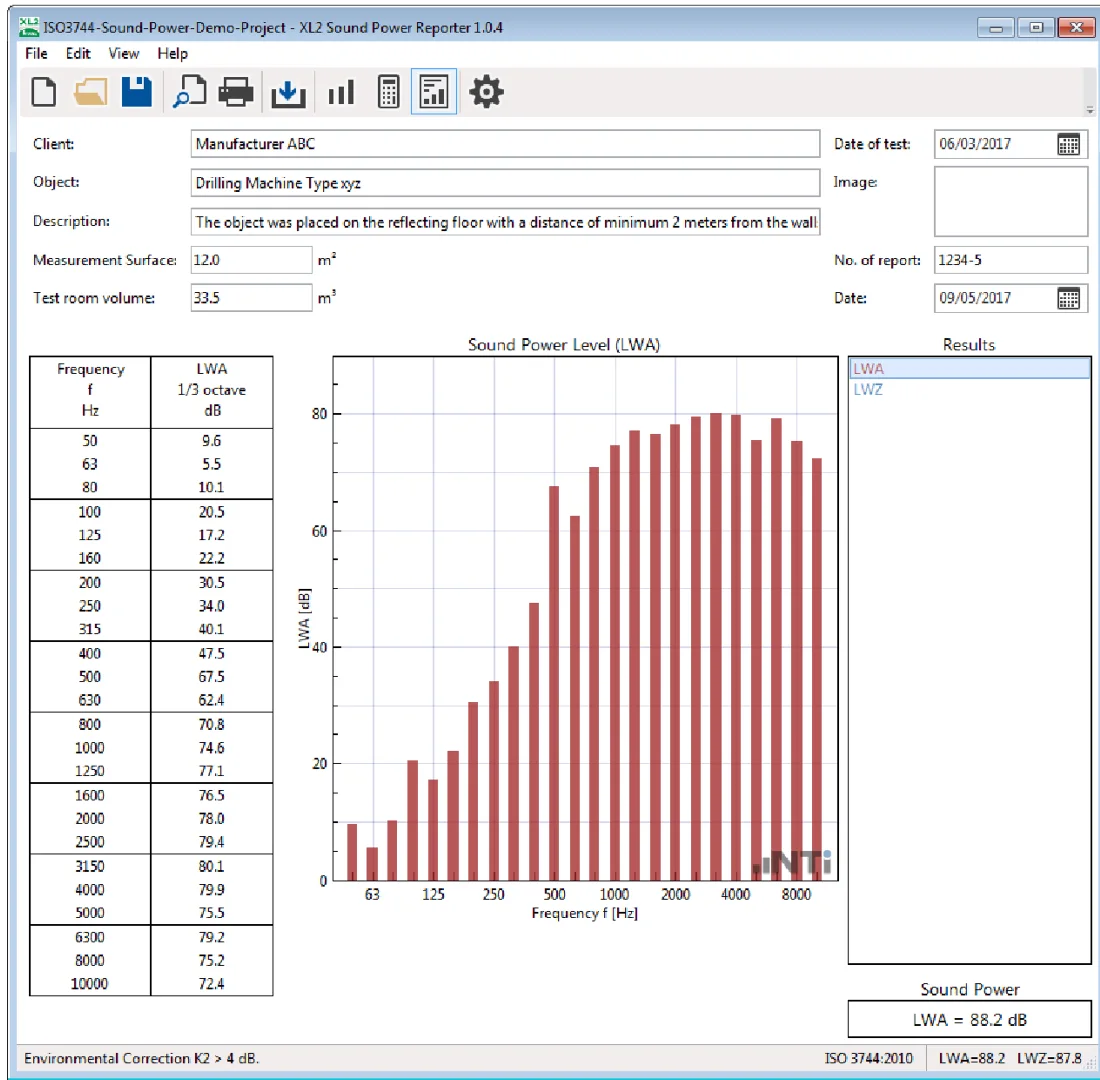
รูปที่ 5Figure 5 มุมมอง Results — ตารางและกราฟกำลังเสียงต่อย่าน และค่าเดี่ยวในกล่อง Sound Power (ตัวอย่าง LWA = 88.2 dB) (ภาพจากคู่มือ V1.10.00 หน้าจอโปรแกรมรุ่น 1.0.4)The Results view: sound power per band in table and chart, and the single number in the Sound Power box (here LWA = 88.2 dB) (from manual V1.10.00; program screen version 1.0.4) - ตารางกำลังเสียงต่อย่าน (หักเสียงพื้นหลังแล้ว)Sound power per band (background-corrected)
- กล่อง Results เลือก LWA / LWZThe Results box: pick LWA / LWZ
- STEP7
ดูหน้าตารายงานPreview the report
เปิด Print Preview เพื่อดูรายงานที่โปรแกรมจัดให้ ถ้าต้องการไฟล์ PDF ให้พิมพ์ผ่านเครื่องพิมพ์ PDF ของ WindowsOpen Print Preview to see the report the program lays out. For a PDF, print to a PDF printer in Windows.
ในโปรแกรมIn the programFile › Print PreviewFile › Print Preview
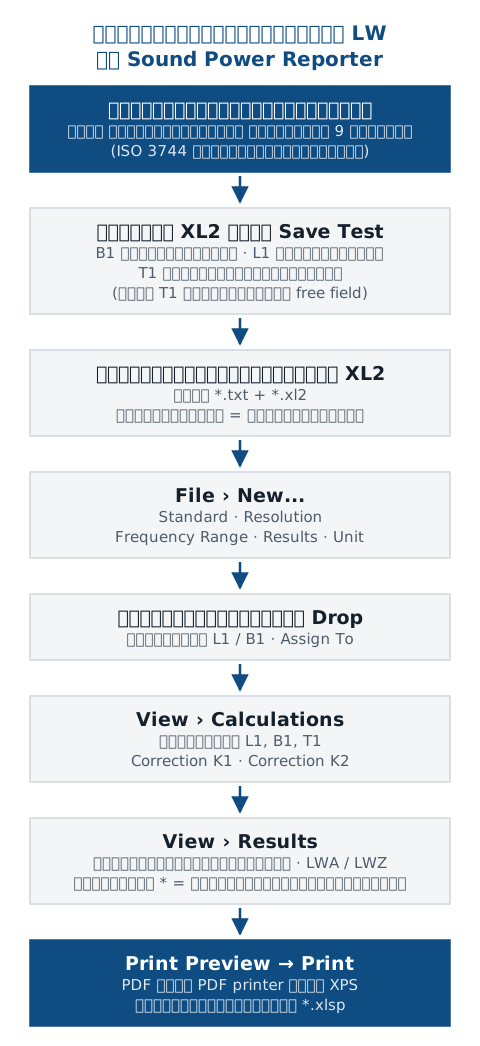
คุณเห็นเส้นทางครบแล้ว: ไฟล์ผลวัด → แยกเสียงเครื่อง (L1) กับเสียงพื้นหลัง (B1) → ค่าเฉลี่ยและค่าแก้ → กำลังเสียง → รายงาน บทต่อจากนี้คือการทำแบบเดียวกันกับข้อมูลที่คุณวัดเอง ซึ่งเรื่องสำคัญที่สุดคือวัดครบทุกตำแหน่งทั้งตอนเครื่องเปิดและปิด และกรอกพื้นที่ผิวการวัดให้ถูกYou have seen the whole path: measurement files → machine noise (L1) and background (B1) → averages and corrections → sound power → report. The rest of this guide does the same with your own data, where the most important parts are measuring every position with the machine on and off, and entering the measurement surface area correctly.
ต่อไป: ติดตั้งและเตรียม License →Next: install and prepare the licence →
01ติดตั้ง / เปิดโปรแกรมINSTALL / OPEN
ติดตั้งโปรแกรมและเตรียม LicenseInstall the program and prepare the licence
ตัวโปรแกรมดาวน์โหลดและติดตั้งได้ฟรี สิ่งที่ต้องซื้อคือสิทธิ์นำเข้าข้อมูลจากเครื่องวัดของคุณ และถ้าจะได้กำลังเสียงแบบ 1/3 ออกเตฟ XL2 ต้องมี XL2 Extended Acoustic Pack ตรวจให้ครบก่อนนัดทดสอบThe program itself is free to download and install; what you buy is the right to import data from your own instrument, and for 1/3-octave sound power the XL2 needs the XL2 Extended Acoustic Pack. Check both before you book the test.
| เครื่องที่ใช้Instrument | สิ่งที่ต้องมีWhat you need | เฟิร์มแวร์Firmware |
|---|---|---|
| XL2XL2 | สิ่งที่ต้องมีWhat you needSound Power Option แบบถาวรในเครื่อง หรือ Sound Power Reporter 365 เพื่อเปิดการนำเข้า และ XL2 Extended Acoustic Pack สำหรับเวลาเสียงก้อง RT60 และกำลังเสียงแบบ 1/3 ออกเตฟThe permanent Sound Power Option in the instrument or Sound Power Reporter 365 to enable import, and the XL2 Extended Acoustic Pack for 1/3-octave RT60 and therefore 1/3-octave sound power | เฟิร์มแวร์FirmwareV3.33 หรือใหม่กว่า (ขั้นต่ำสำหรับการนำเข้า)V3.33 or later (minimum for import) |
| XL2 เฟิร์มแวร์ V3.11 (เช่น XL2-TA)XL2 with firmware V3.11 (e.g. XL2-TA) | สิ่งที่ต้องมีWhat you needเปิดใช้ Sound Power Option แบบออนไลน์ที่ my.nti-audio.com และ PC ต้องออนไลน์ระหว่างนำเข้าActivate the Sound Power Option online at my.nti-audio.com, with the PC online during import | เฟิร์มแวร์FirmwareV3.11V3.11 |
| XL3XL3 | สิ่งที่ต้องมีWhat you needหน้า XL3 ของ NTi ระบุว่าใช้กับโปรแกรมนี้ได้ แต่ NTi ยังไม่ได้เผยแพร่ Option ที่ต้องมี ชนิดไฟล์ และขั้นตอนนำเข้าสำหรับ XL3 กรุณาติดต่อ GET BEST SOUND ก่อนNTi's XL3 page lists this program as compatible, but NTi has not published the required option, file types or import procedure for the XL3. Please contact GET BEST SOUND first | เฟิร์มแวร์Firmwareยังไม่มีข้อมูลทางการNot officially documented |
License มีสามแบบ: 365 รายปีสำหรับเครื่องวัดหนึ่งเครื่อง 365 Company รายปีสำหรับองค์กรที่มีตั้งแต่ 3 เครื่องขึ้นไป และ Permanent สิทธิ์ถาวรต่อหนึ่งเครื่อง (บน XL2 คือ Sound Power Option ที่ติดตั้งในเครื่อง) โปรแกรมตรวจ Option ออนไลน์ระหว่างนำเข้าข้อมูลThere are three licences: 365, annual for one instrument; 365 Company, annual for organisations with three or more instruments; and Permanent, a permanent right for one instrument (on the XL2, the Sound Power Option installed in the instrument). The program checks the option online during import.
หน้าผลิตภัณฑ์ของ NTi ระบุว่าข้อมูลที่วัดไว้ก่อนสมัคร 365 นำเข้าได้หลังเปิดใช้งาน จึงไม่ต้องวัดซ้ำNTi's product page states that data recorded before the 365 subscription can be imported once it is active, so there is no need to measure again.
ก่อนวันทดสอบ ลองวัดสั้น ๆ หนึ่งครั้งด้วย SLMeter แล้วบันทึกแบบ Sound-Power จากนั้นนำเข้าโปรแกรมขณะออนไลน์ ถ้าผ่าน แปลว่าเครื่อง เฟิร์มแวร์ และ License เข้าคู่กันแล้วBefore the test day, take one short SLMeter measurement, save it as Sound-Power and import it while online. If it goes through, the instrument, firmware and licence match.
เมนู Help มี Check for Updates... และ Online Help (ดาวน์โหลดคู่มือ PDF) ภาษาของโปรแกรม (English / German) เปลี่ยนได้ที่ File › Preferences... แล้วโปรแกรมจะปิดและเปิดใหม่The Help menu has Check for Updates... and Online Help (downloads the PDF manual). The program language (English / German) is set in File › Preferences...; the program then closes and restarts.
02วัดMEASURE
สิ่งที่ต้องวัดมาจากหน้างานWhat you must bring back from the test
โปรแกรมคำนวณกำลังเสียงจากสามชุดข้อมูลกับตัวเลขสองตัว ถ้าขาดชุดใด ผลจะคำนวณไม่ได้หรือไม่ได้แก้ค่าตามที่ควร จำไว้ว่า: L1 B1 RT60 และ S VThe program calculates sound power from three data sets and two numbers. If one is missing, the result cannot be calculated or is not corrected as it should be. Remember: L1, B1, RT60, plus S and V.
เสียงของเครื่องที่ทดสอบSource noise L1 · dB
- คืออะไรWhat it is
- LZeq ที่ทุกตำแหน่งไมโครโฟนบนผิวการวัด ขณะเครื่องทำงานในสภาพที่กำหนดThe LZeq at every microphone position on the measurement surface, with the device running in its defined condition.
- ทำไมต้องสนใจWhy it matters
- เป็นข้อมูลหลักที่โปรแกรมเฉลี่ยแล้วแปลงเป็นกำลังเสียงThe main data the program averages and turns into sound power.
เสียงพื้นหลังBackground noise Lb (B1) · dB
- คืออะไรWhat it is
- LZeq ที่ตำแหน่งเดียวกันทุกจุด ขณะปิดเครื่องที่ทดสอบ บันทึกด้วยชื่อ B1The LZeq at the same positions with the device switched off, saved under the name B1.
- ทำไมต้องสนใจWhy it matters
- ใช้คำนวณค่าแก้เสียงพื้นหลัง K1Used for the background correction K1.
- เข้าใจผิดบ่อยCommon misunderstanding
- ต้องวัดที่ตำแหน่งเดียวกับ L1 ไม่ใช่จุดเดียวกลางห้องIt must be measured at the same positions as L1, not at one spot in the middle of the room.
เวลาเสียงก้องของห้องทดสอบTest-room reverberation time RT60 · s
- คืออะไรWhat it is
- เวลาเสียงก้องแบบ 1/3 ออกเตฟของห้องที่ทดสอบThe 1/3-octave reverberation time of the test room.
- ทำไมต้องสนใจWhy it matters
- ใช้คำนวณค่าแก้สภาพแวดล้อม K2Used for the environmental correction K2.
- เข้าใจผิดบ่อยCommon misunderstanding
- ถ้าทดสอบในสภาพสนามเสียงอิสระ ไม่ต้องวัด และไม่มี K2In a free field it is skipped and no K2 applies.
พื้นที่ผิวการวัดและปริมาตรห้องMeasurement surface and room volume S · V · m² · m³
- คืออะไรWhat it is
- พื้นที่ของผิวสมมติที่ครอบเครื่องและใช้วางไมโครโฟน และปริมาตรของห้องทดสอบThe area of the imaginary surface around the device that carries the microphones, and the test-room volume.
- ทำไมต้องสนใจWhy it matters
- โปรแกรมใช้ทั้งสองค่าในการคำนวณ ไม่ใช่แค่ข้อความหัวรายงาน ในสนามเสียงอิสระไม่ต้องใช้ปริมาตรThe program uses both in the calculation, not just as header text. No volume is needed in a free field.
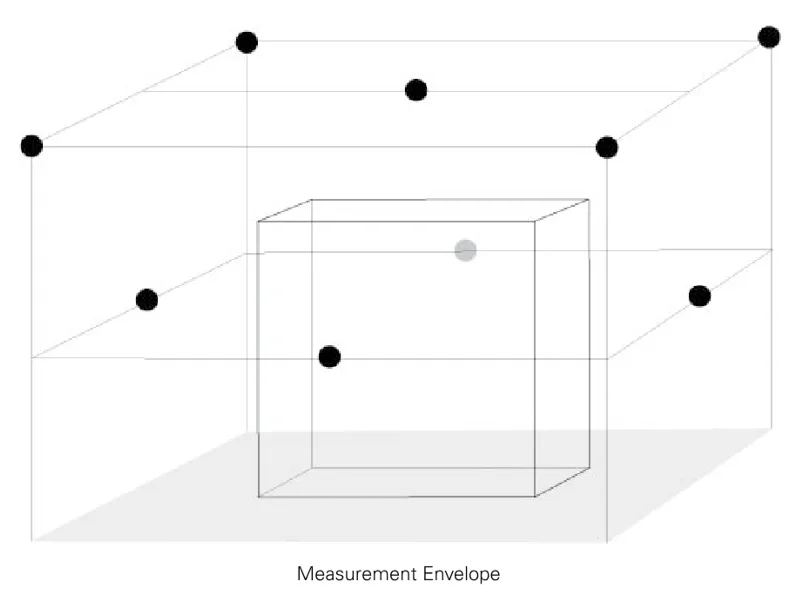
แนวทาง ISO 3744 จากภาคผนวกของคู่มือ NTiISO 3744 guidance from the appendix of NTi's manual
| เรื่องItem | แนวทางของ NTiNTi's guidance |
|---|---|
| ผิวการวัดMeasurement surface | แนวทางของ NTiNTi's guidanceผิวครอบรอบเครื่อง เช่น ทรงกล่อง แนะนำระยะห่างจากเครื่องอย่างน้อยราว 1 mAn envelope around the source, e.g. a cuboid, at a recommended minimum of about 1 m from it |
| ตำแหน่งไมโครโฟนMicrophone positions | แนวทางของ NTiNTi's guidanceอย่างน้อย 9 ตำแหน่ง: 4 ที่มุมของชั้นบน 4 ที่กลางด้านข้าง 1 ที่กลางด้านบน และเพิ่มตามขนาดเครื่องตามที่มาตรฐานกำหนดAt least nine: four at the corners of the top layer, four at the centres of the sides, one at the centre of the top; more for larger sources, as the standard describes |
| ทิศของไมโครโฟนMicrophone orientation | แนวทางของ NTiNTi's guidanceตั้งฉากกับผิวการวัด ไมโครโฟนที่มุมหันเข้าหากึ่งกลางของระนาบล่างNormal to the measurement surface; the corner microphones point to the centre of the bottom plane |
| เสียงพื้นหลังและเสียงเครื่องBackground and source noise | แนวทางของ NTiNTi's guidanceLZeq ตำแหน่งละ 20 วินาที ด้วย SLMeter หน้า RTA แบบ 1/3 ออกเตฟ ผู้วัดควรออกจากห้องระหว่างวัดLZeq for 20 seconds per position with SLMeter, RTA page, 1/3 octave; the operator should leave the room during the measurement |
| เวลาเสียงก้องReverberation time | แนวทางของ NTiNTi's guidanceใช้ลำโพงรอบทิศ (dodecahedron) 3 ตำแหน่งไมโครโฟน วัดตำแหน่งละ 2 ครั้ง รวม 6 ค่า แต่ละครั้งอย่างน้อย 3 รอบ และรอบเปิด/ปิดยาวกว่าเวลาเสียงก้องที่คาดไว้An omnidirectional (dodecahedron) loudspeaker, three microphone positions, two measurements each (six readings), at least three cycles per measurement, with the on/off cycle longer than the expected reverberation time |
| เครื่องมือEquipment | แนวทางของ NTiNTi's guidanceเครื่องวัดต้องเป็น class 1 ตาม IEC 61672-1 ตรวจทั้งระบบด้วย calibrator class 1 (IEC 60942) ตอนเริ่มและจบของทุกวัน และสอบเทียบระบบทุก ๆ ไม่เกินสองปีClass 1 meter per IEC 61672-1; check the whole system with a class 1 calibrator (IEC 60942) at the start and end of every day, and calibrate it at intervals of no more than two years |
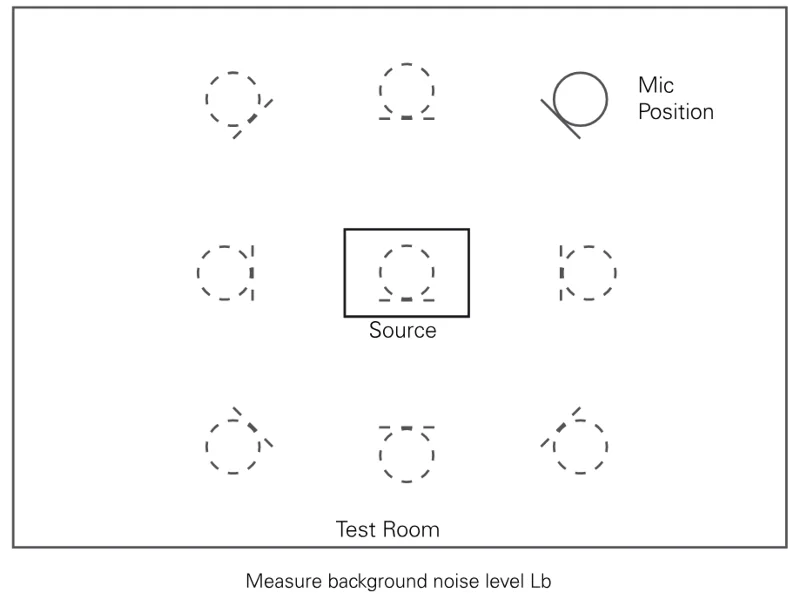
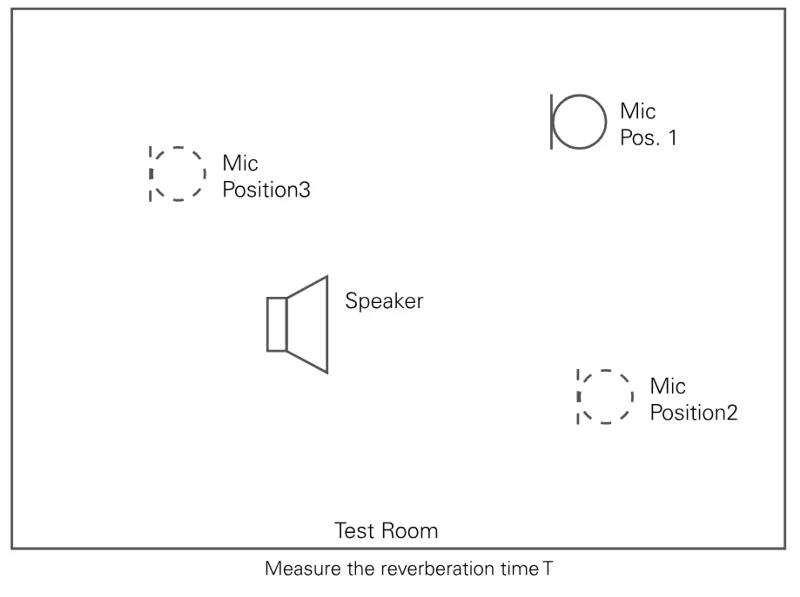
เครื่องอัดอากาศขนาดเล็กทดสอบตาม ISO 3744 ในห้องที่มีพื้นสะท้อน ใช้ผิวครอบทรงกล่องกับไมโครโฟน 9 ตำแหน่งตามแนวทางของ NTi สิ่งที่ต้องมีในโฟลเดอร์ของเครื่องนี้เมื่อกลับถึงสำนักงาน:
• ไฟล์ B1 9 ไฟล์ (เสียงพื้นหลัง 20 วินาทีต่อตำแหน่ง วัดก่อนเปิดเครื่อง)
• ไฟล์ L1 9 ไฟล์ (เสียงเครื่อง 20 วินาทีต่อตำแหน่ง ที่ตำแหน่งเดียวกัน)
• ไฟล์ RT60 6 ไฟล์ (3 ตำแหน่ง × 2 ครั้ง)
• ไฟล์ระบบ *.xl2 ของทุกการวัด
• ในสมุดบันทึก: สภาพการเดินเครื่อง ขนาดผิวครอบ พื้นที่ผิว S และปริมาตรห้อง V
ถ้านับแล้วไม่ครบ ให้วัดชุดที่ขาดก่อนย้ายเครื่องออกจากตำแหน่ง เพราะกลับมาวัดทีหลังให้สภาพเดิมได้ยาก ในการอ่านผล ตัวอย่างรายงานในคู่มือ NTi เป็นสว่านที่วัดในห้อง 33.5 m³ ผิวการวัด 12 m² รายงานแสดงตาราง LWA รายย่าน 1/3 ออกเตฟ 50 Hz–10 kHz กราฟ และตัวเลขรวม LWA = 88.2 dBA small air compressor is tested to ISO 3744 in a room with a reflecting floor, using a box-shaped envelope with the nine microphone positions of NTi's guidance. What the device folder must hold when you are back in the office:
• 9 B1 files (background, 20 s per position, measured before start-up)
• 9 L1 files (machine noise, 20 s per position, same positions)
• 6 RT60 files (3 positions × 2)
• the *.xl2 system files of every measurement
• in your notes: operating condition, envelope size, surface area S and room volume V
If the count is short, measure the missing set before the machine is moved, because the same conditions are hard to recreate later. For reading the result, the sample report in NTi's manual is a drilling machine in a 33.5 m³ room with a 12 m² measurement surface: it shows a 1/3-octave LWA table from 50 Hz to 10 kHz, a chart and the overall LWA = 88.2 dB.
คู่มือเขียนตาม ISO 3744:2010 ซึ่งถูกแทนที่ด้วย ISO 3744:2025 แล้ว จำนวนตำแหน่ง รูปทรงผิวการวัด และเกณฑ์ของห้องกับเสียงพื้นหลังให้ยึดฉบับที่งานกำหนด และตรวจว่าโปรแกรมรุ่นที่คุณใช้รองรับฉบับนั้นก่อนระบุฉบับปีในรายงาน สวมอุปกรณ์ป้องกันการได้ยินตลอดการทดสอบ เพราะเครื่องที่ทดสอบอาจดังมากThe manual follows ISO 3744:2010, which has been replaced by ISO 3744:2025. Take the number of positions, the surface shape and the room and background criteria from the edition your job names, and check that your program version supports it before you put an edition year on the report. Wear hearing protection throughout: the device under test can be very loud.
หลักการของมาตรฐานแต่ละฉบับและความต่างของระดับความแม่นยำ ดูได้ที่ ISO 3740 series และขั้นตอนหน้างานแบบละเอียดที่ วิธีการตรวจวัดกำลังเสียงThe principles of each standard and the accuracy grades are in the ISO 3740 series; the detailed site procedure is in the sound power application guide.
03บันทึกSAVE
บันทึกผลบน XL2 ให้โปรแกรมแยกข้อมูลได้เองSave on the XL2 so the program sorts the data
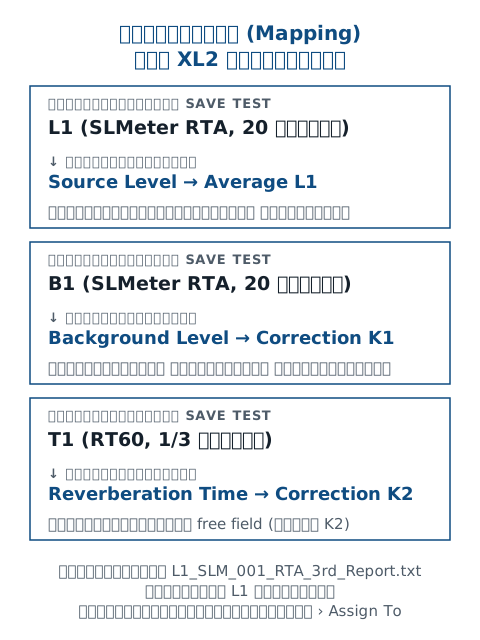
โปรแกรมรู้ว่าไฟล์ไหนเป็นเสียงเครื่อง (L1) หรือเสียงพื้นหลัง (B1) จากชื่อไฟล์ ใช้เวลาเตรียมห้านาทีก่อนวัด แล้วคุณจะไม่ต้องมานั่งแยกไฟล์ทีละไฟล์The program tells machine noise (L1) from background (B1) by the file name. Five minutes of preparation before the test saves you sorting files one by one.
ขั้นตอนในบทนี้เป็นของ XL2 ตามคู่มือ V1.10.00 NTi ยังไม่ได้เผยแพร่วิธีบันทึกและส่งข้อมูลจาก XL3 เข้า Sound Power Reporter ถ้าคุณใช้ XL3 อย่าเดาชื่อไฟล์หรือโครงสร้างโฟลเดอร์ ให้ติดต่อ GET BEST SOUND ก่อนThe steps in this chapter are for the XL2, per the V1.10.00 manual. NTi has not published how to save and transfer XL3 data into the Sound Power Reporter. If you use an XL3, do not guess file names or folder structure: contact GET BEST SOUND first.
- STEP1
ส่งออกไฟล์ชื่อจากโปรแกรมไปไว้ในเครื่องExport the name list from the program to the instrument
ในโปรแกรม เปิด Settings แท็บ Mapping แล้วกด Export... จะได้ไฟล์ savenames.txt ที่มีชื่อ L1 และ B1 นำไปวางไว้ที่โฟลเดอร์หลัก (root) ของการ์ดหน่วยความจำ XL2In the program open Settings › Mapping and press Export... to get savenames.txt with the names L1 and B1. Put it in the root of the XL2 memory card.
ในโปรแกรมIn the programView › Settings › Mapping › Export...View › Settings › Mapping › Export...
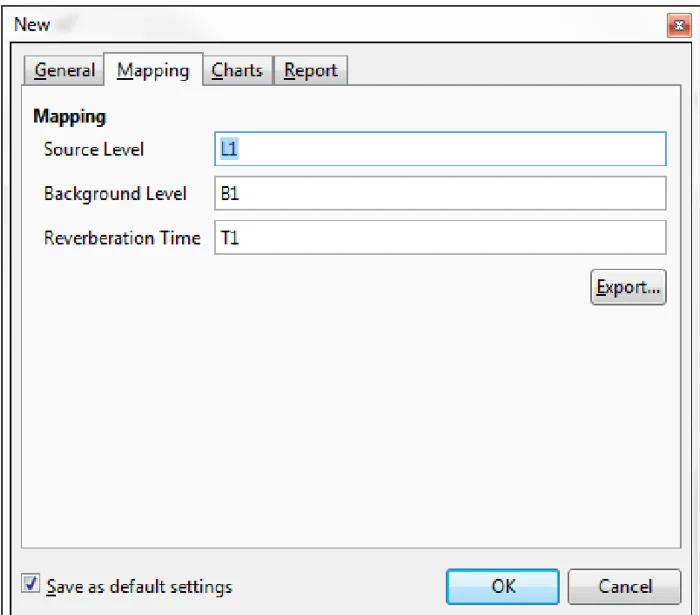
รูปที่ 10Figure 10 แท็บ Mapping: Source Level = L1, Background Level = B1, Reverberation Time = T1 กด Export... เพื่อได้ไฟล์ savenames.txt (ในคู่มือถ่ายจากหน้าต่าง New ซึ่งมีแท็บเดียวกัน) (ภาพจากคู่มือ V1.10.00 หน้าจอโปรแกรมรุ่น 1.0.4)The Mapping tab: Source Level = L1, Background Level = B1, Reverberation Time = T1. Export... writes savenames.txt (the manual shows it in the New dialog, which has the same tab) (from manual V1.10.00; program screen version 1.0.4) - ปุ่ม Export...The Export... button
- STEP2
ปิด Autosave บนเครื่องSwitch Autosave off on the instrument
ในเมนูหน่วยความจำของ XL2 ตั้ง Autosave: Off เพื่อเลือกชื่อได้ทุกครั้งที่บันทึก เครื่องจะใช้ชื่อเดิมกับการวัดครั้งต่อไปจนกว่าคุณจะเปลี่ยน จึงวัดเสียงพื้นหลังครบทุกตำแหน่งก่อน แล้วค่อยเปลี่ยนเป็น L1In the XL2 memory menu set Autosave: Off so you can pick the name each time. The instrument keeps the same name for the next measurements until you change it, so measure the background at every position first, then switch to L1.
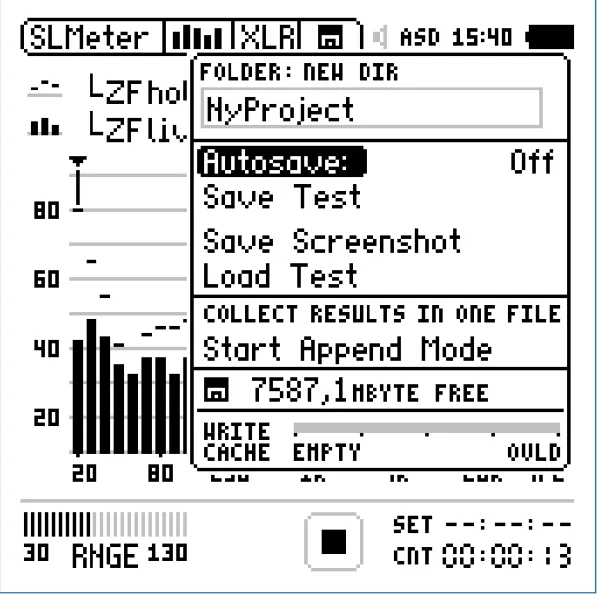
รูปที่ 11Figure 11 เมนูหน่วยความจำของ XL2 — บรรทัด Autosave: ต้องเป็น Off (ภาพจากคู่มือ V1.10.00)The XL2 memory menu: Autosave: must read Off (from manual V1.10.00) ภาพ: NTi Audio — คู่มือ Sound Power Reporter for XL2 V1.10.00 (พ.ค. 2020) หน้า 7Image: NTi Audio — Sound Power Reporter for XL2 — User Manual V1.10.00 (May 2020), p. 7 - STEP3
หนึ่งเครื่อง หนึ่งโฟลเดอร์One device, one folder
ต่อ XL2 กับ PC แบบ Mass Storage เปิดโฟลเดอร์ Projects แล้วสร้างโฟลเดอร์ย่อยหนึ่งโฟลเดอร์ต่อหนึ่งเครื่องที่ทดสอบ เช่น Device 1, Device 2 ถ้าวัดหลายเครื่องต่อเนื่องแล้วไฟล์ปนกัน คัดลอกแยกเข้าโฟลเดอร์ของแต่ละเครื่องบน PC ภายหลังได้Connect the XL2 to the PC as Mass Storage, open Projects and make one subfolder per device under test, e.g. Device 1, Device 2. If files from several devices end up together, you can copy them into each device's folder on the PC later.
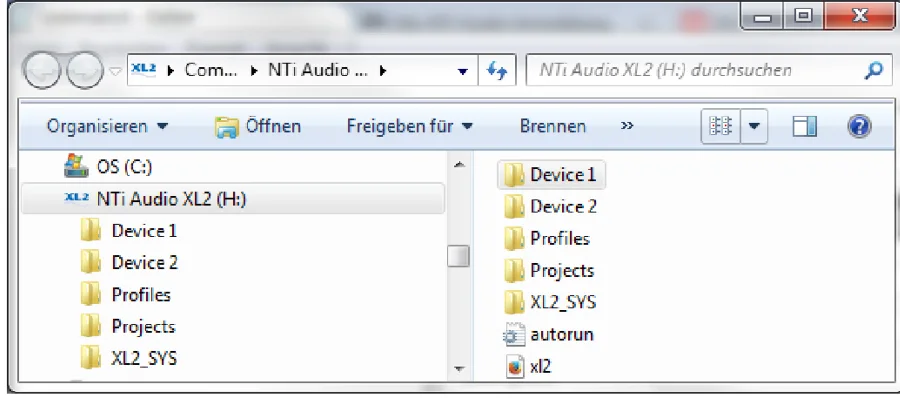
รูปที่ 12Figure 12 XL2 ต่อคอมพิวเตอร์แบบ Mass Storage — หนึ่งโฟลเดอร์ต่อหนึ่งเครื่องที่ทดสอบ เช่น Device 1, Device 2 (ภาพเป็น Windows ภาษาเยอรมัน) (ภาพจากคู่มือ V1.10.00)The XL2 as Mass Storage: one folder per device under test, e.g. Device 1, Device 2 (German Windows in the picture) (from manual V1.10.00) ภาพ: NTi Audio — คู่มือ Sound Power Reporter for XL2 V1.10.00 (พ.ค. 2020) หน้า 7Image: NTi Audio — Sound Power Reporter for XL2 — User Manual V1.10.00 (May 2020), p. 7 - STEP4
วัดแล้วบันทึกด้วยชื่อจากรายการMeasure, then save with a name from the list
ระดับเสียง: ฟังก์ชัน SLMeter หน้า RTA แบบ 1/3 ออกเตฟ ถ่วงน้ำหนัก Z เริ่มวัดแล้วหยุดที่ 20 วินาที เวลาเสียงก้อง: ฟังก์ชัน RT60 แบบ 1/3 ออกเตฟ (ต้องมี XL2 Extended Acoustic Pack) เปิดเมนูหน่วยความจำ เลือก Save Test ในหน้าต่างที่ขึ้นมาเลือก Sound-Power ที่ปลายบรรทัดแรก แล้วเลือกชื่อ กด Enter เพื่อบันทึกLevels: SLMeter, RTA page, 1/3 octave, Z-weighted; start and stop after 20 seconds. Reverberation: RT60 in 1/3 octave (needs the XL2 Extended Acoustic Pack). Open the memory menu, choose Save Test, pick Sound-Power at the end of the first line of the pop-up, choose the name and press Enter to save.
ในโปรแกรมIn the programXL2: Save Test › Sound-Power › เลือกชื่อXL2: Save Test › Sound-Power › choose the name
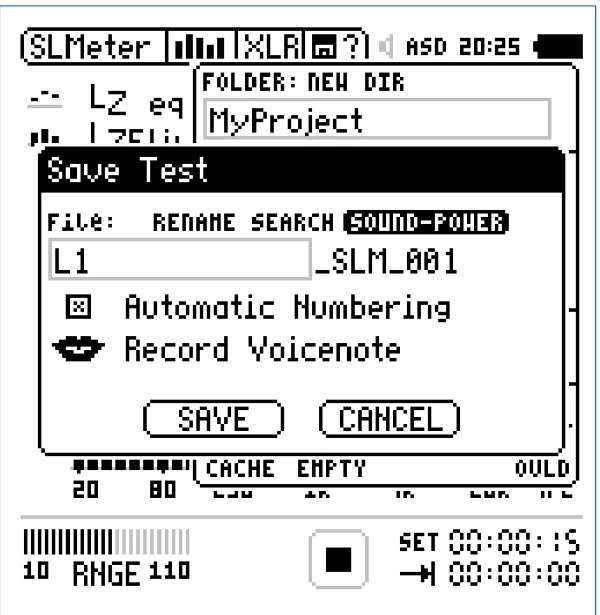
รูปที่ 13Figure 13 หน้าต่าง Save Test หลังวัด RTA: เลือก Sound-Power ที่ท้ายบรรทัดแรก เลือกชื่อ (L1 / B1) แล้วบันทึก ไฟล์จะชื่อ L1_SLM_001... (ภาพจากคู่มือ V1.10.00)The Save Test pop-up after an RTA measurement: pick Sound-Power at the end of the first line, choose the name (L1 / B1) and save; the file is named L1_SLM_001... (from manual V1.10.00) ภาพ: NTi Audio — คู่มือ Sound Power Reporter for XL2 V1.10.00 (พ.ค. 2020) หน้า 8Image: NTi Audio — Sound Power Reporter for XL2 — User Manual V1.10.00 (May 2020), p. 8
ไฟล์ที่ได้จะมีชื่อเช่น L1_SLM_001_RTA_3rd_Report.txt สำหรับเสียงเครื่อง และ T1_RT60_000_Report.txt สำหรับเวลาเสียงก้องThe files get names such as L1_SLM_001_RTA_3rd_Report.txt for machine noise and T1_RT60_000_Report.txt for reverberation.
คัดลอกมาแต่ไฟล์ .txt แล้วทิ้งไฟล์ระบบ *.xl2 หรือลืมไฟล์ RT60 ไว้ในโฟลเดอร์อื่น โฟลเดอร์ของเครื่องต้องมีทั้งไฟล์ RTA ไฟล์ RT60 และไฟล์ระบบ *.xl2 ของทุกการวัดCopying only the .txt files without the *.xl2 system files, or leaving the RT60 files in another folder. The device folder must hold the RTA files, the RT60 files and the *.xl2 system files of every measurement.
04สร้างโปรเจกต์CREATE PROJECT
สร้างโปรเจกต์และเลือกมาตรฐานCreate the project and choose the standard
มาตรฐานที่เลือกกำหนดวิธีคำนวณและข้อความหัวรายงาน เลือกให้ตรงกับวิธีที่คุณวัดจริง ไม่ใช่ฉบับที่ดูน่าเชื่อถือที่สุดThe standard you choose sets the calculation and the report heading. Choose the one that matches how you actually measured, not the one that sounds most impressive.
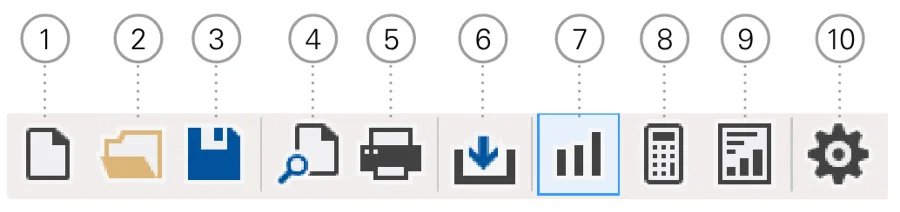
- New ProjectNew Project
- Open Project File (*.xlsp)Open Project File (*.xlsp)
- Save Project File (*.xlsp)Save Project File (*.xlsp)
- Print PreviewPrint Preview
- PrintPrint
- Import (เลือกโฟลเดอร์ผลวัด)Import (pick the measurement folder)
- Measurements ViewMeasurements View
- Calculations ViewCalculations View
- Results ViewResults View
- SettingsSettings
- STEP1
เปิดหน้าต่างโปรเจกต์ใหม่Open the new-project panel
เลือกคำสั่ง New จากเมนู FileChoose New in the File menu.
ในโปรแกรมIn the programFile › New...File › New...
- STEP2
เลือกมาตรฐานและความละเอียดChoose the standard and resolution
เลือก Standard แล้วเลือก Resolution (ออกเตฟหรือ 1/3 ออกเตฟ) ให้ตรงกับข้อมูลที่วัดมาChoose the Standard, then the Resolution (octave or 1/3 octave) to match the data you measured.
รูปที่ 15Figure 15 หน้าต่าง New: เลือก Standard, Resolution, Frequency Range, Results และ Unit แล้วกด OK — หนึ่งโปรเจกต์คือหนึ่งเครื่องที่ทดสอบ (ภาพจากคู่มือ V1.10.00 หน้าจอโปรแกรมรุ่น 1.0.4)The New dialog: choose Standard, Resolution, Frequency Range, Results and Unit, then OK. One project is one device under test (from manual V1.10.00; program screen version 1.0.4) - Standard มาตรฐานStandard
- Resolution ความละเอียดความถี่ (ให้ตรงกับที่วัด)Resolution (to match what you measured)
- Frequency Range Min / MaxFrequency Range: Min / Max
- Results ค่าที่ต้องการ เช่น LWA, LWZResults such as LWA, LWZ
- Unit หน่วยUnit
- STEP3
ช่วงความถี่ ผลลัพธ์ และหน่วยFrequency range, results and unit
เลือก Frequency Range (อยู่ภายใน 50 Hz–10 kHz) กำหนด Results ที่ต้องการ เช่น LWA หรือ LWZ เลือก Unit แล้วกด OK ค่าเหล่านี้แก้ภายหลังได้ที่ Settings แท็บ GeneralChoose the Frequency Range (within 50 Hz–10 kHz), define the Results you need, e.g. LWA or LWZ, choose the Unit and press OK. These can be changed later in Settings › General.
| มาตรฐาน (ตามคู่มือ)Standard (per the manual) | วิธีMethod | ใช้เมื่อUse when |
|---|---|---|
| ISO 3741 / ANSI S12.51ISO 3741 / ANSI S12.51 | วิธีMethodPrecision ในห้องทดสอบแบบก้องเสียงPrecision, reverberation test rooms | ใช้เมื่อUse whenมีห้องก้องเสียงที่ผ่านเกณฑ์ของมาตรฐานYou have a reverberation room that meets the standard |
| ISO 3744 / ANSI-ASA S12.54ISO 3744 / ANSI-ASA S12.54 | วิธีMethodEngineering ในสนามเสียงเกือบอิสระเหนือพื้นสะท้อนEngineering, essentially free field over a reflecting plane | ใช้เมื่อUse whenงานทั่วไปที่ต้องการระดับวิศวกรรม ในห้องหรือกลางแจ้งที่เข้าเกณฑ์General engineering-grade work, indoors or outdoors where the criteria are met |
| ISO 3746 / ANSI-ASA S12.56ISO 3746 / ANSI-ASA S12.56 | วิธีMethodSurvey ผิวครอบเหนือพื้นสะท้อนSurvey, enveloping surface over a reflecting plane | ใช้เมื่อUse whenคัดกรองหรือเปรียบเทียบ ยอมรับความไม่แน่นอนที่สูงกว่าScreening or comparison, accepting a larger uncertainty |
สำหรับ ISO 3744 ตั้งแต่ Release V1.10 โปรแกรมมีตัวเลือกสภาพสนามเสียงอิสระ (Free Field Condition) เมื่อทดสอบในสนามเสียงอิสระจะไม่มีค่าแก้ K2 ไม่ต้องวัด RT60 และไม่ต้องใส่ปริมาตรห้อง คู่มือไม่ได้แสดงว่าตัวเลือกนี้อยู่ตรงไหนในหน้าต่าง ให้ดูในหน้าต่าง New หรือ Settings ของโปรแกรมรุ่นที่คุณใช้For ISO 3744, from Release V1.10 the program has a free-field option (Free Field Condition). In a free field no K2 correction applies, no RT60 is measured and no room volume is entered. The manual does not show where the option sits; look for it in the New panel or Settings of your program version.
ปีของฉบับในตารางตามคู่มือคือ 2010 ปัจจุบัน ISO 3744 เป็นฉบับ 2025 และ NTi ไม่ได้ระบุเวอร์ชันโปรแกรมล่าสุดบนหน้าผลิตภัณฑ์ ตรวจชื่อมาตรฐานที่พิมพ์บนหัวรายงานของโปรแกรมรุ่นที่คุณใช้ก่อนส่งงานThe manual gives the 2010 editions; ISO 3744 is now the 2025 edition, and NTi does not state the latest program version on its product page. Check the standard printed on the report heading of your version before sending the work.
05นำเข้า / โอนข้อมูลIMPORT / TRANSFER
นำเข้าข้อมูลและตรวจการแยก L1 / B1Import the data and check the L1 / B1 split
การนำเข้าใช้เวลาไม่กี่วินาที แต่ต้องตรวจทุกครั้งว่าไฟล์เสียงเครื่องไม่ได้ไปอยู่ในกลุ่มเสียงพื้นหลัง เพราะความผิดพลาดนี้ทำให้ K1 และผลลัพธ์ผิดทั้งหมดImporting takes seconds, but always check that no machine-noise file has landed in the background group: that single mistake makes K1 and the whole result wrong.
- STEP1
ลากทั้งโฟลเดอร์ของเครื่องDrag the device folder
ลากโฟลเดอร์ของเครื่องจากการ์ด XL2 ไปวางในช่องนำเข้าของมุมมอง Measurements (คู่มือเรียกช่องนี้ทั้ง Drop measurement files or folder here และ Add your measurements here) หรือเลือกเฉพาะไฟล์ *.xl2 แล้วลากลงช่องเดียวกันDrag the device folder from the XL2 card onto the drop field of the Measurements view (the manual calls it both Drop measurement files or folder here and Add your measurements here), or select the *.xl2 files and drag them onto the same field.
ในโปรแกรมIn the programหรือ File › Import › Folder... / File... หรือปุ่ม Import ในแถบเครื่องมือOr File › Import › Folder... / File..., or the Import toolbar button
- STEP2
ตรวจการจัดกลุ่มCheck the assignment
ไฟล์ที่ชื่อขึ้นต้นด้วย L1 จะเป็นเสียงของเครื่อง (source noise) และ B1 เป็นเสียงพื้นหลัง (background noise) ถ้าไฟล์ใดผิดกลุ่ม คลิกขวาที่ไฟล์ในรายการ Measurements แล้วเลือก Assign ToFiles starting with L1 become source noise and B1 background noise. If a file is in the wrong group, right-click it in the Measurements list and choose Assign To.
รูปที่ 16Figure 16 หลังนำเข้า ไฟล์ถูกจัดกลุ่มตามชื่อ: ฟ้า = L1 เสียงเครื่อง เขียว = B1 เสียงพื้นหลัง ชมพู = T1 เวลาเสียงก้อง ถ้าผิดกลุ่มคลิกขวา › Assign To (ภาพจากคู่มือ V1.10.00 หน้าจอโปรแกรมรุ่น 1.0.4)After import the files are grouped by name: blue = L1 machine, green = B1 background, pink = T1 reverberation. If one is wrong, right-click › Assign To (from manual V1.10.00; program screen version 1.0.4) - L1 เสียงของเครื่อง (Source Level)L1: machine noise (Source Level)
- B1 เสียงพื้นหลัง (Background Level)B1: background noise (Background Level)
- T1 เวลาเสียงก้องของห้องT1: room reverberation time
- STEP3
ลบการวัดที่เสียDelete bad readings
การวัดที่รู้ว่าเสีย เช่น มีรถยกผ่านระหว่างวัดเสียงพื้นหลัง ให้เลือกแล้วลบออกจากรายการ MeasurementsReadings known to be bad, e.g. a forklift passed during a background measurement, should be selected and deleted from the Measurements list.
ในโปรแกรมIn the programEdit › DeleteEdit › Delete
จำนวนไฟล์ L1 ต้องเท่ากับจำนวนไฟล์ B1 และเท่ากับจำนวนตำแหน่งไมโครโฟน และมีไฟล์ RT60 ครบ (ยกเว้นสนามเสียงอิสระ) ถ้าไม่เท่ากัน ให้หาสาเหตุก่อนไปขั้นต่อไปThe number of L1 files must equal the number of B1 files and the number of microphone positions, and the RT60 files must all be there (except in a free field). If they do not match, find out why before going on.
นำเข้าโดยไม่ได้ออนไลน์ หรือใช้เฟิร์มแวร์ต่ำกว่า V3.33 โดยไม่มี Option ที่เปิดใช้แล้ว โปรแกรมจะไม่รับข้อมูลเพราะตรวจ Option ไม่ผ่านImporting offline, or with firmware below V3.33 and no activated option: the program refuses the data because the option check fails.
06ตั้งค่าCONFIGURE
กรอกข้อมูลการทดสอบและตั้งค่ารายงานEnter the test data and set up the report
พื้นที่ผิวการวัดและปริมาตรห้องไม่ใช่แค่ข้อความบนรายงาน โปรแกรมใช้คำนวณกำลังเสียงโดยตรง ใส่ผิดหนึ่งตัว ผลก็เลื่อนทั้งหมดThe measurement surface area and room volume are not just report text: the program calculates the sound power with them. One wrong entry shifts the whole result.
- ช่อง Details: ผู้ว่าจ้าง (Client) ชื่อเครื่อง (Object) คำอธิบาย พื้นที่ผิวการวัด และ ปริมาตรห้องทดสอบ (ไม่ต้องใส่ในสนามเสียงอิสระ)Details: client, object, description, measurement surface area and test-room volume (not needed in a free field)
- คำอธิบายควรบอกสภาพการเดินเครื่องและการวางเครื่อง เช่น วางบนพื้นสะท้อนห่างผนังเท่าใด เหมือนตัวอย่างรายงานในคู่มือThe description should state the operating condition and placement, e.g. on the reflecting floor and how far from the walls, as in the manual's sample report
- รูปหรือแบบร่างของเครื่อง: คลิกช่องรูปแล้วเลือกไฟล์ ขนาดแนะนำ 340×160 px สำหรับ A4 หรือ 350×130 px สำหรับ LetterPicture or sketch of the object: click the image field and load a file; recommended 340×160 px for A4 or 350×130 px for Letter
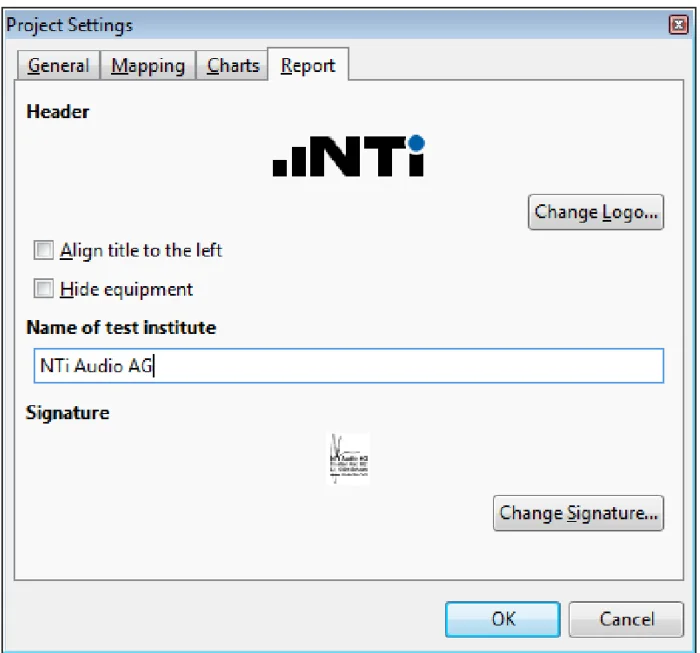
- View › Settings แท็บ Report: โลโก้ (120×35 px) ลายเซ็น (350×70 px) Name of the test institute และตัวเลือก Align title to the left กับ Hide equipmentView › Settings, Report tab: logo (120×35 px), signature (350×70 px), Name of the test institute, and the options Align title to the left and Hide equipment
- แท็บ General: ช่วงความถี่ ผลลัพธ์ และหน่วย แท็บ Charts: สเกลแกน Y ของกราฟ RTA, RT60 และ ResultsGeneral tab: frequency range, results and unit. Charts tab: Y-axis scaling for the RTA, RT60 and Results charts
กำลังเสียงคือพลังงานที่ผ่านผิวการวัดทั้งผืน ผิวที่ใหญ่ขึ้นหมายถึงพลังงานรวมมากขึ้นที่ระดับความดันเสียงเฉลี่ยเท่าเดิม ดังนั้นค่า S ที่ผิดจะเลื่อน LWA ทุกย่าน ดูหลักการได้ที่ กำลังเสียงกับความดันเสียงSound power is the energy passing through the whole measurement surface: a larger surface means more total energy at the same average pressure level, so a wrong S shifts LWA in every band. The principle is in sound power vs sound pressure.
07วิเคราะห์ANALYZE
ตรวจค่าเฉลี่ยและค่าแก้ K1 K2Check the averages and the K1 / K2 corrections
มุมมอง Calculations บอกว่าผลสุดท้ายถูกแก้ไปมากน้อยแค่ไหน ถ้า K1 หรือ K2 ใหญ่ผิดสังเกต ผลกำลังเสียงก็เชื่อถือได้น้อยลงThe Calculations view tells you how much the final result has been corrected. If K1 or K2 is unusually large, the sound power is less trustworthy.
- STEP1
เปิดมุมมอง CalculationsOpen the Calculations view
กราฟแสดงค่าเฉลี่ยของเสียงเครื่องและเสียงพื้นหลังในช่วงความถี่ที่เลือก ดูว่าเส้นทั้งสองห่างกันพอในทุกย่านหรือไม่The chart shows the averaged machine and background noise over the chosen range. Check that the two curves are far enough apart in every band.
ในโปรแกรมIn the programView › CalculationsView › Calculations
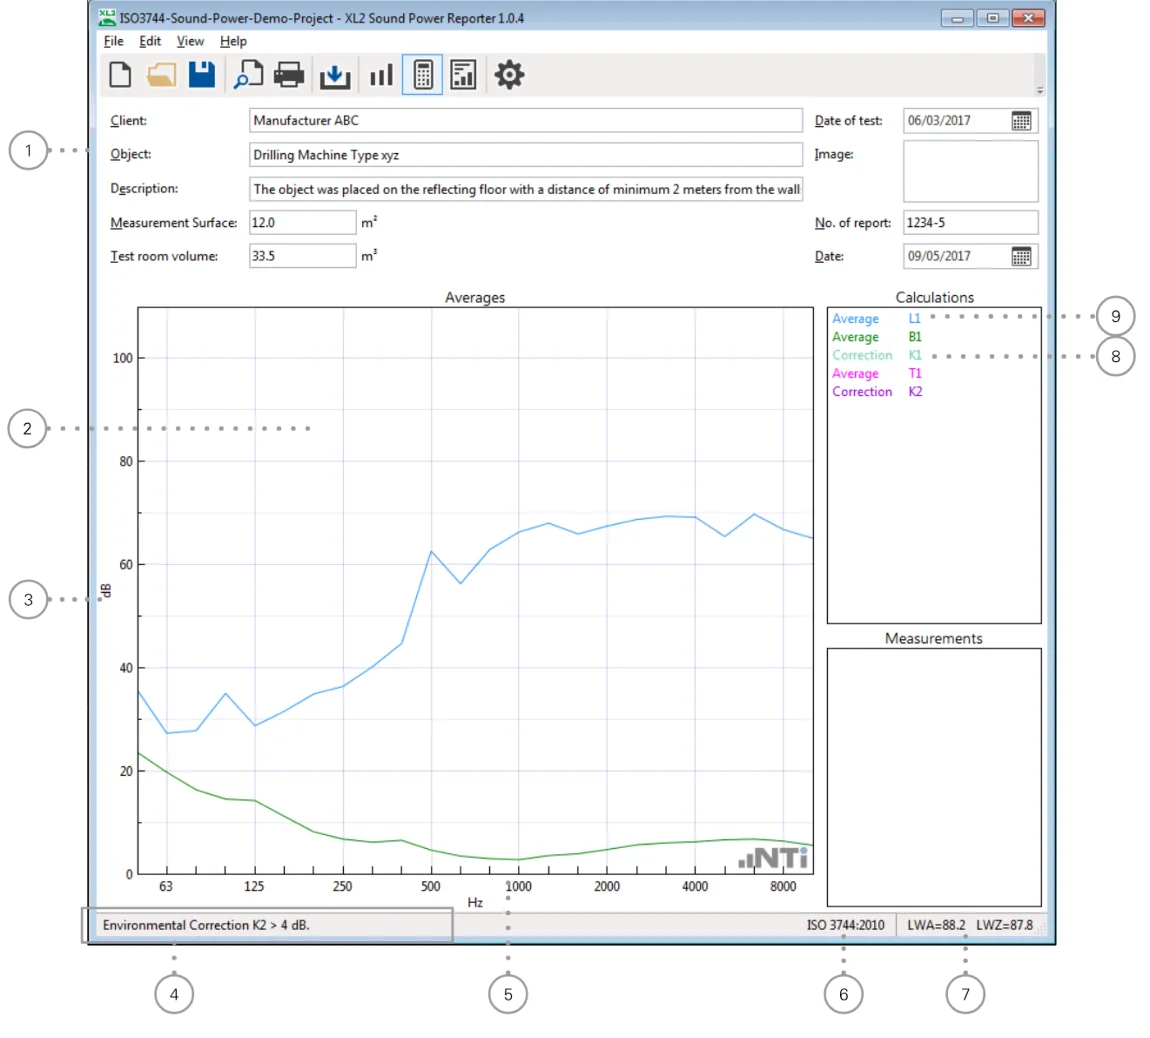
รูปที่ 18Figure 18 ส่วนต่าง ๆ ของมุมมอง Calculations (หมายเลขตามคู่มือ) (ภาพจากคู่มือ V1.10.00 หน้าจอโปรแกรมรุ่น 1.0.4)The parts of the Calculations view (numbers as in the manual) (from manual V1.10.00; program screen version 1.0.4) - Details ผิวการวัดและปริมาตรห้องใช้ในการคำนวณDetails: measurement surface and room volume feed the calculation
- Chart ค่าเฉลี่ยเสียงเครื่องและเสียงพื้นหลังChart: averaged source and background noise
- Y-Axis (ตั้งใน Settings › Charts)Y-Axis (Settings › Charts)
- Guideline Bar ข้อมูลเพิ่มเติม เช่น Environmental Correction K2Guideline Bar: extra information such as Environmental Correction K2
- X-Axis 50 Hz–10 kHzX-Axis: 50 Hz–10 kHz
- Standard มาตรฐานที่ใช้Standard in use
- Sound Power Result ค่าเดี่ยวSound Power Result: single numbers
- Corrections เลือก Correction K1 เพื่อดูค่าแก้เสียงพื้นหลังCorrections: select Correction K1 for the background correction
- Average เลือก Average L1 เพื่อดูรายละเอียด กด ESC เพื่อกลับAverage: select Average L1 for the detail; ESC returns
- STEP2
ดูค่าแก้เสียงพื้นหลังLook at the background correction
เลือก Correction K1 เพื่อดูค่าแก้เสียงพื้นหลังรายย่าน ย่านที่ K1 ใหญ่คือย่านที่เสียงพื้นหลังใกล้เสียงเครื่องSelect Correction K1 to see the background correction per band. Bands with a large K1 are those where the background is close to the machine noise.
- STEP3
ดูรายละเอียดของค่าเฉลี่ยOpen an average in detail
เลือกรายการเช่น Average L1 เพื่อดูทุกการวัดที่ใช้เฉลี่ยใน Detailed View กด ESC เพื่อกลับหน้ารวมSelect an item such as Average L1 to see every reading in the Detailed View; press ESC to return to the overview.
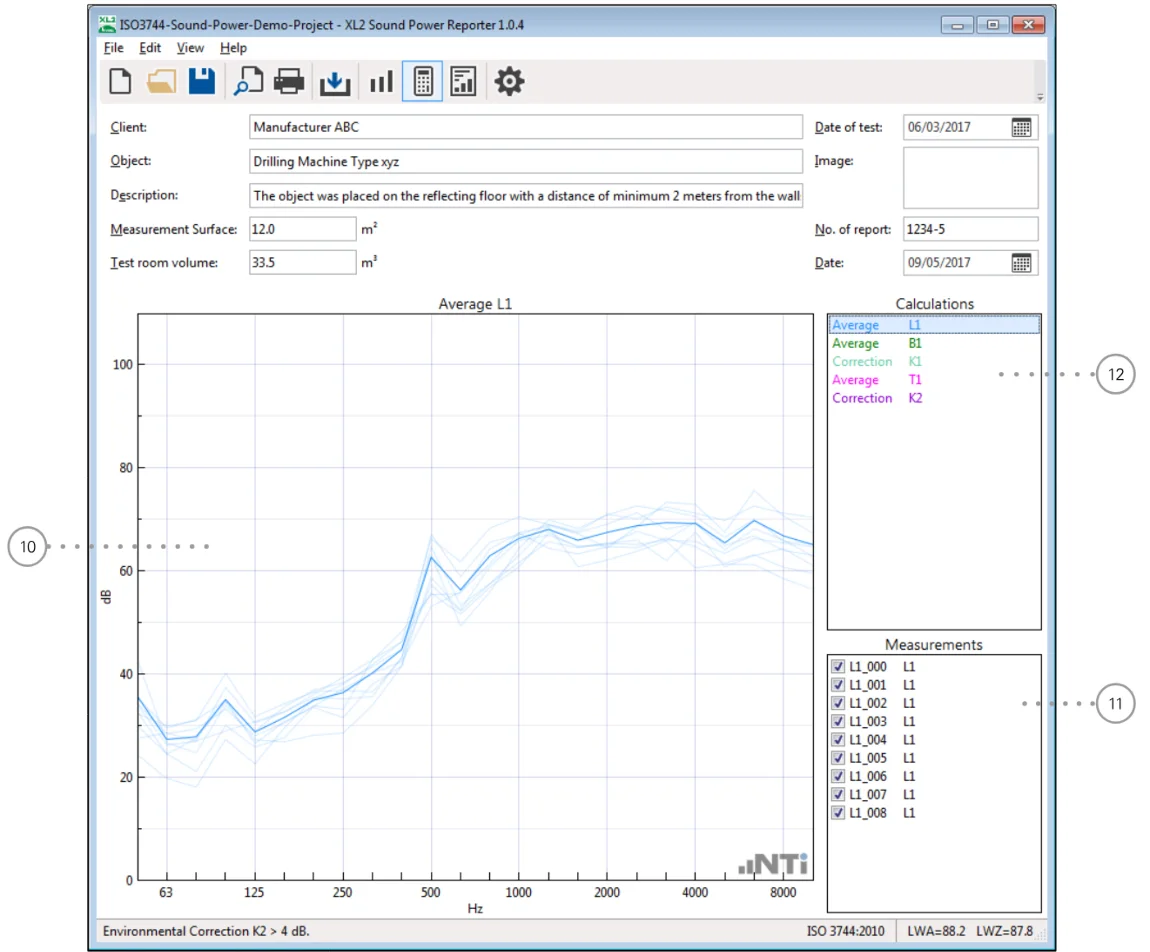
รูปที่ 19Figure 19 เมื่อเลือก Average L1: หมายเลข 10 Detailed View ทุกค่าที่วัดกับเส้นค่าเฉลี่ย, 11 Measurements Selection เอาเครื่องหมายถูกออกเพื่อไม่ใช้ค่านั้น, 12 Selected Average Parameter ค่าที่เลือกดู (ภาพจากคู่มือ V1.10.00 หน้าจอโปรแกรมรุ่น 1.0.4)With Average L1 selected: 10 Detailed View of every reading and the average, 11 Measurements Selection (untick to leave a reading out), 12 Selected Average Parameter (from manual V1.10.00; program screen version 1.0.4) ภาพ: NTi Audio — คู่มือ Sound Power Reporter for XL2 V1.10.00 (พ.ค. 2020) หน้า 30Image: NTi Audio — Sound Power Reporter for XL2 — User Manual V1.10.00 (May 2020), p. 30 - STEP4
ตัดค่าที่ผิดปกติออกRemove outliers
ถ้าตำแหน่งใดโดดจากตำแหน่งอื่นโดยมีเหตุผลทางเทคนิค เช่น มีเสียงรบกวนระหว่างวัด ให้ปิดการใช้ใน Measurements SelectionIf one position stands out for a technical reason, such as a disturbance during it, disable it in Measurements Selection.
ข้อควรระวังWatch outระวัง: ในกำลังเสียง ตำแหน่งที่ดังกว่าตำแหน่งอื่นอาจเป็นทิศที่เครื่องแผ่เสียงออกมากจริง ไม่ใช่ค่าผิด อย่าตัดทิ้งเพียงเพราะตัวเลขสูงCareful: in sound power a louder position may be the direction the machine really radiates most, not an error. Do not remove it just because it is high.
ค่าแก้ K2 มาจากเวลาเสียงก้องเฉลี่ยของห้องกับข้อมูลห้องที่กรอกไว้ ถ้าห้องก้องมาก K2 จะใหญ่ ในสนามเสียงอิสระไม่มี K2 คู่มือของ NTi ไม่ได้ให้สูตรของ K1 และ K2 ถ้าต้องอธิบายการคำนวณในรายงาน ให้อ้างมาตรฐานที่ใช้K2 comes from the room's average reverberation time and the room data you entered: a reverberant room gives a large K2; a free field has no K2. NTi's manual does not give the K1 and K2 formulas; if the report must explain the calculation, cite the standard used.
08อ่านผลINTERPRET RESULTS
อ่านผลกำลังเสียงให้เป็นRead the sound power correctly
มุมมอง Results แสดงสิ่งที่จะไปอยู่ในรายงาน: ตารางกำลังเสียงรายย่าน กราฟ และตัวเลขเดียว สิ่งที่มือใหม่มักพลาดคือไม่ดูเครื่องหมาย * ในตารางThe Results view shows what goes into the report: the sound power table per band, the chart and the single number. What beginners miss most often is the * marks in the table.
ตารางและกราฟแสดงกำลังเสียงในช่วงความถี่ที่ตั้งไว้ภายใน 50 Hz–10 kHz ซึ่งแก้ค่าเสียงพื้นหลังแล้ว ใช้กล่อง Result Selector เลือกผลที่จะแสดง (ตัวเลือกที่มีขึ้นกับ Results ที่ตั้งใน Settings › General) เช่น LWA หรือ LWZ แบบรวม 1/1 ออกเตฟ หรือ 1/3 ออกเตฟThe table and chart show the sound power over the set range within 50 Hz–10 kHz, already background-corrected. Use the Result Selector box to choose what is shown (the choices depend on the Results set in Settings › General), e.g. LWA or LWZ as broadband, 1/1-octave or 1/3-octave values.
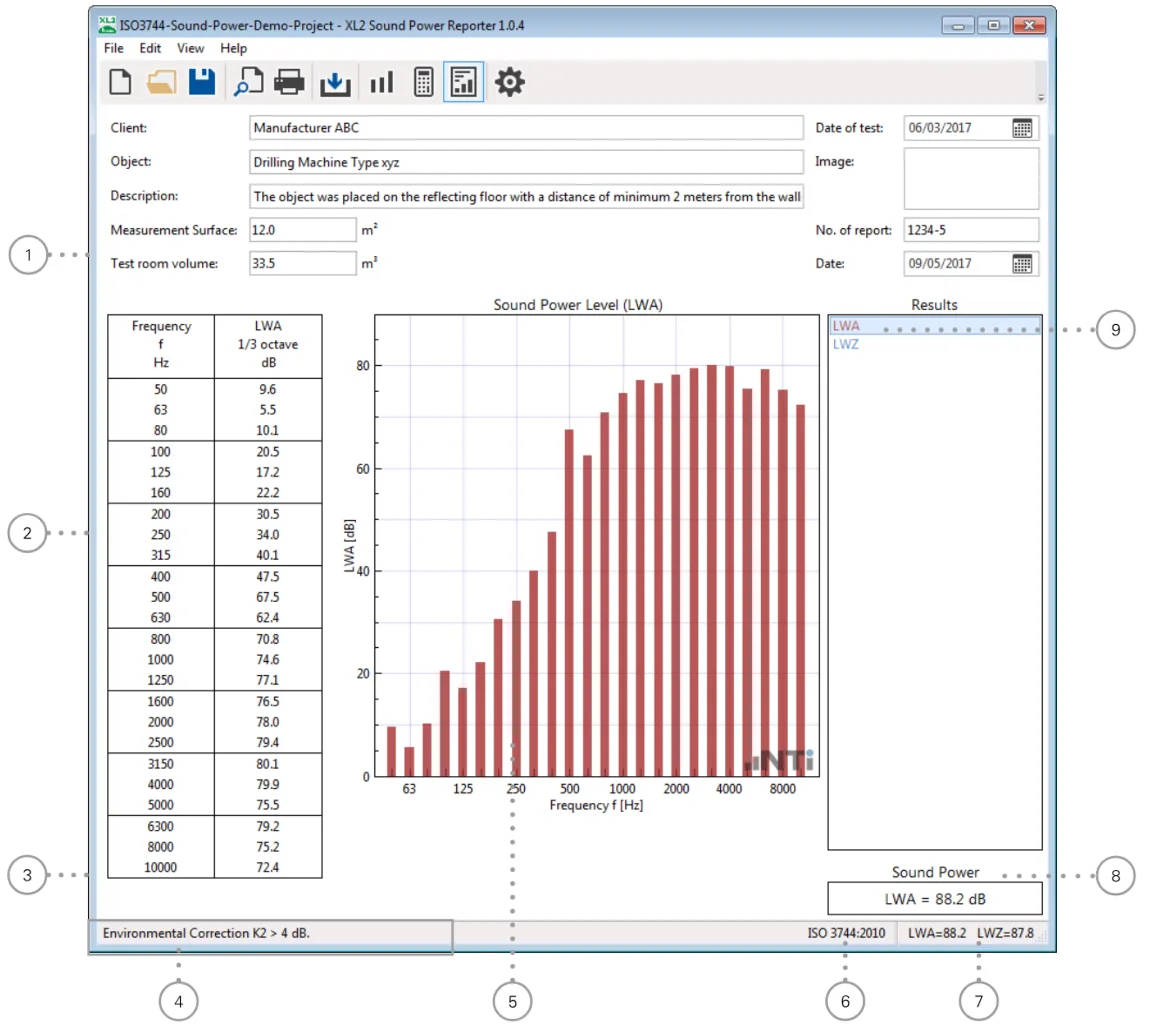
- Details ข้อมูลหัวรายงาน ผิวการวัดและปริมาตรห้องDetails: report header, measurement surface, room volume
- Results Table กำลังเสียงต่อย่าน หักเสียงพื้นหลังแล้ว ย่านที่แก้แบบคงที่มีเครื่องหมาย *Results Table: sound power per band, background-corrected; bands with a fixed correction carry *
- ข้อมูลการแก้เสียงพื้นหลังแบบคงที่ (ย่านที่มี *)Note on the fixed background correction (bands with *)
- Guideline Bar ข้อมูลเพิ่มเติมGuideline Bar: extra information
- Results Chart สเปกตรัมกำลังเสียงResults Chart: sound power spectrum
- Standard มาตรฐานที่ใช้Standard in use
- Sound Power Result ค่าเดี่ยวที่ตั้งใน Settings › GeneralSound Power Result: single numbers set in Settings › General
- Sound Power Result ค่าเดี่ยวของผลที่เลือกในข้อ 9Sound Power Result for the result picked in 9
- Result Selector Box เลือกผลที่จะแสดงResult Selector Box: pick the result to show
ระดับกำลังเสียงSound power level LW · dB re 1 pW
- คืออะไรWhat it is
- พลังงานเสียงทั้งหมดที่แหล่งกำเนิดแผ่ออกทุกทิศทาง คิดเป็น dB เทียบกับ 1 pWThe total acoustic energy the source emits in all directions, in dB relative to 1 pW.
- ทำไมต้องสนใจWhy it matters
- ไม่ขึ้นกับระยะหรือตำแหน่งผู้ฟัง จึงใช้เปรียบเทียบเครื่องและระบุในเอกสารผลิตภัณฑ์ได้It does not depend on distance or listener position, so it can compare machines and be declared in product documents.
- เข้าใจผิดบ่อยCommon misunderstanding
- ไม่ใช่ระดับเสียงที่คนได้ยินที่จุดใดจุดหนึ่ง ตัวเลขกำลังเสียงมักสูงกว่าระดับความดันเสียงที่วัดได้รอบเครื่องมาก และนั่นเป็นเรื่องปกติIt is not the level anyone hears at a given spot. The sound power figure is usually much higher than the pressure levels measured around the machine, and that is normal.
กำลังเสียงถ่วงน้ำหนัก A / ไม่ถ่วงน้ำหนักA-weighted / unweighted sound power LWA · LWZ · dB
- คืออะไรWhat it is
- LWA ถ่วงน้ำหนัก A LWZ ไม่ถ่วงน้ำหนักความถี่ ทั้งแบบรวมและรายย่านLWA is A-weighted, LWZ has no frequency weighting; both as broadband and per band.
- ทำไมต้องสนใจWhy it matters
- LWA เป็นตัวเลขที่ใช้บ่อยในเอกสารผลิตภัณฑ์ LWZ ใช้เมื่อต้องดูรายละเอียดทางวิศวกรรม เช่น ความถี่ต่ำLWA is the usual figure in product documents; LWZ is for engineering detail such as low frequencies.
ค่าแก้เสียงพื้นหลังBackground noise correction K1 · dB
- คืออะไรWhat it is
- ค่าที่โปรแกรมหักผลของเสียงพื้นหลังออกจากระดับที่วัดได้ แสดงใน CalculationsWhat the program removes for background noise from the measured levels, shown in Calculations.
- ทำไมต้องสนใจWhy it matters
- บอกว่าผลแต่ละย่านได้รับผลจากเสียงพื้นหลังมากเพียงใดIt tells you how much each band was affected by background noise.
- เข้าใจผิดบ่อยCommon misunderstanding
- ย่านที่มีเครื่องหมาย * ในตารางผลใช้ค่าแก้แบบคงที่ ค่านั้นไม่ใช่ค่าที่วัดได้แม่นยำเท่าย่านอื่น ควรระบุในรายงานBands marked * in the results table use a fixed correction; they are not as reliable as the other bands and should be noted in the report.
ค่าแก้สภาพแวดล้อมEnvironmental (room) correction K2 · dB
- คืออะไรWhat it is
- ค่าที่หักผลของเสียงสะท้อนในห้องทดสอบ คำนวณจากเวลาเสียงก้องและข้อมูลห้องWhat is removed for reflections in the test room, from the reverberation time and the room data.
- ทำไมต้องสนใจWhy it matters
- ห้องที่ก้องทำให้ระดับที่ไมโครโฟนสูงกว่าที่เครื่องแผ่ออกจริงA reverberant room raises the level at the microphones above what the machine really radiates.
- เข้าใจผิดบ่อยCommon misunderstanding
- K2 ไม่ใช่ตัวแก้ห้องที่ไม่ผ่านเกณฑ์ ห้องต้องเข้าเกณฑ์ของมาตรฐานก่อน ค่าแก้จึงใช้ได้K2 does not rescue a room that fails the criteria: the room must meet the standard for the correction to be valid.
ค่าเฉลี่ยที่แสดงประกอบSupporting averages L1 · Lb · RT60 · dB · dB · s
- คืออะไรWhat it is
- ระดับเสียงเครื่องเฉลี่ย ระดับเสียงพื้นหลังเฉลี่ย และเวลาเสียงก้องเฉลี่ยThe average source level, average background level and average reverberation time.
- ทำไมต้องสนใจWhy it matters
- ใช้ตรวจย้อนว่าผลลัพธ์มาจากข้อมูลที่สมเหตุสมผลThey let you trace the result back to sensible data.
รายงาน LWA เป็นตัวเลขเดียวโดยไม่ดูว่ามีหลายย่านที่มีเครื่องหมาย * ถ้าเจอแบบนี้ ครั้งต่อไปให้ทดสอบในช่วงที่เงียบกว่าหรือพื้นที่ที่เสียงพื้นหลังต่ำกว่า และระบุข้อจำกัดในรายงานฉบับนี้Reporting LWA as a single number without noticing that several bands carry *. If that happens, test at a quieter time or in a quieter space next time, and state the limitation in this report.
09รายงานREPORT
ออกรายงานและเก็บโปรเจกต์Issue the report and keep the project
รายงานพร้อมเมื่อมาตรฐานถูกต้อง ส่วนหัวครบ ผลผ่านการตรวจแล้ว และคุณเก็บไฟล์โปรเจกต์ไว้แก้ภายหลังได้The report is ready when the standard is right, the header is complete, the result has been checked and the project file is saved for later changes.
- STEP1
ดูตัวอย่างแล้วพิมพ์Preview, then print
Print Preview แสดงรายงานของผลลัพธ์ที่เลือกไว้ ตรวจทั้งฉบับก่อนพิมพ์ คู่มือไม่มีคำสั่งบันทึกเป็น PDF โดยตรง ให้พิมพ์ผ่านเครื่องพิมพ์ PDF หรือ XPSPrint Preview shows the reports for the selected results; check them fully before printing. The manual documents no direct PDF save: print to a PDF printer or to XPS.
ในโปรแกรมIn the programFile › Print Preview แล้ว File › PrintFile › Print Preview, then File › Print
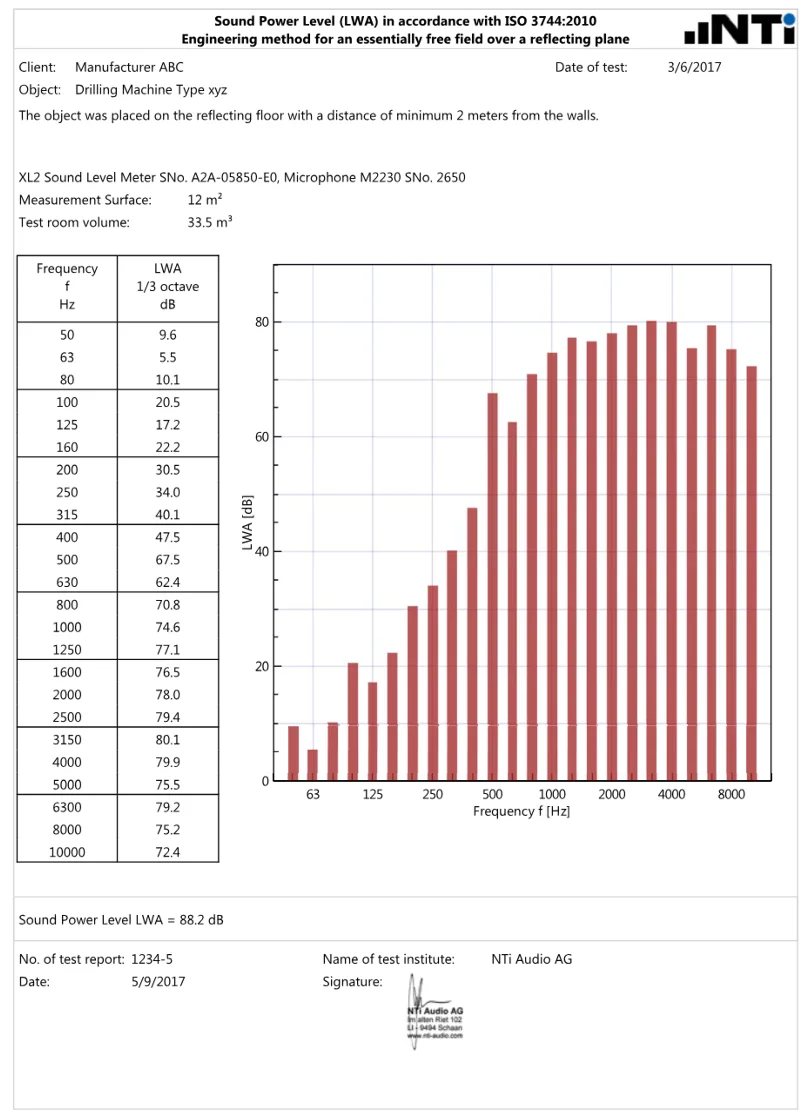
รูปที่ 21Figure 21 ตรวจรายงานทั้งหน้าใน Print Preview ก่อนพิมพ์: ชื่อมาตรฐาน ข้อมูลเครื่อง ผิวการวัด ปริมาตรห้อง ตาราง กราฟ และค่า LWA (ภาพจากคู่มือ V1.10.00)Check the whole page in Print Preview before printing: standard title, device data, measurement surface, room volume, table, chart and LWA (from manual V1.10.00) ภาพ: NTi Audio — คู่มือ Sound Power Reporter for XL2 V1.10.00 (พ.ค. 2020) หน้า 34Image: NTi Audio — Sound Power Reporter for XL2 — User Manual V1.10.00 (May 2020), p. 34 - STEP2
คัดลอกข้อมูลไปใช้ในรายงานของคุณเองCopy data into your own report
ใช้ Copy กับข้อมูลที่เลือกในกล่องด้านขวาของมุมมอง Measurements, Calculations หรือ Results แล้ววางในเอกสารหรือโปรแกรมตารางของคุณ คู่มือไม่ได้ระบุการส่งออกเป็นไฟล์ Word หรือ Excel โดยตรงUse Copy on the data selected in the right-hand box of the Measurements, Calculations or Results view and paste it into your own document or spreadsheet. The manual documents no direct Word or Excel file export.
ในโปรแกรมIn the programEdit › CopyEdit › Copy
- STEP3
บันทึกโปรเจกต์Save the project
บันทึกเป็นไฟล์ *.xlsp เพื่อเปิดแก้หรือพิมพ์ซ้ำภายหลัง เก็บไว้คู่กับโฟลเดอร์ข้อมูลดิบจาก XL2Save it as an *.xlsp file so you can edit or reprint later, and keep it next to the raw data folder from the XL2.
ในโปรแกรมIn the programFile › Save / Save as...File › Save / Save as...
ก่อนส่งรายงาน: มาตรฐานและฉบับถูกต้อง ส่วนหัวครบ (สภาพการเดินเครื่อง พื้นที่ผิวการวัด และปริมาตรห้องหรือระบุว่าเป็นสนามเสียงอิสระ) จำนวนไฟล์ L1 / B1 / RT60 ครบ ย่านที่มี * ได้รับการอธิบาย และมีบันทึกการตรวจเครื่องด้วย calibrator ตอนเริ่มและจบวันBefore sending: correct standard and edition, complete header (operating condition, measurement surface area, and room volume or a free-field statement), complete L1 / B1 / RT60 sets, bands marked * explained, and a record of the calibrator checks at the start and end of the day.
10แก้ปัญหาTROUBLESHOOT
ปัญหาที่พบบ่อยและวิธีแก้Common problems and fixes
| อาการSymptom | สาเหตุที่เป็นไปได้Likely cause | วิธีแก้Fix |
|---|---|---|
| นำเข้าไม่ได้ / ขึ้นเรื่อง OptionImport refused / option message | สาเหตุที่เป็นไปได้Likely causeไม่มี Sound Power Option หรือ 365 เฟิร์มแวร์ต่ำกว่า V3.33 หรือไม่มีอินเทอร์เน็ตตอนนำเข้าNo Sound Power Option or 365, firmware below V3.33, or no internet during import | วิธีแก้Fixตรวจตารางในบทติดตั้ง อัปเดตเฟิร์มแวร์ แล้วลองใหม่ขณะออนไลน์Check the table in the install chapter, update the firmware and retry online |
| ไม่มีผลแบบ 1/3 ออกเตฟNo 1/3-octave result | สาเหตุที่เป็นไปได้Likely causeXL2 ไม่มี XL2 Extended Acoustic Pack จึงวัด RT60 แบบ 1/3 ออกเตฟไม่ได้XL2 without the XL2 Extended Acoustic Pack, so no 1/3-octave RT60 | วิธีแก้Fixเพิ่ม Option หรือถ้างานรับได้ ใช้ความละเอียดออกเตฟ หรือทดสอบในสนามเสียงอิสระซึ่งไม่ต้องใช้ RT60Add the option, or if acceptable use octave resolution, or test in a free field where no RT60 is needed |
| ไฟล์เข้าผิดกลุ่มFiles in the wrong group | สาเหตุที่เป็นไปได้Likely causeบันทึกบน XL2 โดยไม่ได้เลือกชื่อ L1 / B1 หรือลืมเปลี่ยนชื่อเมื่อเปิดเครื่องSaved on the XL2 without choosing L1 / B1, or the name was not switched when the machine started | วิธีแก้Fixย้ายด้วยคลิกขวา › Assign To และครั้งหน้าวัด B1 ให้ครบก่อนเปลี่ยนเป็น L1Move them with right-click › Assign To; next time finish B1 before switching to L1 |
| ไม่มีข้อมูล RT60 หรือ K2No RT60 or K2 data | สาเหตุที่เป็นไปได้Likely causeไฟล์ RT60 อยู่นอกโฟลเดอร์ของเครื่อง หรือขาดไฟล์ระบบ *.xl2RT60 files outside the device folder, or *.xl2 system files missing | วิธีแก้Fixคัดลอกใหม่ทั้งโฟลเดอร์ ถ้าเป็นสนามเสียงอิสระ ไม่ต้องมี RT60Copy the whole folder again; in a free field no RT60 is needed |
| หลายย่านมีเครื่องหมาย *Many bands marked * | สาเหตุที่เป็นไปได้Likely causeเสียงพื้นหลังใกล้เสียงของเครื่องเกินไปBackground too close to the machine noise | วิธีแก้Fixทดสอบในช่วงที่เงียบกว่า ย้ายไปพื้นที่ที่เงียบกว่า หรือปิดแหล่งเสียงอื่น แล้ววัดใหม่Test at a quieter time, move to a quieter space or switch off other sources, then re-measure |
| LWA สูงหรือต่ำผิดคาดทุกย่านLWA shifted in every band | สาเหตุที่เป็นไปได้Likely causeพื้นที่ผิวการวัดหรือปริมาตรห้องใน Details ผิดWrong measurement surface area or room volume in Details | วิธีแก้Fixตรวจการคำนวณพื้นที่ผิวครอบกับขนาดจริง แล้วแก้ใน DetailsRecheck the envelope area against the real dimensions and correct Details |
| ใช้ XL3Using an XL3 | สาเหตุที่เป็นไปได้Likely causeNTi ยังไม่ได้เผยแพร่ Option และขั้นตอนนำเข้าสำหรับ XL3NTi has not published the option or import procedure for the XL3 | วิธีแก้Fixติดต่อ GET BEST SOUND ก่อนวัดงานจริงContact GET BEST SOUND before a real job |