QUICK STARTเริ่มใช้งานใน 5–10 นาทีUp and running in 5–10 minutes
ลองโปรแกรมด้วยข้อมูลตัวอย่างของ NTiTry the program with NTi's demo data
วิธีเรียนที่เร็วที่สุดคือเปิดโปรแกรมกับข้อมูลตัวอย่างก่อน ยังไม่ต้องออกไปวัดจริง คุณจะเห็นทั้งเส้นทางตั้งแต่ไฟล์ผลวัดจนถึงหน้ารายงานภายในไม่กี่นาทีThe fastest way to learn is to open the program with demo data before you measure anything. In a few minutes you will see the whole path from measurement files to the report page.
ต้องมีอะไรบ้างก่อนเริ่มWhat you need before you start
- PC ที่ใช้ Windows (NTi ระบุ Windows รุ่นที่รองรับไว้ในหน้าผลิตภัณฑ์)A Windows PC (NTi lists the supported Windows versions on the product page)
- ไฟล์ติดตั้ง Sound Insulation Reporter จากหน้าผลิตภัณฑ์ของ NTi Audio (ตัวโปรแกรมใช้ได้ฟรี ส่วนการนำเข้าข้อมูลจากเครื่องของคุณต้องมี License)The Sound Insulation Reporter installer from NTi Audio's product page (the program is free; importing your own instrument data needs a licence)
- การเชื่อมต่ออินเทอร์เน็ต สำหรับดาวน์โหลดข้อมูลตัวอย่างและการตรวจ LicenseAn internet connection, for the demo data and the licence check
- STEP1
ติดตั้งแล้วเปิดโปรแกรมInstall and open the program
ดาวน์โหลดไฟล์ติดตั้งจากหน้า Sound Insulation Reporter ของ NTi Audio ติดตั้งตามขั้นตอนปกติของ Windows แล้วเปิดโปรแกรมDownload the installer from NTi Audio's Sound Insulation Reporter page, install it the usual Windows way and start the program.
ข้อควรระวังWatch outติดตั้งได้หลายเครื่อง ไม่ต้องกลัวว่า License จะหมดเพราะติดตั้งบนโน้ตบุ๊กสำนักงานกับเครื่องหน้างานIt can be installed on several computers, so installing it on the office PC and the site laptop does not use up the licence.
- STEP2
ดาวน์โหลดข้อมูลตัวอย่างGet the demo data
ใช้คำสั่งดาวน์โหลดข้อมูลตัวอย่างในเมนู Help หรือดาวน์โหลดไฟล์ Demo Data จากหน้าผลิตภัณฑ์ของ NTi แล้วเก็บไว้ในโฟลเดอร์ที่หาเจอง่ายUse the demo-data command in the Help menu, or download the Demo Data file from NTi's product page, and keep it in a folder you can find easily.
ในโปรแกรมIn the programHelp › Download Demo Data...Help › Download Demo Data...
- STEP3
สร้างผนังกั้นใหม่ (Partition)Create a new partition
ในโปรแกรมนี้ หนึ่งโปรเจกต์คือผนังหรือพื้นกั้นหนึ่งชิ้น เลือกมาตรฐาน ประเภทการวัด (Airborne เสียงผ่านอากาศ / Impact เสียงกระแทก / Facade ผนังภายนอก) และจำนวนตำแหน่งลำโพงให้ตรงกับชุดข้อมูล แล้วกด OKIn this program one project is one partition (one wall or floor). Choose the standard, the type (Airborne / Impact / Facade) and the number of speaker positions to match the data set, then press OK.
ในโปรแกรมIn the programFile › New Partition... (คู่มือรุ่นเก่าเรียกว่า New) › เลือก Standard, Airborne / Impact / Facade, Speaker positions › OKFile › New Partition... (older manuals: New) › choose Standard, Airborne / Impact / Facade, Speaker positions › OK
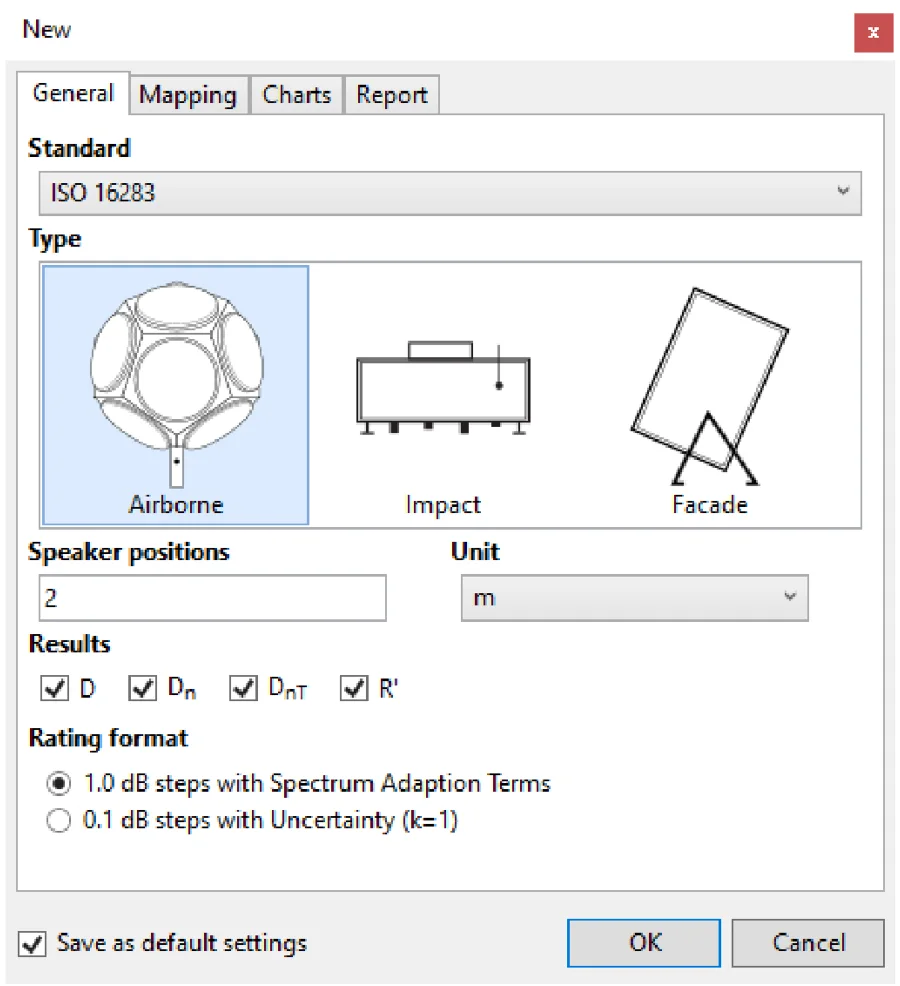
รูปที่ 2Figure 2 หน้าต่างสร้างผนังกั้นใหม่ (หัวหน้าต่างชื่อ New) — เลือกตามข้อมูลที่วัดมาแล้วกด OKThe new-partition dialog (titled New): choose to match the data you measured, then press OK - Standard มาตรฐานที่ต้องการรายงานStandard: the standard to report to
- Type: Airborne / Impact / FacadeType: Airborne / Impact / Facade
- Speaker positions จำนวนตำแหน่งลำโพงที่วัดSpeaker positions: how many you measured
- Results ค่าที่จะแสดงในรายงานResults: the values to report
- Rating format ขั้นละ 1.0 dB หรือ 0.1 dB พร้อมความไม่แน่นอนRating format: 1.0 dB steps, or 0.1 dB with uncertainty
- OK สร้างโปรเจกต์OK creates the project
- STEP4
ลากโฟลเดอร์ข้อมูลลงโปรแกรมDrag the data folder into the program
ลากโฟลเดอร์ข้อมูลทั้งโฟลเดอร์ไปวางในช่อง Drop measurement files or folder here โปรแกรมจะจับคู่แต่ละไฟล์กับตำแหน่งวัดจากชื่อไฟล์ให้อัตโนมัติDrag the whole data folder onto Drop measurement files or folder here. The program assigns each file to its measurement position from the file name.
ข้อควรระวังWatch outช่องนี้รับไฟล์ .zip ด้วย (ตั้งแต่เวอร์ชัน 1.40) จึงไม่ต้องแตกไฟล์ก่อนก็ได้The drop field also accepts a .zip file (from version 1.40), so you do not have to unzip first.
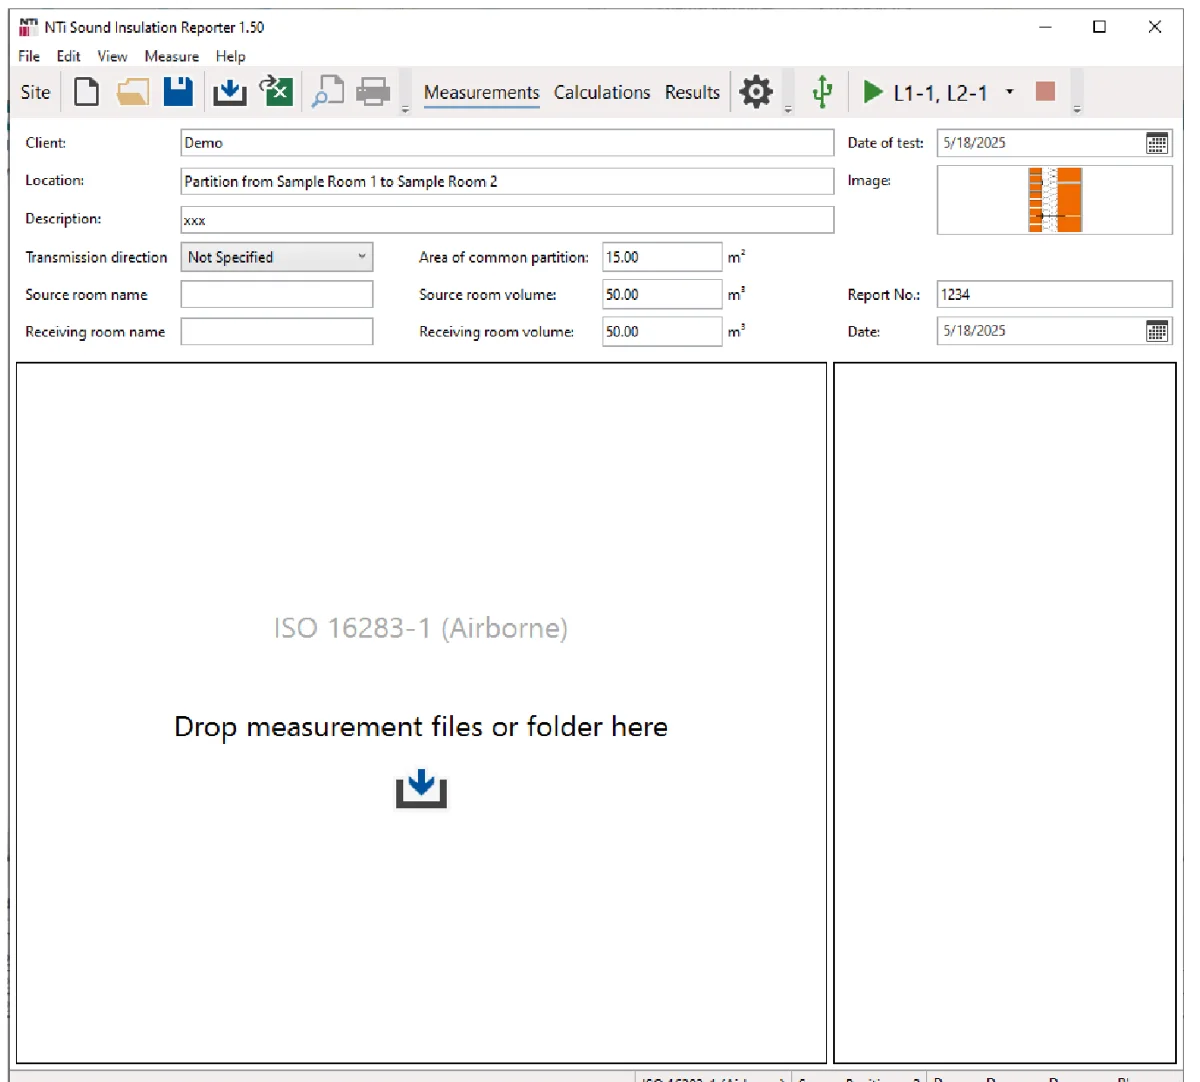
รูปที่ 3Figure 3 หลังกด OK จะเห็นช่อง Drop measurement files or folder here — ลากทั้งโฟลเดอร์ของผนังกั้นมาวางที่นี่After OK you see Drop measurement files or folder here: drag the whole partition folder onto it ภาพ: NTi Audio — คู่มือ Sound Insulation Reporter for XL3 & XL2 หน้า 26Image: NTi Audio — Sound Insulation Reporter for XL3 & XL2 — User Manual, p. 26 - STEP5
ดูผลลัพธ์Look at the result
เปิดมุมมอง Results จะเห็นตารางและกราฟ 50 Hz–5 kHz พร้อมค่าเดี่ยว (single-number rating) และค่าปรับ C และ CtrOpen the Results view: a table and chart from 50 Hz to 5 kHz with the single-number rating and the C and Ctr terms.
ในโปรแกรมIn the programView › ResultsView › Results
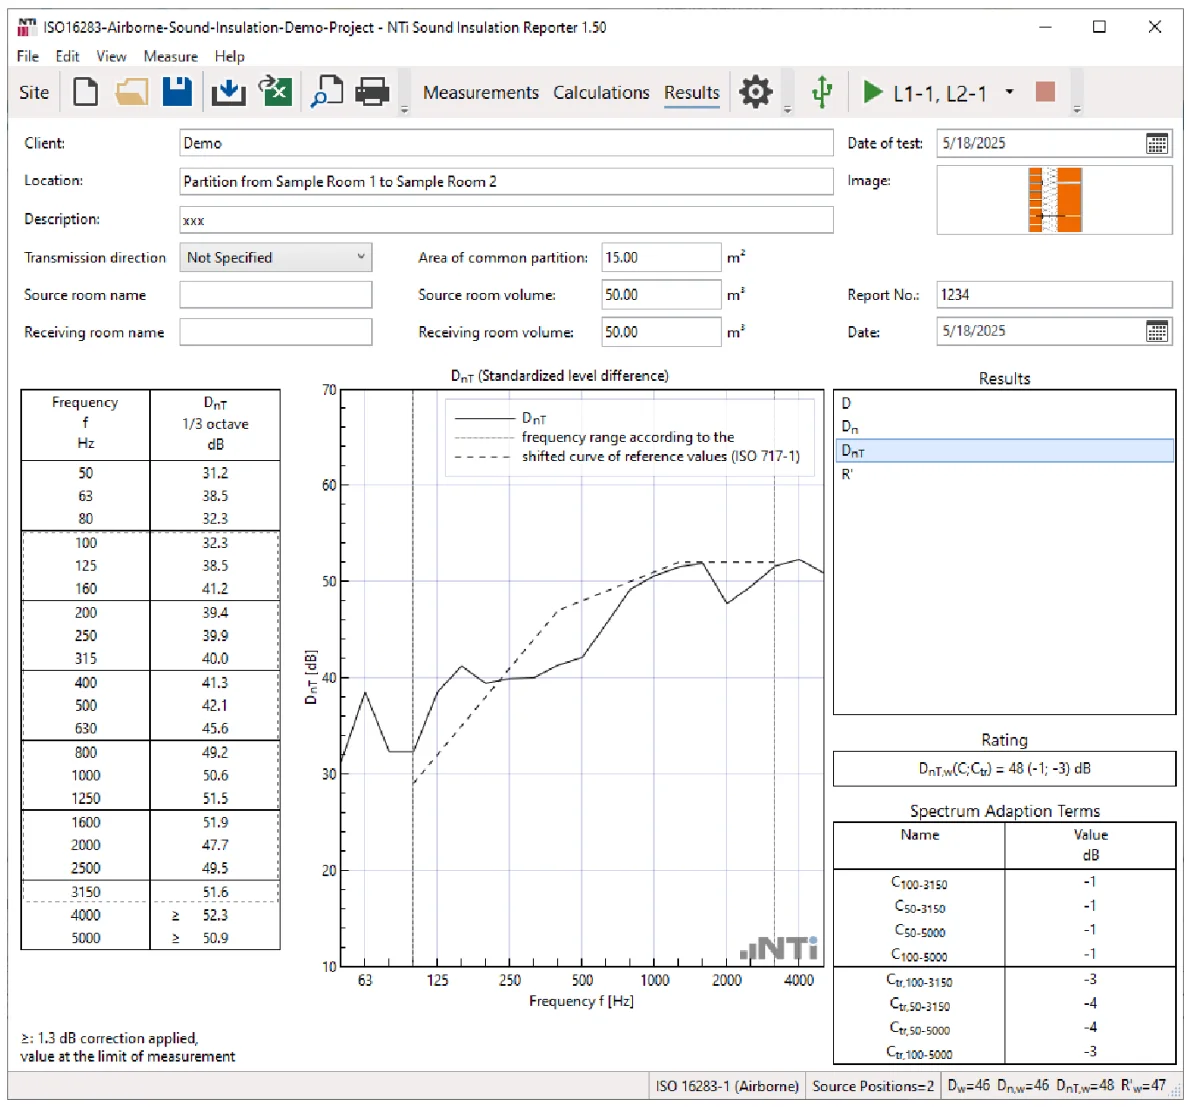
รูปที่ 4Figure 4 มุมมอง Results — ตารางค่าต่อย่านความถี่ กราฟเทียบกับเส้นอ้างอิง และค่าเดี่ยวที่มุมขวาThe Results view: band values, the curve against the reference, and the single number on the right ภาพ: NTi Audio — คู่มือ Sound Insulation Reporter for XL3 & XL2 หน้า 36Image: NTi Audio — Sound Insulation Reporter for XL3 & XL2 — User Manual, p. 36 - STEP6
ดูหน้าตารายงานPreview the report
เปิด Print Preview เพื่อดูรายงานที่โปรแกรมจัดให้ ถ้าต้องการไฟล์ PDF ให้พิมพ์ผ่านเครื่องพิมพ์ PDF ของ WindowsOpen Print Preview to see the report the program lays out. For a PDF, print to a PDF printer in Windows.
ในโปรแกรมIn the programFile › Print PreviewFile › Print Preview
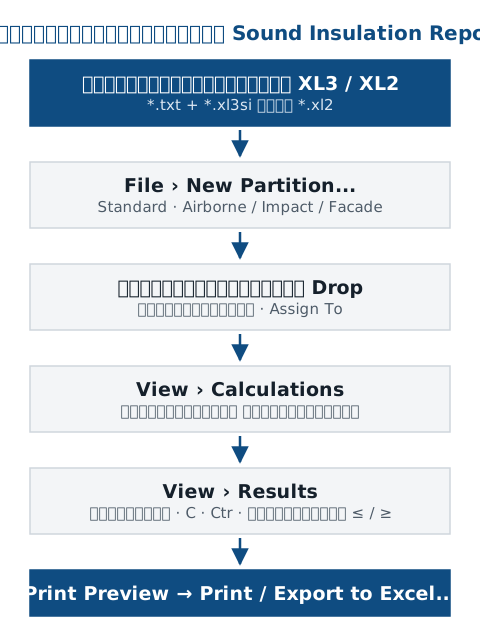
คุณเห็นเส้นทางครบแล้ว: ไฟล์ผลวัด → จับคู่ตำแหน่ง → ค่าเฉลี่ย → ผลลัพธ์ → รายงาน บทต่อจากนี้คือการทำแบบเดียวกันกับข้อมูลที่คุณวัดเอง ซึ่งเรื่องสำคัญที่สุดคือวัดให้ครบและตั้งชื่อไฟล์ให้ถูกตั้งแต่หน้างานYou have seen the whole path: measurement files → position mapping → averages → results → report. The rest of this guide does the same with your own data, where the most important part is measuring everything and naming the files correctly on site.
ต่อไป: สิ่งที่ต้องวัดมาจากหน้างาน →Next: what you must bring back from site →
01ติดตั้ง / เปิดโปรแกรมINSTALL / OPEN
ติดตั้งโปรแกรมและเตรียม LicenseInstall the program and prepare the licence
ตัวโปรแกรมดาวน์โหลดและติดตั้งได้ฟรี สิ่งที่ต้องซื้อคือสิทธิ์นำเข้าข้อมูลจากเครื่องวัดของคุณ เรื่องนี้ควรเคลียร์ให้เรียบร้อยก่อนออกไปวัดจริง ไม่ใช่ตอนกำลังจะส่งรายงานThe program itself is free to download and install; what you buy is the right to import data from your own instrument. Sort this out before you go on site, not when the report is due.
| เครื่องที่ใช้Instrument | สิ่งที่ต้องมีWhat you need | เฟิร์มแวร์Firmware |
|---|---|---|
| XL3XL3 | สิ่งที่ต้องมีWhat you needXL3 Sound Insulation Option บนเครื่อง (มีในชุด XL3 Sound Insulation Bundle ร่วมกับ License โปรแกรม) และ License ของ Sound Insulation Reporter เช่น 365XL3 Sound Insulation Option on the instrument (the XL3 Sound Insulation Bundle includes it with the software licence) and a Sound Insulation Reporter licence such as 365 | เฟิร์มแวร์FirmwareV1.46 หรือใหม่กว่า สำหรับการนำเข้าV1.46 or later for import |
| XL2XL2 | สิ่งที่ต้องมีWhat you needXL2 Extended Acoustic Pack (สำหรับเวลาเสียงก้อง 1/3 ออกเตฟ) และ XL2 Sound Insulation Option แบบถาวร หรือ Sound Insulation Reporter 365 เพื่อเปิดการนำเข้า เพิ่ม XL2 Remote Measurement Option ถ้าจะควบคุมเครื่องจากโปรแกรมXL2 Extended Acoustic Pack (for 1/3-octave reverberation time) and the permanent XL2 Sound Insulation Option or Sound Insulation Reporter 365 to enable import; add the XL2 Remote Measurement Option to control the instrument from the program | เฟิร์มแวร์FirmwareV4.03 หรือใหม่กว่า สำหรับการนำเข้าV4.03 or later for import |
License แบบ 365 เป็นรายปีสำหรับเครื่องวัดหนึ่งเครื่อง ส่วน 365 Company สำหรับองค์กรที่มีตั้งแต่ 3 เครื่องขึ้นไป และ Permanent เป็นสิทธิ์ถาวรต่อหนึ่งเครื่อง การเปิดใช้งานทำผ่านพอร์ทัล my.nti-audio.com และโปรแกรมจะตรวจ License ออนไลน์ระหว่างนำเข้าข้อมูลThe 365 licence is annual for one instrument; 365 Company is for organisations with three or more instruments; Permanent is a permanent right for one instrument. Activation runs through the my.nti-audio.com portal, and the program checks the licence online during import.
ก่อนออกหน้างาน ลองนำเข้าไฟล์ทดลองหนึ่งไฟล์จากเครื่องของคุณเองสักครั้ง ถ้าผ่าน แปลว่าเครื่อง เฟิร์มแวร์ และ License เข้าคู่กันแล้วBefore the site visit, import one test file from your own instrument. If it goes through, the instrument, firmware and licence match.
ถ้าวัดไว้ก่อนซื้อ License NTi ระบุว่ายังนำข้อมูลนั้นเข้ามาได้หลังซื้อ subscription จึงไม่ต้องวัดซ้ำIf you measured before buying the licence, NTi states that the data can still be imported after you buy a subscription, so there is no need to measure again.
เมนู Help มี Check for Updates... สำหรับตรวจเวอร์ชันใหม่ และ Online Help สำหรับเปิดความช่วยเหลือของผู้ผลิตThe Help menu has Check for Updates... for new versions and Online Help for the manufacturer's help.
02วัดMEASURE
สิ่งที่ต้องวัดมาจากหน้างานWhat you must bring back from site
โปรแกรมคำนวณได้เฉพาะจากสิ่งที่คุณวัดมา ถ้าขาดชุดใดชุดหนึ่ง รายงานจะไม่ครบหรือผิด ขอให้จำตัวอักษรสี่ตัวนี้: L1 L2 B2 T2The program can only calculate from what you measured. If one set is missing, the report is incomplete or wrong. Remember four labels: L1, L2, B2, T2.
ระดับเสียงห้องต้นทางSending-room level L1 · dB
- คืออะไรWhat it is
- ระดับเสียงในห้องที่มีลำโพงเปิดสัญญาณทดสอบ เฉลี่ยจากหลายตำแหน่งไมโครโฟนต่อหนึ่งตำแหน่งลำโพงThe level in the room with the loudspeaker running, averaged over several microphone positions per speaker position.
- ทำไมต้องสนใจWhy it matters
- เป็นตัวตั้งของผลต่างระดับเสียงIt is the starting point of the level difference.
ระดับเสียงห้องรับReceiving-room level L2 · dB
- คืออะไรWhat it is
- ระดับเสียงที่ทะลุมาถึงห้องรับ ขณะลำโพงยังเปิดอยู่ในห้องต้นทางThe level that reaches the receiving room while the loudspeaker is still running in the sending room.
- ทำไมต้องสนใจWhy it matters
- L1 − L2 คือความสามารถในการกันเสียงก่อนปรับแก้L1 − L2 is the insulation before corrections.
เสียงพื้นหลังห้องรับReceiving-room background B2 · dB
- คืออะไรWhat it is
- ระดับเสียงในห้องรับขณะปิดแหล่งกำเนิดเสียงThe level in the receiving room with the source switched off.
- ทำไมต้องสนใจWhy it matters
- ใช้ปรับแก้ L2 เมื่อสัญญาณไม่ดังพอเหนือเสียงพื้นหลังIt corrects L2 when the signal is not far enough above the background.
- เข้าใจผิดบ่อยCommon misunderstanding
- ไม่ใช่ขั้นที่ข้ามได้ ถ้าไม่มี B2 โปรแกรมบอกไม่ได้ว่า L2 ช่วงความถี่ไหนปนเสียงพื้นหลังIt is not optional: without B2 the program cannot tell which L2 bands are contaminated by background noise.
เวลาเสียงก้องห้องรับReceiving-room reverberation time T2 · s
- คืออะไรWhat it is
- เวลาเสียงก้องของห้องรับ วัดเป็นย่าน 1/3 ออกเตฟThe reverberation time of the receiving room, measured in 1/3 octaves.
- ทำไมต้องสนใจWhy it matters
- ใช้ปรับผลตามความก้องของห้อง เพื่อให้ได้ DnT และ R'It corrects the result for how reverberant the room is, giving DnT and R'.
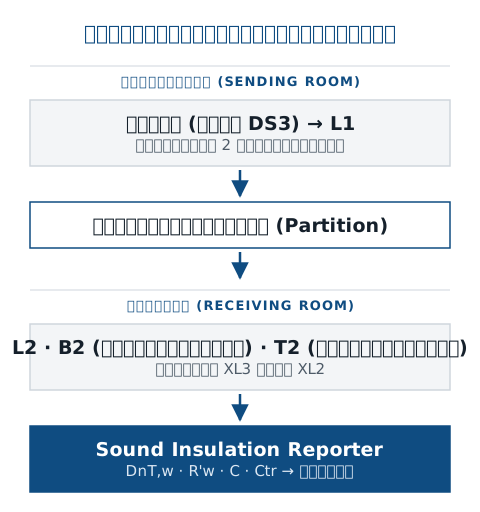
ลำดับการวัดที่ NTi แนะนำ (เสียงผ่านอากาศ)The order NTi recommends (airborne)
- วัด B2 ก่อน ขณะทุกอย่างเงียบและไม่มีใครอยู่ในห้องMeasure B2 first, while everything is quiet and nobody is in the room.
- วางลำโพงตำแหน่งที่ 1 แล้ววัด L1 ในห้องต้นทางและ L2 ในห้องรับPut the loudspeaker at position 1, then measure L1 in the sending room and L2 in the receiving room.
- ย้ายลำโพงไปตำแหน่งที่ 2 แล้ววัด L1 และ L2 อีกครั้ง (ต้องมีอย่างน้อยสองตำแหน่งลำโพง)Move the loudspeaker to position 2 and measure L1 and L2 again (at least two speaker positions).
- วัด T2 ในห้องรับMeasure T2 in the receiving room.
| เรื่องItem | คำแนะนำของ NTiNTi's recommendation |
|---|---|
| ห้องรับReceiving room | คำแนะนำของ NTiNTi's recommendationใช้ห้องที่เล็กกว่า หรือห้องที่เป็นทรงกล่อง เป็นห้องรับUse the smaller room, or the box-shaped room, as the receiving room |
| ตำแหน่งลำโพงSpeaker positions | คำแนะนำของ NTiNTi's recommendationห่างผนัง/พื้นอย่างน้อย 0.5 m ห่างผนังกั้นอย่างน้อย 1.0 m และตำแหน่งที่ 2 ห่างตำแหน่งที่ 1 อย่างน้อย 1.4 mAt least 0.5 m from the boundaries and 1.0 m from the partition; position 2 at least 1.4 m from position 1 |
| ตำแหน่งไมโครโฟน (L1, L2, B2)Microphone positions (L1, L2, B2) | คำแนะนำของ NTiNTi's recommendation5 ตำแหน่งต่อห้อง ห่างกันอย่างน้อย 0.7 m ห่างผนังอย่างน้อย 0.5 m ห่างลำโพงอย่างน้อย 1.0 m และไม่วางเป็นตารางสม่ำเสมอFive per room, at least 0.7 m apart, 0.5 m from boundaries, 1.0 m from the loudspeaker, not on a regular grid |
| ระยะเวลาวัดระดับเสียงLevel duration | คำแนะนำของ NTiNTi's recommendationLZeq อย่างน้อย 15 s ต่อตำแหน่ง ถ้าเสียงพื้นหลังไม่นิ่ง เช่น 30 sLZeq for at least 15 s per position; for unsteady background, e.g. 30 s |
| เวลาเสียงก้องReverberation time | คำแนะนำของ NTiNTi's recommendation3 ตำแหน่งไมโครโฟน อย่างน้อย 2 (ดีกว่าคือ 3) การสลายตัวต่อตำแหน่ง และรอบเปิด/ปิดสัญญาณต้องยาวกว่าเวลาเสียงก้องที่คาดไว้Three microphone positions, at least two (better three) decays per position; the signal on/off cycle must be longer than the expected reverberation time |
| สัญญาณทดสอบTest signal | คำแนะนำของ NTiNTi's recommendationในห้องรับ สัญญาณควรดังกว่าเสียงพื้นหลังอย่างน้อย 6 dB (ดีกว่าคือ 10 dB) ทุกย่านความถี่ 50 Hz–5 kHzIn the receiving room, at least 6 dB (better 10 dB) above background in every band from 50 Hz to 5 kHz |
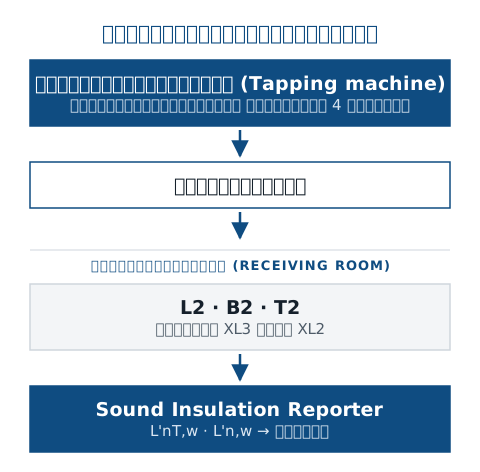
งานเสียงกระแทกใช้เครื่องเคาะมาตรฐาน (tapping machine) อย่างน้อย 4 ตำแหน่ง และไมโครโฟนอย่างน้อย 2 ตำแหน่งต่อหนึ่งตำแหน่งเครื่องเคาะ ต้องมีเสียงพื้นหลัง ระดับเสียงห้องรับ และเวลาเสียงก้องห้องรับเช่นเดียวกัน ส่วนงานผนังภายนอกแบบ global method วัดระดับเสียงที่ 2 m หน้าผนังแทน L1Impact work uses a standard tapping machine at no fewer than four positions, with at least two microphone positions per tapping-machine position, plus background, receiving-room level and receiving-room reverberation time. Facade work (global method) measures the level 2 m in front of the facade instead of L1.
คนวัดยืนอยู่ในห้องระหว่างวัด B2 หรือ L2 ทั้งเสียงและตัวคนดูดซับเสียงทำให้ผลเพี้ยน ให้ออกจากห้องแล้วสั่งวัดจากภายนอกถ้าทำได้The operator stays in the room during B2 or L2. Both the noise and the body's absorption change the result: leave the room and start the measurement from outside if you can.
ตรวจไมโครโฟนด้วย Sound Calibrator Class 1 ทั้งตอนเริ่มและตอนจบของทุกวัน และสวมอุปกรณ์ป้องกันการได้ยินเมื่อเปิดสัญญาณทดสอบดังCheck the microphone with a class 1 sound calibrator at the start and end of every day, and wear hearing protection while the test signal runs.
03บันทึกSAVE
บันทึกผลบนเครื่องให้โปรแกรมจับคู่ได้เองSave on the instrument so the program can map the files
โปรแกรมรู้ว่าไฟล์ไหนคือ L1 ตำแหน่งที่ 1 หรือ T2 จากชื่อไฟล์ ถ้าบันทึกถูกตั้งแต่หน้างาน การนำเข้าจะเสร็จในไม่กี่วินาที ถ้าบันทึกมั่ว คุณจะต้องมานั่งจับคู่ทีละไฟล์The program recognises L1 position 1 or T2 from the file name. Save correctly on site and the import takes seconds; save carelessly and you will assign files one by one.
XL3 ที่มี XL3 Sound Insulation OptionXL3 with the XL3 Sound Insulation Option
- STEP1
เปิดฟังก์ชันการกันเสียงและตั้งค่าก่อนเริ่มOpen the sound insulation function and set it up first
บนเครื่อง XL3 เปิดเมนู Sound Insulation แล้วไปที่หน้า Settings เลือกระยะเวลาวัดระดับเสียง (6, 15, 30 หรือ 60 s) วิธีวัดเวลาเสียงก้อง (T20 หรือ T30) และ Min. Trigger LevelOn the XL3 open Sound Insulation, go to Settings and choose the level duration (6, 15, 30 or 60 s), the reverberation method (T20 or T30) and the Min. Trigger Level.
ข้อควรระวังWatch outตั้งค่าหน้านี้ให้เสร็จก่อนเริ่มวัด ไม่ใช่ระหว่างวัดFinish this page before you start, not halfway through.
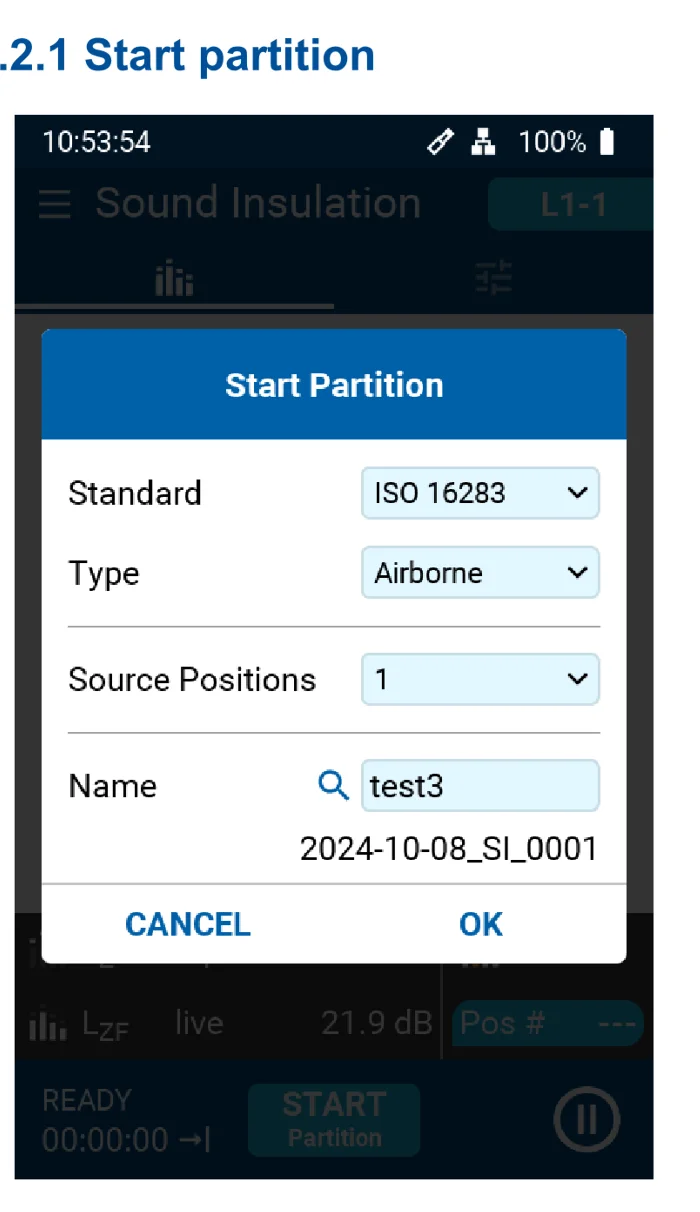
รูปที่ 7Figure 7 บน XL3 ปุ่ม START Partition เปิดหน้าต่างนี้ — เลือก Standard, Type, Source Positions และชื่อ แล้วกด OKOn the XL3, START Partition opens this dialog: choose Standard, Type, Source Positions and a name, then OK ภาพ: NTi Audio — คู่มือ Sound Insulation Reporter for XL3 & XL2 หน้า 16Image: NTi Audio — Sound Insulation Reporter for XL3 & XL2 — User Manual, p. 16 - STEP2
เลือกตำแหน่งที่กำลังวัดจากรายการPick the position you are measuring
ในหน้า Select measurement เลือกรายการที่กำลังวัด (เช่น B2, L1 ของลำโพงตำแหน่งที่ 1) เครื่องจะตั้งชื่อและจัดไฟล์ให้เอง ผลในห้องรับจะแสดง B2 ไว้ด้วย และทำเครื่องหมายย่านที่ L2 ดังกว่า B2 ไม่ถึง 6 dB หรือ 10 dBOn Select measurement pick the item you are measuring (e.g. B2, or L1 for speaker position 1); the instrument names and files it for you. The receiving-room result also shows B2 and labels L2 bands less than 6 dB or 10 dB above it.
- STEP3
คัดลอกทั้งโฟลเดอร์ของผนังกั้นCopy the whole partition folder
โฟลเดอร์ของผนังกั้นแต่ละชิ้นมีไฟล์ผลวัด *.txt และไฟล์ระบบ *.xl3si ต้องคัดลอกไปทั้งโฟลเดอร์ ไม่ใช่เลือกเฉพาะ .txtEach partition folder holds the *.txt measurement files and the *.xl3si system files: copy the whole folder, not just the .txt files.
XL2
- STEP1
ส่งออกไฟล์ชื่อจากโปรแกรมไปไว้ในเครื่องExport the name list from the program to the instrument
ในโปรแกรม เปิด Settings แท็บ Mapping แล้วกด Export... จะได้ไฟล์ savenames.txt นำไปวางไว้ที่โฟลเดอร์หลัก (root) ของหน่วยความจำ XL2 และตั้ง Autosave: Off บนเครื่องIn the program open Settings › Mapping and press Export... to get savenames.txt. Put it in the root of the XL2 memory and set Autosave: Off on the instrument.
ในโปรแกรมIn the programView › Settings › Mapping › Export...View › Settings › Mapping › Export...
- STEP2
หนึ่งผนังกั้น หนึ่งโฟลเดอร์One partition, one folder
ต่อ XL2 กับ PC แบบ Mass Storage เปิดโฟลเดอร์ Projects แล้วสร้างโฟลเดอร์ย่อยหนึ่งโฟลเดอร์ต่อหนึ่งผนังกั้น เพราะในโปรแกรม หนึ่งผนังกั้นคือหนึ่งโปรเจกต์Connect the XL2 to the PC as Mass Storage, open Projects and make one subfolder per partition, because in the program one partition is one project.
- STEP3
วัดแล้วบันทึกด้วยชื่อจากรายการMeasure, then save with a name from the list
ระดับเสียง: ฟังก์ชัน SLMeter หน้า RTA แบบ 1/3 ออกเตฟ ถ่วงน้ำหนัก Z ประมาณ 15 s เวลาเสียงก้อง: ฟังก์ชัน RT60 แบบ 1/3 ออกเตฟ เมื่อหน้าต่าง Save Test ขึ้นมา เลือก Sound-Insul แล้วเลือกชื่อตำแหน่งจากรายการLevels: SLMeter, RTA page, 1/3 octave, Z-weighted, about 15 s. Reverberation: RT60, 1/3 octave. When the Save Test pop-up appears, choose Sound-Insul and pick the position name from the list.
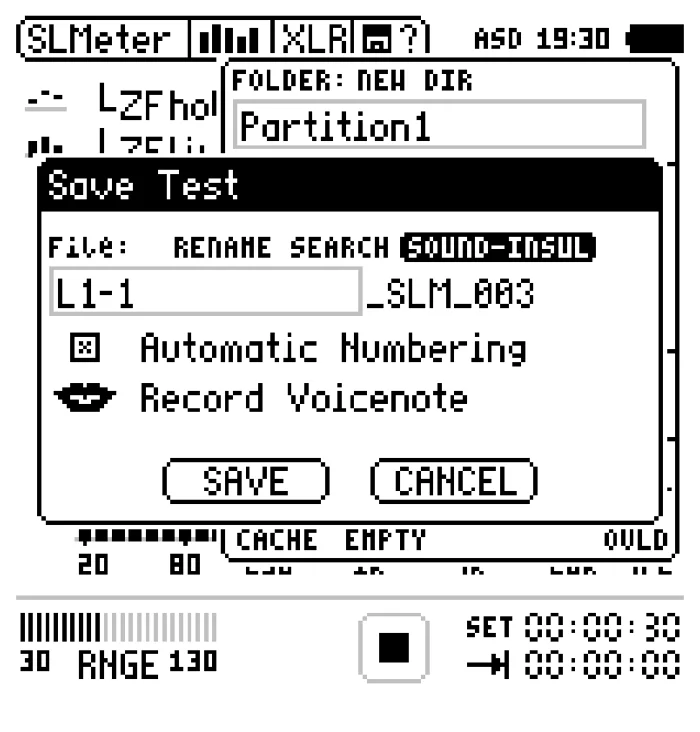
รูปที่ 8Figure 8 บน XL2 หน้าต่าง Save Test: เลือก Sound-Insul ที่ท้ายบรรทัดแรก แล้วเลือกชื่อตำแหน่ง เช่น L1-1 ก่อนกด SAVEOn the XL2 Save Test pop-up: pick Sound-Insul at the end of the first line, then the position name such as L1-1, and SAVE ภาพ: NTi Audio — คู่มือ Sound Insulation Reporter for XL3 & XL2 หน้า 42Image: NTi Audio — Sound Insulation Reporter for XL3 & XL2 — User Manual, p. 42
ไฟล์ชื่อ L1-1_SLM_001_RTA_3rd_Report.txt จะถูกจับคู่เป็น L1-1 คือระดับเสียงในห้องต้นทาง ลำโพงตำแหน่งที่ 1 โดยอัตโนมัติA file named L1-1_SLM_001_RTA_3rd_Report.txt is mapped automatically to L1-1: sending-room level, speaker position 1.
วัดสเปกตรัมด้วยการถ่วงน้ำหนัก A หรือ C โปรแกรมแปลงเป็น Z ให้ตอนนำเข้าก็จริง แต่ขั้นตอนของ NTi กำหนดให้วัดด้วย Z ตั้งแต่ต้นMeasuring the spectra A- or C-weighted. The program converts them to Z on import, but NTi's procedure says to measure Z-weighted from the start.
04สร้างโปรเจกต์CREATE PROJECT
สร้างโปรเจกต์ผนังกั้นCreate the partition project
ทุกอย่างในรายงาน เช่น ค่าที่คำนวณ หน่วย และรูปแบบตัวเลข ขึ้นกับตัวเลือกในหน้าต่างนี้ ใช้เวลาเลือกให้ตรงกับมาตรฐานที่ผู้ว่าจ้างกำหนดEverything in the report (which values are calculated, the units, the number format) depends on this dialog. Take the time to match the standard your client requires.
- STEP1
เปิดหน้าต่างผนังกั้นใหม่Open the new-partition dialog
เลือกคำสั่งสร้างผนังกั้นใหม่จากเมนู FileChoose the new-partition command in the File menu.
ในโปรแกรมIn the programFile › New Partition...File › New Partition...
ข้อควรระวังWatch outตั้งแต่เวอร์ชัน 1.50 โปรแกรมมีมุมมอง Site View สำหรับจัดการหลายผนังกั้นของอาคารเดียวกันพร้อมกัน ถ้าจะทำทีละผนังกั้นตามคู่มือนี้ NTi แนะนำให้กด New PartitionsFrom version 1.50 the program has a Site View for handling several partitions of one building at once. To work one partition at a time as in this guide, NTi says to click New Partitions.
- STEP2
เลือกมาตรฐานและประเภทงานChoose the standard and the type
เลือก Standard (เช่น ISO 16283, ASTM E336, Document E, DIN 4109) แล้วเลือก Airborne, Impact หรือ FacadeChoose the Standard (e.g. ISO 16283, ASTM E336, Document E, DIN 4109), then Airborne, Impact or Facade.
- STEP3
จำนวนตำแหน่งลำโพง หน่วย และผลที่ต้องการSpeaker positions, unit and results
ใส่จำนวน Speaker positions ให้ตรงกับที่วัดมา เลือก Unit และ Results ที่ต้องการให้แสดงในรายงาน (เช่น DnT,w หรือ R'w)Enter the number of Speaker positions you measured, and choose the Unit and the Results to show in the report (e.g. DnT,w or R'w).
- STEP4
เลือกรูปแบบค่าเดี่ยวChoose the rating format
Rating Format แบบขั้นละ 1.0 dB เช่น Dw (C;Ctr) = 41 (-1;-3) dB ใช้ได้กับทุกมาตรฐาน ส่วนแบบขั้นละ 0.1 dB พร้อมค่าความไม่แน่นอน เช่น 40.5 dB +/- 0.9 dB ใช้ได้เฉพาะ BB93, DIN 4109, ISO 16283, ISO 10140 และ SIA 181The 1.0 dB Rating Format, e.g. Dw (C;Ctr) = 41 (-1;-3) dB, works with every standard; the 0.1 dB format with uncertainty, e.g. 40.5 dB +/- 0.9 dB, only with BB93, DIN 4109, ISO 16283, ISO 10140 and SIA 181.
บน XL3 ถ้าไม่มี XL3 Sound Insulation Option หรือ Reverberation Time Option เครื่องวัดเวลาเสียงก้องได้เฉพาะแบบออกเตฟ ทำให้เลือกมาตรฐานในโปรแกรมได้น้อยลงOn the XL3 without the Sound Insulation or Reverberation Time Option, reverberation time is octave-only, which limits the standards you can use in the program.
05นำเข้า / โอนข้อมูลIMPORT / TRANSFER
นำเข้าข้อมูลและตรวจการจับคู่Import the data and check the mapping
การนำเข้าเร็วมาก แต่ขั้นที่ช่วยคุณได้จริงคือการตรวจว่าทุกไฟล์ไปอยู่ถูกช่องImporting is fast; the step that actually protects you is checking that every file landed in the right slot.
- STEP1
ลากทั้งโฟลเดอร์ของผนังกั้นDrag the partition folder
ลากโฟลเดอร์จากการ์ดหน่วยความจำหรือ PC ไปวางในช่อง Drop measurement files or folder here หรือใช้ปุ่ม Import ในแถบเครื่องมือDrag the folder from the memory card or PC onto Drop measurement files or folder here, or use the Import toolbar button.
ในโปรแกรมIn the programFile › Import › Folder... / File...File › Import › Folder... / File...
- STEP2
ตรวจรายการตำแหน่งCheck the position list
รายการ Measurements ด้านขวาแสดงว่าไฟล์ไหนถูกจับคู่กับตำแหน่งใด ถ้าผิด คลิกขวาที่ไฟล์แล้วเลือก Assign To ส่วนการวัดที่เสีย (เช่น มีคนเดินผ่าน) ลบออกจากรายการได้The Measurements list on the right shows which file went to which position. If one is wrong, right-click it and choose Assign To; delete false readings (e.g. someone walked past) from the list.
นับให้ครบ: B2, L1 และ L2 ของทุกตำแหน่งลำโพง และ T2 ถ้ามีช่องว่าง แปลว่าไฟล์หายหรือชื่อไฟล์ผิดCount them: B2, L1 and L2 for every speaker position, and T2. An empty slot means a missing file or a wrong file name.
คัดลอกมาแต่ไฟล์ .txt โดยไม่มีไฟล์ระบบ (*.xl2 หรือ *.xl3si) หรือรวมหลายผนังกั้นไว้ในโฟลเดอร์เดียวCopying only the .txt files without the system files (*.xl2 or *.xl3si), or mixing several partitions in one folder.
06ตั้งค่าCONFIGURE
ใส่ข้อมูลห้องและตั้งค่ารายงานEnter the room data and set up the report
พื้นที่ผนังกั้นและปริมาตรห้องไม่ใช่แค่ข้อความหัวรายงาน โปรแกรมนำไปคำนวณด้วย ถ้าใส่ผิด ผลก็ผิดThe partition area and the room volumes are not just header text: the program uses them in the calculation. Enter them wrong and the result is wrong.
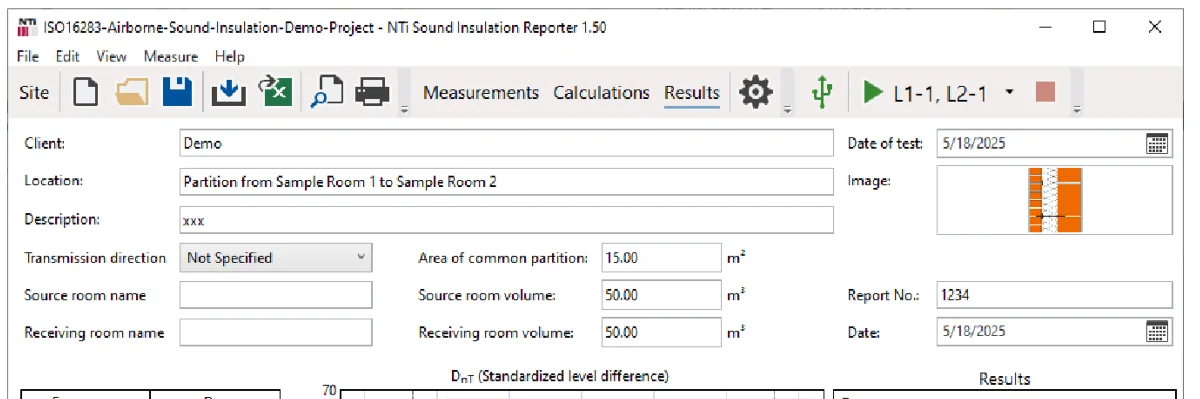
- พื้นที่ผนังกั้นร่วม (m²)Common partition area (m²)
- ปริมาตรห้องต้นทาง (m³)Sending-room volume (m³)
- ปริมาตรห้องรับ (m³)Receiving-room volume (m³)
- ส่วนหัว: ชื่อผู้ว่าจ้าง ชื่อโครงการ คำอธิบาย พื้นที่ผนังกั้น S และ ปริมาตรห้องHeader: client, object, description, partition area S and room volumes
- View › Settings (Project Settings) มีแท็บ General, Mapping, Charts, Report และ ConnectView › Settings (Project Settings) has the tabs General, Mapping, Charts, Report and Connect
- แท็บ Report: โลโก้ (120×30 px ที่ 96 dpi) ลายเซ็น (350×70 px) ชื่อหน่วยงานทดสอบ และตัวเลือกซ่อนบางรายการในรายงานReport tab: logo (120×30 px at 96 dpi), signature (350×70 px), test-institute name and options to hide some items in the report
- รูปผนังกั้นสำหรับกระดาษ A4 ขนาด 340×160 pxPartition picture for A4: 340×160 px
- Edit › Rating Target... ใส่ค่าเป้าหมาย แล้วโปรแกรมจะแสดงผ่าน/ไม่ผ่านในคอลัมน์ ComplianceEdit › Rating Target... sets a target; the program then shows pass/fail in a Compliance column
ห้องที่เล็กกว่า 25 m³: ตามขั้นตอนความถี่ต่ำของ ISO 16283 ให้ใส่ปริมาตรห้องก่อน เวลาเสียงก้องย่าน 63 Hz ออกเตฟคิดจากค่าเฉลี่ยเชิงเส้นของย่าน 50, 63 และ 80 HzRooms under 25 m³: for the ISO 16283 low-frequency procedure enter the volume first; the 63 Hz octave reverberation time is the linear average of the 50, 63 and 80 Hz bands.
การแก้ไขไมโครโฟน (Microphone Corrections) ใน Preferences ไม่ย้อนไปใช้กับโปรเจกต์ที่สร้างไว้แล้ว ตั้งไว้ให้เรียบร้อยก่อนเริ่มโปรเจกต์ใหม่Microphone Corrections in Preferences are not applied to existing projects: set them before you start a new one.
07วิเคราะห์ANALYZE
ตรวจค่าเฉลี่ยก่อนเชื่อผลCheck the averages before you trust the result
มุมมอง Calculations คือที่ที่วิศวกรใช้เวลามากที่สุด เพราะผลสุดท้ายดีได้เท่ากับข้อมูลที่เอามาเฉลี่ยThe Calculations view is where engineers spend most of their time, because the final result is only as good as the data being averaged.
- STEP1
เปิดมุมมอง CalculationsOpen the Calculations view
ดูค่าเฉลี่ย L1, L2, B2 และ T2 ของแต่ละตำแหน่งลำโพง รายการเช่น Average L1-1 หรือ Difference D-1 กดเข้าไปดูรายละเอียดได้ กด ESC เพื่อกลับหน้ารวมLook at the averaged L1, L2, B2 and T2 per speaker position. Items such as Average L1-1 or Difference D-1 open in detail; ESC returns to the overview.
ในโปรแกรมIn the programView › CalculationsView › Calculations
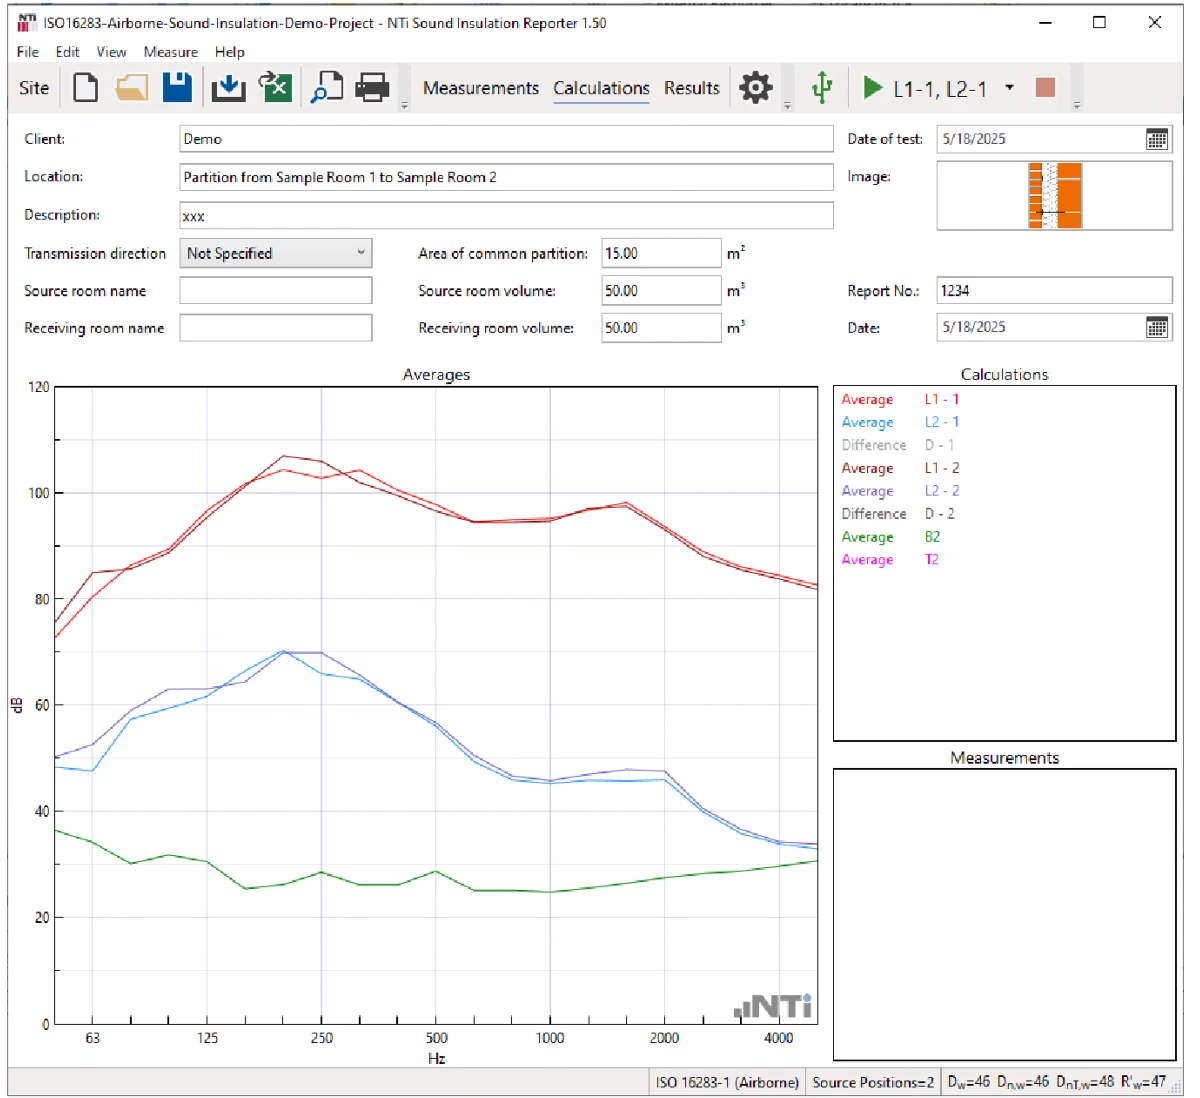
รูปที่ 10Figure 10 มุมมอง Calculations — เส้นแดงคือ L1 เส้นฟ้าคือ L2 เส้นเขียวคือ B2 ตรวจว่าแต่ละตำแหน่งลำโพงให้ผลใกล้เคียงกันก่อนดูผลสุดท้ายThe Calculations view: red = L1, blue = L2, green = B2. Check that the speaker positions agree before you look at the final result - แท็บ Calculations (หรือ View › Calculations)The Calculations tab (or View › Calculations)
- รายการค่าเฉลี่ยและผลต่าง เช่น Average L1-1, Difference D-1Averages and differences such as Average L1-1, Difference D-1
- กราฟค่าเฉลี่ยต่อย่านความถี่Averages per frequency band
- STEP2
ตัดค่าที่ผิดปกติออกRemove outliers
ถ้ากราฟตำแหน่งใดโดดจากตำแหน่งอื่นชัดเจน ให้ปิดการใช้ตำแหน่งนั้นใน Measurement Selection แล้วดูว่าค่าเฉลี่ยเปลี่ยนไปเท่าใดIf one position clearly stands out from the others, disable it in Measurement Selection and see how much the average changes.
ข้อควรระวังWatch outตัดออกเมื่อมีเหตุผลทางเทคนิค เช่น มีเสียงรบกวนระหว่างวัด ไม่ใช่เพราะอยากได้ตัวเลขที่ดูดีกว่าRemove data for a technical reason (e.g. a disturbance during the measurement), not to get a nicer number.
- STEP3
เวลาเสียงก้องที่ไม่ครบย่านIncomplete reverberation data
ถ้าชุด T2 ขาดบางย่าน (มักเป็นความถี่ต่ำ) คลิกขวาที่ชุดข้อมูลแล้วใช้ Duplication to Edit... เพื่อแก้ในสำเนา โปรแกรมเก็บข้อมูลเดิมไว้ให้If the T2 set is missing some bands (usually low frequencies), right-click the data set and use Duplication to Edit... to edit a copy; the original is kept.
ผลต่าง D ใน Calculations รวมการปรับแก้เสียงพื้นหลังไว้แล้วโดยค่าเริ่มต้น การเห็นค่าเฉลี่ยแต่ละตัวช่วยให้รู้ว่าผลสุดท้ายถูกลากด้วยตำแหน่งไหนThe Differences in Calculations include background correction by default. Seeing each average tells you which position is pulling the final result.
08อ่านผลINTERPRET RESULTS
อ่านผลให้เป็นRead the result correctly
ตัวเลขตัวเดียวในรายงานมาจากกราฟทั้งเส้น การอ่านเฉพาะตัวเลขโดยไม่ดูกราฟและเครื่องหมาย ≤ / ≥ คือจุดที่มือใหม่พลาดบ่อยที่สุดThe single number in the report comes from the whole curve. Reading only the number without the curve and the ≤ / ≥ marks is where beginners go wrong most often.
มุมมอง Results แสดงตารางและกราฟ 50 Hz–5 kHz ค่าเดี่ยวคือค่าของเส้นอ้างอิงที่เลื่อนแล้วที่ 500 Hz ตาม ISO 717-1/-2 ส่วน C และ Ctr เป็นค่าปรับตามลักษณะเสียงต้นทางThe Results view shows the table and chart from 50 Hz to 5 kHz. The single number is the value of the shifted reference curve at 500 Hz, per ISO 717-1/-2; C and Ctr adapt it to the source spectrum.
- แท็บ ResultsThe Results tab
- เลือกค่าที่จะดู (D, Dn, DnT, R')Pick the value to show (D, Dn, DnT, R')
- Rating ค่าเดี่ยวพร้อม C และ Ctr เช่น DnT,w(C;Ctr) = 48 (-1; -3) dBRating: the single number with C and Ctr, e.g. DnT,w(C;Ctr) = 48 (-1; -3) dB
- Spectrum Adaption Terms ค่าปรับแต่ละช่วงความถี่Spectrum Adaption Terms for each frequency range
- ย่านที่มี ≥ ได้รับการปรับ 1.3 dB และเป็นค่าที่ขีดจำกัดการวัดBands marked ≥ got the 1.3 dB correction: the value is at the limit of measurement
- เส้นทึบคือค่าที่วัด เส้นประคือเส้นอ้างอิงที่เลื่อนแล้ว (ISO 717-1)Solid = measured; dashed = shifted reference curve (ISO 717-1)
ผลต่างระดับเสียงแบบมาตรฐานStandardised level difference DnT,w · dB
- คืออะไรWhat it is
- ผลต่างระดับเสียงที่ปรับให้เทียบกับเวลาเสียงก้องอ้างอิง 0.5 s แล้วรวมเป็นค่าเดี่ยวThe level difference referred to a 0.5 s reference reverberation time, rated as a single number.
- ทำไมต้องสนใจWhy it matters
- เป็นค่าที่ข้อกำหนดในหลายประเทศใช้ตัดสินว่าห้องสองห้องกันเสียงกันได้พอหรือไม่Many national requirements use it to judge whether two rooms are separated well enough.
ดัชนีลดทอนเสียงปรากฏApparent sound reduction index R'w · dB
- คืออะไรWhat it is
- ความสามารถกันเสียงของผนังกั้นที่วัดในอาคารจริง ซึ่งรวมเสียงที่อ้อมผ่านโครงสร้างข้างเคียงด้วยThe insulation of the partition measured in a real building, including sound that travels round through flanking paths.
- ทำไมต้องสนใจWhy it matters
- ใช้บอกคุณภาพของตัวผนังกั้นในสภาพติดตั้งจริงIt describes the partition as built.
- เข้าใจผิดบ่อยCommon misunderstanding
- R'w ในอาคารจริงไม่ใช่ค่าเดียวกับ R ที่วัดในห้องปฏิบัติการ ค่าหน้างานมักต่ำกว่าเพราะมีเสียงอ้อมField R'w is not the laboratory R: on site it is usually lower because of flanking.
ค่าปรับตามสเปกตรัมSpectrum adaptation terms C, Ctr · dB
- คืออะไรWhat it is
- ค่าที่บวกกับค่าเดี่ยว C สำหรับเสียงคล้าย pink noise เช่น เสียงในที่พักอาศัยหรือการจราจรเร็ว Ctr สำหรับเสียงที่หนักความถี่ต่ำ เช่น การจราจรในเมืองAdded to the single number: C for pink-noise-like sources such as living noise or fast traffic, Ctr for low-frequency-heavy sources such as urban traffic.
- ทำไมต้องสนใจWhy it matters
- ผนังที่ค่าเดี่ยวเท่ากันอาจกันเสียงเพลงเบสหรือเสียงรถบรรทุกได้ต่างกันมากTwo partitions with the same single number can block bass-heavy music or lorries very differently.
| สิ่งที่เห็นในผลWhat you see | ความหมายWhat it means |
|---|---|
| ย่านความถี่มีเครื่องหมาย ≤ หรือ ≥Bands marked ≤ or ≥ | ความหมายWhat it meansL2 ในย่านนั้นดังกว่าเสียงพื้นหลังไม่ถึง 6 dB โปรแกรมใช้ค่าปรับคงที่ 1.3 dB และค่านั้นเป็นเพียงขีดจำกัด ไม่ใช่ค่าที่วัดได้จริงL2 in that band was less than 6 dB above background: the program applied a fixed 1.3 dB correction and the value is only a limit, not a true measurement |
| คอลัมน์ ComplianceCompliance column | ความหมายWhat it meansผ่าน/ไม่ผ่านเทียบกับ Rating Target ที่คุณตั้งไว้Pass/fail against the Rating Target you set |
| Dn แทน DnTDn instead of DnT | ความหมายWhat it meansDn อ้างอิงพื้นที่ดูดซับ 10 m² ใช้เมื่อไม่มีพื้นที่ผนังร่วมหรือไม่ชัดเจนDn refers to 10 m² of absorption; used when there is no clear common partition area |
มีหลายย่านที่ติดเครื่องหมาย ≤ / ≥ แต่ยังรายงานค่าเดี่ยวเหมือนเป็นค่าที่วัดได้ครบ ถ้าเจอแบบนี้ ครั้งต่อไปให้เพิ่มระดับสัญญาณทดสอบหรือวัดในช่วงที่เงียบกว่าSeveral bands carry ≤ / ≥ marks, yet the single number is reported as if fully measured. If you see this, raise the test signal or measure at a quieter time next time.
09รายงานREPORT
ออกรายงานและเก็บโปรเจกต์Issue the report and keep the project
รายงานพร้อมเมื่อส่วนหัวครบ ผลผ่านการตรวจแล้ว และคุณเก็บไฟล์โปรเจกต์ไว้แก้ภายหลังได้The report is ready when the header is complete, the result has been checked and the project file is saved for later changes.
- STEP1
ดูตัวอย่างแล้วพิมพ์Preview, then print
ตรวจรายงานทั้งฉบับใน Print Preview ก่อนพิมพ์ โปรแกรมไม่ได้มีปุ่มบันทึกเป็น PDF โดยตรงตามคู่มือ ให้พิมพ์ผ่านเครื่องพิมพ์ PDF หรือ XPSCheck the whole report in Print Preview before printing. The manual documents no direct PDF save: print to a PDF (or XPS) printer.
ในโปรแกรมIn the programFile › Print Preview แล้ว File › Print...File › Print Preview, then File › Print...
- STEP2
ส่งออกข้อมูลไปทำงานต่อExport the data for further work
Export to Excel... ส่งออกข้อมูลผลวัดและผลลัพธ์ทั้งหมด ส่วน Copy / Copy values ใช้คัดลอกค่าไปวางในรายงานของคุณเองExport to Excel... exports all measurement data and results; Copy / Copy values puts values on the clipboard for your own report.
ในโปรแกรมIn the programFile › Export to Excel...File › Export to Excel...
- STEP3
บันทึกโปรเจกต์Save the project
บันทึกเป็นไฟล์ *.xlba เพื่อเปิดแก้หรือพิมพ์ซ้ำภายหลัง เก็บไว้คู่กับโฟลเดอร์ข้อมูลดิบจากเครื่องSave it as a *.xlba file so you can edit or reprint later, and keep it next to the raw data folder from the instrument.
ในโปรแกรมIn the programFile › Save Partition / Save Partition as...File › Save Partition / Save Partition as...
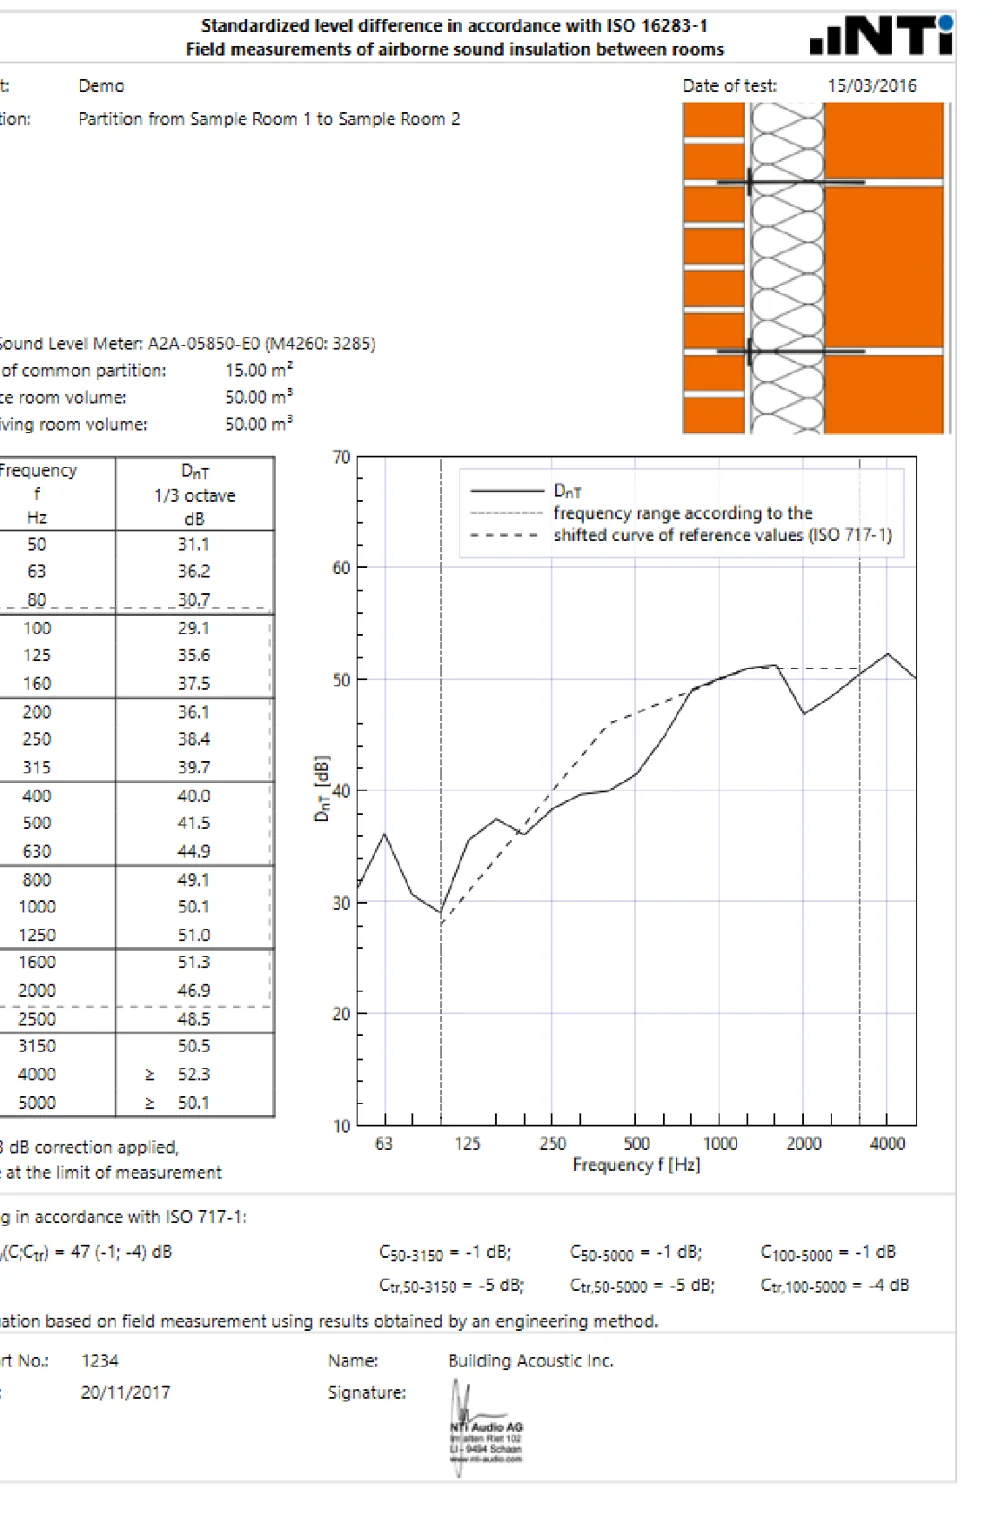
ก่อนส่งรายงาน: มาตรฐานถูกต้อง ส่วนหัวครบ (พื้นที่ผนังกั้นและปริมาตรห้อง) ทุกตำแหน่งอยู่ถูกช่อง ย่านที่มีเครื่องหมาย ≤ / ≥ ได้รับการอธิบายในรายงาน และมีบันทึกการสอบเทียบไมโครโฟนBefore sending: correct standard, complete header (partition area and room volumes), every position in the right slot, bands with ≤ / ≥ explained in the report, and a microphone calibration record.
10ใช้ร่วมกับเครื่องมืออื่นWORKFLOWS
วัดสองห้องพร้อมกันจากโปรแกรม (Remote / Live)Measure both rooms at once from the program (remote / live)
เมื่อคล่องกับวิธีบันทึกบนเครื่องแล้ว งานที่ต้องวัดหลายผนังกั้นจะเร็วขึ้นมากถ้าควบคุมเครื่องวัดจากโปรแกรมโดยตรงOnce you are comfortable saving on the instrument, jobs with many partitions go much faster when you control the instruments from the program.
| เครื่องInstrument | การเชื่อมต่อConnection |
|---|---|
| XL3XL3 | การเชื่อมต่อConnectionWi-Fi เครือข่ายเดียวกับ PC (โปรแกรมค้นเจอเครื่องเอง) หรือ USB-CWi-Fi on the same network as the PC (the program finds it) or USB-C |
| XL2XL2 | การเชื่อมต่อConnectionต้องมี XL2 Remote Measurement Option และต่อด้วย USB ถ้าจะใช้ไร้สายต้องมี Wi-Fi access point หรือ USB device server เพิ่มNeeds the XL2 Remote Measurement Option and a USB connection; wireless use needs a Wi-Fi access point or USB device server |
เปิด Measure › Connect... เพื่อดูเครื่องที่เชื่อมต่อ สถานะที่อาจเห็นคือ Valid Licence, Upgrade required, Unassigned Device หรือ Not Connected เลือกตัวเลือก Simultaneous measurement in source and receiving room เมื่อใช้สองเครื่องพร้อมกัน แล้วสั่ง Start / Stop จากเมนู Measure การวัดเวลาเสียงก้องแบบนี้ใช้ T20 เป็นค่าเริ่มต้น (เลือก T30 ได้)Open Measure › Connect... to see the connected instruments; the status can read Valid Licence, Upgrade required, Unassigned Device or Not Connected. Tick Simultaneous measurement in source and receiving room when using two instruments, then use Start / Stop in the Measure menu. Reverberation measured this way defaults to T20 (T30 selectable).
ถ้าใช้เครื่องขยายเสียง PA3 ควบคุมผ่าน LAN/Wi-Fi แล้วโปรแกรมขึ้นข้อความ "A critical error occurred" ให้ตรวจว่า firewall บล็อก IP ของ PA3 หรือไม่If you control a PA3 amplifier over LAN/Wi-Fi and the program shows "A critical error occurred", check whether the firewall blocks the PA3's IP address.
11แก้ปัญหาTROUBLESHOOT
ปัญหาที่พบบ่อยและวิธีแก้Common problems and fixes
| อาการSymptom | สาเหตุที่เป็นไปได้Likely cause | วิธีแก้Fix |
|---|---|---|
| นำเข้าไม่ได้ / ขึ้นเรื่อง LicenseImport refused / licence message | สาเหตุที่เป็นไปได้Likely causeไม่มี License หรือ Option ที่ถูกต้อง เฟิร์มแวร์เก่ากว่าขั้นต่ำ หรือไม่มีอินเทอร์เน็ตตอนนำเข้าMissing licence or option, firmware below the minimum, or no internet during import | วิธีแก้Fixตรวจตารางในบทติดตั้ง อัปเดตเฟิร์มแวร์ แล้วลองใหม่ขณะออนไลน์Check the table in the install chapter, update the firmware and retry online |
| บางตำแหน่งว่างEmpty positions | สาเหตุที่เป็นไปได้Likely causeไฟล์หาย ชื่อไฟล์ไม่ตรงรายการ หรือไม่มีไฟล์ระบบMissing file, name not in the list, or system files missing | วิธีแก้Fixคัดลอกใหม่ทั้งโฟลเดอร์ หรือจับคู่เองด้วย Assign ToCopy the whole folder again, or assign by hand with Assign To |
| เวลาเสียงก้องมีแค่แบบออกเตฟReverberation time only in octaves | สาเหตุที่เป็นไปได้Likely causeXL3 ไม่มี XL3 Sound Insulation Option / Reverberation Time Option หรือ XL2 ไม่มี XL2 Extended Acoustic PackXL3 without the Sound Insulation / Reverberation Time Option, or XL2 without the XL2 Extended Acoustic Pack | วิธีแก้Fixเพิ่ม Option ที่จำเป็น หรือเลือกมาตรฐานที่ใช้ข้อมูลออกเตฟได้Add the option, or use a standard that accepts octave data |
| หลายย่านมี ≤ / ≥Many bands marked ≤ / ≥ | สาเหตุที่เป็นไปได้Likely causeสัญญาณทดสอบเบาเกินไปเทียบกับเสียงพื้นหลังTest signal too weak against the background | วิธีแก้Fixเพิ่มระดับสัญญาณ ใช้ลำโพงที่แรงกว่า หรือวัดช่วงที่เงียบกว่าRaise the signal, use a more powerful source, or measure at a quieter time |
| T2 ย่านต่ำขาดLow T2 bands missing | สาเหตุที่เป็นไปได้Likely causeการสลายตัวในย่านต่ำวัดไม่ได้Low-band decays could not be evaluated | วิธีแก้Fixใช้ Duplication to Edit... แก้ในสำเนา และบันทึกเหตุผลไว้Use Duplication to Edit... on a copy and note the reason |