QUICK STARTเริ่มใช้งานใน 5–10 นาทีUp and running in 5–10 minutes
วัดระดับเสียงครั้งแรกด้วย XL3Your first sound level measurement with the XL3
เป้าหมายของ 10 นาทีแรกคือได้ผลวัดหนึ่งไฟล์ที่ถูกต้อง: ไมโครโฟนถูกตรวจพบ ผ่าน Calibration วัดด้วย Sound Level Meter แล้วบันทึกลง SD card เรื่องอื่นค่อยเรียนในบทถัดไปThe goal of the first ten minutes is one correct measurement file: the microphone detected, calibrated, measured with the Sound Level Meter and saved to the SD card. Everything else comes in the later chapters.
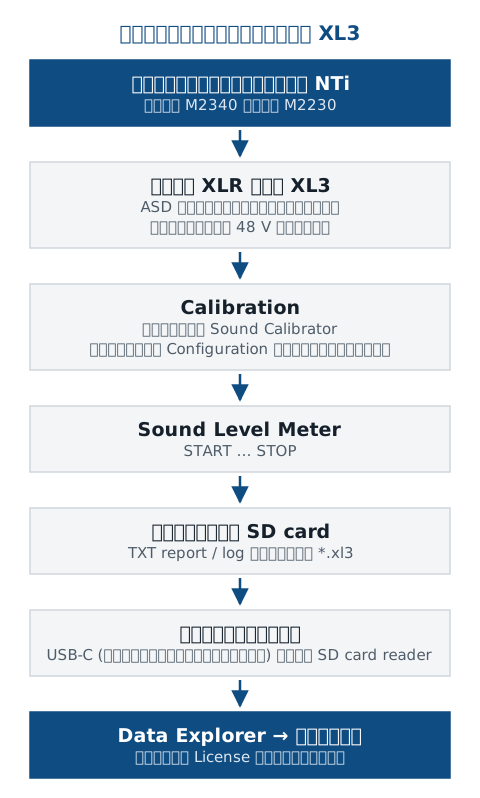
ต้องมีอะไรบ้างก่อนเริ่มWhat you need before you start
- XL3 ที่ชาร์จแบตเตอรี่แล้ว (แบตเตอรี่ใหม่มีไฟประมาณครึ่งเดียว ควรชาร์จให้เต็มก่อนใช้ครั้งแรก)An XL3 with a charged battery (a new battery is about half charged: charge it fully before first use)
- ไมโครโฟนวัดเสียงของ NTi เช่น M2340 หรือ M2230An NTi measurement microphone such as the M2340 or M2230
- Sound Calibrator (เช่น 94.0 dB หรือ 114.0 dB ที่ 1 kHz)A sound calibrator (e.g. 94.0 dB or 114.0 dB at 1 kHz)
- Micro SD card ในเครื่อง — XL3 จะไม่ยอมเริ่มวัดถ้าไม่มีที่เก็บข้อมูล (SD card หรือ USB drive)A micro SD card in the instrument: the XL3 will not start a measurement without storage (SD card or USB drive)
- STEP1
ต่อไมโครโฟนเข้าช่อง XLR ที่หัวเครื่องFit the microphone to the XLR input at the top
เสียบไมโครโฟนเข้าช่อง XLR ที่ปลายด้านบนของเครื่อง (หมายเลข 1 ในภาพช่องต่อของบท รู้จัก XL3) ช่องนี้มีระบบ ASD: เมื่อเป็นไมโครโฟนของ NTi เครื่องจะเปิดไฟ 48 V และอ่านข้อมูล Calibration ของไมโครโฟนให้เองPlug the microphone into the XLR input at the top end (number 1 in the connector figure of Get to know the XL3). This input has ASD: with an NTi microphone the XL3 switches 48 V phantom power on and reads the microphone's calibration data by itself.
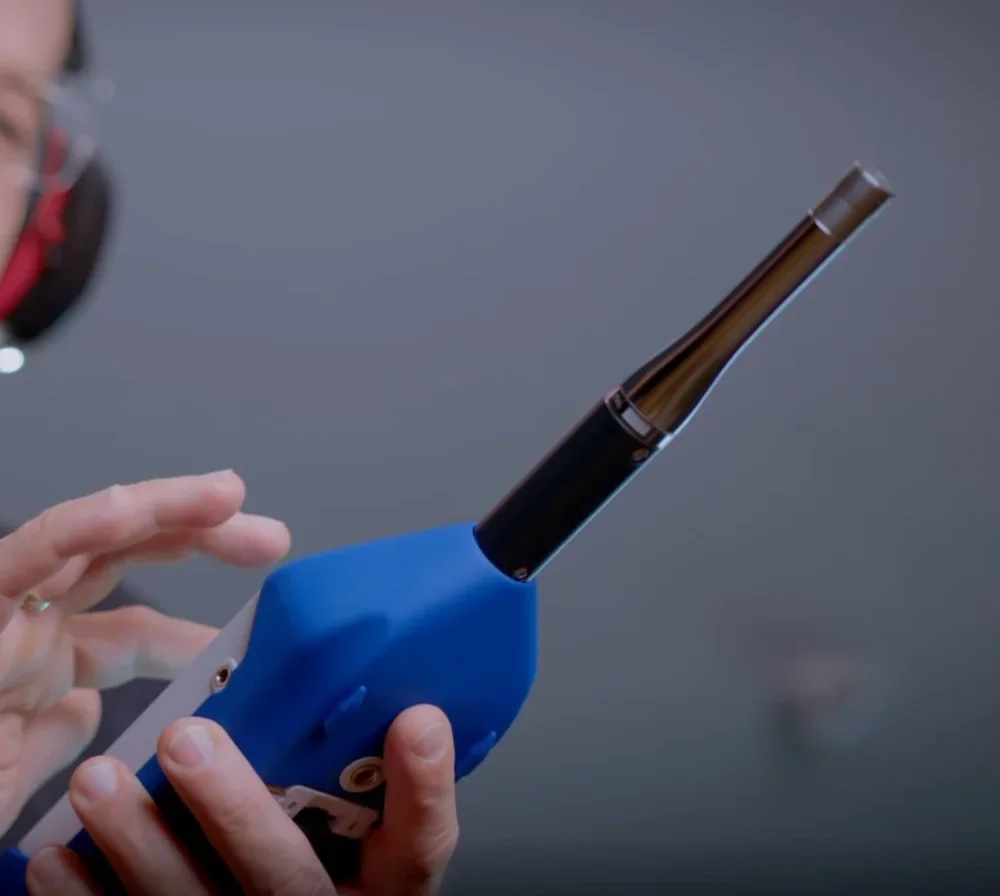
รูปที่ 2Figure 2 ไมโครโฟนวัดเสียงเสียบตรงเข้าช่อง XLR ที่หัวเครื่อง ถือเครื่องให้ไมโครโฟนชี้ไปทางแหล่งเสียงและอยู่ห่างจากลำตัวThe measurement microphone plugs straight into the XLR input at the top. Hold the XL3 so the microphone points towards the source and away from your body. ภาพ: NTi Audio (ภาพผลิตภัณฑ์ทางการ)Image: NTi Audio (official product image) - STEP2
เปิดเครื่องSwitch on
กดปุ่ม On/Off (ปุ่มสีน้ำเงินมุมซ้ายล่าง) ค้างประมาณ 2 วินาที ครั้งแรกที่เปิด เครื่องจะพาตั้งภาษา Time Zone และเครือข่าย (ดูบทเตรียมเครื่อง) หน้าตั้งค่าส่วนใหญ่ข้ามไปก่อนได้Hold the On/Off key (blue, bottom left) for about 2 seconds. On the very first start the XL3 walks you through language, time zone and network (see the set-up chapter).
ข้อควรระวังWatch outระหว่างใช้งาน กด On/Off สั้น ๆ เป็นการปิด/เปิดจอเท่านั้น เครื่องยังวัดต่อ การปิดเครื่องจริงต้องกดค้างประมาณ 3 วินาทีDuring use a short press only switches the display off and on; the meter keeps running. To switch off, hold it for about 3 seconds.
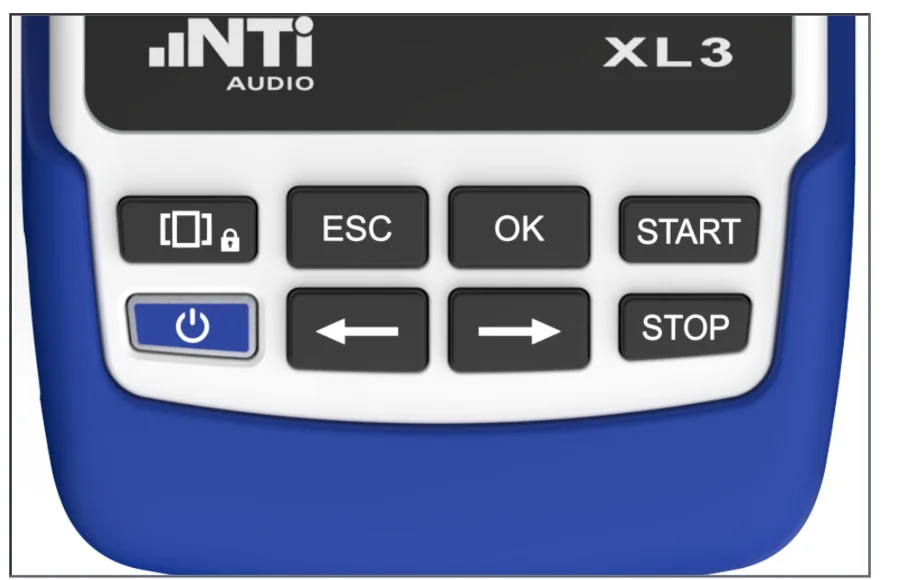
รูปที่ 3Figure 3 แป้นกดของ XL3 — ปุ่มที่ใช้ในการวัดครั้งแรกThe XL3 keypad: the keys you need for the first measurement - On/Off — กดค้าง ~2 วินาที เพื่อเปิดเครื่องOn/Off: hold ~2 s to switch on
- START — เริ่มวัดSTART: starts a measurement
- STOP — หยุดวัดSTOP: stops the measurement
- STEP3
ตรวจไมโครโฟนและทำ CalibrationCheck the microphone and calibrate
ปัดหน้าจอจากขอบบนลงมาแล้วแตะไอคอน Calibration จะเห็นหน้าจอ Calibration: ช่อง Sensor ต้องขึ้น Detected สีฟ้า เลือก Configuration ให้ตรงกับไมโครโฟนที่ติดตั้งจริง ใส่ระดับของ Calibrator ที่ช่อง Calibrator สวม Calibrator บนไมโครโฟนแล้วเปิด จากนั้นแตะ START รอจนขึ้น Calibration: Successfully finishedSwipe down from the top edge and tap the calibration icon to open Calibration. Sensor must show a blue Detected. Set the Configuration to match the microphone as it is mounted, enter your calibrator's level in Calibrator, fit the calibrator on the microphone and switch it on, then tap START and wait for Calibration: Successfully finished.
ข้อควรระวังWatch outระดับที่ใส่ต้องรวมค่า free-field correction ของ Calibrator กับไมโครโฟน เช่น M2340 กับ NTi CAL200 ที่ 94.0 dB ให้ใส่ 93.88 dB (ดูตารางในบท Calibration)The level you enter must include the free-field correction for your calibrator and microphone, e.g. M2340 with an NTi CAL200 at 94.0 dB → enter 93.88 dB (table in the calibration chapter).
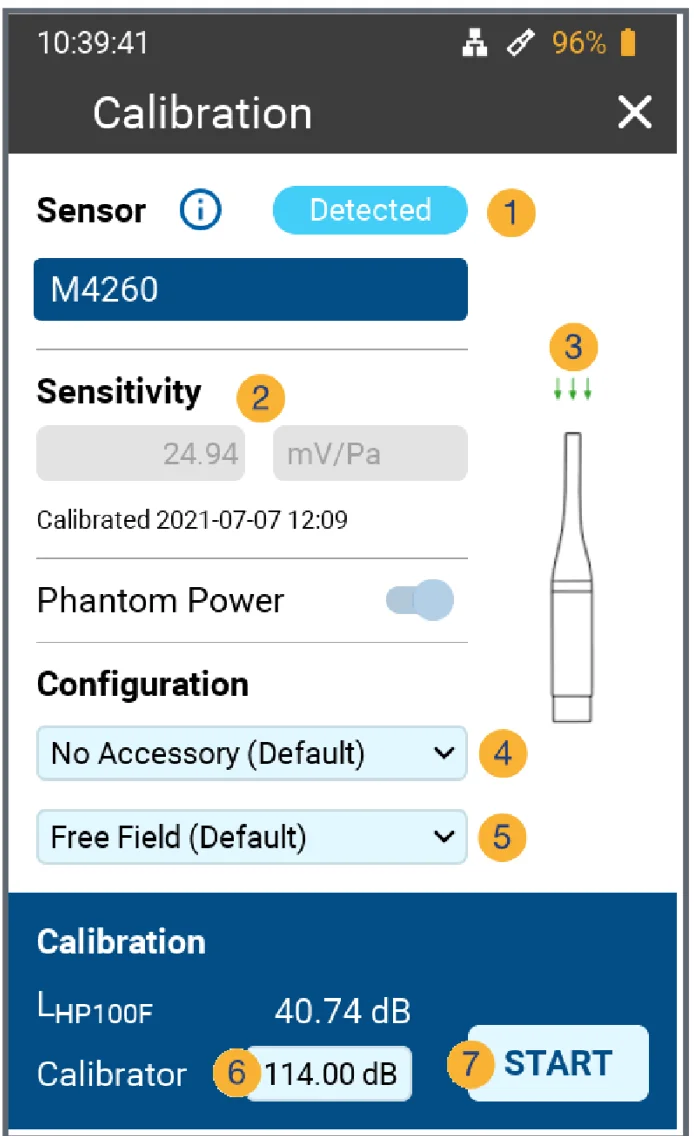
รูปที่ 4Figure 4 หน้าจอ Calibration (หมายเลขตามคู่มือ NTi) — ตรวจ 1 ก่อน เลือก 4 และ 5 ให้ตรงกับของจริง ใส่ 6 แล้วแตะ 7The Calibration screen (numbers as in NTi's manual): check 1 first, set 4 and 5 to match reality, enter 6, then tap 7 - Detected — ตรวจพบไมโครโฟนและอ่านข้อมูล ASD แล้วDetected: microphone found, ASD data read
- Sensitivity — ความไวของไมโครโฟน และวันที่ Calibrate ล่าสุดSensitivity and the date of the last calibration
- ภาพแสดงการติดตั้งตามที่เลือกไว้ใน 4 และ 5Picture of the setup selected in 4 and 5
- อุปกรณ์ที่ติดกับไมโครโฟน เช่น No Accessory (Default), Wind Screen 50 mmAccessory on the microphone, e.g. No Accessory (Default), Wind Screen 50 mm
- Free Field (Default) หรือ diffuse field ตามลักษณะสนามเสียงที่จะวัดFree Field (Default) or diffuse field, according to the sound field you will measure
- Calibrator — ระดับของ Calibrator (มักเป็น 94.0 หรือ 114.0 dB)Calibrator: the calibrator level (typically 94.0 or 114.0 dB)
- START — เริ่ม CalibrationSTART begins the calibration
- STEP4
เลือก Sound Level MeterChoose the Sound Level Meter
แตะไอคอนเมนูที่มุมซ้ายบน (≡) แล้วแตะ Sound Level Meter รายการในเมนูขึ้นกับ Option ที่ติดตั้งในเครื่องTap the menu icon at the top left (≡), then tap Sound Level Meter. The functions listed depend on the options installed.
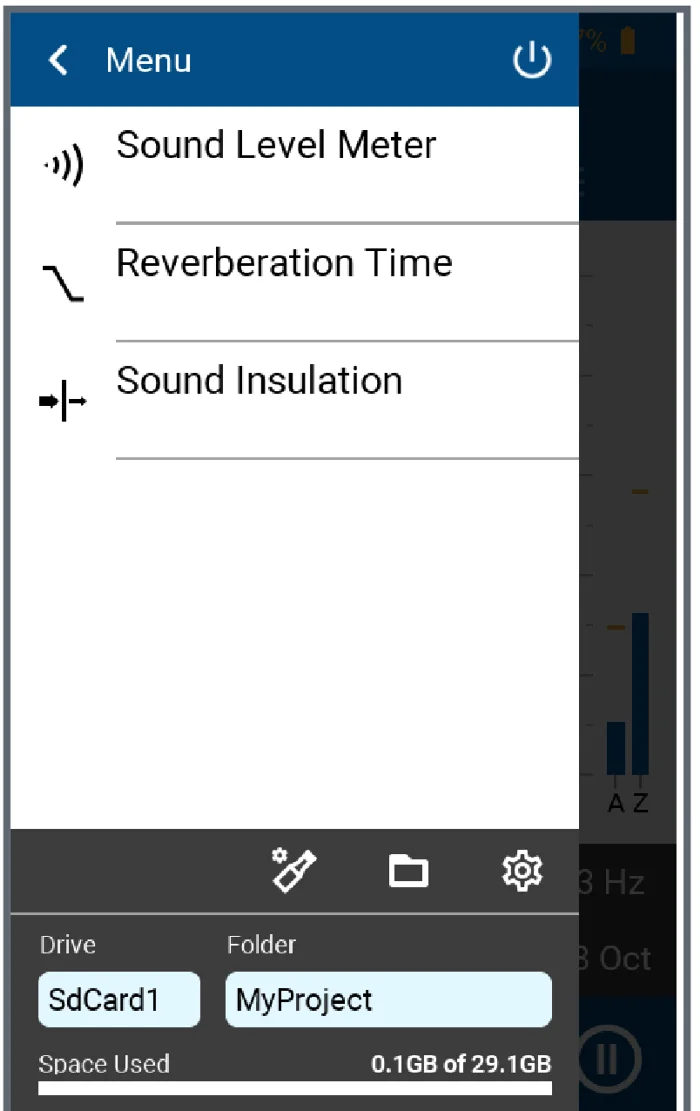
รูปที่ 5Figure 5 เมนูหลัก (Menu) — เลือกฟังก์ชันวัด และดูว่าผลจะถูกเก็บที่ไดรฟ์และโฟลเดอร์ใดThe Menu: pick the measurement function and see which drive and folder results go to - Sound Level Meter — ฟังก์ชันวัดระดับเสียงSound Level Meter: the sound level function
- ไอคอนโฟลเดอร์ — เปิดรายการผลที่บันทึกไว้ (measurement explorer)Folder icon: opens the saved results (measurement explorer)
- Drive และ Folder — ที่เก็บผลวัด เช่น SdCard1 › MyProjectDrive and Folder: where results are stored, e.g. SdCard1 › MyProject
- STEP5
กด START แล้วดูหน้าจอระหว่างวัดPress START and watch the screen
กดปุ่ม START บรรทัดสถานะด้านล่างจะเปลี่ยนเป็น STARTING แล้วเป็น LOGGING (หรือ RUNNING ถ้าไม่ได้เปิด Logging) พร้อมเวลาที่วัดไปแล้ว ค่าเฉลี่ยอย่าง LAeq จะเริ่มมีตัวเลขหลังกด START เท่านั้น ก่อนหน้านั้นจะแสดง --.-Press START. The status line at the bottom changes to STARTING, then LOGGING (or RUNNING without logging) with the elapsed time. Averages such as LAeq only show a number after START; before that they read --.-
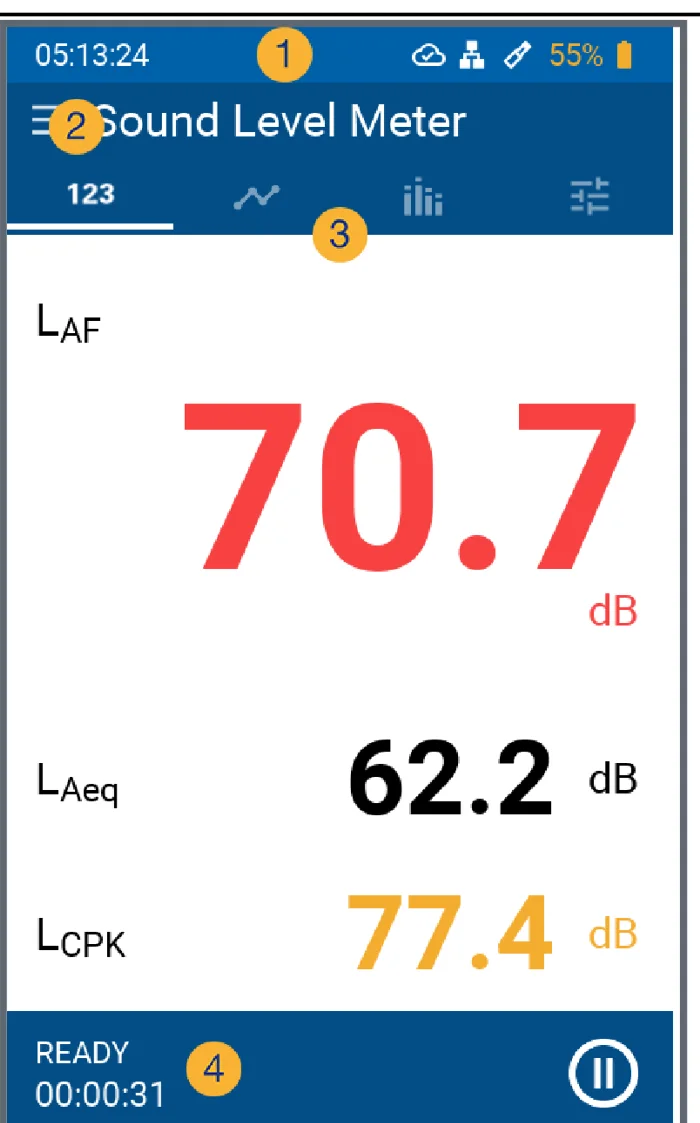
รูปที่ 6Figure 6 หน้าจอ Sound Level Meter (หมายเลขตามคู่มือ NTi) — ระหว่างวัดให้ดูบรรทัดสถานะ (4) ว่ากำลังวัดอยู่จริง และดูค่าที่ต้องการในพื้นที่ผล (3)The Sound Level Meter screen (numbers as in NTi's manual): while measuring, check the status line (4) and read your values in the results area (3) - แถบสถานะ: เวลา เครือข่าย ไมโครโฟน แบตเตอรี่Status bar: time, network, microphone, battery
- เมนูหลักMain menu
- พื้นที่แสดงผล ปัดซ้าย/ขวาเพื่อเปลี่ยนหน้าResults area: swipe left/right to change page
- สถานะการวัด (READY / LOGGING / PAUSE) และเวลาที่วัดไปแล้วMeasurement status (READY / LOGGING / PAUSE) and elapsed time
- STEP6
กด STOP แล้วบันทึกPress STOP and save
กดปุ่ม STOP สถานะจะเป็น STOPPING → SAVING → READY ถ้าตั้ง Save ไว้แบบ prompt หรือ manually จะมีหน้าต่าง Save Result ให้ตรวจ Folder และ Name เพิ่ม Comment ได้ แล้วยืนยัน ผลจะถูกเก็บลง SD card ในโฟลเดอร์โปรเจกต์Press STOP: the status goes STOPPING → SAVING → READY. With Save set to prompt or manually, a Save Result window lets you check Folder and Name, add a Comment and confirm. The result goes to the project folder on the SD card.
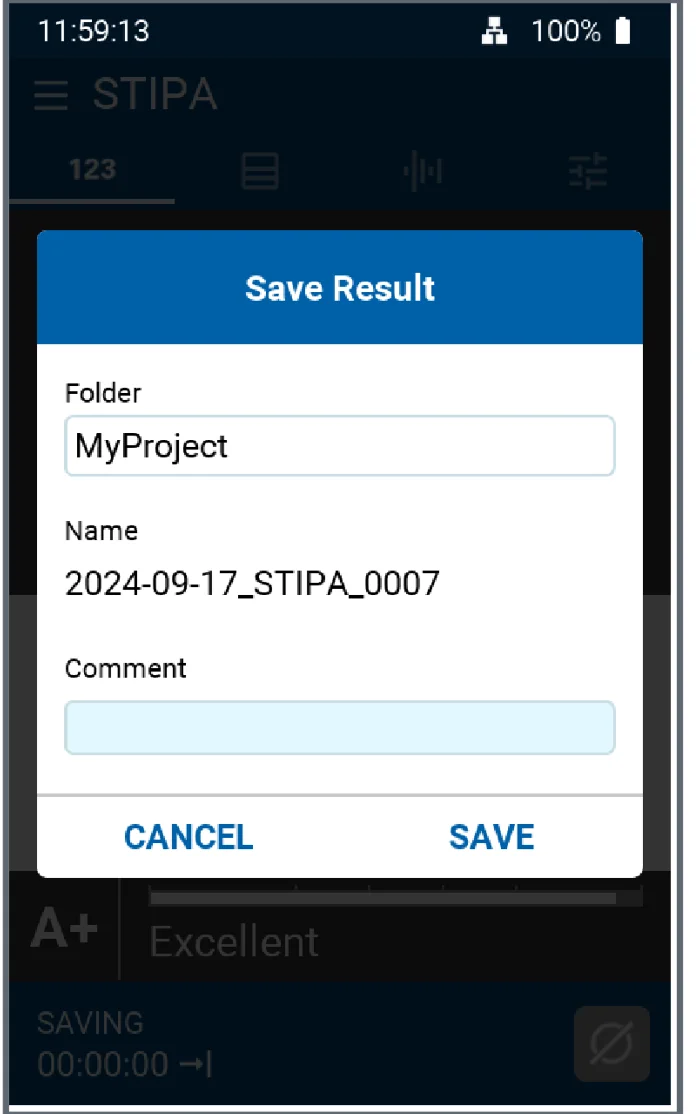
รูปที่ 7Figure 7 หน้าต่าง Save Result (ภาพตัวอย่างจากบท STIPA ของคู่มือ หน้าต่างเดียวกันใช้กับทุกฟังก์ชัน) — ตรวจโฟลเดอร์ก่อนกดบันทึกThe Save Result window (example from the STIPA chapter of the manual; the same window appears for every function): check the folder before saving ภาพ: NTi Audio — XL3 Instruction Manual V1.60 หน้า 84Image: NTi Audio — XL3 Instruction Manual V1.60, p. 84
คุณมีผลวัดหนึ่งไฟล์ที่ผ่าน Calibration แล้วอยู่ใน SD card ถ้าไม่มีหน้าต่าง Save Result ขึ้น แปลว่าเครื่องตั้ง Save ไว้แบบ automatic ผลถูกเก็บให้เองในโฟลเดอร์โปรเจกต์You now have one calibrated measurement file on the SD card. If no Save Result window appeared, Save is set to automatic and the result went straight into the project folder.
ต่อไป: รู้จักปุ่ม ช่องต่อ และหน้าจอ →Next: keys, connectors and screen →
01รู้จักเครื่องGET TO KNOW
รู้จัก XL3: ช่องต่อ ปุ่ม และหน้าจอGet to know the XL3: connectors, keys and screen
XL3 ใช้งานได้ทั้งจอสัมผัสและแป้นกด 8 ปุ่ม งานวัดทั่วไปใช้แค่ไม่กี่ปุ่ม แต่ควรรู้ว่าช่องต่อแต่ละช่องมีไว้ทำอะไรThe XL3 works through its touchscreen and eight keys. Everyday measuring needs only a few of them, but you should know what each connector is for.
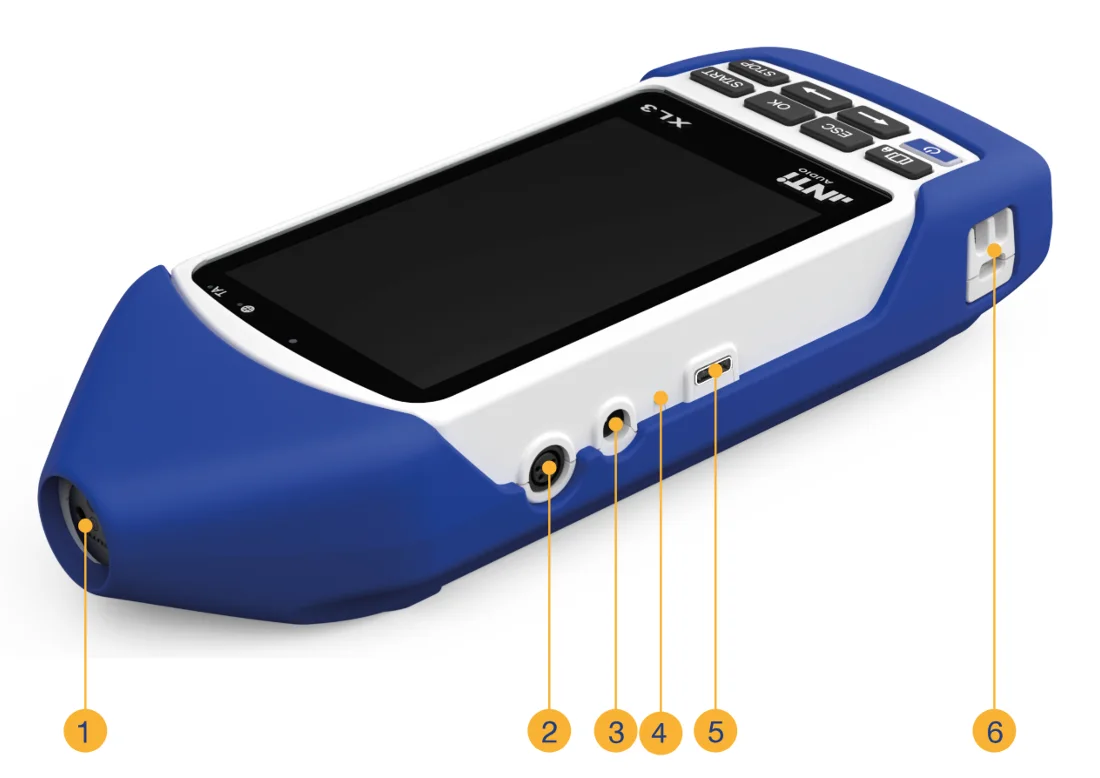
- ช่อง XLR แบบบาลานซ์สำหรับไมโครโฟนหรือสัญญาณเสียง มี ASD เปิดไฟ 48 V และอ่านข้อมูลไมโครโฟน NTi ให้เองBalanced XLR input for a microphone or audio, with ASD: switches 48 V on and reads NTi microphone data
- Digital I/O ที่โปรแกรมได้ เช่น Input Keypad XL3 หรือสถานีตรวจอากาศProgrammable digital I/O, e.g. Input Keypad XL3 or a weather station
- ช่องไฟ DC สำหรับอะแดปเตอร์ของ XL3DC socket for the XL3 power supply
- LED สถานะการชาร์จ: ดับ = ไม่มีไฟเข้า, เขียว = เต็ม, แดง = กำลังชาร์จ, แดง/เขียวกะพริบ = ไฟไม่พอCharge LED: off = no supply, green = full, red = charging, red/green flashing = supply not sufficient
- USB-C ต่อคอมพิวเตอร์ ชาร์จ หรือต่ออะแดปเตอร์ LANUSB-C: computer, charging or the LAN adapter
- จุดคล้องสายรัดข้อมือ / ล็อกกันขโมยWrist strap / anti-theft lock point
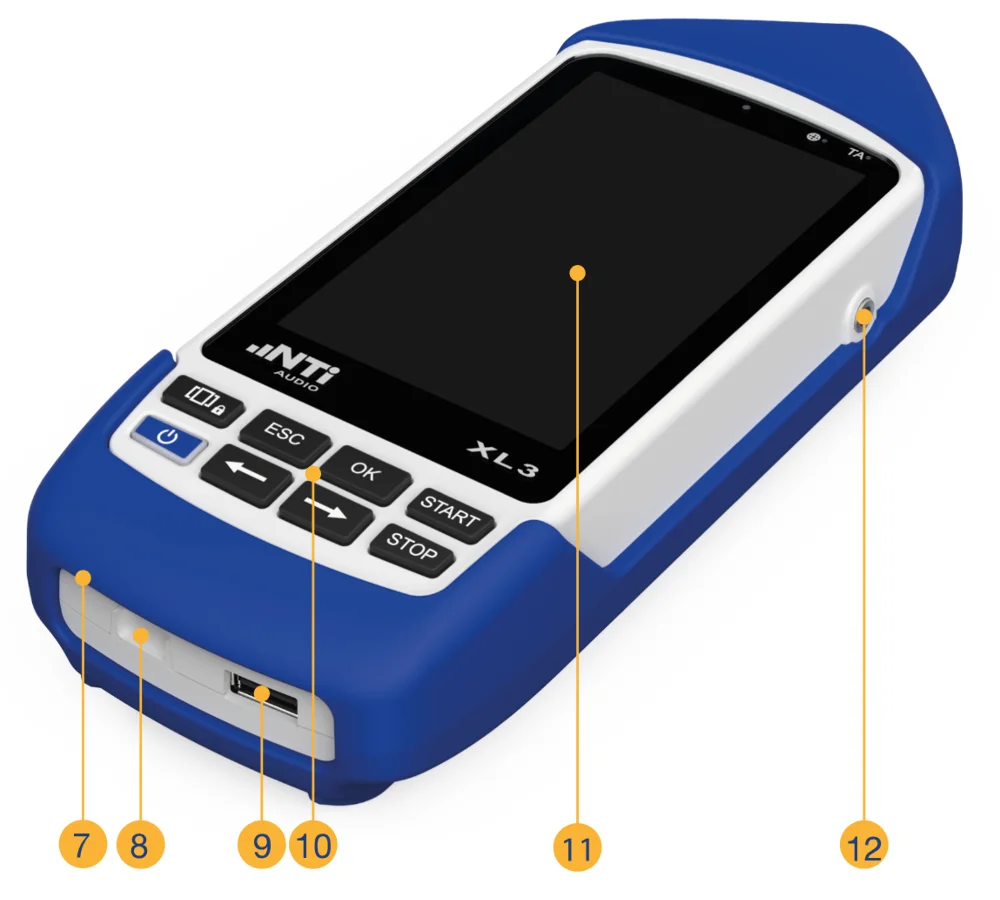
- ไมโครโฟนในตัวสำหรับบันทึกเสียงพูดเป็นหมายเหตุBuilt-in voice microphone for spoken comments
- ช่อง Micro SD card เก็บผลวัด ภาพหน้าจอ และไฟล์ WAVMicro SD card slot: results, screenshots, WAV files
- USB-A สำหรับอุปกรณ์ภายนอก เช่น USB driveUSB-A for external devices such as a USB drive
- แป้นกดKeypad
- จอสัมผัสสีColour touchscreen
- ช่องหูฟัง ฟังสัญญาณอินพุตHeadphone output to listen to the input
- ปุ่มเปลี่ยนหน้า / ล็อก: กดเปลี่ยนหน้าผล กดค้างเพื่อล็อกหรือปลดล็อกจอPage / lock key: switches result pages; hold to lock or unlock the screen
- ESC ยกเลิกและปิดหน้าต่างESC cancels and closes the window
- OK ยืนยันการเลือกOK confirms the selection
- START เริ่มวัดSTART starts a measurement
- On/Off: ~2 วินาที = เปิด, กดสั้น = เปิด/ปิดจอ, ~3 วินาที = ปิดหรือรีสตาร์ตOn/Off: ~2 s = on, short = display on/off, ~3 s = off or restart
- ← เลื่อนเคอร์เซอร์ในกราฟ← moves the cursor in a chart
- → เลื่อนเคอร์เซอร์ในกราฟ (กด ← + → พร้อมกัน = บันทึกภาพหน้าจอ)→ moves the cursor (← + → together = screenshot)
- STOP หยุดวัดSTOP stops the measurement
จอสัมผัส: แตะเพื่อเลือก ปัดซ้าย/ขวาเพื่อเปลี่ยนหน้าผล และปัดจากขอบบนลงมาเพื่อเปิด Quick settingsTouchscreen: tap to select, swipe left/right to change the result page, and swipe down from the top edge for Quick settings.
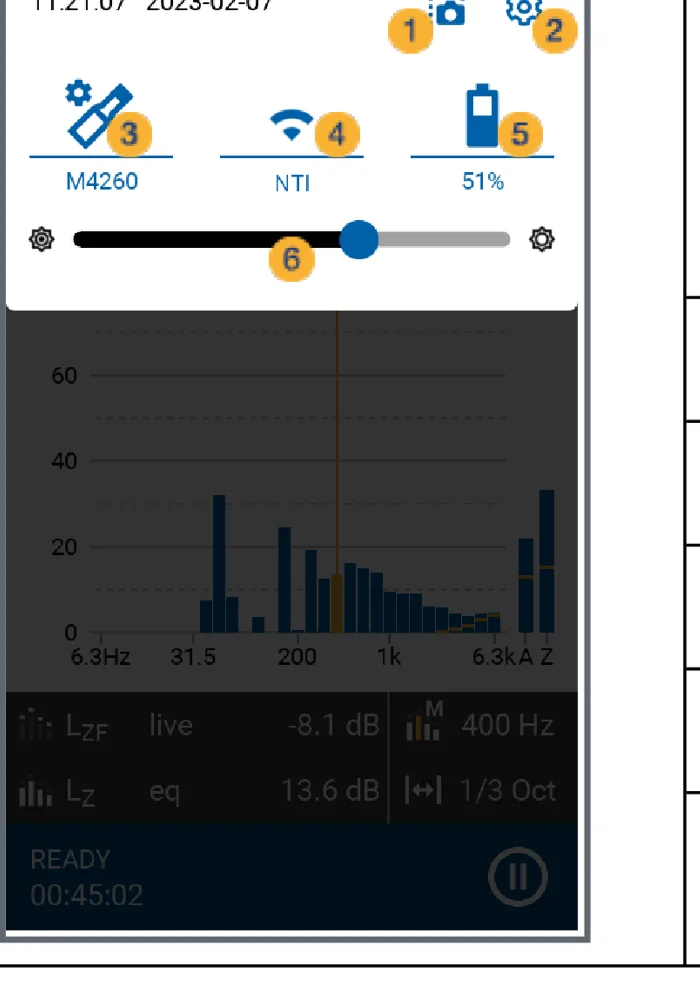
- บันทึกภาพหน้าจอเป็น PNG ลง SD cardRecord a PNG screenshot to the SD card
- System settingsSystem settings
- หน้าจอ CalibrationThe Calibration screen
- Connections (เครือข่าย)Connections (network)
- แบตเตอรี่Rechargeable battery
- ความสว่างหน้าจอDisplay brightness
02ติดตั้งและเตรียมSET UP
เตรียมเครื่องครั้งแรกFirst-time set-up
- STEP1
ชาร์จแบตเตอรี่ให้เต็มCharge the battery fully
แบตเตอรี่ใหม่มีไฟประมาณครึ่งเดียว ชาร์จด้วยอะแดปเตอร์ของ XL3 ขณะปิดเครื่องใช้เวลาประมาณ 3 ชั่วโมง หรือชาร์จผ่าน USB-C (อะแดปเตอร์ 3 A ชาร์จเต็มได้ในไม่ถึง 3 ชั่วโมงแม้เปิดใช้งาน) แบตเตอรี่ใช้งานได้มากกว่า 8 ชั่วโมงเมื่อเปิดจอ และมากกว่า 12 ชั่วโมงเมื่อปิดจอA new battery is about half charged. With the XL3 adapter and the instrument off, a full charge takes about 3 hours; over USB-C a 3 A supply charges fully in under 3 hours even while in use. Battery life is more than 8 h with the display on and more than 12 h with it off.
ข้อควรระวังWatch outใช้อะแดปเตอร์ของแท้เท่านั้น อะแดปเตอร์อื่นอาจกระทบผลวัดและไม่อยู่ในประกัน ปิดเครื่องก่อนถอดแบตเตอรี่ทุกครั้งUse only the original adapter: others may affect results and are not covered by warranty. Switch off before removing the battery.
- STEP2
ขั้นตอนเปิดเครื่องครั้งแรก (Onboarding)First start (onboarding)
เลือก Language, Time Zone และ Decimal Separator แล้วแตะ NEXT เลือก Wi-Fi (หรือใช้ LAN ผ่านอะแดปเตอร์ USB-C) ตั้ง password และ Device Name ถ้าต้องการ แล้วแตะ START เพื่อเข้าสู่ Sound Level MeterChoose Language, Time Zone and Decimal Separator, tap NEXT; pick a Wi-Fi network (or LAN through a USB-C adapter); optionally set a password and Device Name; tap START to open the Sound Level Meter.
ข้อควรระวังWatch outเว็บของ XL3 (Web Server) จะใช้ได้ก็ต่อเมื่อตั้งรหัสผ่านแล้ว ถ้าจะดึงไฟล์ผ่านเบราว์เซอร์ภายหลัง ให้ตั้งไว้ตั้งแต่ตอนนี้The XL3 website (Web Server) only works once a password is set: set one now if you want to download files through a browser later.
- STEP3
วันที่และเวลาDate and time
XL3 ตั้งเวลาเองผ่านอินเทอร์เน็ต (NTP) หรือ GPS Mouse ของ NTi ตั้งเองด้วยมือไม่ได้ เลือกได้เฉพาะ Time Zone ดังนั้นควรต่อเครือข่ายอย่างน้อยหนึ่งครั้งก่อนงานวัดจริงThe XL3 sets its clock over the internet (NTP) or from NTi's GPS Mouse; it cannot be set by hand, only the time zone can. Connect to a network at least once before real work.
การตั้งค่าอื่นทั้งหมดอยู่ใน System Settings (ปัดลงแล้วแตะไอคอนเฟือง หรือแตะไอคอนเมนูแล้วเลือกเฟือง)All other settings are in System Settings (swipe down and tap the gear icon, or tap the menu icon and then the gear).
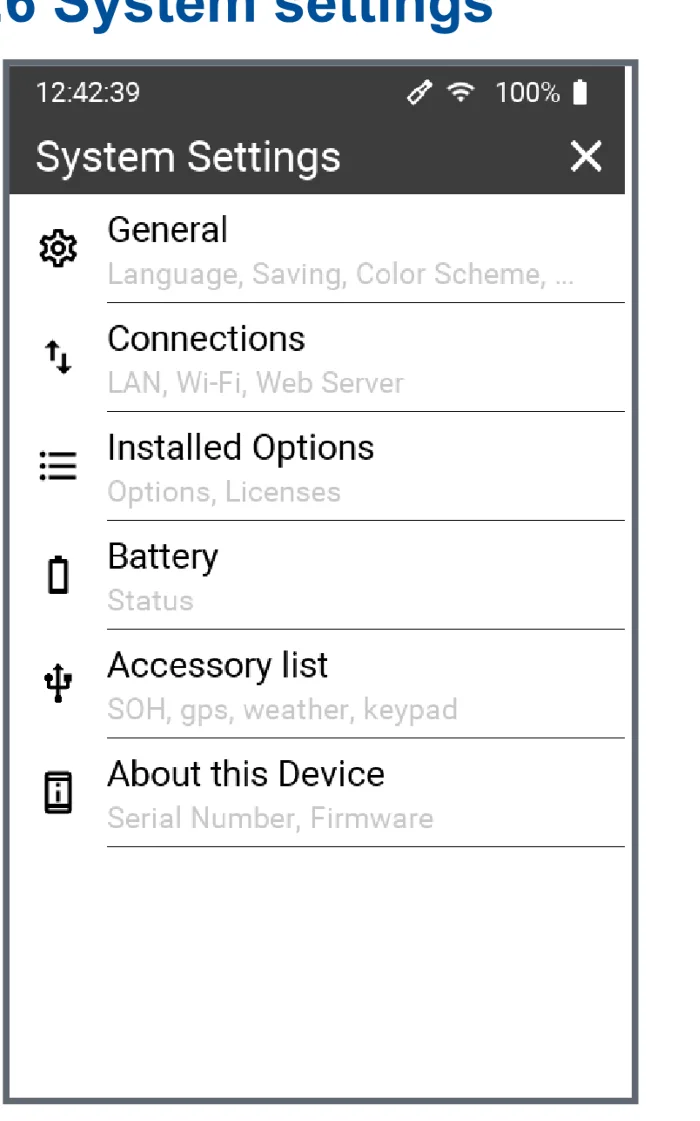
เปิด Installed Options ดูว่าเครื่องมี Option อะไรบ้าง ฟังก์ชันที่ไม่มี Option จะไม่ขึ้นในเมนู ส่วน About this Device บอกเวอร์ชันเฟิร์มแวร์และบอกว่ามีเวอร์ชันใหม่หรือไม่ (เครื่องต้องออนไลน์)Open Installed Options to see what your instrument has: functions without their option do not appear in the menu. About this Device shows the firmware version and whether a newer one exists (the XL3 must be online).
03ตรวจสอบCHECK
ไมโครโฟน Configuration และ CalibrationMicrophone, Configuration and calibration
ก่อนเชื่อผลวัด ต้องมั่นใจสองเรื่อง: เครื่องรู้ว่าไมโครโฟนถูกติดตั้งแบบไหน และความไวของไมโครโฟนถูกตรวจกับ Calibrator แล้ว NTi แนะนำให้ตรวจกับ Calibrator ก่อนวัด และสอบเทียบเครื่องพร้อมไมโครโฟนปีละครั้งBefore you trust a result, two things must be right: the instrument knows how the microphone is mounted, and the microphone sensitivity has been checked with a calibrator. NTi recommends a calibrator check before measuring and an annual service calibration of meter and microphone.
Configuration ต้องตรงกับไมโครโฟนที่ติดตั้งจริงThe Configuration must match the microphone as it is really mounted
ในหน้าจอ Calibration มีรายการ Configuration สองช่อง ช่องแรกคืออุปกรณ์ที่ติดกับไมโครโฟน ช่องที่สองคือประเภทสนามเสียง XL3 ใช้สองค่านี้เลือกเส้นแก้การตอบสนองความถี่ (equalization curve) ให้เอง ถ้าเลือกไม่ตรงกับของจริง ผลที่ความถี่สูงจะคลาดเคลื่อนโดยไม่มีอะไรเตือนThe Calibration screen has two Configuration lists: the accessory on the microphone, and the type of sound field. The XL3 uses both to pick the frequency-response correction (equalization curve). If they do not match reality, high-frequency results are off without any warning.
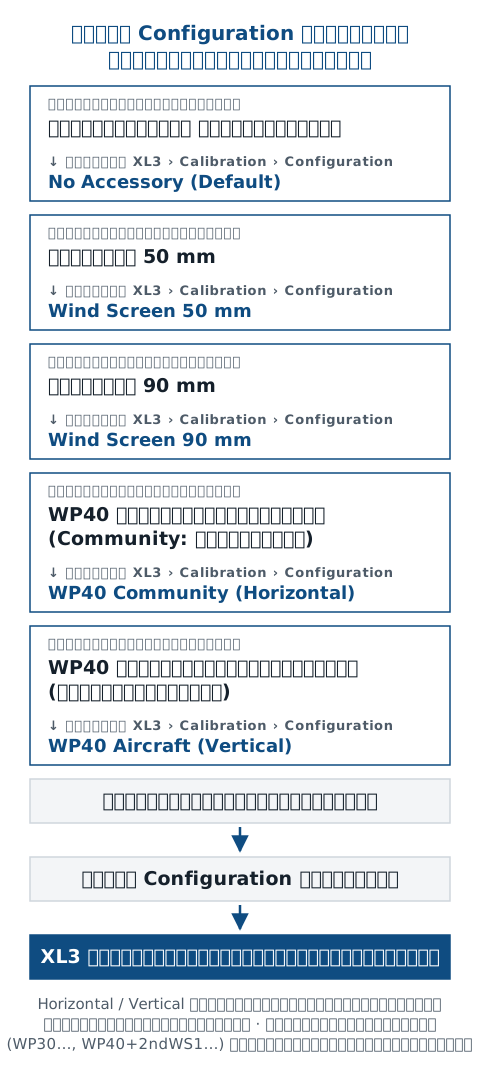
Free Field หรือ Diffuse Field? ไมโครโฟนวัดเสียงของ NTi ทุกตัวเป็นแบบ free-field equalized คือให้การตอบสนองที่ถูกต้องเมื่อเสียงเข้าตรงหน้าไมโครโฟน (0°) ค่าเริ่มต้น Free Field (Default) จึงใช้เมื่อเสียงที่วัดมาจากทิศทางหลักทางเดียวและคุณชี้ไมโครโฟนไปหาแหล่งเสียง ส่วน diffuse field ใช้เมื่อเสียงมาจากทุกทิศใกล้เคียงกัน เช่น ในห้องที่ก้องมากFree field or diffuse field? All NTi measurement microphones are free-field equalized: their response is correct for sound arriving head-on (0°). The default Free Field (Default) is for sound that comes mainly from one direction, with the microphone pointed at the source. Diffuse field is for sound arriving from all directions alike, as in a very reverberant room.
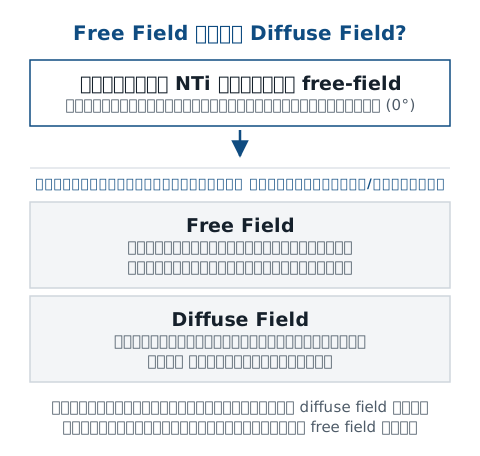
เข้าใจว่า Free Field แปลว่า "วัดนอกอาคาร" จริง ๆ แล้วเป็นเรื่องทิศทางที่เสียงเข้าหาไมโครโฟน และคำว่า Horizontal / Vertical ในชื่อ WP40 คือทิศของเสียง (เสียงชุมชนเข้ามาแนวนอน เสียงเครื่องบินมาจากด้านบน) ไม่ใช่ท่าวางไมโครโฟน — ไมโครโฟนกลางแจ้งต้องติดตั้งแนวตั้งเสมอTaking Free Field to mean "outdoors". It is about the direction the sound arrives from, and Horizontal / Vertical in the WP40 names is the direction of the sound (community noise horizontally, aircraft from above), not how the microphone is mounted: outdoor microphones are always mounted upright.
ทำ Calibration ทีละขั้นCalibrating step by step
- STEP1
เปิดหน้าจอ CalibrationOpen the Calibration screen
ปัดลงจากขอบบนแล้วแตะไอคอน Calibration (หมายเลข 3 ในรูป Quick settings) หรือแตะไอคอนเดียวกันที่แถบล่างของเมนูหลักSwipe down and tap the calibration icon (number 3 in the Quick settings figure), or the same icon at the bottom of the main menu.
- STEP2
ตรวจ Sensor และเลือก ConfigurationCheck the sensor and set the Configuration
ช่อง Sensor ต้องเป็น Detected สีฟ้าพร้อมรุ่นไมโครโฟน ถ้าขึ้น No ASD สีเหลือง แปลว่าเครื่องไม่เห็นข้อมูลไมโครโฟน ตรวจการเสียบและสาย เลือกอุปกรณ์และประเภทสนามเสียงให้ตรงกับของจริงSensor must read a blue Detected with the microphone model. A yellow No ASD means the instrument cannot read the microphone data: check the plug and cable. Set the accessory and the field type to match reality.
- STEP3
ใส่ระดับ CalibratorEnter the calibrator level
แตะช่อง Calibrator แล้วใส่ระดับตามที่ระบุบน Calibrator รวม free-field correction แล้ว (ตารางด้านล่าง)Tap Calibrator and enter the level stated for your calibrator, including the free-field correction (table below).
- STEP4
สวม Calibrator แล้วแตะ STARTFit the calibrator and tap START
สวม Calibrator บนไมโครโฟนให้แน่น เปิด Calibrator แล้วแตะ START รอจนข้อความเปลี่ยนจาก Calibration running... เป็น Calibration: Successfully finished ค่าความไวใหม่จะถูกเขียนลงชิป ASD ของไมโครโฟนและใช้ต่อจากนี้Fit the calibrator firmly, switch it on and tap START. Wait until Calibration running... changes to Calibration: Successfully finished. The new sensitivity is written into the microphone's ASD chip and used from now on.
| M2230 / M2340 กับ Calibrator 94.0 dBM2230 / M2340 with a 94.0 dB calibrator | ค่าที่ใส่ / ค่าแก้Enter / correction |
|---|---|
| NTi CAL200NTi CAL200 | ค่าที่ใส่ / ค่าแก้Enter / correction93.88 dB / −0.1293.88 dB / −0.12 |
| B&K 4231B&K 4231 | ค่าที่ใส่ / ค่าแก้Enter / correction93.85 dB / −0.1593.85 dB / −0.15 |
| Nor 1256Nor 1256 | ค่าที่ใส่ / ค่าแก้Enter / correction93.85 dB / −0.1593.85 dB / −0.15 |
| Cirrus CR:515Cirrus CR:515 | ค่าที่ใส่ / ค่าแก้Enter / correction93.70 dB / −0.3093.70 dB / −0.30 |
ค่าในตารางใช้กับการติดตั้งแบบ No Accessory, Wind Screen 50/90 mm และ WP40 ตามคู่มือ XL3 V1.60 หน้า 111 และ 119 ถ้าใช้ WP30 (Legacy) หรือไมโครโฟนรุ่นอื่น ให้ดูตารางในคู่มือValues for No Accessory, Wind Screen 50/90 mm and WP40, from the XL3 manual V1.60 pp. 111 and 119. For WP30 (legacy) or other microphones use the manual's tables.
ถ้าค่าที่วัดได้ต่างจากค่าจากโรงงานเกิน ±1.5 dB (ไมโครโฟน Class 1) หรือ ±3.0 dB (Class 2) เครื่องจะขึ้นข้อความ Measured sensitivity too far ... ให้ตรวจระดับ Calibrator ที่ใส่และตัวไมโครโฟน อย่ากดผ่านไปวัดต่อIf the result differs from the factory value by more than ±1.5 dB (Class 1 microphone) or ±3.0 dB (Class 2), the XL3 shows Measured sensitivity too far ... Check the calibrator level you entered and the microphone; do not carry on measuring.
เสียงรบกวนรอบข้างขณะ Calibrate ต้องต่ำกว่า 69 dB (Calibrator 94 dB) หรือต่ำกว่า 89 dB (114 dB) และถ้าเพิ่งย้ายเครื่องจากที่ร้อน/เย็นต่างกันราว 10 °C ให้รอประมาณ 10 นาทีก่อนBackground noise during calibration must be below 69 dB (94 dB calibrator) or 89 dB (114 dB). After a temperature change of about 10 °C, wait about 10 minutes first.
04วัดMEASURE
วัดระดับเสียงด้วย Sound Level MeterMeasuring with the Sound Level Meter
XL3 วัดทุกค่าพร้อมกันเสมอ ทั้ง A/C/Z, Fast/Slow, Leq, Lmax, Lmin และสเปกตรัม ส่วนที่คุณเลือกคือจะ "แสดง" ค่าไหนบนจอและจะ "บันทึก" อะไรลงไฟล์ ซึ่งเป็นสองเรื่องที่แยกกันThe XL3 always measures everything at once: A/C/Z, Fast/Slow, Leq, Lmax, Lmin and the spectrum. What you choose is which values to show on screen and what to record to the file, and those are two separate choices.
Sound Level Meter มีสี่หน้า เลือกจากไอคอนใต้ชื่อฟังก์ชันหรือปัดซ้าย/ขวา: 123 ตัวเลข, กราฟระดับตามเวลา, สเปกตรัม และหน้าตั้งค่า (ไอคอนแถบเลื่อน)The Sound Level Meter has four pages, chosen with the icons under its title or by swiping: 123 numbers, level-time graph, spectrum, and settings (slider icon).
- STEP1
เลือกค่าที่จะแสดงChoose the values to display
ในหน้า 123 แตะชื่อค่า (เช่น LAF) จะเปิดหน้าต่างเลือก Frequency Weighting (A, C, Z), Time Weighting (F, S, eq …), Reading (live, max, min …) และ Correction ค่าสเปกตรัมและ percentile อยู่ที่ MoreOn the 123 page tap a value name (e.g. LAF) to choose Frequency Weighting (A, C, Z), Time Weighting (F, S, eq …), Reading (live, max, min …) and Correction; spectral and percentile values are under More.
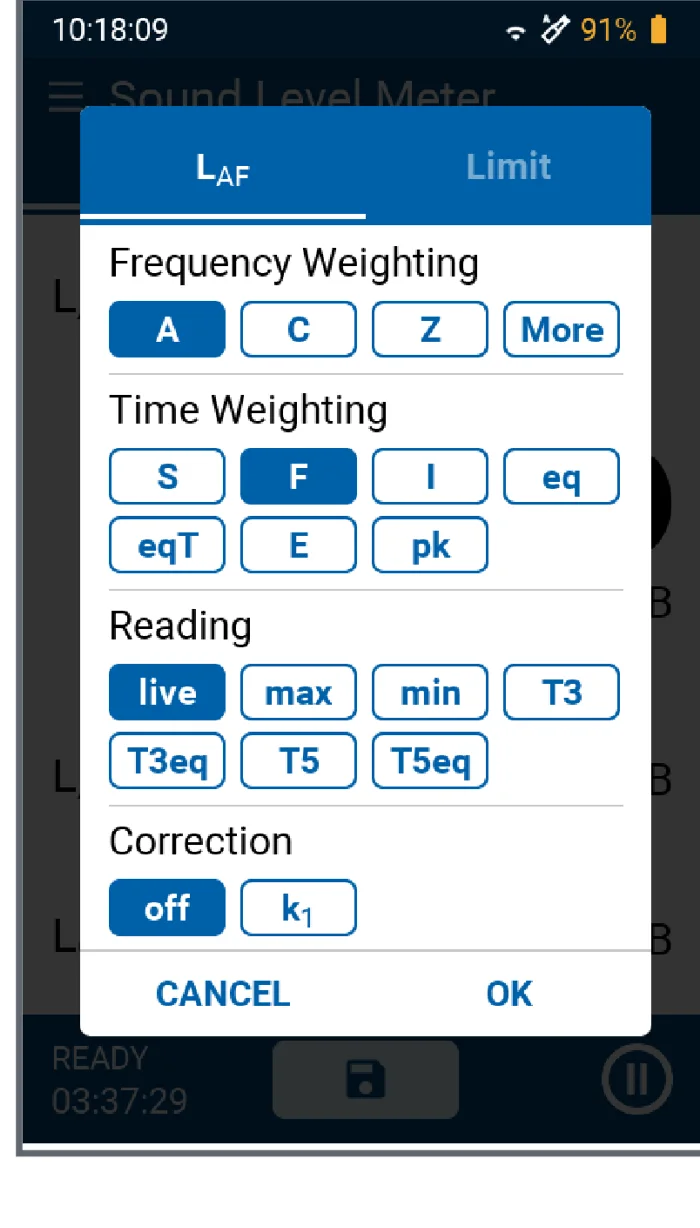
รูปที่ 16Figure 16 แตะชื่อค่าบนหน้า 123 เพื่อเปลี่ยนว่าจะแสดงค่าอะไร ตัวอย่างนี้คือ LAF = A-weighting, Fast, liveTap a value name on the 123 page to change what it shows; here LAF = A-weighting, Fast, live ภาพ: NTi Audio — XL3 Instruction Manual V1.60 หน้า 35Image: NTi Audio — XL3 Instruction Manual V1.60, p. 35 - STEP2
ตั้ง Timer ก่อนเริ่มวัดSet the timer before you start
แตะช่อง READY ที่มุมล่างซ้ายก่อนเริ่มวัด เลือก Continuous (วัดจนกด STOP), Single (วัดตามเวลาที่ตั้ง 1 วินาทีถึง 24 ชั่วโมงแล้วหยุดเอง) หรือ Repeated (วัดเป็นรอบ 5 วินาทีถึง 1 ชั่วโมง)Tap the READY field at the bottom left before starting: Continuous (until STOP), Single (a set time from 1 s to 24 h, then stops) or Repeated (cycles of 5 s to 1 h).
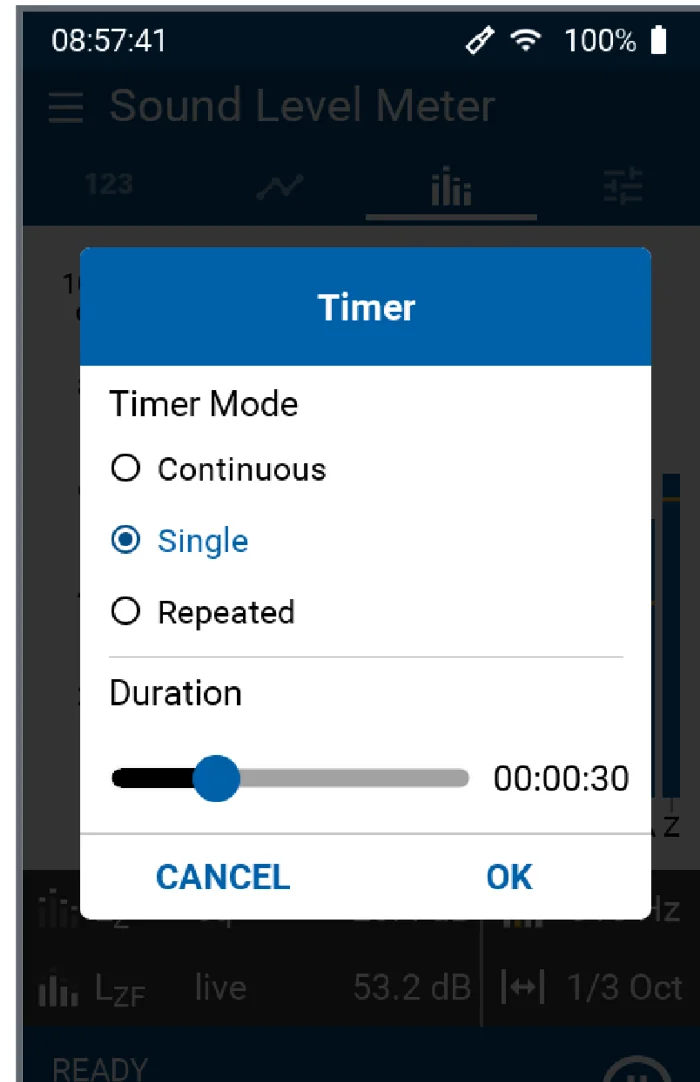
รูปที่ 17Figure 17 หน้าต่าง Timer — งานวัดที่กำหนดเวลาไว้ เช่น 15 นาที ใช้ Single แล้วตั้ง DurationThe Timer window: for a fixed-duration job, e.g. 15 minutes, use Single and set the Duration ภาพ: NTi Audio — XL3 Instruction Manual V1.60 หน้า 35Image: NTi Audio — XL3 Instruction Manual V1.60, p. 35 - STEP3
ตั้งว่าจะบันทึกอะไรลงไฟล์Set what goes into the file
หน้าตั้งค่า › Report & Logging: Spectra (off / eq / eq, max, min / all), Logging interval (off / 1 s / 100 ms — 100 ms ต้องมี XL3 Extended Noise Measurement Option), Audio recording และ Levels to be recorded (All หรือเลือกได้ถึง 10 ค่า) เครื่องสร้างรายงาน TXT ให้เองเมื่อจบการวัดSettings page › Report & Logging: Spectra (off / eq / eq, max, min / all), Logging interval (off / 1 s / 100 ms; 100 ms needs the XL3 Extended Noise Measurement Option), Audio recording, and Levels to be recorded (All, or up to 10 selected). A TXT report is created automatically at the end.
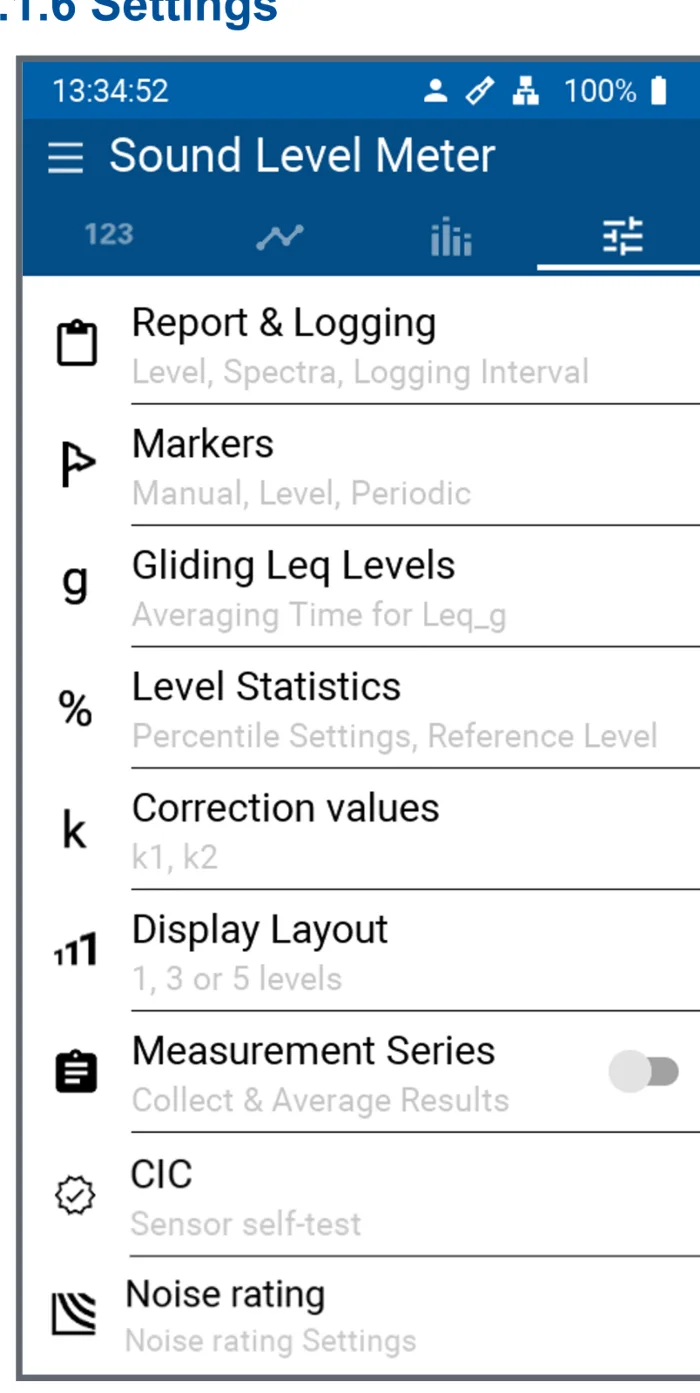
รูปที่ 18Figure 18 หน้า Settings ของ Sound Level Meter — เรื่องที่ต้องตั้งก่อนงานวัดส่วนใหญ่อยู่ที่ Report & LoggingThe Sound Level Meter Settings page: what to set before most jobs is under Report & Logging - Report & Logging — สเปกตรัม ช่วงเวลา log เสียง และค่าที่จะบันทึกReport & Logging: spectra, log interval, audio and the values to record
ตั้งค่าที่แสดงบนจอแล้วคิดว่าไฟล์จะมีค่านั้นแน่นอน ค่าที่แสดงกับค่าที่บันทึกตั้งแยกกัน ถ้า Levels to be recorded เป็น Selected ให้ตรวจว่าค่าที่รายงานต้องใช้อยู่ในรายการAssuming that whatever is on screen goes into the file. Display and recording are set separately: with Levels to be recorded = Selected, check that the values your report needs are in the list.
หน้าสเปกตรัมThe spectrum page
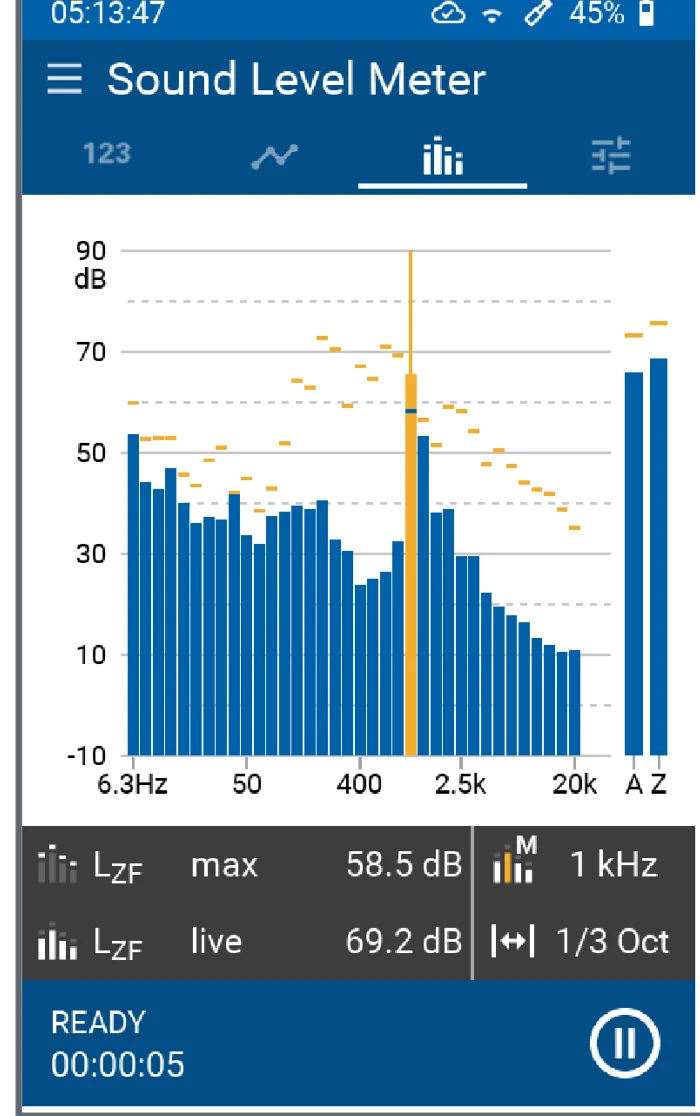
ระหว่างวัดควรดูอะไรWhat to watch while measuring
- บรรทัดสถานะต้องเป็น LOGGING หรือ RUNNING และเวลาเดินอยู่The status line reads LOGGING or RUNNING and the time is running
- ค่า LAeq เริ่มมีตัวเลขและค่อย ๆ นิ่งขึ้นเมื่อเวลาผ่านไปLAeq has a number and settles as time goes on
- ถ้ามีเหตุการณ์ที่ไม่ใช่เสียงที่ต้องการวัด (คนพูดใกล้ไมโครโฟน รถผ่าน) ให้แตะไอคอนหยุดชั่วคราวบนจอ ข้อมูลช่วงหยุดถูกทำเครื่องหมายว่าใช้ไม่ได้และไม่ถูกนำไปเฉลี่ยIf something you do not want to measure happens (someone talking at the microphone, a passing vehicle), tap the pause icon: that stretch is marked invalid and left out of the averages
- ไอคอนไมโครโฟนที่แถบสถานะต้องยังอยู่ ส่วนไอคอน No storage ที่กะพริบแปลว่าไม่มีที่เก็บข้อมูลThe microphone icon stays in the status bar; a blinking No storage icon means there is no storage
การวัดที่ยาวเกิน 24 ชั่วโมง เครื่องจะเปิดไฟล์ใหม่ให้เองทุก 24 ชั่วโมงโดยข้อมูลต่อเนื่องไม่ขาดช่วงFor measurements longer than 24 hours the XL3 starts a new file every 24 hours automatically, without a gap.
การเลือก Fast หรือ Slow ขึ้นกับลักษณะเสียง วัตถุประสงค์ของการวัด และมาตรฐานหรือข้อกำหนดที่ใช้ ถ้ามาตรฐานระบุค่าไว้ เช่น LAFmax ให้ใช้ตามนั้นก่อน อ่านเพิ่มที่ Fast, Slow, ImpulseChoosing Fast or Slow depends on the sound, the purpose of the measurement and the applicable standard or requirement; if a standard names the quantity (e.g. LAFmax), follow it first. More in Fast, Slow, Impulse.
05บันทึกSAVE
บันทึกผลและเปิดดูผลที่บันทึกSaving and reopening results
| General › Save | หลังกด STOPAfter STOP | เหมาะกับGood for |
|---|---|---|
| manuallymanually | หลังกด STOPAfter STOPขึ้นหน้าต่าง Save Result ให้เลือก CANCEL หรือบันทึก ผลที่ยังไม่บันทึกยังอยู่แม้ปิดเครื่องSave Result opens: cancel or save; unsaved results survive switching off | เหมาะกับGood forการวัดทดลองTrial measurements |
| promptprompt | หลังกด STOPAfter STOPขึ้นหน้าต่าง Save Result พร้อม Folder และ Name ให้เพิ่ม Comment ได้Save Result shows Folder and Name; add a Comment | เหมาะกับGood forงานที่ต้องจดหมายเหตุแต่ละจุดJobs where each position needs a note |
| automaticautomatic | หลังกด STOPAfter STOPบันทึกเองลงโฟลเดอร์โปรเจกต์ ชื่อไฟล์แบบ yyyy-mm-dd_SLM_nnnSaved automatically to the project folder as yyyy-mm-dd_SLM_nnn | เหมาะกับGood forงานที่ต้องการให้เก็บทุกครั้งแน่นอนJobs where nothing may be lost |
ผลวัดหนึ่งครั้งประกอบด้วยรายงานและ log เป็นไฟล์ TXT (เปิดด้วย Excel ได้) และไฟล์ระบบ *.xl3 ที่เข้ารหัสไว้สำหรับเปิดบนเครื่องและนำเข้าโปรแกรมของ NTi **อย่าแก้ไขไฟล์ *.xl3** ถ้าไฟล์ถูกแก้ เครื่องจะเปิดผลนั้นไม่ได้Each measurement consists of a TXT report and log (open them in Excel) and an encrypted *.xl3 system file for reopening on the XL3 and importing into NTi software. **Do not edit *.xl3 files**: a modified file will not load.
เปิดดูผลที่บันทึกไว้บนเครื่องReopening a saved result on the instrument
- STEP1
เปิด measurement explorerOpen the measurement explorer
แตะไอคอนเมนู แล้วแตะไอคอนโฟลเดอร์ จะเห็นรายการผลวัดในโปรเจกต์ แตะจุดสามจุด (⋮) ข้างไฟล์เพื่อเปิด Select Action: Load, Info, Delete, CancelTap the menu icon, then the folder icon: the project's measurements are listed. Tap the three dots (⋮) next to a file for Select Action: Load, Info, Delete, Cancel.
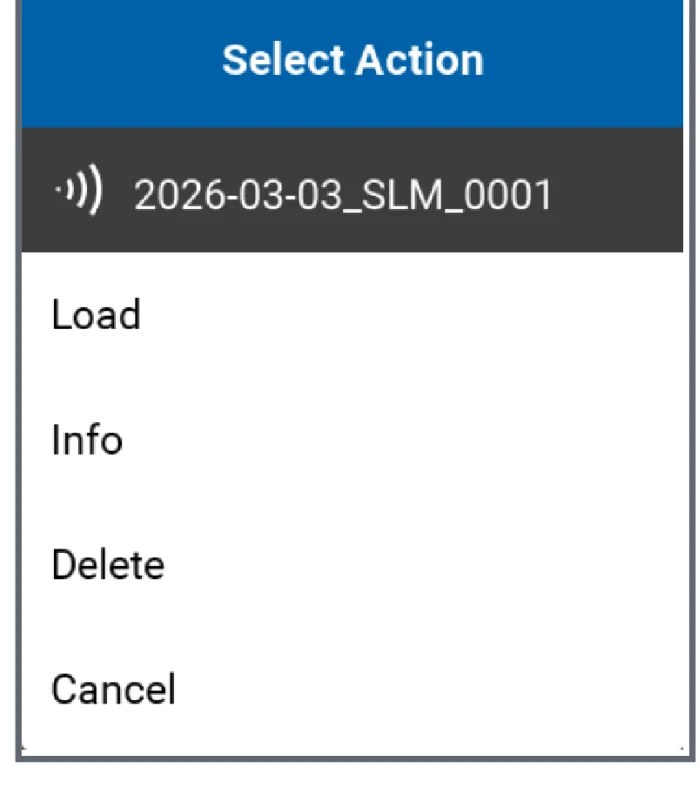
รูปที่ 20Figure 20 Select Action — Load เปิดผลกลับมาดูบนเครื่อง ส่วน Delete ลบทั้งโฟลเดอร์ผลวัดและทุกไฟล์ในนั้นSelect Action: Load reopens the result on the instrument; Delete removes the whole measurement folder and everything in it ภาพ: NTi Audio — XL3 Instruction Manual V1.60 หน้า 32Image: NTi Audio — XL3 Instruction Manual V1.60, p. 32 - STEP2
Load แล้วดูผลรวมLoad and view the results
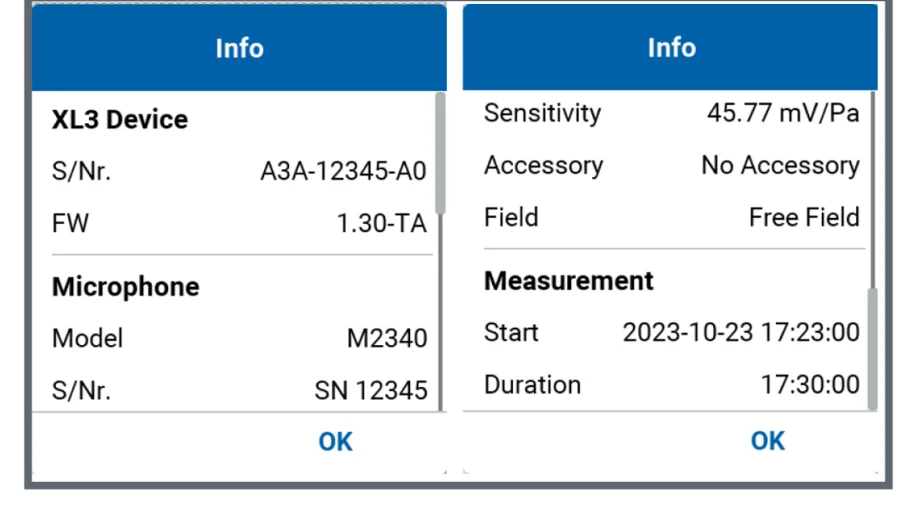
เลือก Load เครื่องขึ้น Measurement loaded successfully แตะไอคอน i เพื่อดูข้อมูลเครื่อง ไมโครโฟน และการวัด แตะ OK เพื่อดูผลรวมของการวัดครั้งนั้นChoose Load: Measurement loaded successfully appears. Tap the i icon for instrument, microphone and measurement details; tap OK to see the aggregated results.
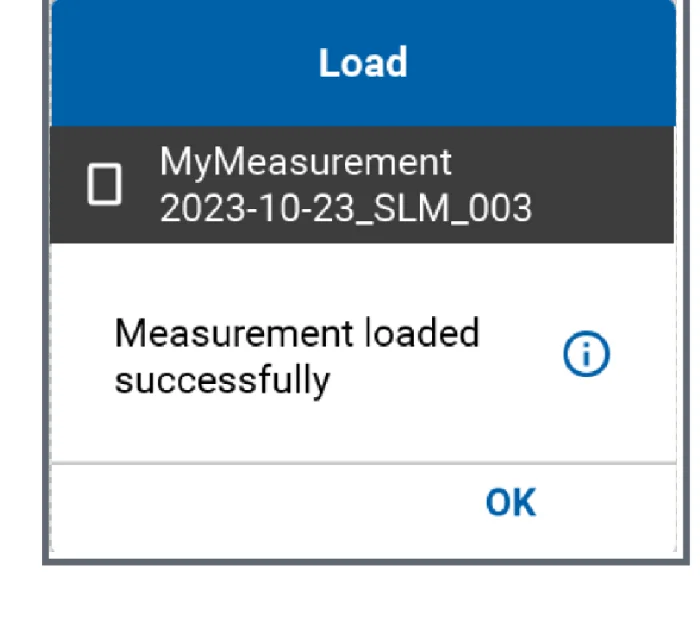
รูปที่ 21Figure 21 หลัง Load สำเร็จ แตะ i เพื่อดูรายละเอียด หรือ OK เพื่อดูผลAfter a successful Load, tap i for details or OK for the results ภาพ: NTi Audio — XL3 Instruction Manual V1.60 หน้า 32Image: NTi Audio — XL3 Instruction Manual V1.60, p. 32
บันทึกเสียงพูดเป็นหมายเหตุได้ (เฟิร์มแวร์ V1.52 ขึ้นไป) ในหน้าต่าง Save Result แตะไอคอนไมโครโฟนเพื่อพูด แตะหยุดเมื่อเสร็จ ไฟล์เสียงถูกเก็บคู่กับผลวัดYou can record a spoken comment (firmware V1.52 or later): in Save Result tap the microphone icon, speak, tap stop; the voice note is stored with the measurement.
06โอนข้อมูลTRANSFER
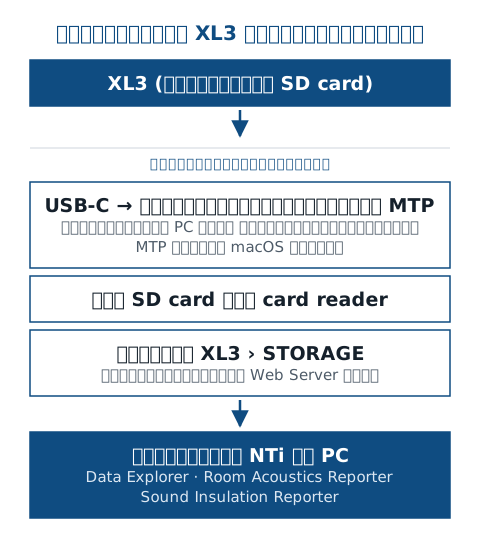
นำข้อมูลเข้าคอมพิวเตอร์Getting the data onto a computer
- STEP1
ผ่าน USB-COver USB-C
ต่อ XL3 กับ PC ด้วยสาย USB เครื่องจะขึ้นเป็นอุปกรณ์แบบ MTP คล้าย thumb drive ลากไฟล์มาไว้ใน PC ก่อน แล้วจึงเปิดด้วยโปรแกรม เพราะโปรแกรมอ่านไฟล์ตรงผ่าน MTP ไม่ได้ MTP ใช้กับ macOS ไม่ได้Connect the XL3 to the PC by USB: it shows up as an MTP device, like a thumb drive. Copy the files to the PC first, then open them in software; programs cannot read files directly over MTP. MTP does not work on macOS.
- STEP2
ถอด SD cardRemove the SD card
ใช้ card reader อ่านการ์ดได้โดยตรง NTi แนะนำให้การ์ดเป็น FAT32 เพื่อให้ใช้กับคอมพิวเตอร์ได้กว้างที่สุดRead the card in a card reader. NTi recommends FAT32 for the widest computer compatibility.
- STEP3
ผ่านเว็บของ XL3 (STORAGE)Through the XL3 website (STORAGE)
ตั้งรหัสผ่าน Web Server ก่อน แล้วพิมพ์ IP ของเครื่อง (ดูที่ System Settings › Connections) ในเบราว์เซอร์บนเครือข่ายเดียวกัน หรือเข้าจากอินเทอร์เน็ตผ่าน connect.nti-audio.com ด้วย Connect Key ของเครื่อง หน้า STORAGE ให้ดาวน์โหลดทีละไฟล์ได้ แม้ระหว่างที่เครื่องกำลังวัดSet a Web Server password first, then type the instrument's IP (System Settings › Connections) into a browser on the same network, or go through connect.nti-audio.com with the instrument's Connect Key. The STORAGE page lets you download each file, even during a measurement.
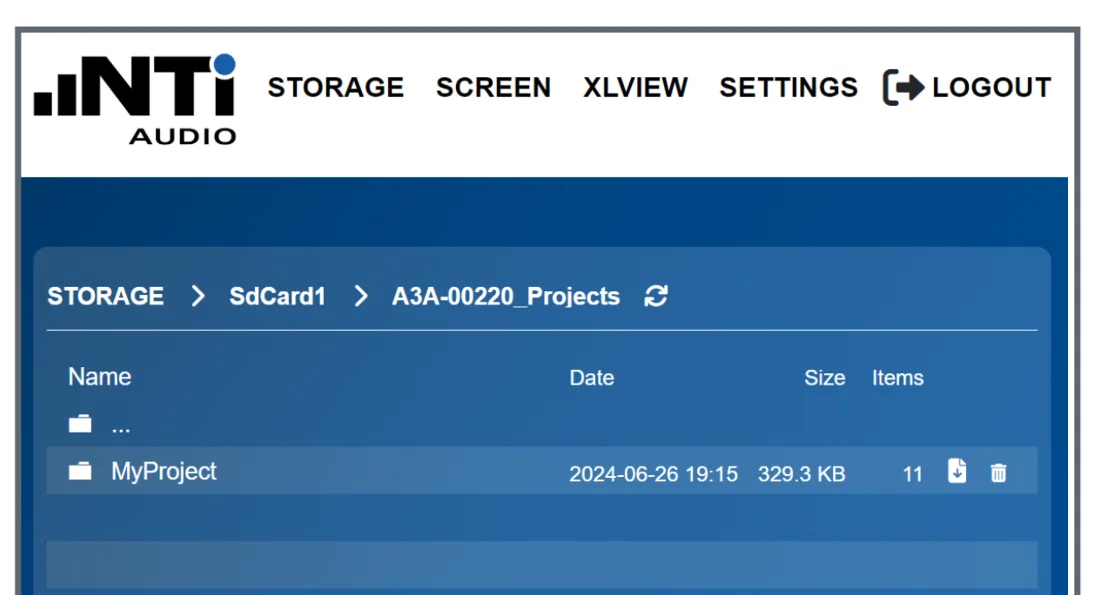
รูปที่ 23Figure 23 หน้า STORAGE บนเว็บของ XL3 — เปิดโฟลเดอร์โปรเจกต์แล้วดาวน์โหลดไฟล์ที่ต้องการThe STORAGE page of the XL3 website: open the project folder and download the files you need ภาพ: NTi Audio — XL3 Instruction Manual V1.60 หน้า 92Image: NTi Audio — XL3 Instruction Manual V1.60, p. 92
NTi Connect ใช้ฟรี 2 GB ต่อเดือนต่อเครื่อง เกินจากนั้นความเร็วจะถูกลดจนถึงต้นเดือนถัดไป ไฟล์เสียงขนาดใหญ่จึงควรดึงผ่าน USB หรือ SD cardNTi Connect is free up to 2 GB per month per instrument, then throttled until the next month: fetch large audio files over USB or the SD card.
07รายงานREPORT
วิเคราะห์และทำรายงานบนคอมพิวเตอร์Analysis and reports on the computer
| งานJob | ใช้อะไรUse | ต้องมีNeeds |
|---|---|---|
| ดูตัวเลขและ log ทั่วไปLook at numbers and logs | ใช้อะไรUseเปิดไฟล์ TXT ด้วย ExcelOpen the TXT files in Excel | ต้องมีNeeds—— |
| วิเคราะห์ log ระดับเสียง markers และทำรายงานAnalyse sound level logs, markers, reports | ใช้อะไรUseData ExplorerData Explorer | ต้องมีNeedsLicense ของ Data Explorer สำหรับเครื่อง หรือ XL3 Environmental Noise BundleA Data Explorer licence for the instrument, or the XL3 Environmental Noise Bundle |
| รายงานเวลาเสียงก้องReverberation time reports | ใช้อะไรUseRoom Acoustics ReporterRoom Acoustics Reporter | ต้องมีNeedsLicense ของโปรแกรม หรือ XL3 Room Acoustics BundleProgram licence or XL3 Room Acoustics Bundle |
| รายงานการกันเสียงSound insulation reports | ใช้อะไรUseSound Insulation ReporterSound Insulation Reporter | ต้องมีNeedsLicense ของโปรแกรม หรือ XL3 Sound Insulation Bundle เฟิร์มแวร์ V1.46 ขึ้นไปProgram licence or XL3 Sound Insulation Bundle; firmware V1.46 or later |
| รายงาน STIPASTIPA reports | ใช้อะไรUseSTI Reporting Tool (Excel)STI Reporting Tool (Excel) | ต้องมีNeedsสำหรับผู้ใช้ที่ลงทะเบียนเครื่องกับ NTiFor users who registered the instrument with NTi |
08ใช้ร่วมกับเครื่องมืออื่นWORKFLOWS
วัดเวลาเสียงก้อง (Reverberation Time)Measuring reverberation time
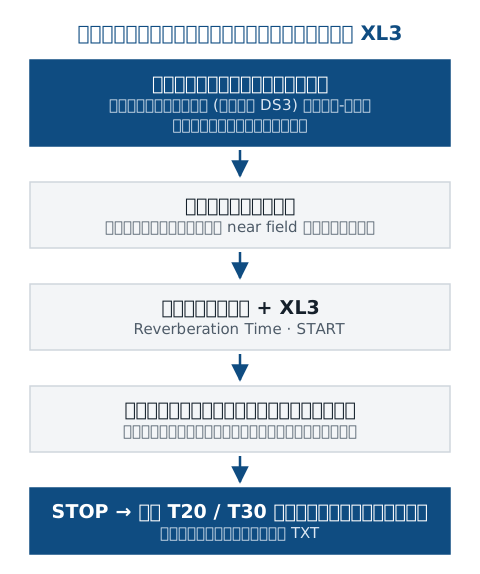
ฟังก์ชันพื้นฐานวัดแบบออกเตฟ 63 Hz–8 kHz ได้ T20 หรือ T30 การวัดแบบ 1/3 ออกเตฟต้องมี XL3 Extended Room Acoustics Option (หรือบางส่วนจาก XL3 Sound Insulation Option)The standard function measures octaves from 63 Hz to 8 kHz, T20 or T30. 1/3 octaves need the XL3 Extended Room Acoustics Option (or partly the XL3 Sound Insulation Option).
- STEP1
เลือกฟังก์ชันและโฟลเดอร์Choose the function and folder
เมนู › Reverberation Time เลือก Drive และ Folder ที่จะเก็บผล ตั้งค่าในหน้าตั้งค่าก่อนเริ่ม (ต้องหยุดการวัดก่อนจึงจะเปลี่ยนค่าได้)Menu › Reverberation Time; choose the Drive and Folder. Set the parameters first (a running measurement must be stopped before they can change).
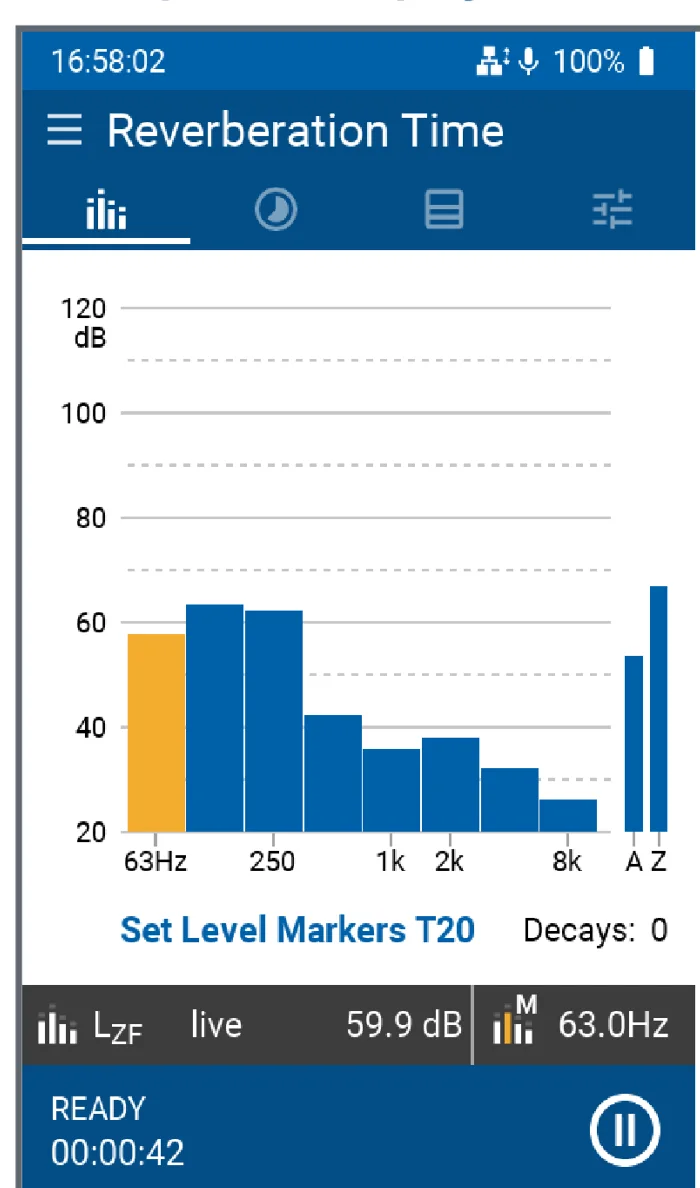
รูปที่ 25Figure 25 หน้าสเปกตรัมของ Reverberation Time แสดงระดับปัจจุบันก่อนเริ่มวัด ใช้ดูว่าแหล่งเสียงดังพอในทุกย่านหรือไม่The Reverberation Time spectrum page shows the current level before measuring: use it to see whether the source is loud enough in every band ภาพ: NTi Audio — XL3 Instruction Manual V1.60 หน้า 58Image: NTi Audio — XL3 Instruction Manual V1.60, p. 58 - STEP2
วางแหล่งเสียงและเครื่องPlace the source and the instrument
วางแหล่งเสียง (เช่น ลำโพงรอบทิศ DS3) และ XL3 ตามมาตรฐานที่ใช้ อย่าวางไมโครโฟนใน near field ของแหล่งเสียง ย่านความถี่ต่ำกระตุ้นได้ยาก จึงควรเก็บหลายรอบPlace the source (e.g. the DS3 omnidirectional speaker) and the XL3 as the standard requires; keep the microphone out of the source's near field. Low frequencies are hard to excite, so record several cycles.
- STEP3
START แล้วเปิด-ปิดแหล่งเสียงSTART, then switch the source on and off
กด START แล้วเปิดแหล่งเสียงให้ดังกว่าระดับทริกเกอร์ เมื่อปิดแหล่งเสียง เครื่องจะจับการสลายตัว ย่านที่ได้ผลถูกต้องจะมีเครื่องหมายถูก แต่ละรอบถูกเฉลี่ยรวมให้เองPress START, switch the source on above the trigger level; when it stops the XL3 captures the decay and ticks the valid bands. Each further cycle is added to the average.
- STEP4
STOP แล้วดูผลSTOP and read the result
กด STOP เมื่อได้รอบเพียงพอ ผลเฉลี่ยถูกบันทึกเป็นไฟล์ TXT ย่านที่มีปัญหาจะมีเครื่องหมาย XPress STOP when you have enough cycles; the average is saved as a TXT file. Bands with problems are marked with an X.
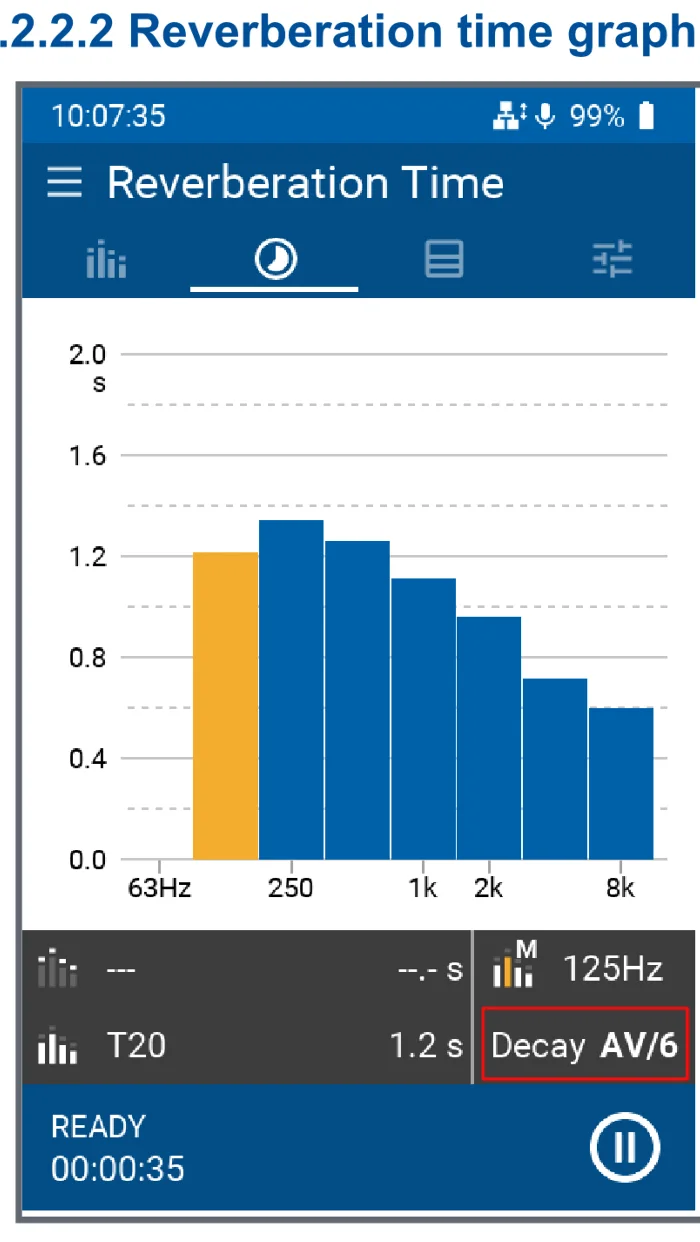
รูปที่ 26Figure 26 กราฟผล — แต่ละแท่งคือเวลาเสียงก้องของย่านความถี่ แท่งสีเหลืองคือย่านที่เลือก ค่าอยู่ที่แถบด้านล่าง (ตัวอย่าง T20 = 1.2 s) ช่อง DECAY ใช้ดูทีละรอบResult graph: each bar is the reverberation time of a band; the yellow bar is the selected band, whose value is in the strip below (e.g. T20 = 1.2 s). DECAY steps through single cycles ภาพ: NTi Audio — XL3 Instruction Manual V1.60 หน้า 58Image: NTi Audio — XL3 Instruction Manual V1.60, p. 58
เปิดเสียงดังเพื่อวัดเวลาเสียงก้อง ต้องสวมอุปกรณ์ป้องกันการได้ยิน ถ้าเครื่องหยุดพร้อมข้อความ Measurement stopped: buffer full ให้เว้นเวลาระหว่างรอบมากขึ้น หลีกเลี่ยงเสียงรบกวนระหว่างรอบ และใช้ปุ่มหยุดชั่วคราวขณะย้ายตำแหน่งLoud test signals need hearing protection. If the XL3 stops with Measurement stopped: buffer full, leave more time between cycles, avoid noise between triggers and use pause while moving.
09ใช้ร่วมกับเครื่องมืออื่นWORKFLOWS
วัด STIPA (ต้องมี XL3 STIPA Option)Measuring STIPA (XL3 STIPA Option)
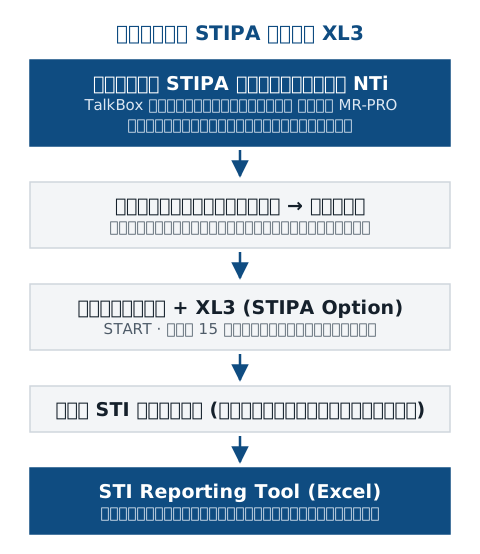
- เลือก STIPA จากเมนู ทำให้ห้องเงียบ ไม่มีคนพูดใกล้ไมโครโฟนChoose STIPA; make the room quiet, nobody talking near the microphone.
- เลือกแหล่งสัญญาณ: TalkBox ที่ตำแหน่งผู้พูด (Track 1, Output Mode = Speaker), MR-PRO ป้อนเข้าระบบเสียงทางไฟฟ้า หรือเครื่องเล่นอื่นกับไฟล์ STIPA ของ NTi ใช้เฉพาะสัญญาณต้นฉบับของ NTiPick the signal source: TalkBox at the talker position (Track 1, Output Mode = Speaker), MR-PRO injected electrically into the PA, or another player with NTi's STIPA file. Use only the original NTi signal.
- เปิดสัญญาณและตั้งระบบให้ดังเท่าการประกาศจริง ไมโครโฟนสูง 1–1.2 m (ผู้ฟังนั่ง) หรือ 1.5–1.8 m (ยืน) ไม่อยู่หน้าลำโพงหรือชิดผนัง คนวัดอยู่นอกสนามเสียงSwitch the signal on at the real announcement level. Microphone at 1–1.2 m (seated) or 1.5–1.8 m (standing), not in front of a speaker or next to a wall; operator out of the sound field.
- กด START เครื่องวัด 15 วินาทีแล้วหยุดเอง บันทึกผลในหน้าต่าง Save ResultPress START: it measures 15 s and stops by itself; save in the Save Result window.
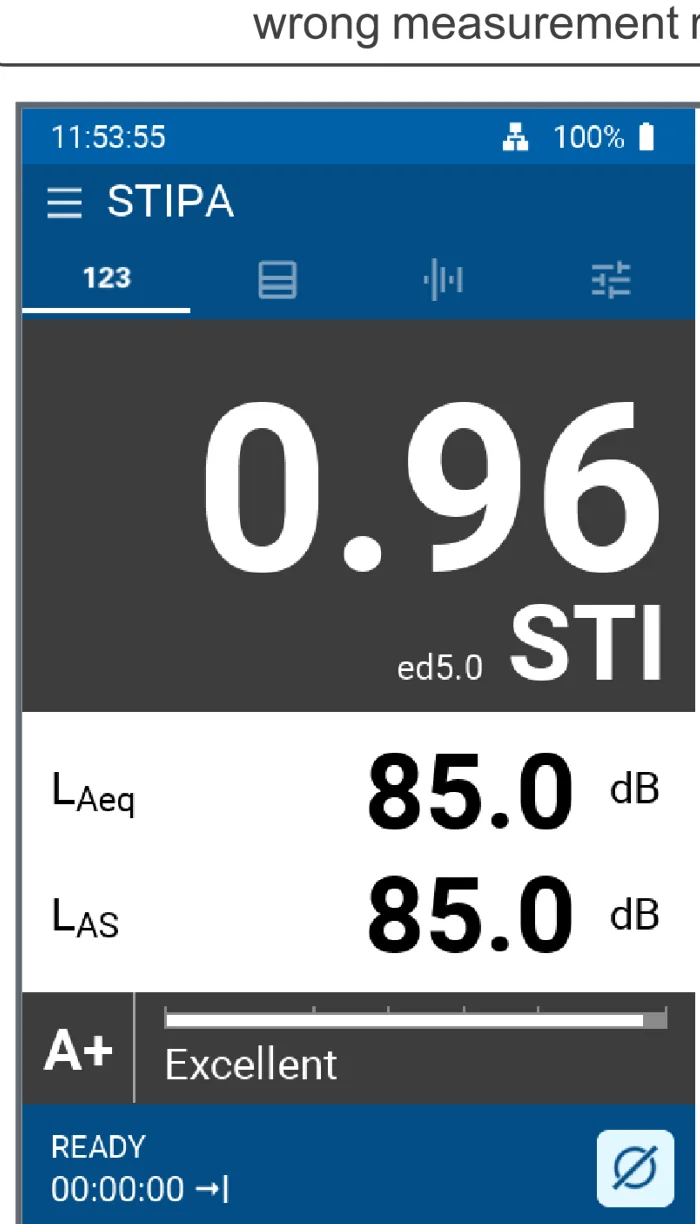
เสียงรบกวนแบบกระแทกหรือเสียงพูดทำให้ค่า STI สูงเกินจริง ถ้าวัดโดยไม่มีสัญญาณทดสอบแล้วได้ STI มากกว่า 0.3 ผลน่าจะผิด ค่าที่วัดซ้ำในจุดเดียวกันควรต่างกันไม่เกิน 0.03 STIImpulsive noise or speech makes STI too high. If a measurement without the test signal gives STI above 0.3, results are likely wrong. Repeats at one position should agree within 0.03 STI.
10ใช้ร่วมกับเครื่องมืออื่นWORKFLOWS
วัดการกันเสียง (ต้องมี XL3 Sound Insulation Option)Measuring sound insulation (XL3 Sound Insulation Option)
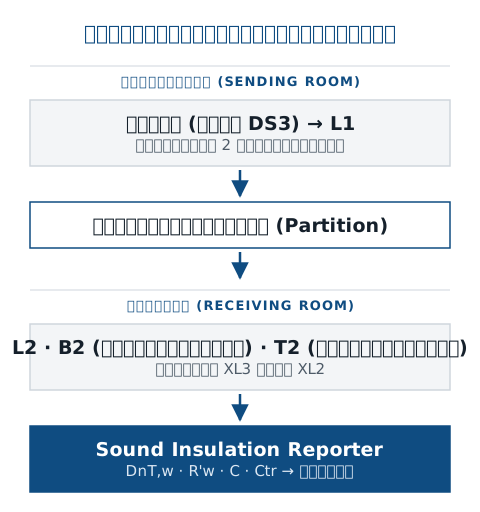
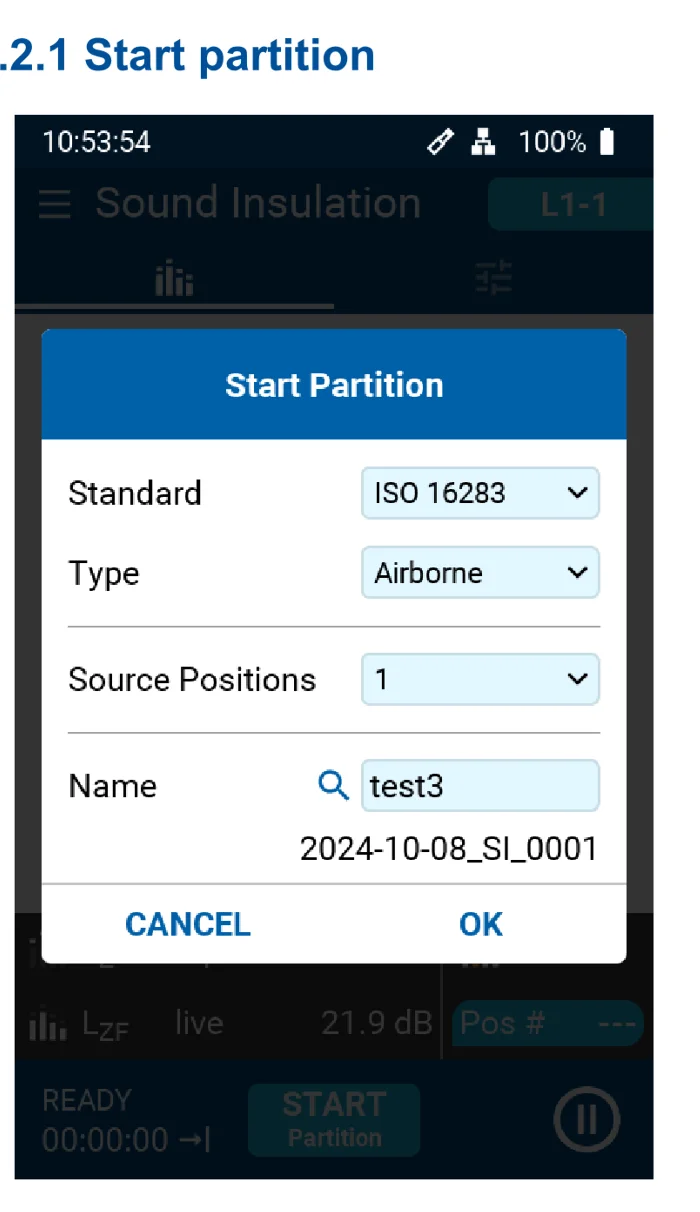
- เมนู › Sound Insulation แตะ START Partition เลือก Standard (ISO 16283, Document E, ASTM), Type (Airborne, Impact, Facade), จำนวน Source Positions และชื่อ แล้ว OKMenu › Sound Insulation, tap START Partition; choose Standard (ISO 16283, Document E, ASTM), Type (Airborne, Impact, Facade), Source Positions and a name, then OK.
- ตั้งค่าในหน้า Settings ก่อนเริ่ม: SLM measurement duration (6, 15, 30 หรือ 60 s), Reverb. Time (T20 หรือ T30), Min. Trigger LevelSet the Settings page first: SLM measurement duration (6, 15, 30 or 60 s), Reverb. Time (T20 or T30), Min. Trigger Level.
- วัด B2 ก่อน (ปิดแหล่งเสียง) แล้ววัด L1-x ในห้องต้นทาง L2-x ในห้องรับ ทุกตำแหน่งลำโพง และ T2 ในห้องรับ เลือกแต่ละรายการในหน้า Select measurementMeasure B2 first (source off), then L1-x in the sending room and L2-x in the receiving room for every speaker position, and T2 in the receiving room, choosing each on the Select measurement page.
- จบด้วย STOP แล้ว END Partition ดูผล D, Dn, DnT หรือ R' ได้ที่ Results แล้วนำไฟล์เข้า Sound Insulation ReporterFinish with STOP and END Partition; read D, Dn, DnT or R' under Results, then import the files into Sound Insulation Reporter.
ขั้นตอนเต็มและการอ่านผลในโปรแกรม อยู่ใน คู่มือการใช้งาน Sound Insulation ReporterThe full procedure and reading the results in the software are in the Sound Insulation Reporter user guide.
สวมอุปกรณ์ป้องกันการได้ยินก่อนเปิดแหล่งเสียงWear hearing protection before switching the sound source on.
11แก้ปัญหาTROUBLESHOOT
ปัญหาที่พบบ่อยและวิธีแก้Common problems and fixes
| อาการSymptom | สาเหตุ / วิธีแก้Cause / fix |
|---|---|
| กด START แล้วไม่เริ่มวัดSTART does not start | สาเหตุ / วิธีแก้Cause / fixไม่มีที่เก็บข้อมูล: ใส่ SD card หรือ USB driveNo storage: insert an SD card or USB drive |
| ค่าเฉลี่ยขึ้น --.-Averages show --.- | สาเหตุ / วิธีแก้Cause / fixปกติ ค่าเฉลี่ยจะมีเมื่อกด START แล้วเท่านั้นNormal: averages appear only after START |
| Sensor ขึ้น No ASDSensor shows No ASD | สาเหตุ / วิธีแก้Cause / fixตรวจการเสียบไมโครโฟนและสาย ถ้าใช้ไมโครโฟนที่ไม่มี ASD ให้ลบข้อมูลเดิมด้วยไอคอนถังขยะ แล้วใส่ความไวหรือ CalibrateCheck the microphone and cable; for a non-ASD microphone erase the old data with the trash icon, then enter the sensitivity or calibrate |
| ข้อความ Measured sensitivity too far …Measured sensitivity too far … | สาเหตุ / วิธีแก้Cause / fixตรวจระดับ Calibrator ที่ใส่และตัวไมโครโฟน ติดต่อ NTi หรือเราถ้ายังเป็นอยู่Check the calibrator level and the microphone; contact NTi or us if it persists |
| เปิดผลที่บันทึกไม่ได้A saved result will not load | สาเหตุ / วิธีแก้Cause / fixไฟล์ *.xl3 ถูกแก้ไขThe *.xl3 file was modified |
| โปรแกรมบน PC เปิดไฟล์ไม่ได้PC software cannot open the files | สาเหตุ / วิธีแก้Cause / fixคัดลอกไฟล์จากอุปกรณ์ MTP ลง PC ก่อน (MTP ใช้กับ macOS ไม่ได้)Copy the files from the MTP device to the PC first (no MTP on macOS) |
| เข้าเว็บของ XL3 ไม่ได้XL3 website unreachable | สาเหตุ / วิธีแก้Cause / fixต้องตั้งรหัสผ่าน Web Server และไฟ LED เครือข่ายต้องเป็นสีเหลือง ขาว หรือฟ้าA Web Server password must be set and the network LED must be yellow, white or blue |
| ไฟล์เสียงแบบไม่บีบอัดเปิดแล้วเบามากUncompressed WAV sounds almost silent | สาเหตุ / วิธีแก้Cause / fixปกติ เพราะไฟล์มีช่วงไดนามิกกว้างNormal: the file has a wide dynamic range |