QUICK STARTเริ่มใช้งานใน 5–10 นาทีUp and running in 5–10 minutes
ลองโปรแกรมด้วยข้อมูลตัวอย่างของ NTiTry the program with NTi's demo data
ก่อนออกไปวัดห้องจริง ให้ลองเส้นทางทั้งหมดกับข้อมูลตัวอย่างก่อน ภายในไม่กี่นาทีคุณจะเห็นตั้งแต่ไฟล์ผลวัดจนถึงหน้ารายงาน และรู้ว่าแต่ละมุมมองของโปรแกรมมีไว้ทำอะไรBefore you measure a real room, walk the whole path with demo data. In a few minutes you will see everything from measurement files to the report page and learn what each view of the program is for.
ต้องมีอะไรบ้างก่อนเริ่มWhat you need before you start
- PC ที่ใช้ Windows (หน้าผลิตภัณฑ์ของ NTi ระบุ Windows Vista, 7, 8.x, 10, 11)A Windows PC (NTi's product page lists Windows Vista, 7, 8.x, 10, 11)
- ไฟล์ติดตั้ง Room Acoustics Reporter และไฟล์ Demo Data จากหน้าผลิตภัณฑ์ของ NTi Audio (ตัวโปรแกรมใช้ได้ฟรี ส่วนการนำเข้าข้อมูลจากเครื่องของคุณต้องมี License)The Room Acoustics Reporter installer and the Demo Data file from NTi Audio's product page (the program is free; importing your own instrument data needs a licence)
- การเชื่อมต่ออินเทอร์เน็ต สำหรับดาวน์โหลดและการตรวจ License ตอนนำเข้าข้อมูลของคุณเองภายหลังAn internet connection, for the downloads and, later, the licence check when you import your own data
- STEP1
ติดตั้งแล้วเปิดโปรแกรมInstall and open the program
ดาวน์โหลดไฟล์ติดตั้งจากหน้า Room Acoustics Reporter ของ NTi Audio ติดตั้งตามขั้นตอนปกติของ Windows แล้วเปิดโปรแกรมDownload the installer from NTi Audio's Room Acoustics Reporter page, install it the usual Windows way and start the program.
ข้อควรระวังWatch outติดตั้งได้หลายเครื่อง จะลงทั้งเครื่องสำนักงานและโน้ตบุ๊กหน้างานก็ได้It can be installed on several computers, so the office PC and the site laptop can both have it.
- STEP2
เตรียมข้อมูลตัวอย่างGet the demo data ready
ดาวน์โหลดไฟล์ Demo Data (ไฟล์ .zip) จากหน้าผลิตภัณฑ์ แตกไฟล์ไว้ในโฟลเดอร์ที่หาเจอง่าย แล้วเปิดดูว่าข้างในมีอะไรDownload the Demo Data (.zip) from the product page, unzip it into a folder you can find easily and look at what is inside.
- STEP3
สร้างโปรเจกต์ใหม่Create a new project
ในโปรแกรมนี้ หนึ่งโปรเจกต์คือหนึ่งห้อง สำหรับการลองครั้งแรก เปิดหน้าต่าง New แล้วกด OK ด้วยค่าเริ่มต้นได้เลย เหมือนตัวอย่าง My First Steps ในคู่มือIn this program one project is one room. For the first try, open the New panel and press OK with the default settings, as in the manual's My First Steps.
ในโปรแกรมIn the programFile › New... › OKFile › New... › OK
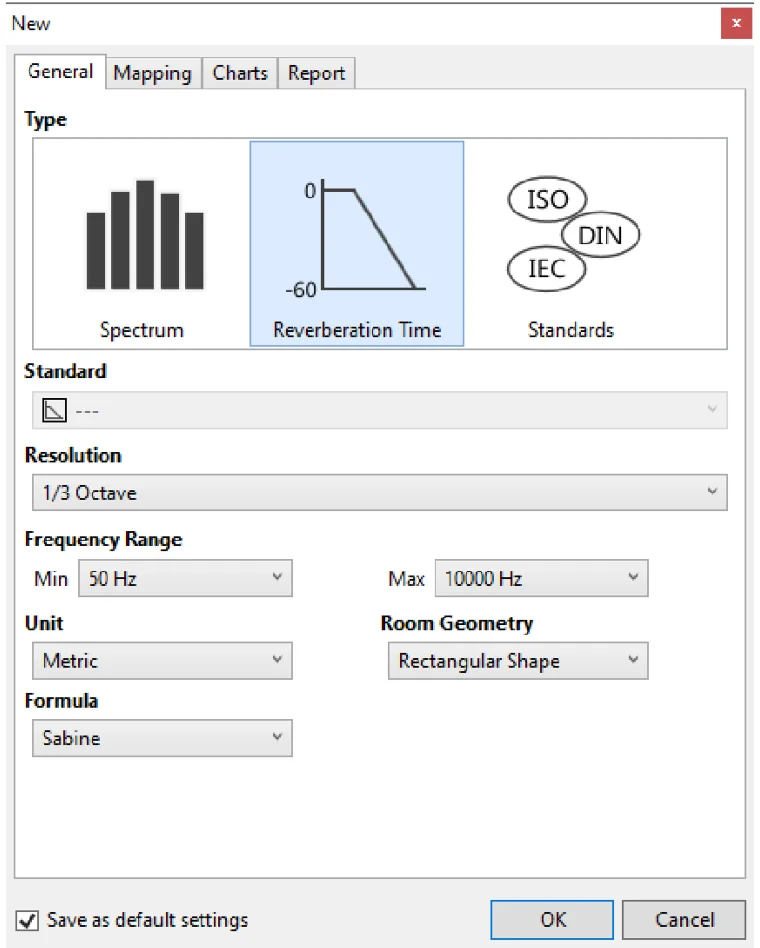
รูปที่ 2Figure 2 หน้าต่าง New พร้อมค่าเริ่มต้น — ครั้งแรกกด OK ได้เลย โปรเจกต์ใหม่หนึ่งโปรเจกต์คือหนึ่งห้อง (ภาพจากคู่มือ V1.20 หน้าจอโปรแกรมรุ่น 1.10.15)The New panel with its defaults: for the first try just press OK. One project is one room (from manual V1.20; program screen version 1.10.15) ภาพ: NTi Audio — คู่มือ Room Acoustics Reporter for XL2 V1.20 (พ.ย. 2021) หน้า 11Image: NTi Audio — Room Acoustics Reporter for XL2 — User Manual V1.20 (Nov 2021), p. 11 - STEP4
นำข้อมูลเข้าBring the data in
ถ้าข้อมูลตัวอย่างเป็นโฟลเดอร์ผลวัด (ไฟล์ .txt กับ .xl2) ให้ลากทั้งโฟลเดอร์ไปวางในช่อง Drop measurement files or folder here ถ้าเป็นไฟล์โปรเจกต์ *.xlra ให้เปิดด้วยคำสั่ง Open แทนIf the demo data is a measurement folder (.txt and .xl2 files), drag the whole folder onto Drop measurement files or folder here. If it is a *.xlra project file, open it with the Open command instead.
ในโปรแกรมIn the programลากลงช่องนำเข้า หรือ File › Open...Drag onto the drop field, or File › Open...
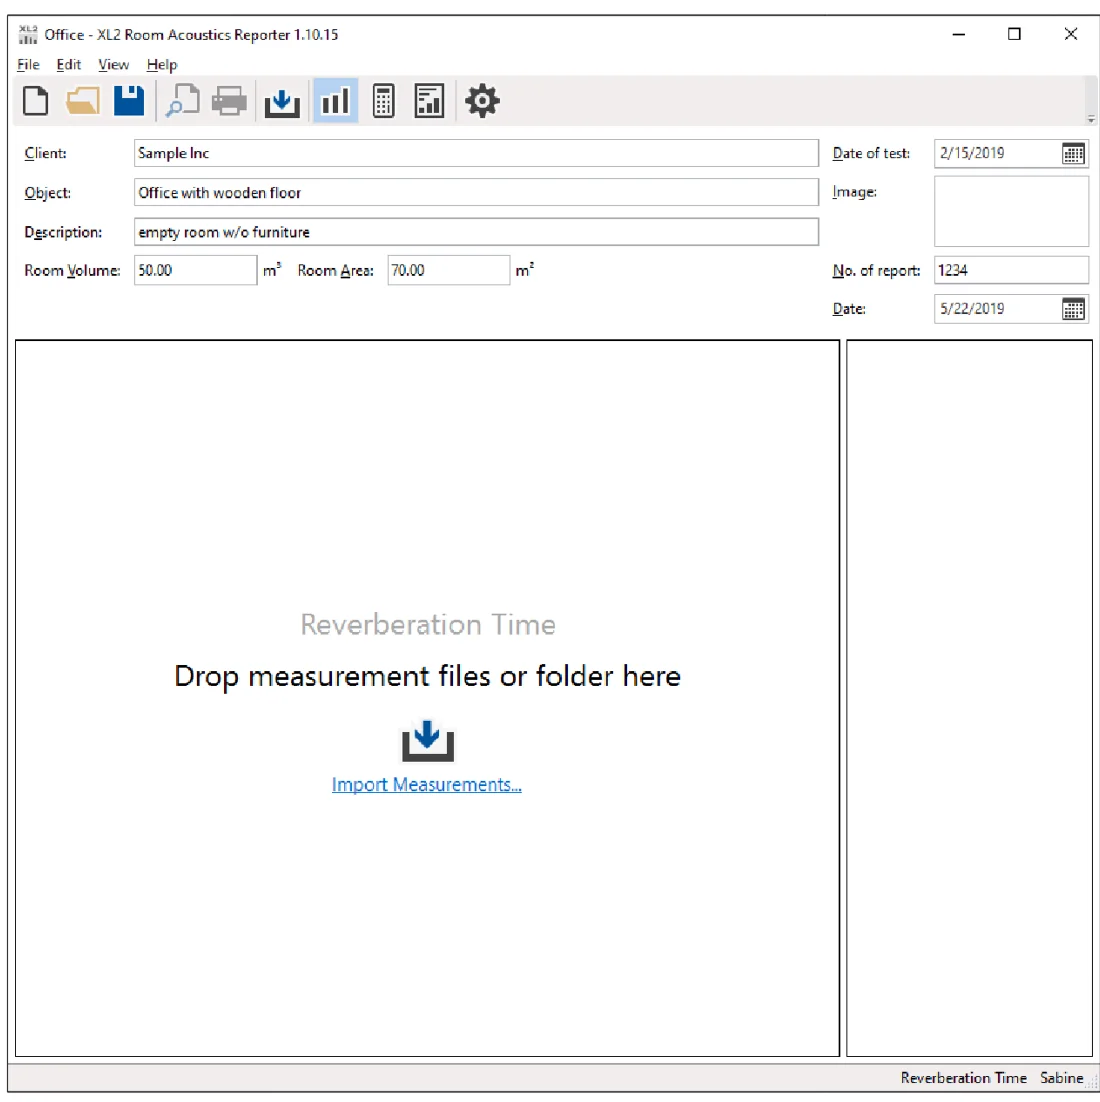
รูปที่ 3Figure 3 หลังกด OK จะเห็นมุมมอง Measurements ที่ยังว่าง — ก่อนลากให้ตรวจว่าโฟลเดอร์มีทั้งไฟล์ *.txt และ *.xl2 (ภาพจากคู่มือ V1.20 หน้าจอโปรแกรมรุ่น 1.10.15)After OK you see the empty Measurements view. Before dropping, check the folder holds both the *.txt and the *.xl2 files (from manual V1.20; program screen version 1.10.15) - ช่อง Drop measurement files or folder here — ลากโฟลเดอร์ห้องมาวางที่นี่Drop measurement files or folder here: drag the room folder onto it
- STEP5
ดูค่าเฉลี่ยของแต่ละชุดLook at the averages
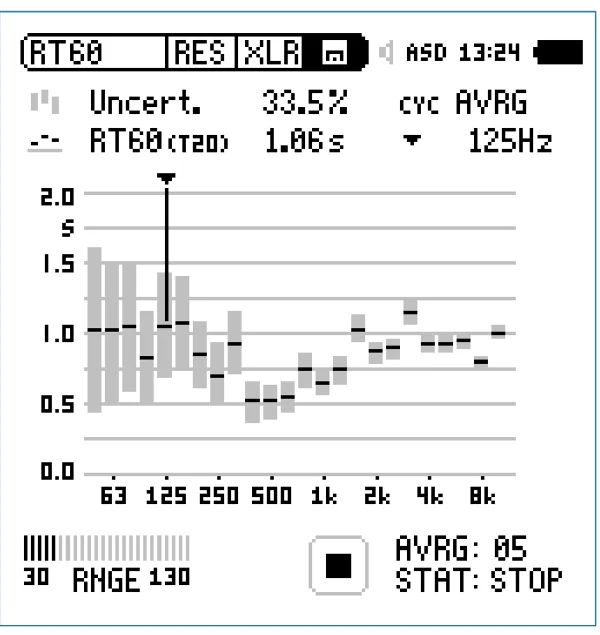
มุมมอง Calculations แสดงค่าเฉลี่ยของข้อมูล พื้นที่สีเทารอบเส้นกราฟคือช่วงที่ผลแต่ละครั้งกระจายอยู่ ยิ่งแคบ ยิ่งแปลว่าผลแต่ละตำแหน่งใกล้กันThe Calculations view shows the averaged data. The grey area around the curve is the spread of the individual readings: the narrower, the closer the positions agree.
ในโปรแกรมIn the programView › CalculationsView › Calculations
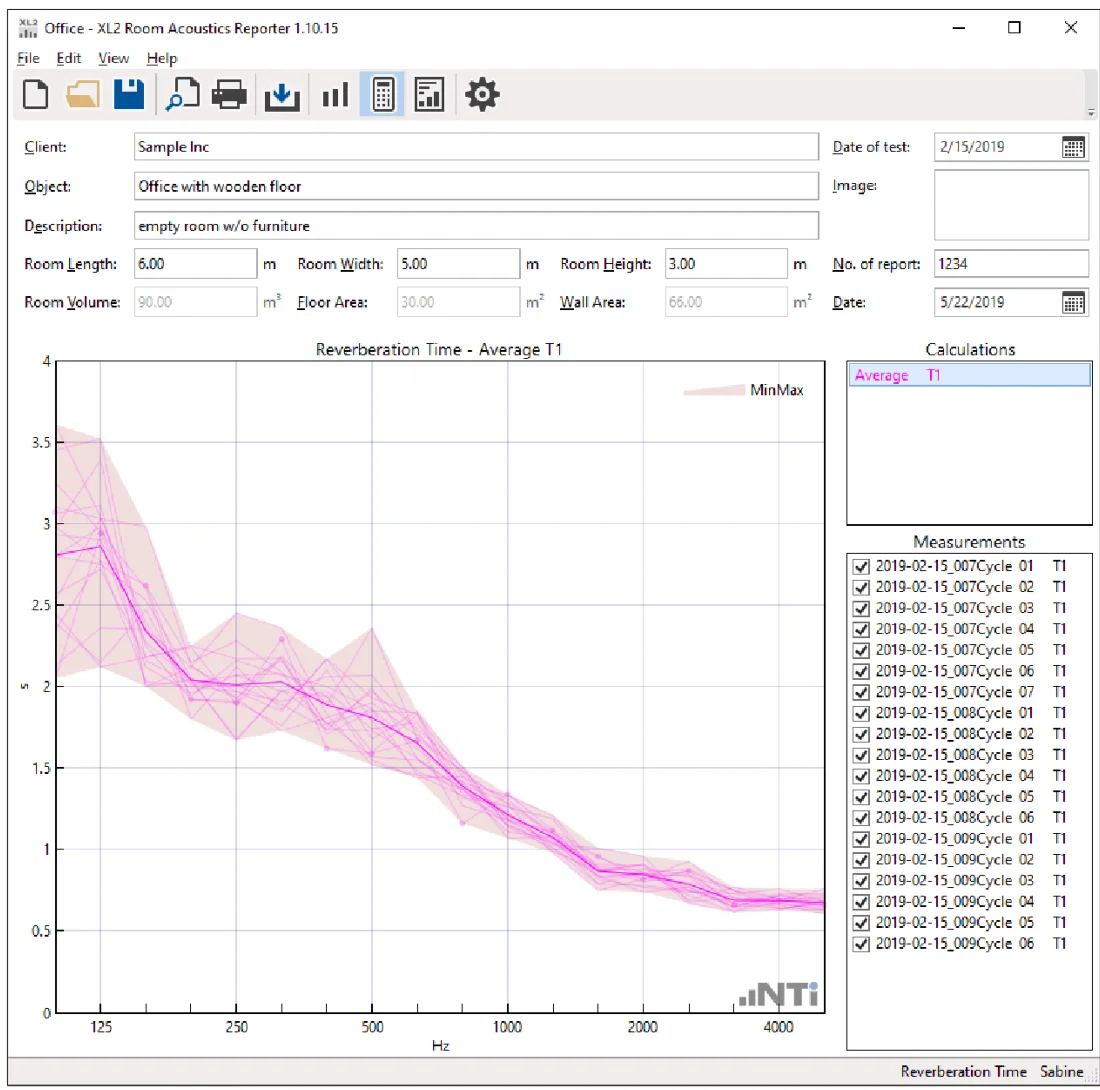
รูปที่ 4Figure 4 มุมมอง Calculations — เส้นเข้มคือค่าเฉลี่ย แถบสีจางคือช่วงของค่าที่วัดแต่ละครั้ง ยิ่งแคบยิ่งแปลว่าตำแหน่งต่าง ๆ ให้ผลใกล้กัน (ภาพจากคู่มือ V1.20 หน้าจอโปรแกรมรุ่น 1.10.15)The Calculations view: the solid line is the average, the pale band is the span of the readings. The narrower, the better the positions agree (from manual V1.20; program screen version 1.10.15) ภาพ: NTi Audio — คู่มือ Room Acoustics Reporter for XL2 V1.20 (พ.ย. 2021) หน้า 14Image: NTi Audio — Room Acoustics Reporter for XL2 — User Manual V1.20 (Nov 2021), p. 14 - STEP6
อ่านผลลัพธ์Read the result
มุมมอง Results แสดงตารางและกราฟ 50 Hz–10 kHz ใต้ตารางคือเวลาเสียงก้องเฉลี่ยของย่านกลาง ในตัวอย่างของคู่มือคือย่าน 1/3 ออกเตฟ 400 Hz ถึง 1250 HzThe Results view shows the table and chart from 50 Hz to 10 kHz. Below the table is the mid-frequency average reverberation time; in the manual's example, the 1/3-octave bands from 400 Hz to 1250 Hz.
ในโปรแกรมIn the programView › ResultsView › Results
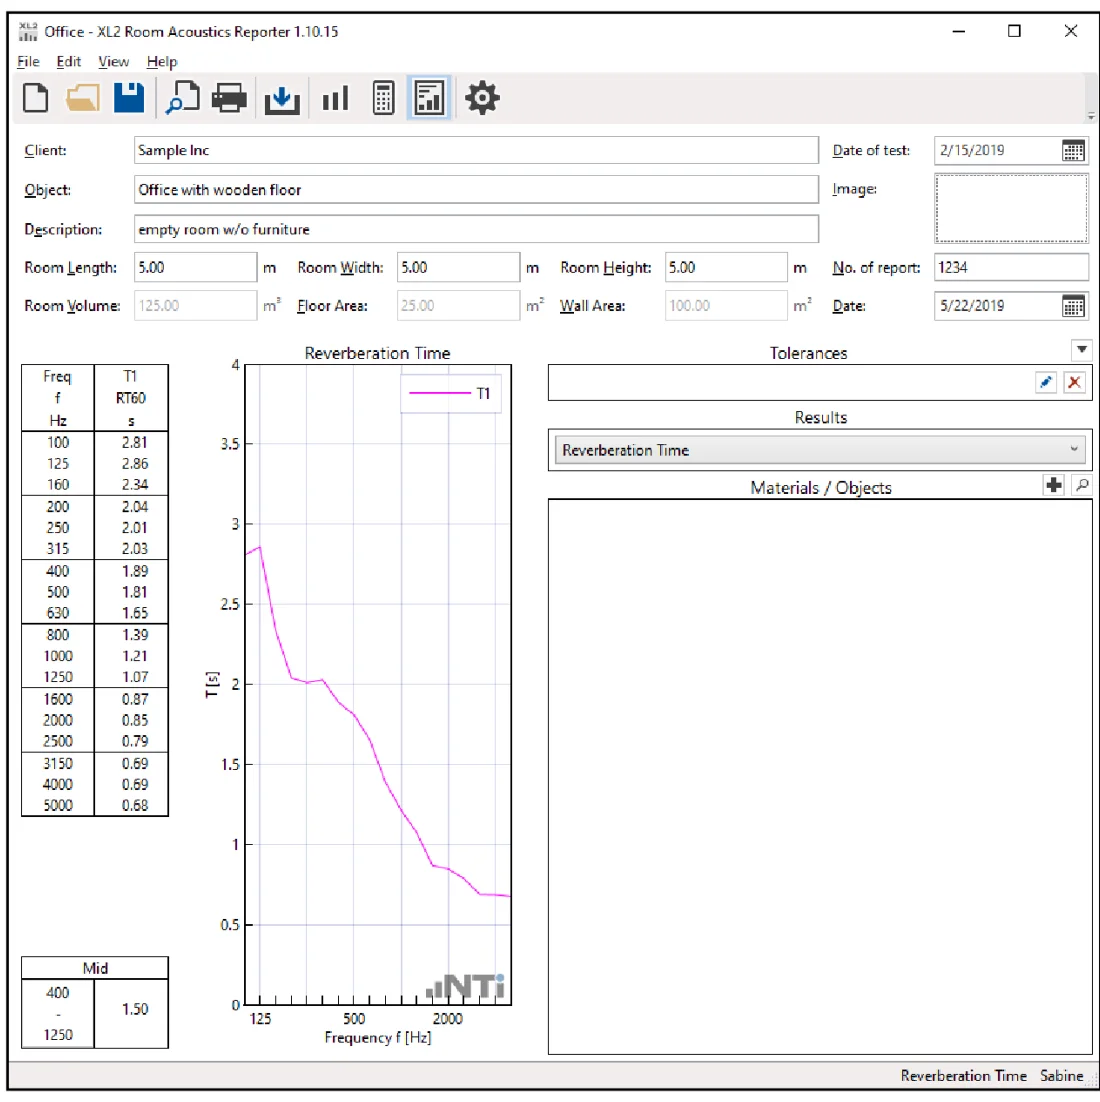
รูปที่ 5Figure 5 มุมมอง Results — อ่านตารางต่อย่านความถี่ และค่าเฉลี่ยช่วงความถี่กลางใต้ตาราง (ตัวอย่างนี้ 400–1250 Hz = 1.50 s) (ภาพจากคู่มือ V1.20 หน้าจอโปรแกรมรุ่น 1.10.15)The Results view: read the band table and the mid-frequency average under it (here 400–1250 Hz = 1.50 s) (from manual V1.20; program screen version 1.10.15) - ตารางเวลาเสียงก้องต่อย่านความถี่ (T1, RT60 เป็นวินาที)Reverberation time per band (T1, RT60 in seconds)
- Mid ค่าเฉลี่ยของช่วงความถี่กลางMid: the mid-frequency average
- STEP7
ดูหน้าตารายงานPreview the report
เปิด Print Preview เพื่อดูรายงานที่โปรแกรมจัดให้ ถ้าต้องการไฟล์ PDF ให้พิมพ์ผ่านเครื่องพิมพ์ PDF ของ WindowsOpen Print Preview to see the report the program lays out. For a PDF, print to a PDF printer in Windows.
ในโปรแกรมIn the programFile › Print PreviewFile › Print Preview
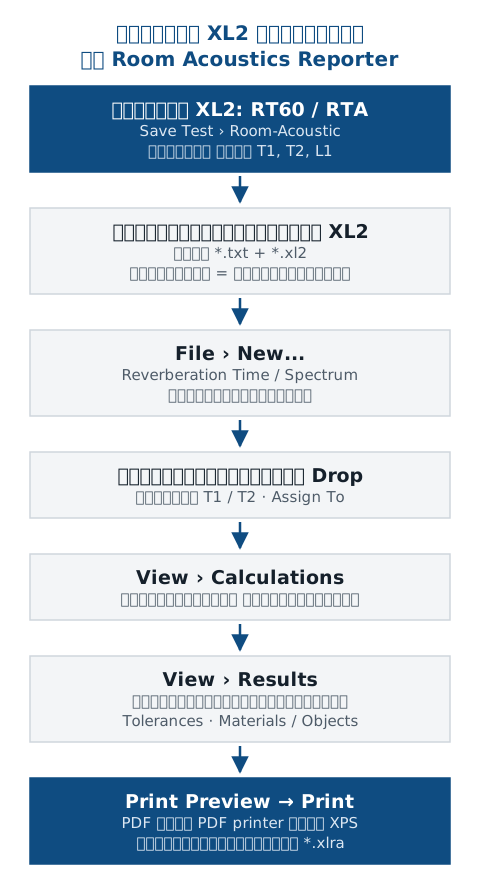
คุณเห็นเส้นทางครบแล้ว: ไฟล์ผลวัด → จัดเข้าชุด T1/T2 → ค่าเฉลี่ย → ผลลัพธ์และ Tmid → รายงาน บทต่อจากนี้คือการทำแบบเดียวกันกับข้อมูลที่คุณวัดเอง ซึ่งเรื่องสำคัญที่สุดคือบันทึกด้วยชื่อที่ถูกตั้งแต่หน้างาน และกรอกขนาดห้องให้ถูกก่อนใช้การจำลองYou have seen the whole path: measurement files → T1/T2 sets → averages → results and Tmid → report. The rest of this guide does the same with your own data, where the most important parts are saving with the right names on site and entering the room size correctly before you simulate anything.
ต่อไป: ติดตั้งและเตรียม License →Next: install and prepare the licence →
01ติดตั้ง / เปิดโปรแกรมINSTALL / OPEN
ติดตั้งโปรแกรมและเตรียม LicenseInstall the program and prepare the licence
ตัวโปรแกรมดาวน์โหลดและติดตั้งได้ฟรี สิ่งที่ต้องซื้อคือสิทธิ์นำเข้าข้อมูลจากเครื่องวัดของคุณ และเครื่องต้องมี Option สำหรับวัดเวลาเสียงก้องแบบ 1/3 ออกเตฟ ตรวจสองเรื่องนี้ให้เรียบร้อยก่อนออกไปวัดThe program itself is free to download and install; what you buy is the right to import data from your own instrument, and the instrument needs the option for 1/3-octave reverberation time. Check both before you go on site.
| เครื่องที่ใช้Instrument | สิ่งที่ต้องมีWhat you need | เฟิร์มแวร์Firmware |
|---|---|---|
| XL2XL2 | สิ่งที่ต้องมีWhat you needXL2 Extended Acoustic Pack (เวลาเสียงก้องแบบ 1/3 ออกเตฟ) และ Room Acoustics Reporter 365 (เปิดใช้ออนไลน์) หรือ Room Acoustics Option แบบถาวรในเครื่อง เพื่อเปิดการนำเข้า ถ้าจะวัด Noise Curves หรือ 1/6–1/12 ออกเตฟ ต้องมี Spectral Limits และถ้าจะใช้ Cinema Meter ต้องมี Cinema AssistentXL2 Extended Acoustic Pack (1/3-octave reverberation time) and Room Acoustics Reporter 365 (activated online) or the permanent Room Acoustics Option in the instrument to enable import. Noise Curves or 1/6–1/12 octave need Spectral Limits; Cinema Meter needs Cinema Assistent | เฟิร์มแวร์Firmwareคู่มือแนะนำ V4.70 ขึ้นไป ขั้นต่ำสำหรับการนำเข้าคือ V4.20The manual recommends V4.70 or later; V4.20 is the minimum for import |
| XL2-TA (เฟิร์มแวร์ Type Approved V3.11)XL2-TA (type-approved firmware V3.11) | สิ่งที่ต้องมีWhat you needRoom Acoustics Reporter 365 แบบเปิดใช้ออนไลน์ และ PC ต้องออนไลน์ระหว่างนำเข้าRoom Acoustics Reporter 365 activated online, with the PC online during import | เฟิร์มแวร์FirmwareV3.11V3.11 |
| XL3XL3 | สิ่งที่ต้องมีWhat you needหน้าผลิตภัณฑ์ของ NTi ระบุว่าการใช้งานเต็มรูปแบบต้องมี XL3 Extended Room Acoustics แต่ NTi ยังไม่ได้เผยแพร่ขั้นตอนนำเข้า ชนิดไฟล์ และโครงสร้างโฟลเดอร์สำหรับ XL3 กรุณาติดต่อ GET BEST SOUND ก่อนNTi's product page states that full functionality needs XL3 Extended Room Acoustics, but NTi has not published the XL3 import procedure, file types or folder structure. Please contact GET BEST SOUND first | เฟิร์มแวร์Firmwareยังไม่มีข้อมูลทางการNot officially documented |
License มีสามแบบ: 365 รายปีสำหรับเครื่องวัดหนึ่งเครื่อง 365 Company รายปีสำหรับองค์กรที่มีตั้งแต่ 3 เครื่องขึ้นไป และ Permanent สิทธิ์ถาวรต่อหนึ่งเครื่อง (บน XL2 คือ Room Acoustics Option ที่ติดตั้งในเครื่อง) การเปิดใช้แบบออนไลน์ทำที่ my.nti-audio.com และโปรแกรมจะตรวจ subscription ออนไลน์ระหว่างนำเข้าข้อมูลThere are three licences: 365, annual for one instrument; 365 Company, annual for organisations with three or more instruments; and Permanent, a permanent right for one instrument (on the XL2, the Room Acoustics Option installed in the instrument). Online activation runs through my.nti-audio.com, and the program checks the subscription online during import.
หน้าผลิตภัณฑ์ของ NTi ระบุว่าเมื่อสมัคร 365 แล้ว ข้อมูลที่วัดไว้ก่อนสมัครก็นำเข้าได้ จึงไม่ต้องวัดซ้ำNTi's product page states that once you have the 365 subscription, data recorded before it can also be imported, so there is no need to measure again.
ก่อนออกหน้างาน ลองวัดเวลาเสียงก้องสั้น ๆ หนึ่งครั้งในห้องทำงาน แล้วนำเข้าโปรแกรมขณะออนไลน์ ถ้าผ่านและเห็นย่าน 1/3 ออกเตฟ แปลว่าเครื่อง เฟิร์มแวร์ Option และ License เข้าคู่กันแล้วBefore the site visit, take one short reverberation measurement in your office and import it while online. If it goes through and shows 1/3-octave bands, the instrument, firmware, option and licence match.
เมนู Help มี Check for Updates... สำหรับตรวจเวอร์ชันใหม่ และ Online Help สำหรับดาวน์โหลดคู่มือ PDF ส่วนภาษาของโปรแกรม (English / German ในคู่มือ V1.20) เปลี่ยนได้ที่ File › Preferences... แท็บ General แล้วต้องเปิดโปรแกรมใหม่The Help menu has Check for Updates... for new versions and Online Help to download the PDF manual. The program language (English / German in the V1.20 manual) is set in File › Preferences..., General tab, and needs a restart.
02วัดMEASURE
สิ่งที่ต้องวัดมาจากหน้างานWhat you must bring back from site
โปรแกรมคำนวณได้เฉพาะจากสิ่งที่คุณวัดมา ในงานเวลาเสียงก้อง ข้อมูลหลักคือชุด T1 และถ้าจะเปรียบเทียบคือชุด T2 ในงานสเปกตรัมคือชุด L1 และ L2 อย่าลืมจดขนาดห้องกลับมาด้วย เพราะการจำลองใช้ตัวเลขเหล่านี้The program can only calculate from what you measured. In reverberation work the main data set is T1, plus T2 if you compare; in spectrum work it is L1 and L2. Bring the room dimensions back too: the simulation uses them.
ชุดเวลาเสียงก้องที่ 1Reverberation set 1 T1 · s
- คืออะไรWhat it is
- ผลวัดเวลาเสียงก้องทุกตำแหน่งของสภาพแรก เช่น ห้องก่อนปรับปรุง หรือห้องก้องเปล่าในงานวัดการดูดซับเสียงAll reverberation readings of the first condition, e.g. the room before treatment, or the empty reverberation room in absorption testing.
- ทำไมต้องสนใจWhy it matters
- เป็นฐานของผลลัพธ์ และโปรแกรมใช้ T1 คำนวณค่าการดูดซับเฉลี่ยของห้องสำหรับการจำลองIt is the basis of the result, and the program derives the room's mean absorption from T1 for the simulation.
ชุดเวลาเสียงก้องที่ 2Reverberation set 2 T2 · s
- คืออะไรWhat it is
- ผลวัดของสภาพที่สอง เช่น หลังติดตั้งวัสดุ หรือห้องก้องที่มีตัวอย่างวัสดุReadings of the second condition, e.g. after treatment, or the reverberation room with the specimen.
- ทำไมต้องสนใจWhy it matters
- ใช้แสดงผลก่อน/หลังในรายงานเดียว หรือคำนวณค่าการดูดซับของวัสดุตาม ISO 354 / ASTM C423Shows before/after in one report, or gives the material's absorption per ISO 354 / ASTM C423.
- เข้าใจผิดบ่อยCommon misunderstanding
- ไม่จำเป็นต้องมีทุกงาน ตั้งแต่ V1.20 โปรแกรมทำรายงาน T2 ได้แม้ไม่มี T1It is not needed in every job; from V1.20 the program can report T2 even without T1.
ชุดสเปกตรัมSpectrum sets L1 · L2 · dB
- คืออะไรWhat it is
- สเปกตรัมเสียงออกเตฟหรือ 1/3 ออกเตฟ เช่น เสียงพื้นหลังของระบบปรับอากาศในงาน Noise CurvesOctave or 1/3-octave spectra, e.g. the air-conditioning background noise in noise-curve work.
- ทำไมต้องสนใจWhy it matters
- โปรแกรมเฉลี่ยหลายตำแหน่ง และคำนวณผลรวม ค่าแก้เสียงพื้นหลัง และผลต่างระหว่าง L1 กับ L2The program averages several positions and calculates the sum, background correction and difference between L1 and L2.
ขนาดห้องRoom size V · S · m³ · m²
- คืออะไรWhat it is
- ปริมาตรห้อง และพื้นที่ผิวรวม (พื้น ผนัง และฝ้าเพดานรวมกัน)Room volume, and total surface area (floor, walls and ceiling together).
- ทำไมต้องสนใจWhy it matters
- โปรแกรมใช้คำนวณเวลาเสียงก้องที่คาดการณ์เมื่อเพิ่มวัสดุดูดซับ ถ้าใส่ผิด ผลจำลองก็ผิดThe program uses them to predict the reverberation time with added absorption; wrong values give a wrong prediction.
แนวทางการวัดจาก NTiNTi's measurement guidance
| เรื่องItem | แนวทางของ NTiNTi's guidance |
|---|---|
| เวลาเสียงก้องบน XL2Reverberation on the XL2 | แนวทางของ NTiNTi's guidanceฟังก์ชัน RT60 แบบ 1/1 ออกเตฟ หรือ 1/3 ออกเตฟ (1/3 ออกเตฟต้องมี XL2 Extended Acoustic Pack)The RT60 function in 1/1 or 1/3 octaves (1/3 octave needs the XL2 Extended Acoustic Pack) |
| สเปกตรัมบน XL2Spectrum on the XL2 | แนวทางของ NTiNTi's guidanceฟังก์ชัน SLMeter หน้า RTA แบบ 1/3 ออกเตฟ ถ่วงน้ำหนัก Z วัดแล้วหยุดที่ประมาณ 15 วินาทีSLMeter, RTA page, 1/3 octave, Z-weighted, stopped after about 15 seconds |
| ระดับสัญญาณSignal level | แนวทางของ NTiNTi's guidanceเสียงทดสอบต้องดังพอให้เห็นการลดลงเต็มช่วงเหนือเสียงพื้นหลัง ตัวอย่างของ NTi: ห้องที่เสียงพื้นหลัง 40–50 dB ต้องการเสียงกระตุ้นราว 75 dBThe test sound must be loud enough to show the full decay above the background. NTi's example: a room with 40–50 dB background needs about 75 dB of excitation |
| T20 หรือ T30T20 or T30 | แนวทางของ NTiNTi's guidanceNTi ระบุว่า T30 ให้ความไม่แน่นอนต่ำกว่า T20 แต่ต้องมีช่วงสัญญาณเหนือเสียงพื้นหลังมากกว่าNTi notes that T30 has lower uncertainty than T20 but needs more range above the background |
| คนในห้องPeople in the room | แนวทางของ NTiNTi's guidanceจำนวนคนมีผลต่อเวลาเสียงก้อง ให้จดสภาพการใช้ห้องขณะวัดไว้ในรายงานOccupancy changes the reverberation time: record the room's condition during the measurement in the report |
คู่มือโปรแกรมไม่ได้กำหนดจำนวนตำแหน่งไมโครโฟนและตำแหน่งแหล่งกำเนิดเสียง จำนวนตำแหน่งและระดับความแม่นยำ (Survey / Engineering / Precision) ให้ใช้ตาม ISO 3382-2 หรือมาตรฐานที่งานกำหนด ดูขั้นตอนหน้างานได้ใน วิธีการตรวจวัดเวลาเสียงก้องThe program manual does not set the number of microphone and source positions. Take the number of positions and the accuracy grade (survey / engineering / precision) from ISO 3382-2 or the standard your job names; the site procedure is in the reverberation time application guide.
ตรวจเครื่องวัดด้วย Sound Calibrator ก่อนและหลังการวัด และสวมอุปกรณ์ป้องกันการได้ยินเมื่อใช้เสียงทดสอบดังCheck the meter with a sound calibrator before and after measuring, and wear hearing protection while a loud test signal runs.
03บันทึกSAVE
บันทึกผลบน XL2 ให้โปรแกรมจัดชุดได้เองSave on the XL2 so the program sorts the data
โปรแกรมรู้ว่าไฟล์ไหนเป็น T1 หรือ T2 จากชื่อไฟล์ ถ้าบันทึกด้วยชื่อที่ถูกตั้งแต่หน้างาน การนำเข้าจะเสร็จในไม่กี่วินาที ถ้าไม่ได้ตั้งชื่อ ทุกไฟล์จะเข้า T1 และคุณต้องมาย้ายเองทีละไฟล์The program recognises T1 or T2 from the file name. Save with the right names on site and the import takes seconds; without them every file lands in T1 and you move them one by one.
ขั้นตอนในบทนี้เป็นของ XL2 ตามคู่มือ V1.20 NTi ยังไม่ได้เผยแพร่วิธีบันทึกและส่งข้อมูลจาก XL3 เข้า Room Acoustics Reporter ถ้าคุณใช้ XL3 อย่าเดาชื่อไฟล์หรือโครงสร้างโฟลเดอร์ ให้ติดต่อ GET BEST SOUND ก่อนThe steps in this chapter are for the XL2, per the V1.20 manual. NTi has not published how to save and transfer XL3 data into the Room Acoustics Reporter. If you use an XL3, do not guess file names or folder structure: contact GET BEST SOUND first.
- STEP1
ส่งออกไฟล์ชื่อจากโปรแกรมไปไว้ในเครื่องExport the name list from the program to the instrument
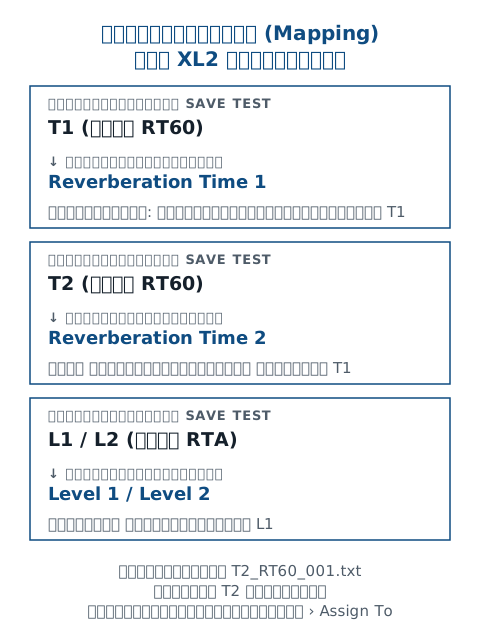
ในโปรแกรม เปิด Settings แท็บ Mapping แล้วกด Export... จะได้ไฟล์ savenames.txt ที่มีชื่อชุดข้อมูล เช่น T1, T2, L1 นำไปวางไว้ที่โฟลเดอร์หลัก (root) ของการ์ดหน่วยความจำ XL2In the program open Settings › Mapping and press Export... to get savenames.txt with the set names such as T1, T2, L1. Put it in the root of the XL2 memory card.
ในโปรแกรมIn the programView › Settings › Mapping › Export...View › Settings › Mapping › Export...
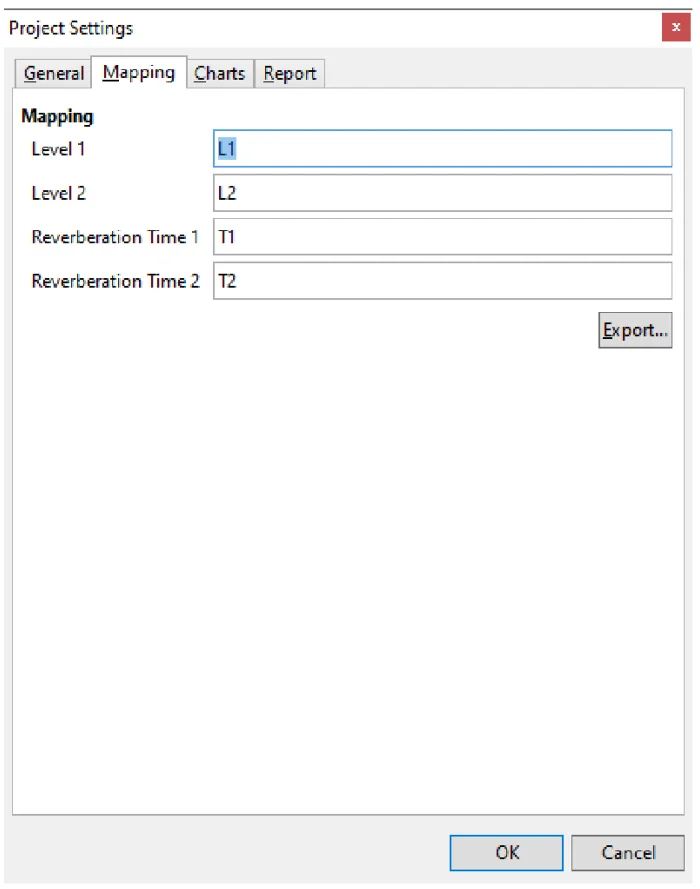
รูปที่ 8Figure 8 แท็บ Mapping — ชื่อ Level 1/2 = L1/L2 และ Reverberation Time 1/2 = T1/T2 กด Export... เพื่อได้ไฟล์ savenames.txt (ภาพจากคู่มือ V1.20 หน้าจอโปรแกรมรุ่น 1.10.15)The Mapping tab: Level 1/2 = L1/L2, Reverberation Time 1/2 = T1/T2. Export... writes savenames.txt (from manual V1.20; program screen version 1.10.15) - ปุ่ม Export...The Export... button
- STEP2
ปิด Autosave บนเครื่องSwitch Autosave off on the instrument
ในเมนูหน่วยความจำของ XL2 ตั้ง Autosave: Off เพื่อให้เลือกชื่อชุดได้ทุกครั้งที่บันทึก เครื่องจะใช้ชื่อเดิมกับการวัดครั้งต่อไปโดยอัตโนมัติจนกว่าคุณจะเปลี่ยนIn the XL2 memory menu set Autosave: Off so you can pick the set name each time you save. The instrument keeps the same name for the next measurements until you change it.
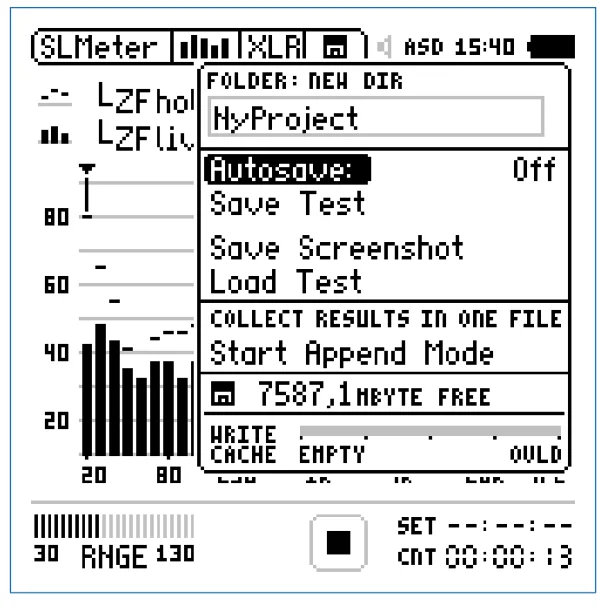
รูปที่ 9Figure 9 เมนูหน่วยความจำของ XL2 — บรรทัด Autosave: ต้องเป็น Off จึงจะเลือกชื่อชุดได้ทุกครั้งที่บันทึก (ภาพจากคู่มือ V1.20)The XL2 memory menu: Autosave: must read Off so you can pick the set name each time you save (from manual V1.20) ภาพ: NTi Audio — คู่มือ Room Acoustics Reporter for XL2 V1.20 (พ.ย. 2021) หน้า 7Image: NTi Audio — Room Acoustics Reporter for XL2 — User Manual V1.20 (Nov 2021), p. 7 - STEP3
หนึ่งห้อง หนึ่งโฟลเดอร์One room, one folder
ต่อ XL2 กับ PC แบบ Mass Storage เปิดโฟลเดอร์ Projects แล้วสร้างโฟลเดอร์ย่อยหนึ่งโฟลเดอร์ต่อหนึ่งห้อง เช่น Room 1, Room 2 เพราะในโปรแกรม หนึ่งห้องคือหนึ่งโปรเจกต์Connect the XL2 to the PC as Mass Storage, open Projects and make one subfolder per room, e.g. Room 1, Room 2, because in the program one room is one project.
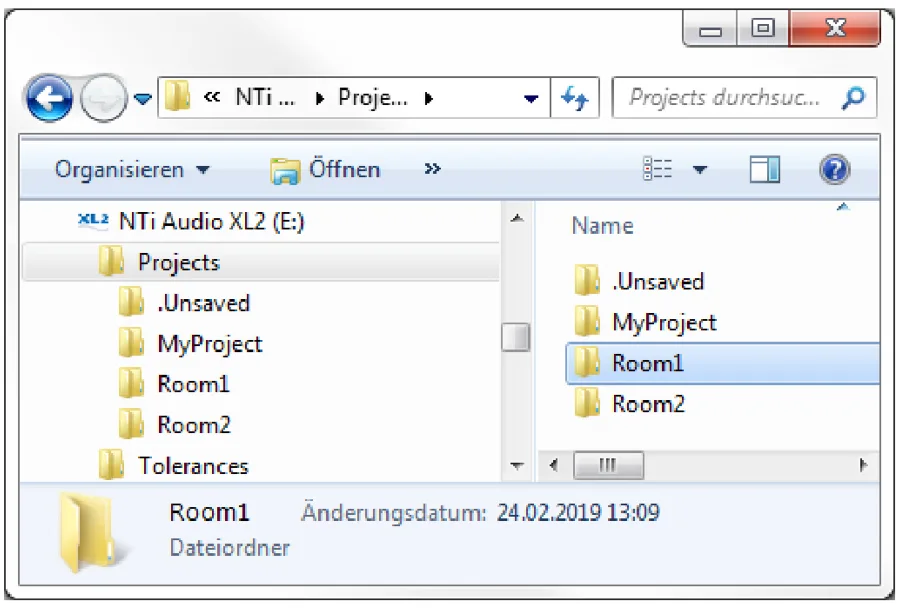
รูปที่ 10Figure 10 XL2 ต่อคอมพิวเตอร์แบบ Mass Storage — ในโฟลเดอร์ Projects สร้างโฟลเดอร์ย่อยต่อห้อง เช่น Room1, Room2 (ภาพเป็น Windows ภาษาเยอรมัน) (ภาพจากคู่มือ V1.20)The XL2 as Mass Storage: inside Projects make one subfolder per room, e.g. Room1, Room2 (German Windows in the picture) (from manual V1.20) ภาพ: NTi Audio — คู่มือ Room Acoustics Reporter for XL2 V1.20 (พ.ย. 2021) หน้า 8Image: NTi Audio — Room Acoustics Reporter for XL2 — User Manual V1.20 (Nov 2021), p. 8 - STEP4
วัดแล้วบันทึกด้วยชื่อจากรายการMeasure, then save with a name from the list
หลังวัดเสร็จ เปิดเมนูหน่วยความจำ เลือก Save Test ในหน้าต่างที่ขึ้นมาเลือก Room-Acoustic ที่ปลายบรรทัดแรก แล้วเลือกชื่อชุด (เช่น T1) กด Enter เพื่อบันทึกAfter the measurement open the memory menu and choose Save Test. In the pop-up choose Room-Acoustic at the end of the first line, pick the set name (e.g. T1) and press Enter to save.
ในโปรแกรมIn the programXL2: Save Test › Room-Acoustic › เลือกชื่อXL2: Save Test › Room-Acoustic › choose the name
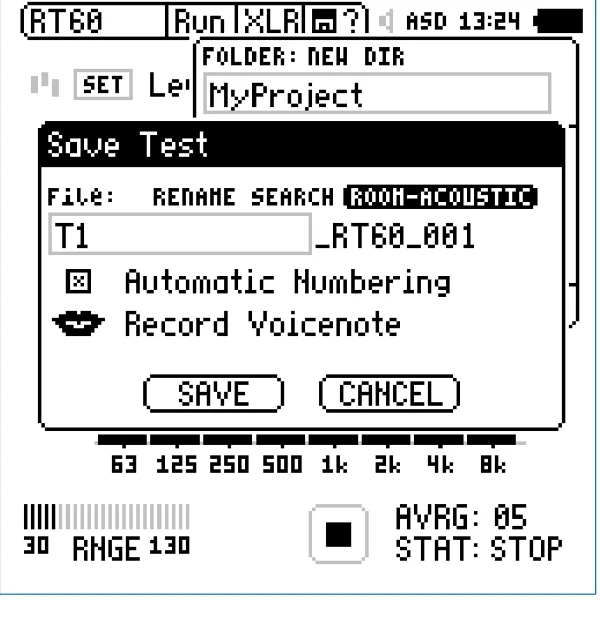
รูปที่ 11Figure 11 หน้าต่าง Save Test หลังวัด RT60: เลือก Room-Acoustic ที่ท้ายบรรทัดแรก เลือกชื่อ T1 แล้วบันทึก ไฟล์จะชื่อ T1_RT60_001... (ภาพจากคู่มือ V1.20)The Save Test pop-up after an RT60 measurement: pick Room-Acoustic at the end of the first line, choose T1 and save; the file is named T1_RT60_001... (from manual V1.20) ภาพ: NTi Audio — คู่มือ Room Acoustics Reporter for XL2 V1.20 (พ.ย. 2021) หน้า 10Image: NTi Audio — Room Acoustics Reporter for XL2 — User Manual V1.20 (Nov 2021), p. 10
ไฟล์ T1_RT60_001_Report.txt คือเวลาเสียงก้องที่บันทึกเป็นชุด T1 และ L1_SLM_003_RTA_3rd_Report.txt คือสเปกตรัม 1/3 ออกเตฟที่บันทึกเป็นชุด L1 โปรแกรมจับเข้าชุดจากส่วนหน้าของชื่อไฟล์T1_RT60_001_Report.txt is a reverberation reading saved as set T1, and L1_SLM_003_RTA_3rd_Report.txt is a 1/3-octave spectrum saved as set L1. The program sorts them by the first part of the file name.
คัดลอกมาแต่ไฟล์ .txt แล้วทิ้งไฟล์ระบบ *.xl2 หรือรวมหลายห้องไว้ในโฟลเดอร์เดียว โปรแกรมต้องการทั้งสองชนิดไฟล์ของทุกการวัด และแต่ละโฟลเดอร์ควรเป็นห้องเดียวCopying only the .txt files and leaving out the *.xl2 system files, or mixing several rooms in one folder. The program needs both file types for every measurement, and each folder should be one room.
04สร้างโปรเจกต์CREATE PROJECT
สร้างโปรเจกต์และเลือกมาตรฐานCreate the project and choose the standard
ชนิดโปรเจกต์กำหนดว่าโปรแกรมจะคำนวณอะไรและรายงานหน้าตาแบบไหน ถ้ายังไม่มีมาตรฐานเฉพาะ ให้เริ่มจาก Reverberation Time หรือ Spectrum แบบทั่วไปThe project type decides what the program calculates and what the report looks like. Without a specific standard, start with the general Reverberation Time or Spectrum type.

- New ProjectNew Project
- Open Project File (*.xlra)Open Project File (*.xlra)
- Save Project File (*.xlra)Save Project File (*.xlra)
- Print PreviewPrint Preview
- PrintPrint
- Import (เลือกโฟลเดอร์ผลวัด)Import (pick the measurement folder)
- Measurements ViewMeasurements View
- Calculations ViewCalculations View
- Results ViewResults View
- SettingsSettings
- STEP1
เปิดหน้าต่างโปรเจกต์ใหม่Open the new-project panel
เลือกคำสั่ง New จากเมนู File หน้าต่าง New จะเปิดพร้อมค่าเริ่มต้นChoose New in the File menu; the New panel opens with default settings.
ในโปรแกรมIn the programFile › New...File › New...
- STEP2
เลือกชนิดหรือมาตรฐานChoose the type or standard
เลือก Reverberation Time หรือ Spectrum (คู่มือบางตอนเรียก RTA) สำหรับการวิเคราะห์ทั่วไป หรือเลือกมาตรฐานเฉพาะจากรายการ แล้วเลือกการตั้งค่าการวิเคราะห์และรายงาน กด OKChoose Reverberation Time or Spectrum (called RTA in parts of the manual) for general analysis, or pick a dedicated standard from the list, then the analysis and report settings, and press OK.
ข้อควรระวังWatch outเมื่อเลือกแบบทั่วไป หัวรายงานจะไม่ระบุชื่อมาตรฐาน (ตั้งแต่ V1.20) ถ้าผู้ว่าจ้างต้องการชื่อมาตรฐานบนรายงาน ให้เลือกมาตรฐานนั้นตั้งแต่แรกWith the general types the report header names no standard (from V1.20). If the client needs the standard on the report, choose it from the start.
รูปที่ 13Figure 13 หน้าต่าง New พร้อมค่าเริ่มต้น — ครั้งแรกกด OK ได้เลย โปรเจกต์ใหม่หนึ่งโปรเจกต์คือหนึ่งห้อง (ภาพจากคู่มือ V1.20 หน้าจอโปรแกรมรุ่น 1.10.15)The New panel with its defaults: for the first try just press OK. One project is one room (from manual V1.20; program screen version 1.10.15) - Type: Spectrum / Reverberation Time / StandardsType: Spectrum / Reverberation Time / Standards
- Standard มาตรฐานเฉพาะ (เมื่อเลือก Standards)Standard: a dedicated standard (with Standards)
- Resolution ความละเอียดความถี่Resolution: frequency resolution
- Frequency Range Min / MaxFrequency Range: Min / Max
- Formula สูตรคำนวณ (ค่าเริ่มต้น Sabine)Formula (default Sabine)
| ถ้างานของคุณคือIf your job is | เลือกในโปรแกรม (ตามคู่มือ V1.20)Choose in the program (V1.20 manual) | สิ่งที่โปรแกรมทำเพิ่มWhat the program adds |
|---|---|---|
| เวลาเสียงก้องในห้องทั่วไปReverberation in ordinary rooms | เลือกในโปรแกรม (ตามคู่มือ V1.20)Choose in the program (V1.20 manual)Reverberation Time หรือ ISO 3382-2 (ทำงานเหมือนกัน) / ISO 3382-1 สำหรับห้องแสดงReverberation Time or ISO 3382-2 (same behaviour) / ISO 3382-1 for performance spaces | สิ่งที่โปรแกรมทำเพิ่มWhat the program addsT1/T2 เปรียบเทียบ Tolerance และการจำลองT1/T2, tolerances and simulation |
| ห้องที่ต้องการคุณภาพเสียงพูด (เยอรมนี)Rooms needing speech quality (Germany) | เลือกในโปรแกรม (ตามคู่มือ V1.20)Choose in the program (V1.20 manual)DIN 18041DIN 18041 | สิ่งที่โปรแกรมทำเพิ่มWhat the program addsเลือก Usage Type ในมุมมอง Results เทียบเวลาเสียงก้อง (กลุ่ม A) หรืออัตราส่วน A/V (กลุ่ม B) และจำลองคนในห้อง 80% ของการใช้งานปกติUsage Type chosen in the Results view; compares reverberation time (group A) or the A/V ratio (group B) and simulates persons at 80% of normal occupancy |
| เกณฑ์สถานที่ทำงาน / ออสเตรียWorkplace rules / Austria | เลือกในโปรแกรม (ตามคู่มือ V1.20)Choose in the program (V1.20 manual)ASR A3.7 / ÖNORM B 8115-3ASR A3.7 / ÖNORM B 8115-3 | สิ่งที่โปรแกรมทำเพิ่มWhat the program addsเทียบกับค่าขีดจำกัดตามประเภทการใช้งานห้องCompares with limits by room usage type |
| สเปกตรัมเสียงNoise spectrum | เลือกในโปรแกรม (ตามคู่มือ V1.20)Choose in the program (V1.20 manual)Spectrum หรือ IEC 61260 (ทำงานเหมือนกัน)Spectrum or IEC 61260 (same behaviour) | สิ่งที่โปรแกรมทำเพิ่มWhat the program addsผลรวม L1+L2 ค่าแก้เสียงพื้นหลัง L1−L2 ผลต่าง L1−L2 และระดับรวมของย่านที่เลือกSum L1+L2, background correction L1−L2, difference L1−L2 and the sum of chosen bands |
| เสียงพื้นหลังของห้อง (HVAC)Room background noise (HVAC) | เลือกในโปรแกรม (ตามคู่มือ V1.20)Choose in the program (V1.20 manual)มาตรฐาน NC / RNC, NR หรือ GKThe NC / RNC, NR or GK standard | สิ่งที่โปรแกรมทำเพิ่มWhat the program addsค่าตัวเลขเดียวจากเส้นเกณฑ์ และผ่าน/ไม่ผ่านA single number from the curves, and pass/fail |
| ค่าการดูดซับเสียงของวัสดุในห้องก้องMaterial absorption in a reverberation room | เลือกในโปรแกรม (ตามคู่มือ V1.20)Choose in the program (V1.20 manual)ISO 354 หรือ ASTM C423ISO 354 or ASTM C423 | สิ่งที่โปรแกรมทำเพิ่มWhat the program addsT1 ห้องเปล่า T2 มีตัวอย่าง ได้ αs และค่าเดี่ยวT1 empty room, T2 with specimen, giving αs and the single numbers |
รายชื่อมาตรฐานและปีของฉบับในตารางมาจากคู่มือ V1.20 หน้าผลิตภัณฑ์ปัจจุบันของ NTi ระบุฉบับใหม่กว่าบางรายการ (เช่น ANSI/ASA S12.2-2019, DIN 15996:2020) และเพิ่ม ISO 11654 ให้ตรวจในหน้าต่าง New ของโปรแกรมรุ่นที่คุณใช้ว่ามีฉบับที่งานกำหนดหรือไม่The standards and editions in the table come from the V1.20 manual. NTi's current product page lists newer editions of some (e.g. ANSI/ASA S12.2-2019, DIN 15996:2020) and adds ISO 11654. Check in the New panel of your program version that the edition your job needs is there.
หน้าต่าง Project SettingsThe Project Settings window
- General: การตั้งค่าการวิเคราะห์และรายงาน รวมถึงแกน X ของกราฟ (ตามที่ใช้ได้)General: analysis and report settings, including the chart X-axis (as applicable)
- Mapping: ปุ่ม Export... สร้าง savenames.txt สำหรับ XL2Mapping: the Export... button creates savenames.txt for the XL2
- Charts: สเกลแกน Y ของทุกมุมมองCharts: Y-axis scaling for all views
- Report: โลโก้ ลายเซ็น ชื่อหน่วยงานทดสอบ และตัวเลือกจัดหน้ารายงาน (ดูบทตั้งค่า)Report: logo, signature, test-institute name and layout options (see the settings chapter)
05นำเข้า / โอนข้อมูลIMPORT / TRANSFER
นำเข้าข้อมูลและจัดชุด T1 / T2Import the data and sort T1 / T2
การนำเข้าเร็วมาก ขั้นที่ช่วยคุณได้จริงคือการดูว่าทุกไฟล์อยู่ถูกชุด และลบการวัดที่เสียออกก่อนเริ่มเฉลี่ยImporting is fast; the step that actually helps is checking that every file sits in the right set and deleting bad readings before averaging starts.
- STEP1
ลากทั้งโฟลเดอร์ของห้องDrag the room folder
ลากโฟลเดอร์ของห้องจากการ์ด XL2 ไปวางในช่อง Drop measurement files or folder here หรือเลือกเฉพาะไฟล์ *.xl2 ในโฟลเดอร์แล้วลากลงช่องเดียวกันDrag the room folder from the XL2 card onto Drop measurement files or folder here, or select the *.xl2 files in the folder and drag them onto the same field.
ในโปรแกรมIn the programหรือ File › Import › File... / Folder... หรือปุ่ม Import ในแถบเครื่องมือOr File › Import › File... / Folder..., or the Import toolbar button
- STEP2
ดูว่าไฟล์เข้าชุดไหนSee which set each file joined
ไฟล์ที่ชื่อขึ้นต้นด้วยชื่อชุด (เช่น T2_RT60_001) จะเข้าชุดนั้นเอง ไฟล์อื่นเข้า T1 (หรือ L1 สำหรับสเปกตรัม) โดยค่าเริ่มต้น ถ้าต้องย้าย คลิกขวาที่ไฟล์ในรายการ Measurements ด้านขวาแล้วเลือก Assign ToFiles whose names start with a set name (e.g. T2_RT60_001) go to that set; all others go to T1 (or L1 for spectra) by default. To move one, right-click it in the Measurements list on the right and choose Assign To.
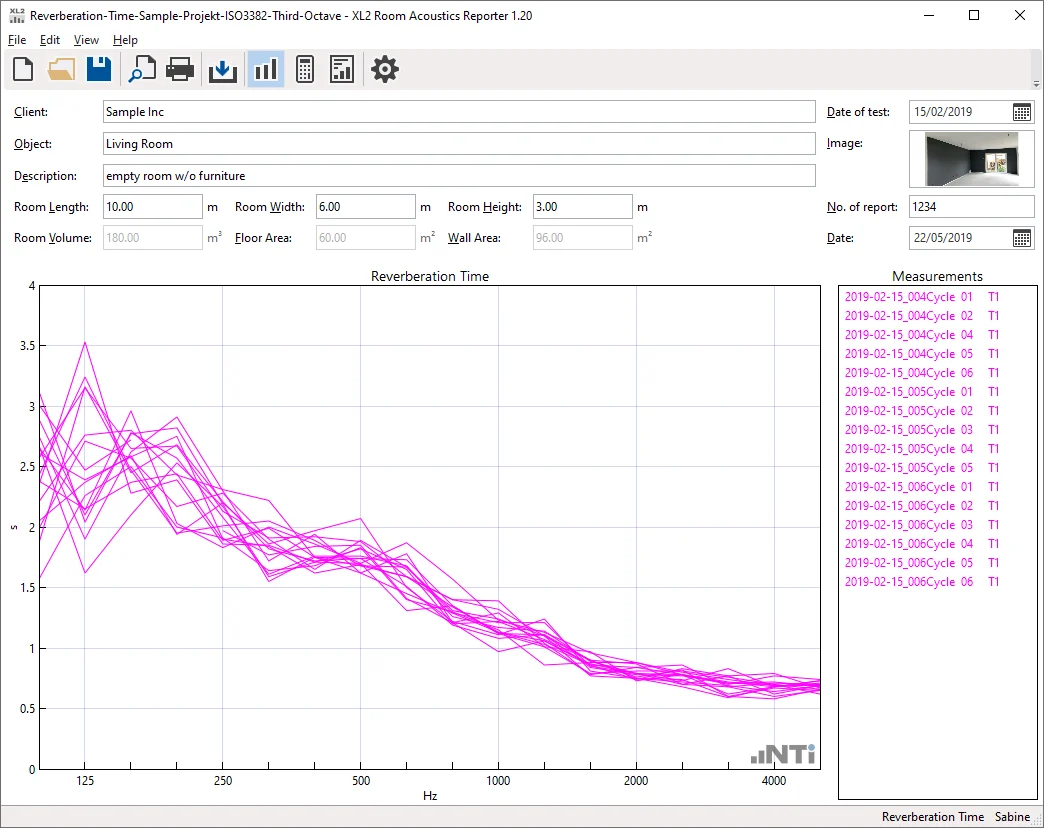
รูปที่ 14Figure 14 มุมมอง Measurements หลังนำเข้า — ทุกไฟล์อยู่ในรายการด้านขวาพร้อมชื่อชุด (T1) คลิกขวาที่รายการเพื่อ Assign To (ภาพจากหน้าเว็บ NTi หน้าจอโปรแกรมรุ่น 1.20)The Measurements view after import: every file is in the list on the right with its set (T1); right-click an entry for Assign To (NTi web image, program version 1.20) - รายการ Measurements — คลิกขวา › Assign To หรือเลือกแล้วลบค่าที่เสียThe Measurements list: right-click › Assign To, or select and delete a bad reading
- STEP3
ลบการวัดที่เสียDelete bad readings
ถ้ามีการวัดที่รู้ว่าเสีย เช่น มีคนพูดหรือประตูปิดดังระหว่างการสลายตัว เลือกแล้วลบออกจากรายการ MeasurementsIf a reading is known to be bad, e.g. someone spoke or a door slammed during the decay, select it and delete it from the Measurements list.
ในโปรแกรมIn the programEdit › DeleteEdit › Delete
- ข้อมูล 1/3 ออกเตฟนำเข้าโปรเจกต์ที่ตั้งเป็นออกเตฟได้ โปรแกรมเฉลี่ยแบบเชิงเส้น (อ้างอิง VMPA-Beschlussbuch 2015 ของเยอรมนี)Third-octave data can go into an octave project; the program uses a linear average (based on the German VMPA-Beschlussbuch 2015)
- สเปกตรัมที่วัดด้วยการถ่วงน้ำหนัก A หรือ C จะถูกแปลงเป็น Z ให้อัตโนมัติSpectra recorded A- or C-weighted are converted to Z automatically
- ข้อมูล 1/6 และ 1/12 ออกเตฟ (ฟังก์ชัน 1/12 Oct, Noise Curves, Cinema Meter ของ XL2) ถูกรวมเป็น 1/3 ออกเตฟอัตโนมัติ1/6- and 1/12-octave data (XL2 functions 1/12 Oct, Noise Curves, Cinema Meter) are aggregated to 1/3 octave automatically
- File › Import › Measurements from Project... ดึงผลวัดจากโปรเจกต์เก่ามาใช้ในโปรเจกต์ใหม่File › Import › Measurements from Project... brings the measurements of an old project into a new one
นับไฟล์ในแต่ละชุดให้ตรงกับจำนวนการวัดที่จดไว้หน้างาน ถ้า T2 ว่างทั้งที่วัดมา แปลว่าบันทึกโดยไม่ได้เลือกชื่อ ให้ย้ายด้วย Assign ToCount the files in each set against your site notes. If T2 is empty although you measured it, the readings were saved without a name: move them with Assign To.
06ตั้งค่าCONFIGURE
กรอกข้อมูลห้องและตั้งค่ารายงานEnter the room data and set up the report
ส่วนหัวของรายงานไม่ได้มีไว้แค่โชว์ พื้นที่ผิวรวมและปริมาตรห้องเป็นตัวเลขที่การจำลองใช้คำนวณ กรอกให้ถูกก่อนเริ่มลองวัสดุThe report header is not just decoration: the total surface area and the room volume are the numbers the simulation calculates with. Get them right before you try any materials.
- ช่อง Details: ผู้ว่าจ้าง (Client) ชื่องาน (Object) คำอธิบาย ขนาดห้อง และปริมาตรห้องDetails: client, object, description, room dimensions and room volume
- พื้นที่ห้อง ในโปรแกรมหมายถึงผลรวมพื้นที่พื้น ผนัง และฝ้าเพดาน ไม่ใช่พื้นที่พื้นอย่างเดียวThe program's room area is the sum of floor, wall and ceiling surfaces, not the floor area alone
- รูปหรือแบบร่างของห้อง: คลิกช่องรูปแล้วเลือกไฟล์ ขนาดแนะนำ 340×160 px สำหรับ A4 หรือ 350×130 px สำหรับ LetterRoom picture or sketch: click the image field and load a file; recommended 340×160 px for A4 or 350×130 px for Letter
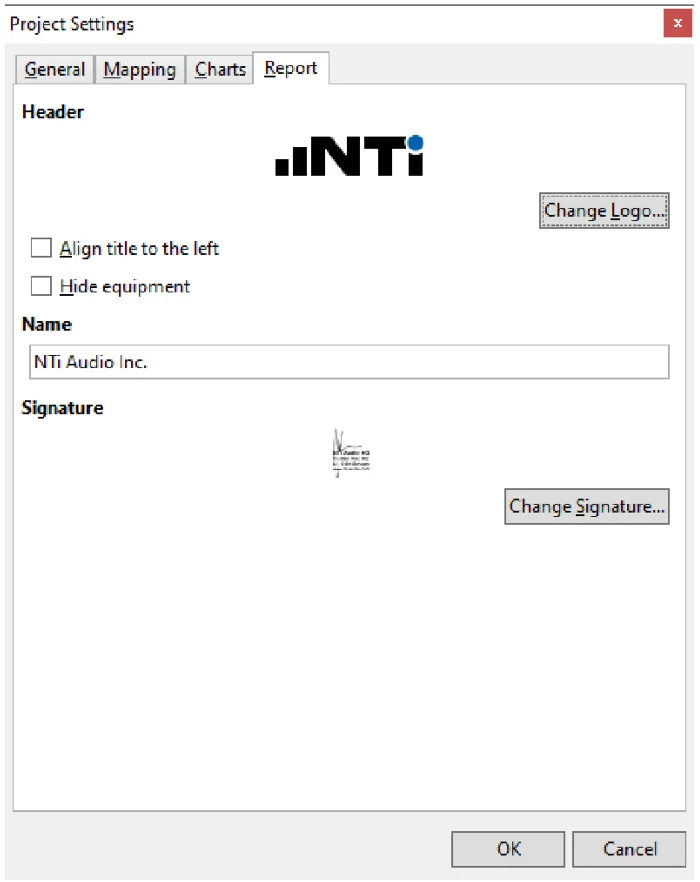
- View › Settings แท็บ Report: โลโก้ (120×30 px ที่ 96 dpi) ลายเซ็น (350×70 px ที่ 96 dpi) Name of the test institute และตัวเลือก Align title to the left (ให้ที่โลโก้มากขึ้น) กับ Hide equipment (ให้ที่คำอธิบายมากขึ้น)View › Settings, Report tab: logo (120×30 px at 96 dpi), signature (350×70 px at 96 dpi), Name of the test institute, and the options Align title to the left (more room for the logo) and Hide equipment (more room for the description)
- Edit › Mid Frequency Range... ตั้งย่านความถี่ที่ใช้เฉลี่ยเวลาเสียงก้อง (Tmid ตาม ISO 3382-1) ใช้ได้เฉพาะโปรเจกต์เวลาเสียงก้องEdit › Mid Frequency Range... sets the band range for the average reverberation time (Tmid per ISO 3382-1); reverberation projects only
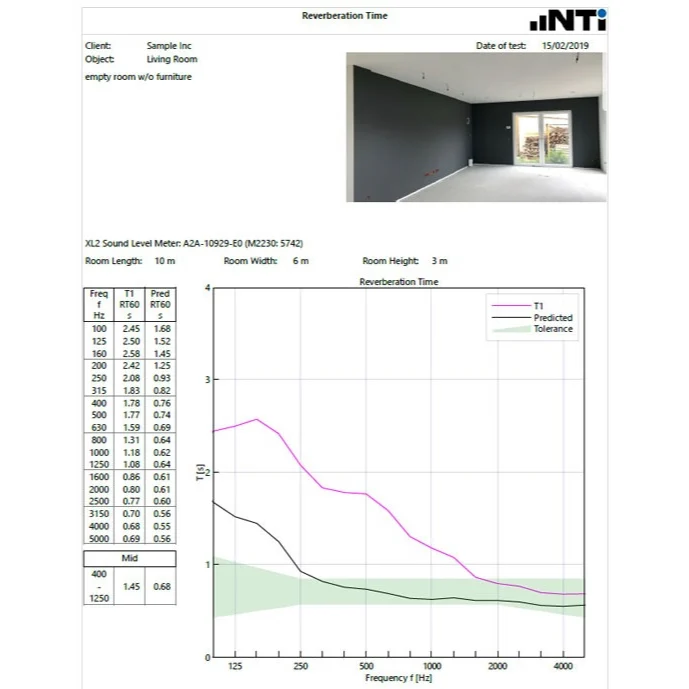
ย่านที่ใช้เฉลี่ยต่างกันตามมาตรฐานและเกณฑ์ที่ใช้ ถ้าไม่ตั้งให้ตรงกับเกณฑ์ของงาน ตัวเลขเดียวบนรายงานจะเทียบกับเกณฑ์ไม่ได้ และต้องระบุย่านนี้ในรายงานเสมอThe averaging range differs between standards and criteria. If it does not match the criterion of the job, the single number on the report cannot be compared with it; always state the range in the report.
File › Preferences... มีสามแท็บ: General (ภาษา) Tolerances (รายการเกณฑ์ผ่าน/ไม่ผ่านที่ใช้ได้กับทุกโปรเจกต์) และ Materials (ฐานข้อมูลวัสดุพร้อมค่าการดูดซับเสียงสำหรับทุกโปรเจกต์เวลาเสียงก้อง) สองแท็บหลังอธิบายวิธีใช้ในบทอ่านผลและบทจำลองFile › Preferences... has three tabs: General (language), Tolerances (the pass/fail list for all projects) and Materials (the absorber database for all reverberation projects). The last two are explained in the result and simulation chapters.
07วิเคราะห์ANALYZE
ตรวจค่าเฉลี่ยก่อนเชื่อผลCheck the averages before you trust the result
มุมมอง Calculations คือที่ที่คุณตัดสินว่าข้อมูลดีพอหรือยัง เพราะค่าเฉลี่ยที่ปนการวัดเสียเพียงครั้งเดียวอาจทำให้ Tmid เพี้ยนได้The Calculations view is where you decide whether the data is good enough: one bad reading in the average can pull Tmid off.
- STEP1
เปิดมุมมอง CalculationsOpen the Calculations view
กราฟแสดงค่าเฉลี่ยของแต่ละชุด และพื้นที่สีเทาคือช่วงที่ผลแต่ละครั้งกระจายอยู่ในแต่ละย่านความถี่The chart shows the average of each set, and the grey area is the spread of the individual readings in each band.
ในโปรแกรมIn the programView › CalculationsView › Calculations
รูปที่ 17Figure 17 มุมมอง Calculations: เลือกค่าเฉลี่ยทางขวาบน ตัดค่าที่ผิดปกติด้วยช่องติ๊กทางขวาล่าง (ภาพจากคู่มือ V1.20 หน้าจอโปรแกรมรุ่น 1.10.15)The Calculations view: pick an average top right, drop an outlier with the tick boxes bottom right (from manual V1.20; program screen version 1.10.15) - Calculations — เลือก Average T1 เพื่อดูรายละเอียด กด ESC เพื่อกลับCalculations: select Average T1 for the detail; ESC returns
- Measurements — เอาเครื่องหมายถูกออกเพื่อไม่ใช้ค่านั้นในค่าเฉลี่ยMeasurements: untick a reading to leave it out of the average
- แถบ MinMax ช่วงของค่าที่วัดThe MinMax band: the span of the readings
- STEP2
ดูรายละเอียดของค่าเฉลี่ยOpen an average in detail
เลือกรายการเช่น Average T1 เพื่อดูว่าค่าเฉลี่ยมาจากการวัดครั้งไหนบ้าง กด ESC เพื่อกลับหน้ารวมSelect an item such as Average T1 to see which readings make up the average; press ESC to return to the overview.
- STEP3
ตัดค่าที่ผิดปกติออกRemove outliers
ถ้าการวัดครั้งไหนโดดจากครั้งอื่นชัดเจน ให้ปิดการใช้ใน Measurements Selection แล้วดูว่าค่าเฉลี่ยเปลี่ยนเท่าใดIf one reading clearly stands out, disable it in Measurements Selection and see how much the average changes.
ข้อควรระวังWatch outตัดออกเมื่อมีเหตุผลทางเทคนิค เช่น มีเสียงรบกวนระหว่างวัด ไม่ใช่เพราะอยากได้ตัวเลขที่ผ่านเกณฑ์Remove a reading for a technical reason, such as a disturbance during it, not to make the number pass.
พื้นที่สีเทากว้างมากเฉพาะย่านความถี่ต่ำแล้วมองข้ามไป ย่านต่ำมักกระจายมากกว่าปกติ แต่ถ้ากว้างผิดสังเกต ให้ย้อนดูว่าเสียงทดสอบดังพอเหนือเสียงพื้นหลังในย่านนั้นหรือไม่Ignoring a very wide grey area in the low bands. Low bands usually spread more, but if it is unusually wide, check whether the test signal was far enough above the background in those bands.
08อ่านผลINTERPRET RESULTS
อ่านผลและเทียบกับเกณฑ์Read the result and compare with a target
มุมมอง Results รวมทุกอย่างที่จะไปอยู่ในรายงาน: ตาราง กราฟ ตัวเลขเดียว และถ้าเลือกไว้ ช่วง Tolerance ที่บอกผ่าน/ไม่ผ่านThe Results view holds everything that goes into the report: table, chart, the single number and, if chosen, the tolerance band that gives pass/fail.
สำหรับโปรเจกต์เวลาเสียงก้อง ตารางและกราฟครอบคลุม 50 Hz–10 kHz และตัวเลขที่คำนวณคือเวลาเสียงก้องเฉลี่ยของย่านที่ตั้งไว้ สำหรับโปรเจกต์สเปกตรัม ตัวเลขที่คำนวณคือผลรวมของทุกย่านความถี่ ใช้ช่อง Results ด้านขวาเลือกผลที่ต้องการแสดงFor a reverberation project the table and chart cover 50 Hz–10 kHz, and the calculated number is the average reverberation time of the set range. For a spectrum project it is the sum of all bands. Use the Results selector on the right to choose what is shown.
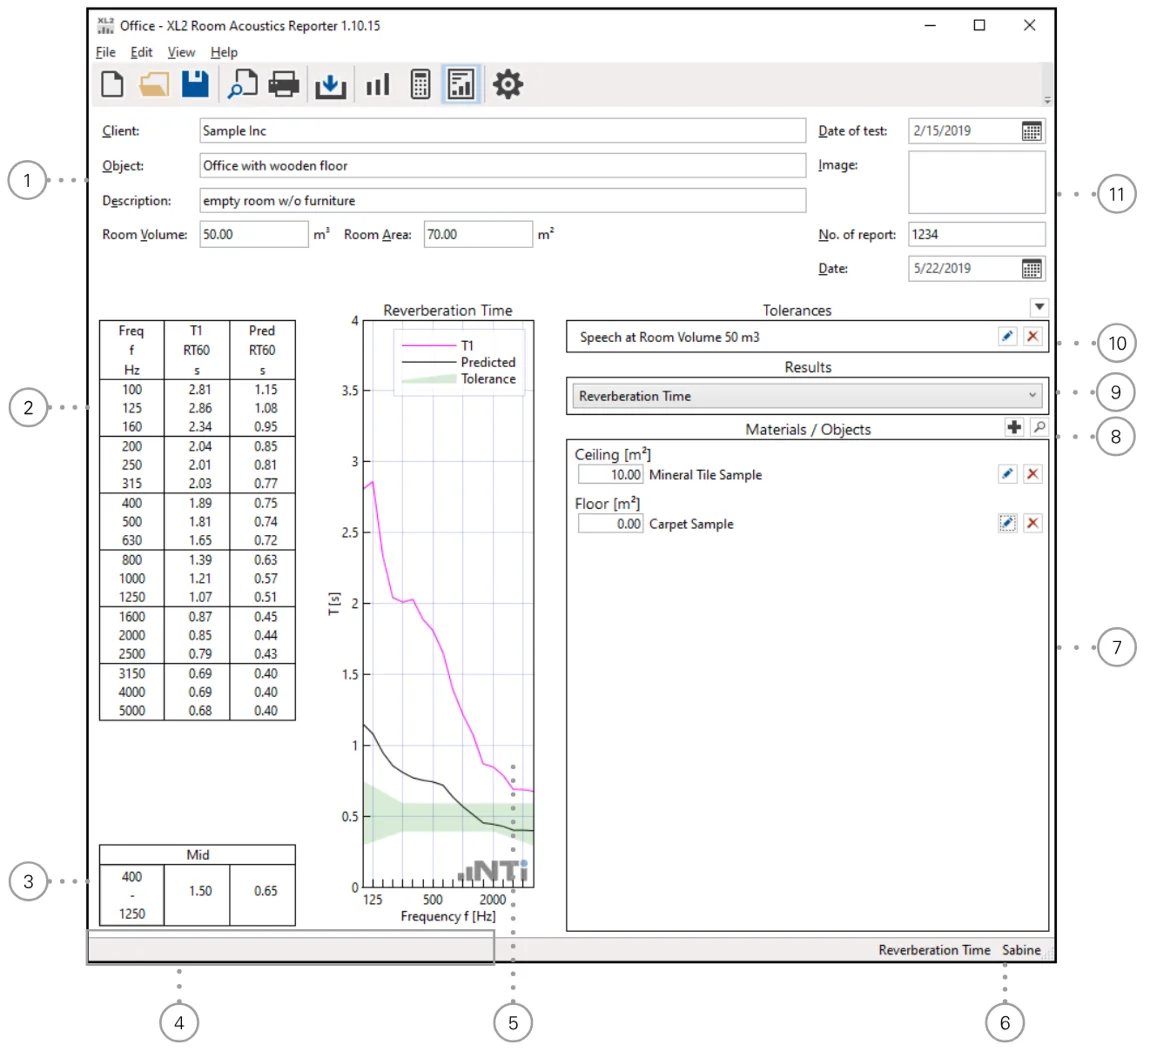
- Details ข้อมูลหัวรายงาน ปริมาตรและพื้นที่ห้องใช้คำนวณค่าคาดการณ์Details: report header; room volume and area feed the prediction
- Results Table ค่าเฉลี่ยในช่วงความถี่ที่เลือกResults Table: averages over the selected range
- Calculated result เวลาเสียงก้องเฉลี่ยของช่วงที่ตั้ง (Spectrum: ผลรวมทุกย่าน)Calculated result: average reverberation time of the set range (Spectrum: sum of all bands)
- Guideline Bar ข้อมูลเพิ่มเติมGuideline Bar: extra information
- Chart คลิกขวาเพื่อคัดลอกข้อมูลChart: right-click to copy the data
- Standard มาตรฐานและสูตรที่ใช้Standard and formula in use
- Materials / Objects พื้นที่หรือจำนวนของวัสดุMaterials / Objects: area or quantity
- Add Material / Objects (+ / ค้นหา)Add Material / Objects (+ / search)
- Results เลือกผลที่จะแสดงResults: pick the result to show
- Tolerances เลือกเกณฑ์ผ่าน / ไม่ผ่านTolerances: pick the pass/fail limit
- Image ภาพหรือแบบห้องImage: room picture or drawing
เวลาเสียงก้องจากช่วงการลดลงReverberation time from the decay range T20 · T30 · s
- คืออะไรWhat it is
- เวลาเสียงก้องที่ประเมินจากการลดลง 20 dB หรือ 30 dB แล้วขยายเป็น 60 dBThe reverberation time evaluated over a 20 dB or 30 dB decay, extended to 60 dB.
- ทำไมต้องสนใจWhy it matters
- เป็นข้อมูลรายย่านที่ทุกผลลัพธ์ในโปรแกรมใช้The per-band data every result in the program is built on.
- เข้าใจผิดบ่อยCommon misunderstanding
- T30 ไม่ได้ดีกว่าเสมอ ถ้าสัญญาณเหนือเสียงพื้นหลังไม่พอ T30 ประเมินไม่ได้T30 is not always better: without enough range above the background it cannot be evaluated.
ค่าเฉลี่ยย่านกลางMid-frequency average Tmid · s
- คืออะไรWhat it is
- เวลาเสียงก้องเฉลี่ยของย่านที่ตั้งใน Mid Frequency Range ตาม ISO 3382-1 ตัวอย่างในคู่มือใช้ย่าน 1/3 ออกเตฟ 400–1250 HzThe average reverberation time over the Mid Frequency Range, per ISO 3382-1; the manual's example uses the 1/3-octave bands 400–1250 Hz.
- ทำไมต้องสนใจWhy it matters
- เป็นตัวเลขเดียวที่มักใช้เทียบกับเกณฑ์ออกแบบThe single number usually compared with design targets.
- เข้าใจผิดบ่อยCommon misunderstanding
- ห้องที่ Tmid ผ่านเกณฑ์อาจยังก้องมากในย่านต่ำ ดูกราฟทั้งเส้นก่อนสรุปA room with an acceptable Tmid can still boom in the low bands: look at the whole curve before concluding.
อัตราส่วนพื้นที่ดูดซับต่อปริมาตรAbsorption-to-volume ratio A/V · m⁻¹
- คืออะไรWhat it is
- พื้นที่ดูดซับเสียงเทียบเท่าหารด้วยปริมาตรห้องThe equivalent absorption area divided by the room volume.
- ทำไมต้องสนใจWhy it matters
- DIN 18041 ใช้ตัดสินห้องกลุ่ม B (ห้องที่คนอยู่ไม่นาน เช่น โถงทางเข้า สำนักงาน)DIN 18041 uses it to judge group B rooms (short-stay rooms such as entrance halls, offices).
ค่าการดูดซับเฉลี่ยของห้องMean absorption coefficient of the room ᾱ · –
- คืออะไรWhat it is
- โปรแกรมคำนวณจาก T1 ที่วัดได้ ปริมาตร และพื้นที่ผิวรวมของห้องDerived by the program from the measured T1, the volume and the total surface area.
- ทำไมต้องสนใจWhy it matters
- เป็นฐานของการจำลอง และบอกว่าควรใช้สูตร Sabine หรือ EyringIt is the basis of the simulation and tells you whether to use Sabine or Eyring.
การเปลี่ยนระดับเสียงSound pressure level change ΔL · dB
- คืออะไรWhat it is
- 10·log(T1/T2) ระดับเสียงในห้องที่คาดว่าจะลดลงเมื่อเวลาเสียงก้องสั้นลง10·log(T1/T2): how much the level in the room is expected to fall as the reverberation time shortens.
- ทำไมต้องสนใจWhy it matters
- ช่วยอธิบายผลของการปรับปรุงเป็นตัวเลขที่ผู้ว่าจ้างเข้าใจง่ายIt turns the effect of the treatment into a figure clients understand.
- เข้าใจผิดบ่อยCommon misunderstanding
- เสียงตรงจากแหล่งกำเนิดไม่ลดลง ส่วนที่ลดคือเสียงสะท้อน คนที่นั่งใกล้แหล่งเสียงจะรู้สึกต่างน้อยกว่าThe direct sound does not change; only the reflected part falls, so listeners close to the source notice less.
ค่าการดูดซับเสียงของวัสดุSound absorption of materials αs · αp · αw · NRC · SAA · –
- คืออะไรWhat it is
- ผลของโปรเจกต์ ISO 354 (พร้อม αp, αw ตัวบ่งชี้รูปร่าง L/M/H และชั้น A–E) หรือ ASTM C423 (NRC และค่าเฉลี่ยการดูดซับ)Results of an ISO 354 project (with αp, αw, shape indicators L/M/H and class A–E) or an ASTM C423 project (NRC and the absorption average).
- ทำไมต้องสนใจWhy it matters
- ใช้เปรียบเทียบและจัดชั้นวัสดุดูดซับเสียงUsed to compare and classify absorbers.
- เข้าใจผิดบ่อยCommon misunderstanding
- ต้องวัดในห้องก้องเสียงตามมาตรฐาน ห้องทั่วไปใช้หาค่าเหล่านี้ไม่ได้They need a qualified reverberation room; an ordinary room cannot give them.
ตั้ง Tolerance เพื่อดูผ่าน/ไม่ผ่านSet a tolerance for pass/fail
- ในมุมมอง Results กดปุ่ม Edit Tolerance ในคอลัมน์ด้านขวาIn the Results view press Edit Tolerance in the right-hand column.
- กรอกตารางค่าบน (upper) ย่านที่ไม่มีเกณฑ์ปล่อยว่างได้ แล้วทำแบบเดียวกันกับค่าล่าง (low) กด OKFill in the upper-tolerance table (bands without a limit can stay empty), then do the same for the low tolerance, and press OK.
- ผลลัพธ์จะแสดงช่วงเป้าหมาย ถ้าเก็บเกณฑ์ไว้ในรายการแล้ว เลือกจาก drop-down Tolerances ได้ทันทีThe result now shows the target band. Stored tolerances can be picked straight from the Tolerances drop-down.
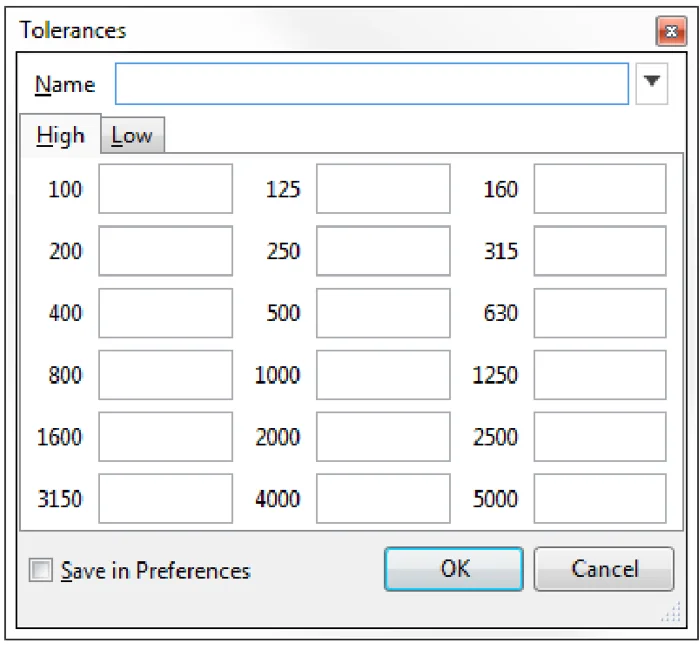
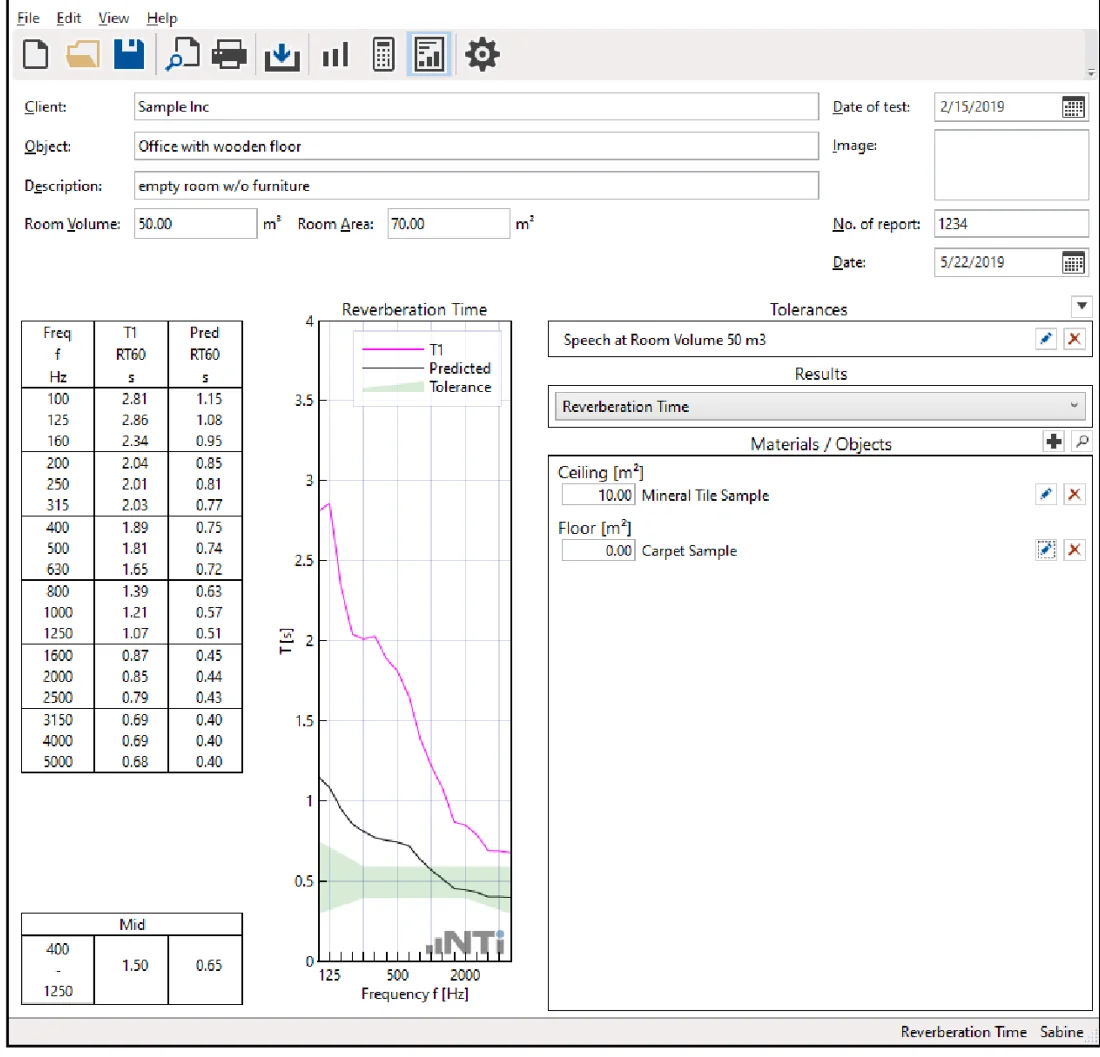
- Tolerances เกณฑ์ที่เลือก (เมนู ▼ และปุ่ม Edit Tolerance ทางขวา)Tolerances: the chosen limit (▼ drop-down and Edit Tolerance on the right)
- แถบเกณฑ์ (Tolerance) บนกราฟThe tolerance band on the chart
เก็บเกณฑ์ไว้ใช้ทุกโปรเจกต์ (ไฟล์ XML)Keep tolerances for every project (XML file)
- เปิด File › Preferences... แท็บ Tolerances จะเห็นตารางเกณฑ์ตัวอย่างOpen File › Preferences..., Tolerances tab: a table of demo tolerances appears.
- ส่งออกเป็นไฟล์ *.xml แล้วเปิดด้วยโปรแกรมตาราง เช่น Microsoft ExcelExport it as an *.xml file and open it in a spreadsheet such as Microsoft Excel.
- เพิ่มเกณฑ์ของคุณตามรูปแบบของตัวอย่าง แล้วบันทึกเป็น XMLAdd your tolerances in the same format as the demo rows and save as XML.
- นำเข้ารายการที่แก้แล้ว กด OK และกลับไปมุมมอง ResultsImport the updated list, press OK and return to the Results view.
วิธีเดียวกันใช้กับแท็บ Materials เพื่อสร้างฐานข้อมูลวัสดุของบริษัท ชื่อวัสดุและตำแหน่งในห้อง (Location) ต้องมี ใช้ (Any) ถ้าวัสดุใช้ได้ทั้งฝ้า ผนัง และพื้นThe same route works on the Materials tab to build a company absorber database. Name and Location are required; use (Any) when a material can go on ceiling, wall or floor.
09ใช้ร่วมกับเครื่องมืออื่นWORKFLOWS
จำลองการเพิ่มวัสดุดูดซับเสียงSimulate added absorbers
ก่อนเสนอให้ติดตั้งวัสดุจริง คุณลองได้ในโปรแกรมว่าถ้าเพิ่มฝ้าดูดซับเสียง พรม หรือจำนวนคน เวลาเสียงก้องจะลดลงเหลือเท่าใดBefore you propose real treatment, you can try in the program how far the reverberation time would drop with an absorbing ceiling, a carpet or more people.
- STEP1
เพิ่มวัสดุใหม่Add a new material
ในมุมมอง Results กด + ข้าง Materials ใส่ Name เลือก Location ในห้อง (Manufacturer และ Description ไม่บังคับ) กรอก Sound absorption coefficients รายย่าน แล้วกด OKIn the Results view press + next to Materials, enter the Name, choose the Location in the room (Manufacturer and Description are optional), fill in the Sound absorption coefficients per band and press OK.
ในโปรแกรมIn the programMaterials / Objects › + › Add...Materials / Objects › + › Add...
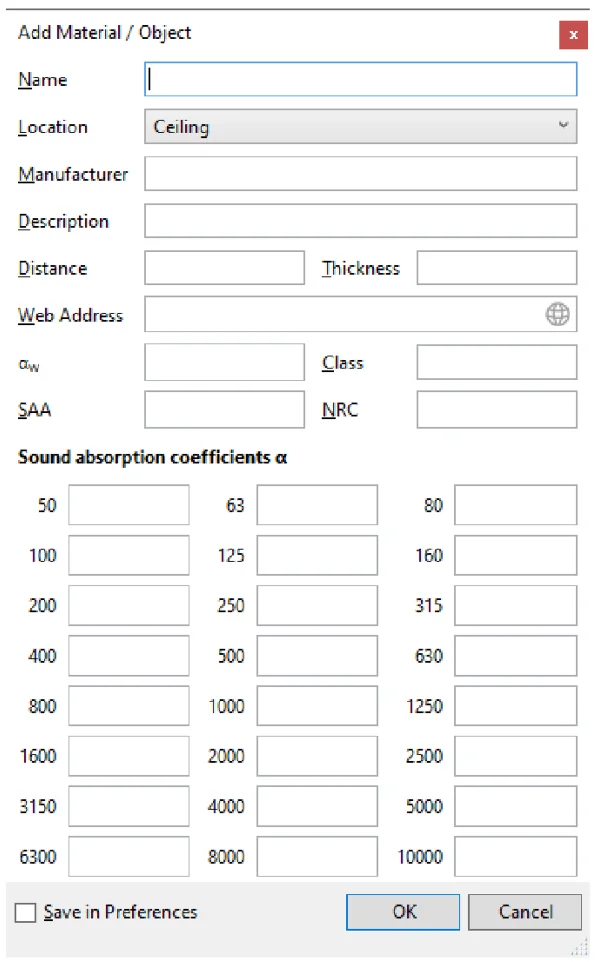
รูปที่ 21Figure 21 หน้าต่าง Add Material / Object: กรอก Name เลือก Location แล้วกรอก Sound absorption coefficients α ทีละย่าน กด OK (ภาพจากคู่มือ V1.20 หน้าจอโปรแกรมรุ่น 1.10.15)The Add Material / Object window: enter the Name, choose the Location, fill the Sound absorption coefficients α per band and press OK (from manual V1.20; program screen version 1.10.15) ภาพ: NTi Audio — คู่มือ Room Acoustics Reporter for XL2 V1.20 (พ.ย. 2021) หน้า 41Image: NTi Audio — Room Acoustics Reporter for XL2 — User Manual V1.20 (Nov 2021), p. 41 - STEP2
หรือเลือกจากฐานข้อมูลOr pick from the database
กดไอคอนค้นหาข้าง Material / Object แล้วเลือกวัสดุที่เก็บไว้ใน Preferences › MaterialsPress the search icon next to Material / Object and choose a material stored in Preferences › Materials.
ในโปรแกรมIn the programSearch...Search...
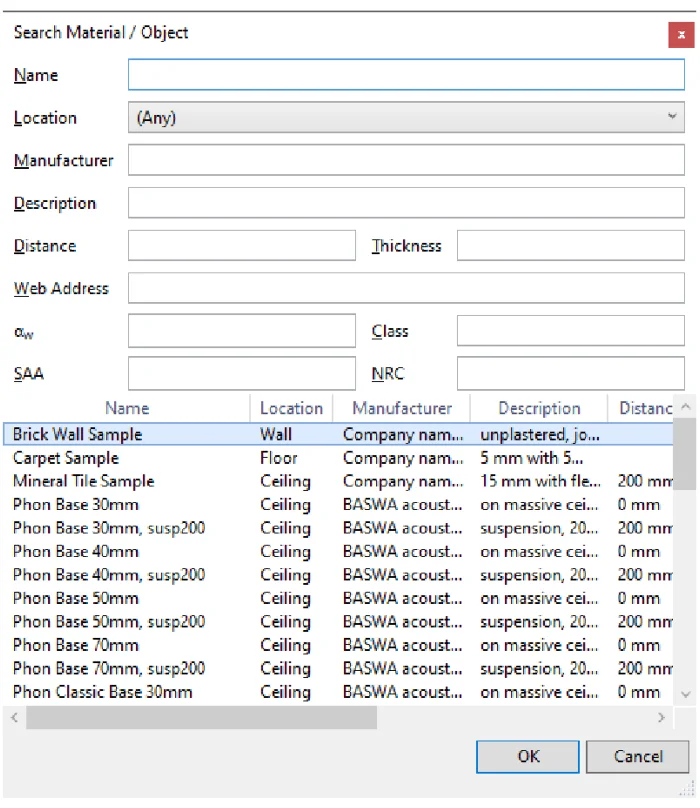
รูปที่ 22Figure 22 หน้าต่าง Search Material / Object: กรองด้วย Name / Location แล้วเลือกวัสดุจากรายการ (ข้อมูลตัวอย่างในคู่มือ) (ภาพจากคู่มือ V1.20 หน้าจอโปรแกรมรุ่น 1.10.15)The Search Material / Object window: filter by Name / Location and pick from the list (sample data from the manual) (from manual V1.20; program screen version 1.10.15) ภาพ: NTi Audio — คู่มือ Room Acoustics Reporter for XL2 V1.20 (พ.ย. 2021) หน้า 44Image: NTi Audio — Room Acoustics Reporter for XL2 — User Manual V1.20 (Nov 2021), p. 44 - STEP3
ใส่พื้นที่หรือจำนวนEnter the area or quantity
ใส่พื้นที่ของวัสดุแผ่นเป็น m² หรือจำนวนของวัตถุ ผลลัพธ์จะแสดงเวลาเสียงก้องที่คาดการณ์ (Pred) คู่กับค่าที่วัดได้Enter the area of a plane absorber in m², or the number of objects. The result shows the predicted reverberation time (Pred) next to the measured one.
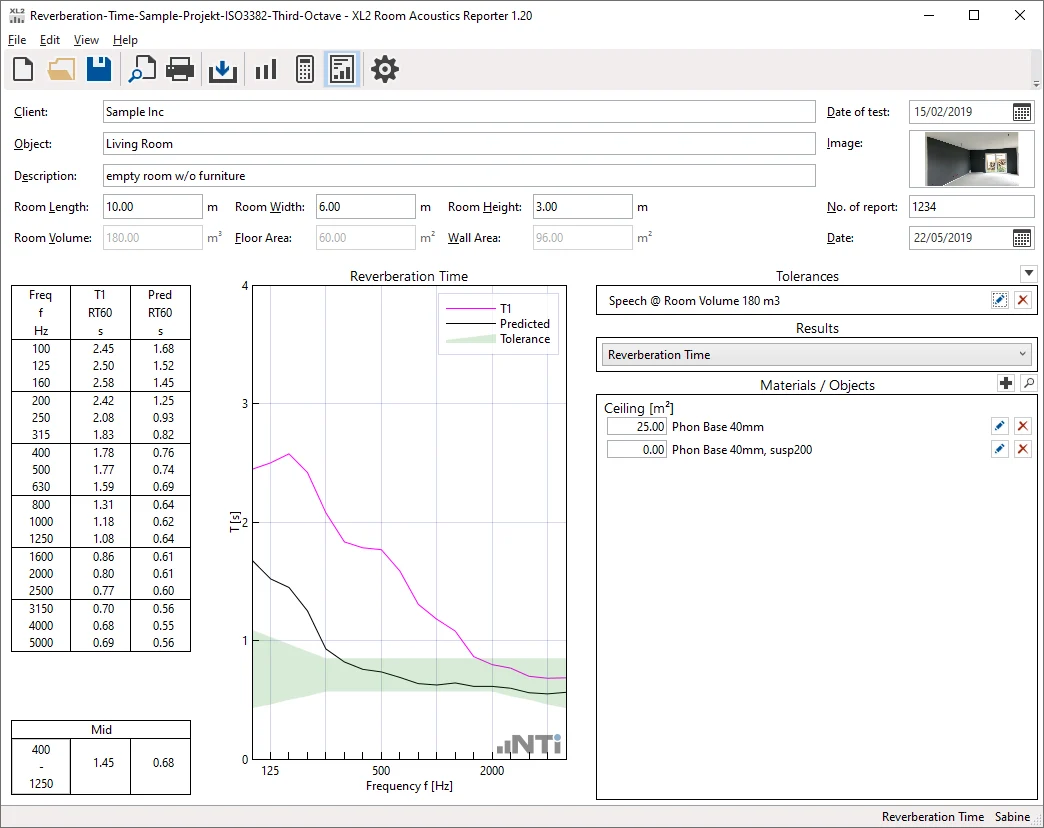
รูปที่ 23Figure 23 กรอกพื้นที่วัสดุ (ตัวอย่าง 25 m² บนฝ้า) แล้วดูคอลัมน์ Pred และเส้นสีดำ Predicted เทียบกับค่าที่วัด T1 (ภาพจากหน้าเว็บ NTi หน้าจอโปรแกรมรุ่น 1.20)Enter the material area (here 25 m² on the ceiling) and compare the Pred column and the black Predicted curve with the measured T1 (NTi web image, program version 1.20) - คอลัมน์ Pred เวลาเสียงก้องที่คาดการณ์The Pred column: predicted reverberation time
- พื้นที่ของวัสดุ (m²) ใน Materials / ObjectsThe material area (m²) in Materials / Objects
- STEP4
เลือกสูตรChoose the formula
ค่าเริ่มต้นคือสูตร Sabine ตาม DIN EN 12354-6:2004 ถ้าค่าการดูดซับเฉลี่ยของห้องเกิน 0.30 NTi แนะนำสูตร Eyring เพราะ Sabine จะให้เวลาเสียงก้องยาวกว่าความจริงThe default is Sabine's formula per DIN EN 12354-6:2004. When the room's mean absorption exceeds 0.30 NTi recommends Eyring, because Sabine then gives a longer reverberation time than reality.
วัสดุที่เพิ่มด้วย + ถูกเก็บไว้ในโปรเจกต์นี้เท่านั้น ถ้าจะใช้กับทุกโปรเจกต์ ให้เพิ่มเข้า Preferences › Materials ตั้งแต่ V1.20 ใส่พื้นที่ติดลบได้ จึงใช้หักผิวเดิมออก (เช่น ฝ้าคอนกรีต) ก่อนเพิ่มวัสดุใหม่ได้ ซึ่งให้ผลใกล้ความจริงกว่าMaterials added with + stay in this project only; to use them everywhere, add them to Preferences › Materials. From V1.20 negative areas are allowed, so you can remove the existing surface (e.g. a concrete ceiling) before adding the new material, which gives a more realistic result.
ตัวอย่างในคู่มือของ NTi: ห้อง 8 × 7 × 3 m มีปริมาตร 168 m³ พื้นที่ผิวรวม 202 m² วัดเวลาเสียงก้องที่ 1 kHz ได้ 2 s โปรแกรมคำนวณค่าการดูดซับเฉลี่ยของห้องได้ราว 0.07 เมื่อเพิ่มฝ้าดูดซับเสียง 56 m² ที่มีค่าการดูดซับ 0.8 ที่ 1 kHz ค่าเฉลี่ยจะขึ้นเป็นราว 0.27 และสูตร Sabine คาดการณ์เวลาเสียงก้องราว 0.49 s ระดับเสียงในห้องลดลงราว 10·log(2.00/0.49) ≈ 6.1 dB
เนื่องจากค่าเฉลี่ย 0.27 ใกล้ 0.30 ลองสลับเป็นสูตร Eyring ในตัวอย่างเดียวกันจะได้ราว 0.43 s และถ้าหักพื้นที่ฝ้าคอนกรีตเดิม (ค่าการดูดซับ 0.03) ออกก่อนเพิ่มฝ้าใหม่ ผล Sabine จะเป็นราว 0.48 s ความต่างของตัวเลขเหล่านี้คือเหตุผลที่ต้องระบุสูตรและสมมติฐานในรายงานThe example in NTi's manual: a room of 8 × 7 × 3 m has a volume of 168 m³ and a total surface of 202 m²; the measured reverberation time at 1 kHz is 2 s. The program derives a mean absorption of about 0.07. Adding a 56 m² absorbing ceiling with a coefficient of 0.8 at 1 kHz raises the mean to about 0.27, and Sabine predicts about 0.49 s. The level in the room falls by about 10·log(2.00/0.49) ≈ 6.1 dB.
Because 0.27 is close to 0.30, switching the same example to Eyring gives about 0.43 s, and removing the existing concrete ceiling area (coefficient 0.03) before adding the new ceiling gives about 0.48 s with Sabine. The spread between these numbers is why the report must state the formula and assumptions.
สูตรทั้งสองเป็นค่าเฉลี่ยของห้อง NTi ระบุสมมติฐานไว้: สนามเสียงแพร่กระจาย วัสดุดูดซับกระจายสม่ำเสมอ (ผิวที่หันหน้าเข้าหากันไม่ควรต่างกันเกิน 3 เท่า) ห้องทรงกล่องสัดส่วนไม่เกิน 1:5 และวัตถุในห้องไม่เกิน 20% ของปริมาตร ถ้าไม่เป็นเช่นนั้น เวลาเสียงก้องจริงมักยาวกว่าที่จำลอง ให้เสนอผลเป็นค่าประมาณ และวัดซ้ำหลังติดตั้งBoth formulas are room averages. NTi lists the assumptions: a diffuse field, evenly spread absorption (opposite surfaces differing by no more than a factor of 3), a shoebox room up to 1:5, and objects taking no more than 20% of the volume. Otherwise the real reverberation time is often longer than simulated: present the result as an estimate and re-measure after installation.
10รายงานREPORT
ออกรายงานและเก็บโปรเจกต์Issue the report and keep the project
รายงานพร้อมเมื่อส่วนหัวครบ ย่านเฉลี่ยและ Tolerance ถูกต้อง ผลผ่านการตรวจแล้ว และคุณเก็บไฟล์โปรเจกต์ไว้แก้ภายหลังได้The report is ready when the header is complete, the averaging range and tolerance are right, the result has been checked and the project file is saved for later changes.
- STEP1
ดูตัวอย่างแล้วพิมพ์Preview, then print
ตรวจรายงานทั้งฉบับใน Print Preview ก่อนพิมพ์ คู่มือไม่มีคำสั่งบันทึกเป็น PDF โดยตรง ให้พิมพ์ผ่านเครื่องพิมพ์ PDF (คู่มือยกตัวอย่างโปรแกรม PDF printer ของผู้ผลิตรายอื่น) หรือ XPSCheck the whole report in Print Preview before printing. The manual documents no direct PDF save: print to a PDF printer (the manual names a third-party PDF printer as an example) or to XPS.
ในโปรแกรมIn the programFile › Print Preview แล้ว File › PrintFile › Print Preview, then File › Print
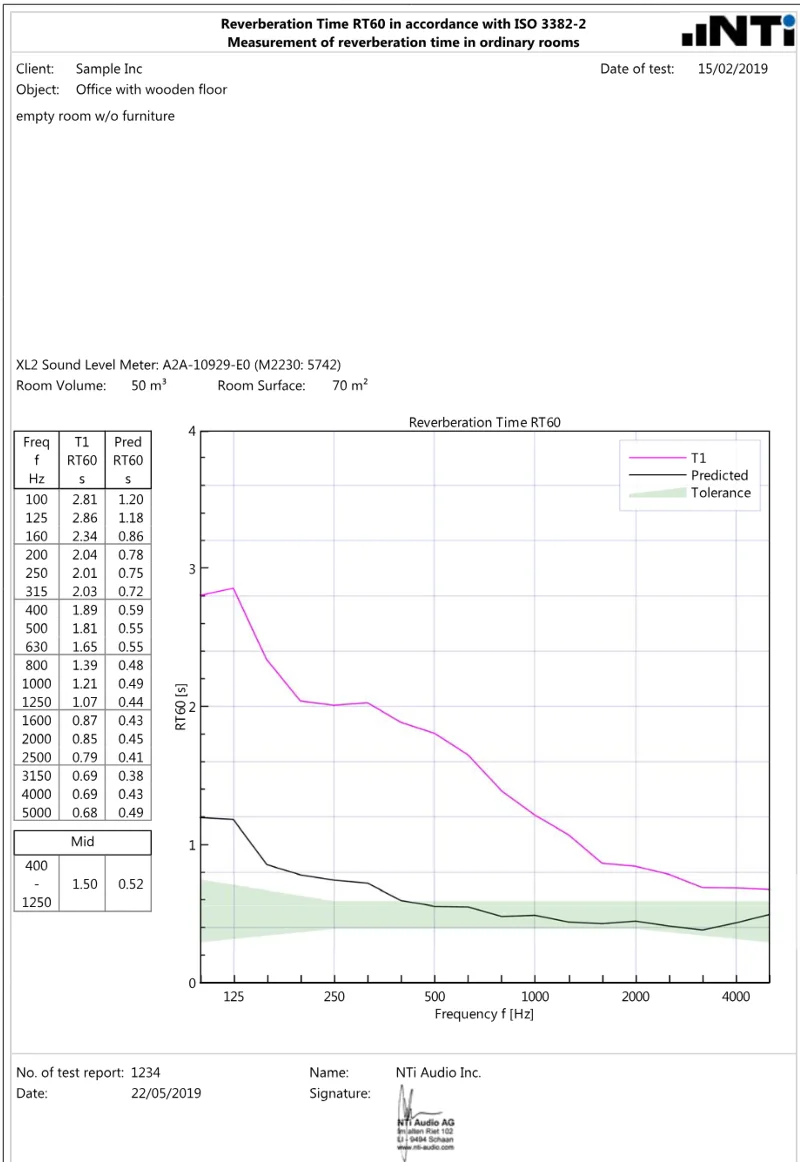
รูปที่ 24Figure 24 ตรวจรายงานทั้งหน้าใน Print Preview ก่อนพิมพ์: หัวรายงาน ข้อมูลห้อง ตาราง กราฟ และช่องชื่อ / ลายเซ็น (ภาพจากคู่มือ V1.20)Check the whole page in Print Preview before printing: header, room data, table, chart and the name / signature block (from manual V1.20) ภาพ: NTi Audio — คู่มือ Room Acoustics Reporter for XL2 V1.20 (พ.ย. 2021) หน้า 31Image: NTi Audio — Room Acoustics Reporter for XL2 — User Manual V1.20 (Nov 2021), p. 31 - STEP2
คัดลอกข้อมูลไปใช้ในรายงานของคุณเองCopy data into your own report
คลิกขวาในกราฟของมุมมอง Results เพื่อคัดลอกข้อมูลไปวาง หรือใช้ Copy กับรายการที่เลือกในกล่องด้านขวาเพื่อนำไปใช้ในโปรแกรมตาราง เช่น Excel คู่มือไม่ได้ระบุการส่งออกเป็นไฟล์ Word หรือ Excel โดยตรงRight-click in the Results chart to copy the data, or use Copy on the items selected in the right-hand box for a spreadsheet such as Excel. The manual documents no direct Word or Excel file export.
ในโปรแกรมIn the programEdit › CopyEdit › Copy
- STEP3
บันทึกโปรเจกต์Save the project
บันทึกเป็นไฟล์ *.xlra เพื่อเปิดแก้หรือพิมพ์ซ้ำภายหลัง เก็บไว้คู่กับโฟลเดอร์ข้อมูลดิบจาก XL2Save it as an *.xlra file so you can edit or reprint later, and keep it next to the raw data folder from the XL2.
ในโปรแกรมIn the programFile › Save / Save as...File › Save / Save as...
ก่อนส่งรายงาน: ชนิดโปรเจกต์หรือมาตรฐานถูกต้อง ส่วนหัวครบ (ขนาดห้อง ปริมาตร พื้นที่ผิวรวม) ย่านเฉลี่ยตรงกับเกณฑ์ ชุด T1/T2 ถูกต้อง Tolerance เป็นเกณฑ์ที่งานกำหนด ผลจำลองระบุว่าเป็นค่าประมาณพร้อมสูตรที่ใช้ และมีบันทึกสภาพห้องขณะวัดและการตรวจเครื่องด้วย Sound CalibratorBefore sending: correct project type or standard, complete header (dimensions, volume, total surface), averaging range matching the criterion, correct T1/T2 sets, the tolerance your job requires, simulations labelled as estimates with the formula used, and a record of the room condition and the calibrator check.
11แก้ปัญหาTROUBLESHOOT
ปัญหาที่พบบ่อยและวิธีแก้Common problems and fixes
| อาการSymptom | สาเหตุที่เป็นไปได้Likely cause | วิธีแก้Fix |
|---|---|---|
| นำเข้าไม่ได้ / ขึ้นเรื่อง LicenseImport refused / licence message | สาเหตุที่เป็นไปได้Likely causeไม่มี 365 หรือ Room Acoustics Option เฟิร์มแวร์ต่ำกว่า V4.20 หรือไม่มีอินเทอร์เน็ตตอนนำเข้าNo 365 or Room Acoustics Option, firmware below V4.20, or no internet during import | วิธีแก้Fixตรวจตารางในบทติดตั้ง อัปเดตเฟิร์มแวร์ แล้วลองใหม่ขณะออนไลน์Check the table in the install chapter, update the firmware and retry online |
| มีแต่เวลาเสียงก้องแบบออกเตฟReverberation time only in octaves | สาเหตุที่เป็นไปได้Likely causeXL2 ไม่มี XL2 Extended Acoustic Pack หรือวัดโดยตั้งเป็น 1/1 ออกเตฟXL2 without the XL2 Extended Acoustic Pack, or measured at 1/1 octave | วิธีแก้Fixเพิ่ม Option หรือวัดใหม่แบบ 1/3 ออกเตฟ ถ้างานรับข้อมูลออกเตฟได้ ใช้โปรเจกต์แบบออกเตฟAdd the option or re-measure in 1/3 octave; if the job accepts octaves, use an octave project |
| ทุกไฟล์เข้า T1Every file is in T1 | สาเหตุที่เป็นไปได้Likely causeบันทึกบน XL2 โดยไม่ได้เลือกชื่อชุด (ไม่มี savenames.txt หรือ Autosave ยังเปิด)Saved on the XL2 without a set name (no savenames.txt, or Autosave still on) | วิธีแก้Fixย้ายด้วยคลิกขวา › Assign To และครั้งหน้าตั้ง Mapping ก่อนวัดMove them with right-click › Assign To, and set up the mapping before the next job |
| ไฟล์บางส่วนไม่เข้าSome files do not import | สาเหตุที่เป็นไปได้Likely causeไม่มีไฟล์ระบบ *.xl2 คู่กับไฟล์ .txtThe *.xl2 system files are missing next to the .txt files | วิธีแก้Fixคัดลอกใหม่ทั้งโฟลเดอร์ของห้องจากการ์ดCopy the whole room folder from the card again |
| พื้นที่สีเทากว้างผิดปกติUnusually wide grey area | สาเหตุที่เป็นไปได้Likely causeมีการวัดเสีย หรือสัญญาณไม่ดังพอเหนือเสียงพื้นหลังA bad reading, or the signal was not far enough above the background | วิธีแก้Fixดูรายละเอียดด้วย Average T1 ปิดค่าที่ผิดใน Measurements Selection หรือวัดใหม่ด้วยแหล่งเสียงที่แรงกว่าInspect with Average T1, disable the bad reading in Measurements Selection, or re-measure with a stronger source |
| ผลจำลองไม่สมเหตุสมผลImplausible simulation | สาเหตุที่เป็นไปได้Likely causeใส่พื้นที่พื้นแทนพื้นที่ผิวรวม ปริมาตรผิด หรือใช้ Sabine กับห้องที่ดูดซับมากFloor area entered instead of total surface, wrong volume, or Sabine used in a highly absorptive room | วิธีแก้Fixแก้ข้อมูลใน Details และเปลี่ยนเป็น Eyring เมื่อค่าการดูดซับเฉลี่ยเกิน 0.30Correct the Details and switch to Eyring when the mean absorption exceeds 0.30 |
| วัสดุที่เพิ่มไว้หายในโปรเจกต์ใหม่Added material missing in a new project | สาเหตุที่เป็นไปได้Likely causeเพิ่มด้วย + ซึ่งเก็บเฉพาะในโปรเจกต์นั้นAdded with +, which stores it in that project only | วิธีแก้Fixเพิ่มเข้า Preferences › MaterialsAdd it to Preferences › Materials |
| ใช้ XL3Using an XL3 | สาเหตุที่เป็นไปได้Likely causeNTi ยังไม่ได้เผยแพร่ขั้นตอนนำเข้าสำหรับ XL3NTi has not published an XL3 import procedure | วิธีแก้Fixติดต่อ GET BEST SOUND ก่อนวัดงานจริงContact GET BEST SOUND before a real job |