ทำไมเรื่องนี้สำคัญWhy this matters
เครื่องวัดระดับเสียงจะแสดงตัวเลขเสมอ ไม่ว่าจะวางไว้ถูกที่หรือไม่ ลมพัดใส่ไมโครโฟนหรือเปล่า หรือเสียงที่วัดได้มาจากแหล่งที่เราสนใจจริงหรือไม่ ตัวเลขที่ดูน่าเชื่อถือจึงอาจผิดได้มาก และถ้าผลนั้นถูกใช้ตัดสินเรื่องร้องเรียน การออกแบบ หรือการตรวจรับงาน ความผิดพลาดก็จะมีผลตามไปด้วยA sound level meter always shows a number, whether or not it is in the right place, whether wind is blowing on the microphone, and whether the sound really comes from the source of interest. A convincing number can therefore be badly wrong, and if it is used to decide a complaint, a design or an acceptance test, the error carries through.
NTi Audio สรุปว่าการวัดที่ใช้ได้ต้องมีสามส่วนพร้อมกันNTi Audio sums up that a valid measurement needs three things at once:
- ถูกต้องตามวิธี (correct): ใช้มาตรฐานที่เหมาะกับงาน ตั้งค่าพารามิเตอร์ ความละเอียดของย่านความถี่ ระยะเวลาการวัด และตำแหน่งวัดถูกต้องCorrect: the right standard for the task, and the right parameters, band resolution, duration and positions.
- มีความหมาย (meaningful): สรุปข้อมูลจำนวนมากให้เหลือค่าที่ตอบคำถามได้ อธิบายหรือแยกค่าผิดปกติที่มีเหตุผล และรายงานให้คนอื่นเข้าใจMeaningful: large datasets reduced to values that answer the question, explainable outliers identified or excluded, and a report others can follow.
- แม่นยำ (accurate): เครื่องมือได้รับการสอบเทียบเป็นระยะ และสอบกลับได้ถึงหน่วย SIAccurate: instruments are calibrated periodically, with traceability to SI units.
ก่อนออกไปวัดBefore you go
- รู้ว่าวัดเพื่อตอบคำถามอะไร และมาตรฐานหรือกฎเกณฑ์ใดกำหนดวิธีวัด เพราะสิ่งนี้กำหนดทุกอย่างที่ตามมา ทั้งค่าที่ต้องบันทึก ตำแหน่ง ระยะเวลา และชั้นความแม่นยำของเครื่องKnow what question the measurement answers and which standard or rules define the method, because that decides everything else: parameters, positions, duration and instrument class.
- ตรวจอายุใบรับรองการสอบเทียบ ของเครื่องวัด ไมโครโฟน และเครื่องสอบเทียบเสียง NTi Audio แนะนำให้สอบเทียบในห้องปฏิบัติการปีละครั้งCheck the calibration certificates of the meter, microphone and sound calibrator; NTi Audio recommends laboratory calibration once a year.
- ตั้งค่าก่อนวัด เช่น การถ่วงน้ำหนักความถี่และเวลา ช่วงบันทึก สเปกตรัม ไฟล์เสียง และค่าพื้นฐานของเปอร์เซ็นไทล์ ซึ่งบางค่าเปลี่ยนภายหลังไม่ได้Set up before measuring: frequency and time weighting, logging interval, spectra, audio and the percentile base parameter; some of these cannot be changed afterwards.
- เตรียมอุปกรณ์เสริม ขาตั้ง ฉากกันลม สายต่อไมโครโฟน แบตเตอรี่สำรอง ตลับเมตร กล้องถ่ายรูป และแบบฟอร์มบันทึกภาคสนามPack the accessories: tripod, windscreen, microphone cable, spare batteries, measuring tape, camera and a field-notes form.
ตรวจสอบด้วยเครื่องสอบเทียบเสียงก่อนและหลังวัดCheck with a sound calibrator before and after
เครื่องสอบเทียบเสียง (sound calibrator) เป็นอุปกรณ์เล็ก ๆ ที่สวมบนไมโครโฟนแล้วสร้างเสียงที่รู้ค่าแน่นอน โดยทั่วไปคือ 94 dB ที่ความถี่ 1 kHz ถ้าเครื่องวัดอ่านได้ใกล้ค่านั้น แสดงว่าทั้งสายการวัดทำงานปกติA sound calibrator is a small device that fits over the microphone and produces a known sound, typically 94 dB at 1 kHz. If the meter reads close to that value, the whole measurement chain is working.
ควรตรวจ ทั้งก่อนเริ่มและหลังจบ การวัด การตรวจก่อนวัดยืนยันว่าเริ่มต้นถูก การตรวจหลังวัดยืนยันว่าไม่มีอะไรเปลี่ยนไประหว่างทาง เช่น ไมโครโฟนถูกกระแทก ความชื้นเข้า หรือสายหลวม ถ้าค่าหลังวัดต่างจากก่อนวัดอย่างเห็นได้ชัด ต้องหาสาเหตุก่อนเชื่อผลที่วัดได้ มาตรฐานหลายฉบับกำหนดว่าผลต่างเท่าไรจึงยอมรับได้Check both before starting and after finishing. The first check shows you started correctly; the second shows nothing changed on the way, such as a knock to the microphone, moisture or a loose cable. If the after-check differs noticeably from the before-check, find the cause before trusting the results. Many standards state how large a difference is acceptable.
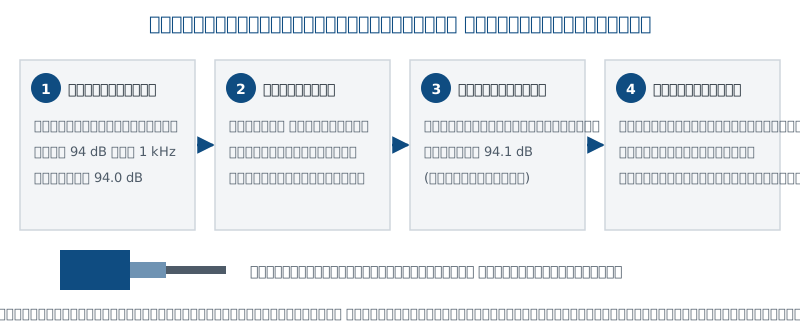
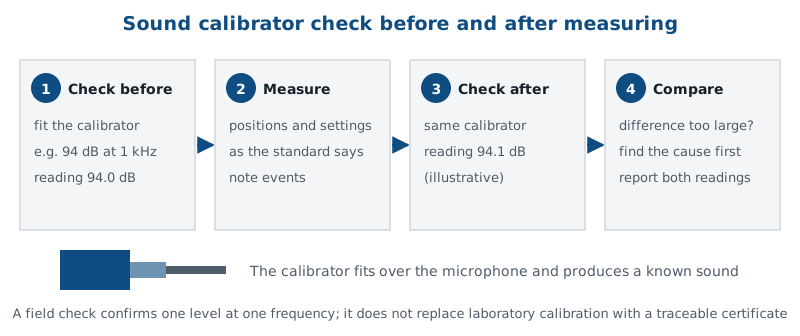
การตรวจด้วยเครื่องสอบเทียบในภาคสนามไม่ได้แทนการสอบเทียบในห้องปฏิบัติการ การตรวจภาคสนามยืนยันแค่ที่ระดับและความถี่เดียว ส่วนการสอบเทียบในห้องปฏิบัติการตรวจทั้งเครื่องและออกใบรับรองที่สอบกลับได้A field check with a calibrator does not replace laboratory calibration. The field check confirms one level at one frequency; laboratory calibration tests the whole instrument and issues a traceable certificate.
ตำแหน่งไมโครโฟนและการสะท้อนMicrophone position and reflections
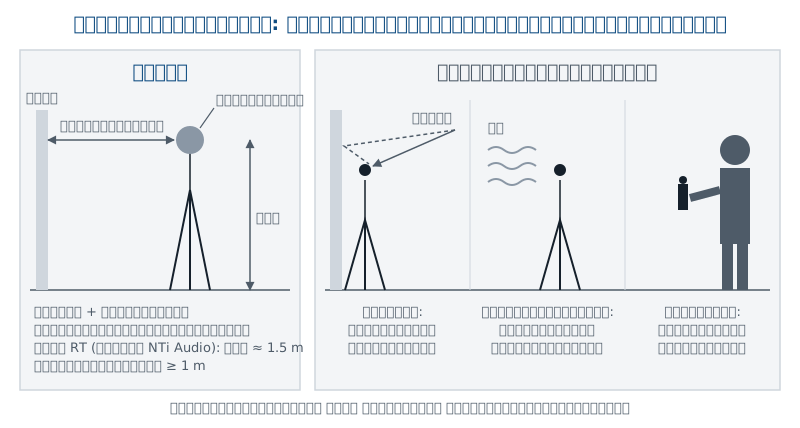
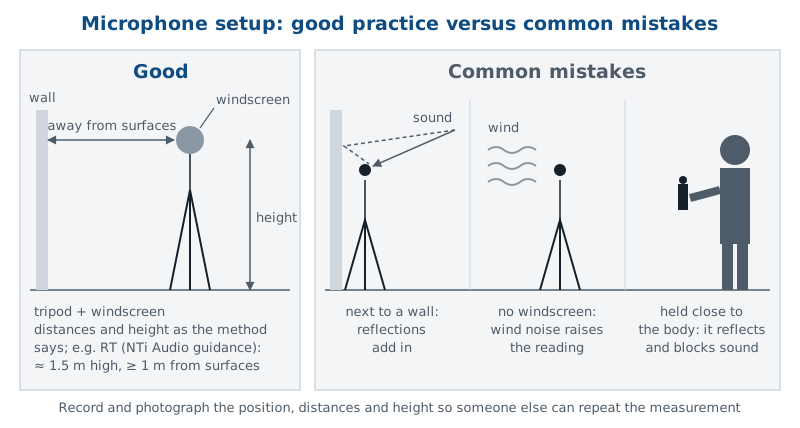
เสียงสะท้อนจากผนัง พื้น รถ หรือแม้แต่ตัวผู้วัดเอง จะรวมกับเสียงตรงและเปลี่ยนค่าที่อ่านได้ ยิ่งไมโครโฟนอยู่ใกล้พื้นผิวแข็ง ผลกระทบยิ่งมาก และมักไม่เท่ากันในแต่ละความถี่Reflections from walls, the floor, vehicles or even the person measuring add to the direct sound and change the reading. The closer the microphone is to a hard surface, the larger the effect, and it is usually different at each frequency.
- อยู่ห่างจากพื้นผิวสะท้อน: ในการวัดเวลาเสียงก้องในห้อง แนวทางการใช้งานของ NTi Audio (ตัวอย่างขั้นตอนการวัด ไม่ใช่ข้อกำหนดของ ISO 3382 ที่ยกมาตรง ๆ) ให้ไมโครโฟนห่างจากพื้นผิวสะท้อนอย่างน้อย 1 เมตร และสูงราว 1.5 เมตร งานอื่นมีระยะของตัวเองตามมาตรฐานที่ใช้Keep away from reflecting surfaces: for reverberation measurements in rooms, NTi Audio's application guidance (an example workflow, not a quoted ISO 3382 requirement) places the microphone at least 1 m from reflecting surfaces and about 1.5 m high. Other tasks have their own distances in their standards.
- ใช้ขาตั้ง: ตัวผู้วัดเป็นทั้งสิ่งสะท้อนและสิ่งบังเสียง การตั้งเครื่องบนขาตั้งหรือถือห่างตัวให้มากที่สุดช่วยลดผลนี้ และทำให้ตำแหน่งซ้ำได้Use a tripod: the operator both reflects and blocks sound. A tripod, or holding the meter as far from the body as possible, reduces the effect and makes the position repeatable.
- ทำตามตำแหน่งที่มาตรฐานกำหนด: บางงานกำหนดชัดเจนมาก เช่น การวัดเสียงท่อไอเสียรถขณะจอดตาม ISO 5130 ที่วางไมโครโฟนห่างปลายท่อ 0.5 เมตร ทำมุม 45 องศา และสูงจากพื้นอย่างน้อย 0.2 เมตรFollow the positions a standard defines: some are very specific, such as the stationary exhaust noise test to ISO 5130, with the microphone 0.5 m from the outlet at 45° and at least 0.2 m above the ground.
- จดและถ่ายรูปตำแหน่ง: ระยะจากแหล่งกำเนิด ความสูง และระยะจากสิ่งสะท้อน เพื่อให้คนอื่นวัดซ้ำได้Record and photograph the position: distance from the source, height and distance to reflectors, so someone else can repeat it.
ลม ฝน และฉากกันลมWind, rain and the windscreen
ลมที่พัดผ่านไมโครโฟนทำให้เกิดเสียงลมที่ตัวไมโครโฟนเอง ซึ่งเครื่องจะวัดรวมไปด้วย โดยเฉพาะที่ความถี่ต่ำ ฉากกันลม (windscreen) ที่เป็นก้อนโฟมช่วยลดเสียงนี้ได้มาก ควรใช้ทุกครั้งที่วัดภายนอกอาคาร และใช้ในอาคารเมื่อมีลมจากเครื่องปรับอากาศพัดใส่ด้วยWind flowing over the microphone creates noise at the microphone itself, which the meter measures along with everything else, especially at low frequencies. A foam windscreen reduces this a lot. Use one for every outdoor measurement, and indoors too when air from ventilation blows on the microphone.
- ฉากกันลมลดเสียงลมได้ แต่ไม่ได้ทำให้หายไปหมด เมื่อลมแรง ข้อมูลอาจยังเชื่อถือไม่ได้ มาตรฐานการวัดภายนอกอาคารมักกำหนดสภาพอากาศที่ยอมรับได้ไว้A windscreen reduces wind noise but does not remove it. In strong wind the data may still be unreliable; outdoor measurement standards usually state acceptable weather conditions.
- ฝนที่ตกลงบนไมโครโฟนหรือฉากกันลมก็สร้างเสียงเช่นกัน และความชื้นอาจทำให้ไมโครโฟนเสียหาย การวัดระยะยาวภายนอกจึงควรใช้ไมโครโฟนสำหรับภายนอกอาคาร ซึ่งมีฉากกันลม เยื่อกันน้ำ และหนามกันนกเกาะRain on the microphone or windscreen also makes noise, and moisture can damage the microphone. Long outdoor measurements should use an outdoor microphone, which has a windscreen, a water-repellent membrane and a bird spike.
- บันทึกสภาพอากาศระหว่างการวัด เพื่อใช้ตัดสินภายหลังว่าช่วงไหนต้องตัดออกRecord the weather during the measurement so you can decide later which periods to exclude.
เสียงพื้นหลังBackground noise
เครื่องวัดไม่รู้ว่าเสียงไหนคือเสียงที่เราสนใจ มันวัดทุกเสียงรวมกัน ถ้าเสียงพื้นหลัง เช่น การจราจร แมลง หรือเครื่องจักรอื่น ดังใกล้เคียงกับเสียงที่ต้องการวัด ผลที่ได้จะสูงกว่าความจริง จึงต้อง วัดเสียงพื้นหลังแยกไว้เสมอ เช่น ช่วงที่ปิดแหล่งกำเนิดThe meter does not know which sound you care about; it measures everything together. If background sound such as traffic, insects or other machines is close in level to the sound you want, the result will be too high. So always measure the background separately, for example with the source switched off.
เพราะเดซิเบลรวมกันแบบพลังงาน ผลกระทบของเสียงพื้นหลังจึงขึ้นกับว่ามันเบากว่าค่ารวมกี่ dB ตัวเลขในตารางนี้คำนวณจากหลักการรวมเดซิเบลทั่วไปBecause decibels add on an energy basis, the effect of the background depends on how many dB it is below the total. The figures in this table follow from ordinary decibel addition.
| เสียงพื้นหลังเบากว่าค่าที่วัดได้Background below the measured total | เสียงพื้นหลังทำให้ค่าสูงขึ้นประมาณBackground raises the total by about |
|---|---|
| 10 dB10 dB | เสียงพื้นหลังทำให้ค่าสูงขึ้นประมาณBackground raises the total by about0.5 dB0.5 dB |
| 6 dB6 dB | เสียงพื้นหลังทำให้ค่าสูงขึ้นประมาณBackground raises the total by about1.3 dB1.3 dB |
| 3 dB3 dB | เสียงพื้นหลังทำให้ค่าสูงขึ้นประมาณBackground raises the total by about3 dB (เสียงสองส่วนดังเท่ากัน)3 dB (both parts are equally loud) |
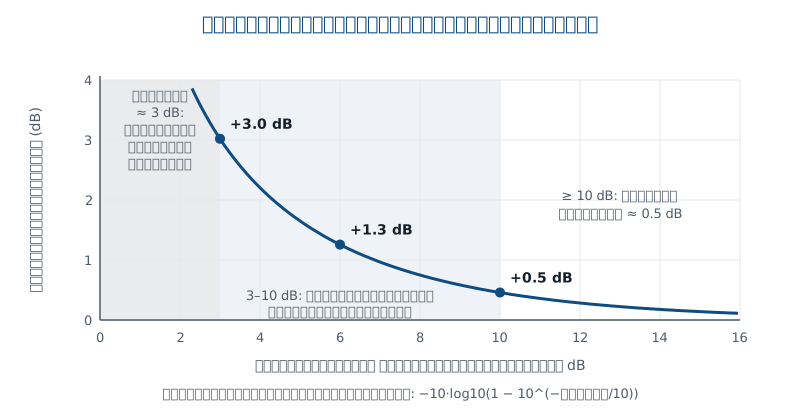
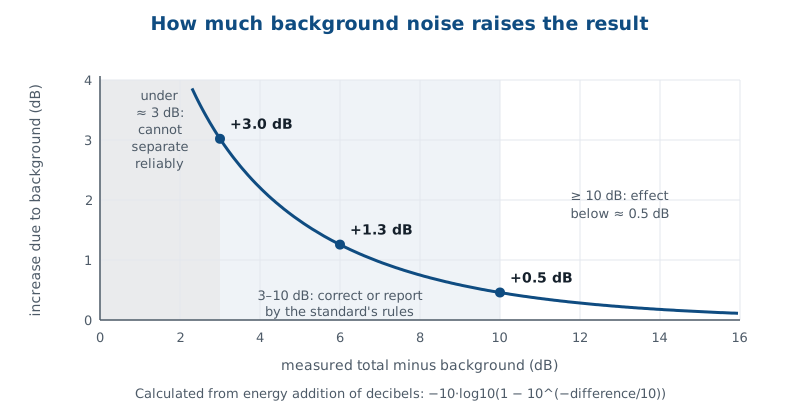
นี่คือเหตุผลที่หลายวิธีวัดกำหนดให้เสียงพื้นหลังเบากว่าเสียงที่วัดอย่างน้อย 10 dB เช่น การวัดเสียงท่อไอเสียตาม ISO 5130 ที่ NTi Audio อธิบาย ถ้าผลต่างน้อยกว่านั้น มาตรฐานแต่ละฉบับมีกฎการแก้ค่าหรือการรายงานของตัวเองThis is why many methods require the background to be at least 10 dB below the measured sound, such as the ISO 5130 exhaust test described by NTi Audio. When the difference is smaller, each standard has its own rules for correcting or reporting the result.
ข้อผิดพลาดจากการตั้งค่าและการอ่านผลMistakes in settings and interpretation
- เลือกการถ่วงน้ำหนักผิด: เช่น วัดเป็น dBZ แต่ต้องรายงานเป็น dBA หรือใช้ Slow ในงานที่กำหนด Fast ค่าที่ได้จะเทียบกับเกณฑ์ไม่ได้Wrong weighting: e.g. measuring dBZ when dBA must be reported, or Slow where Fast is specified; the value cannot be compared with the criterion.
- คำนวณ dBA จากสเปกตรัมแทนการวัดตรง: ทำได้แต่แม่นน้อยกว่า เพราะการแปลงใช้ค่าแก้มาตรฐานที่สมมติว่าเสียงในแต่ละย่านราบเรียบ NTi Audio ยกตัวอย่างย่านออกเตฟ 125 Hz ที่ 70 dB ซึ่งคำนวณได้ 53.9 dBA แต่เสียงจริงให้ 52.7 dBA ต่างกัน 1.2 dBCalculating dBA from a spectrum instead of measuring it: possible but less accurate, because the conversion uses standard corrections that assume a flat spectrum inside each band. NTi Audio's example: a 70 dB level in the 125 Hz octave band gives 53.9 dBA by calculation, while the real signal gives 52.7 dBA, a 1.2 dB difference.
- อ่านข้อมูลช่วงสั้นมากผิด: ในช่วง 100 ms อาจเห็น LAeq สูงกว่า LAFmax ซึ่งเป็นเรื่องปกติจากการถ่วงน้ำหนักเวลา ไม่ใช่เครื่องเสียMisreading very short intervals: over 100 ms, LAeq can exceed LAFmax; this is normal time-weighting behaviour, not a fault.
- ระดับเสียงเกินช่วงของไมโครโฟน: เสียงที่ดังมาก เช่น เสียงกระแทกหรือเสียงปืน อาจเกินระดับสูงสุดที่ไมโครโฟนรับได้ ควรตรวจสเปกของไมโครโฟนและสังเกตสัญญาณเตือนเกินช่วงบนเครื่องLevels beyond the microphone's range: very loud sounds such as impacts or gunshots can exceed the microphone's maximum level; check the microphone specification and watch for overload warnings on the meter.
- วัดสั้นเกินไป: เสียงที่เปลี่ยนเป็นรอบ เช่น เครื่องจักรที่เปิดปิดเป็นระยะ ต้องวัดให้ครอบคลุมหลายรอบMeasuring too briefly: sound that cycles, such as machines switching on and off, must be measured over several cycles.
ระหว่างวัดและหลังวัดDuring and after the measurement
- ฟังและสังเกต ขณะวัด จดเหตุการณ์ที่เกิดขึ้น เช่น รถผ่าน คนพูดใกล้ไมโครโฟน หรือแหล่งกำเนิดหยุดทำงานListen and observe during the measurement; note events such as passing cars, people talking near the microphone, or the source stopping.
- บันทึกเสียงถ้าทำได้ เพื่อใช้ยืนยันภายหลังว่ายอดสูงแต่ละยอดมาจากอะไรRecord audio if you can, to confirm later what caused each peak.
- ตรวจด้วยเครื่องสอบเทียบอีกครั้ง เมื่อจบ และบันทึกค่าCheck with the calibrator again at the end, and write down the reading.
- ทบทวนข้อมูล หาค่าที่ผิดปกติ อธิบายหรือแยกออกอย่างมีเหตุผล และเขียนเหตุผลไว้ในรายงานReview the data: look for outliers, explain or exclude them for stated reasons, and write those reasons in the report.
- รายงานให้ครบ ระบุวิธีวัด เครื่องมือ ใบรับรองการสอบเทียบ ตำแหน่ง สภาพอากาศ เสียงพื้นหลัง และผลการตรวจก่อนหลังReport completely: method, instruments, calibration certificates, positions, weather, background noise and the before/after checks.
ช่างเทคนิควัดเสียงเครื่องปั๊มน้ำหลังอาคาร โดยยืนถือเครื่องไว้ข้างผนังปูน ห่างผนังราว 30 ซม. มีลมพัดแรงและไม่ได้ใส่ฉากกันลม ผลอ่านได้สูงกว่าที่คาด
เมื่อวัดใหม่โดยตั้งเครื่องบนขาตั้งห่างจากผนัง ใส่ฉากกันลม และวัดช่วงที่ปั๊มปิดเพื่อดูเสียงพื้นหลัง ค่าที่ได้ต่ำลง และรู้ด้วยว่าเสียงพื้นหลังเบากว่าเสียงปั๊มกี่ dB ผลครั้งที่สองจึงนำไปใช้ได้จริงA technician measures a water pump behind a building, standing with the meter about 30 cm from a concrete wall, in a strong breeze and without a windscreen. The reading is higher than expected.
Re-measured on a tripod away from the wall, with a windscreen, plus a reading with the pump off to capture the background, the level comes out lower, and it is clear how many dB the background sits below the pump. The second result can actually be used.
สรุปข้อผิดพลาดที่พบบ่อยCommon mistakes at a glance
| ข้อผิดพลาดMistake | ผลที่เกิดEffect | ป้องกันอย่างไรHow to avoid it |
|---|---|---|
| ไม่ตรวจด้วยเครื่องสอบเทียบNo calibrator check | ผลที่เกิดEffectไม่รู้ว่าเครื่องอ่านค่าถูกหรือไม่No proof the meter read correctly | ป้องกันอย่างไรHow to avoid itตรวจที่ 94 dB / 1 kHz ก่อนและหลังวัดCheck at 94 dB / 1 kHz before and after |
| ไม่ใส่ฉากกันลมNo windscreen | ผลที่เกิดEffectค่าสูงเกินจริงจากเสียงลมReadings raised by wind noise | ป้องกันอย่างไรHow to avoid itใส่ฉากกันลมทุกครั้งภายนอกอาคารAlways fit one outdoors |
| อยู่ใกล้ผนังหรือตัวผู้วัดToo close to walls or the body | ผลที่เกิดEffectเสียงสะท้อนเปลี่ยนผลReflections change the result | ป้องกันอย่างไรHow to avoid itใช้ขาตั้ง ทำตามระยะในมาตรฐานUse a tripod; follow the standard's distances |
| ไม่วัดเสียงพื้นหลังNo background measurement | ผลที่เกิดEffectแยกเสียงแหล่งกำเนิดไม่ได้Source cannot be separated | ป้องกันอย่างไรHow to avoid itวัดช่วงที่ปิดแหล่งกำเนิด หรือใช้ L90 ประกอบMeasure with the source off, or use L90 as a guide |
| ตั้งค่าไม่ตรงกับงานSettings do not fit the task | ผลที่เกิดEffectเทียบกับเกณฑ์ไม่ได้Cannot compare with the criterion | ป้องกันอย่างไรHow to avoid itตรวจมาตรฐานก่อน ตั้งค่าก่อนวัดRead the standard first; set up before measuring |
| ไม่จดบันทึกเหตุการณ์No event notes | ผลที่เกิดEffectอธิบายยอดสูงไม่ได้Peaks cannot be explained | ป้องกันอย่างไรHow to avoid itจดบันทึก ใช้เครื่องหมาย และบันทึกเสียงTake notes, use markers, record audio |
คำถามที่พบบ่อยFrequently asked questions
ค่าที่อ่านจากเครื่องสอบเทียบก่อนและหลังต่างกันเล็กน้อย ผลวัดใช้ไม่ได้ไหมMy before and after calibrator readings differ slightly. Are the results invalid?
ขึ้นกับค่าต่างที่มาตรฐานของงานนั้นยอมรับ ให้บันทึกทั้งสองค่าในรายงาน ถ้าเกินที่ยอมรับได้ ให้หาสาเหตุ เช่น ไมโครโฟนถูกกระแทก ความชื้น หรือสายหลวม ก่อนตัดสินใจใช้ผลIt depends on the difference the standard for that job allows. Record both readings in the report. If the difference is beyond what is allowed, find the cause, such as a knock to the microphone, moisture or a loose cable, before deciding whether to use the results.
วัดในอาคารต้องใส่ฟองน้ำกันลมไหมDo I need a windscreen indoors?
ควรใส่เมื่อมีลมจากระบบระบายอากาศหรือเครื่องปรับอากาศพัดโดนไมโครโฟน และฟองน้ำยังช่วยกันฝุ่นและการกระแทกเบา ๆ ด้วย ถ้าอากาศนิ่งจริง บางงานอาจไม่จำเป็น แต่ให้ยึดตามที่มาตรฐานของงานกำหนดFit one when air from ventilation or air conditioning blows on the microphone; a windscreen also gives some protection against dust and light knocks. In truly still air some jobs may not need it, but follow what the standard for the job says.
คำศัพท์สำคัญKey terms
- เครื่องสอบเทียบเสียง (sound calibrator)Sound calibrator
- อุปกรณ์สร้างเสียงที่รู้ค่า เช่น 94 dB ที่ 1 kHz ใช้ตรวจเครื่องวัดในภาคสนามA device producing a known sound, e.g. 94 dB at 1 kHz, used to check a meter in the field.
- การสอบกลับได้ (traceability)Traceability
- ห่วงโซ่การเปรียบเทียบที่ไม่ขาดตอน จากเครื่องมือของเราไปถึงหน่วยมาตรฐาน SIAn unbroken chain of comparisons from our instrument up to the SI units.
- ฉากกันลม (windscreen)Windscreen
- ก้อนโฟมที่ครอบไมโครโฟนเพื่อลดเสียงที่เกิดจากลมA foam cover over the microphone that reduces wind-generated noise.
- เสียงพื้นหลัง (background noise)Background noise
- เสียงทั้งหมดที่ไม่ได้มาจากแหล่งที่เราต้องการวัดAll sound that does not come from the source being measured.
- เสียงสะท้อน (reflection)Reflection
- เสียงที่กระทบพื้นผิวแข็งแล้วสะท้อนกลับมารวมกับเสียงตรงSound that bounces off a hard surface and adds to the direct sound.
ความเข้าใจผิดที่พบบ่อยCommon misunderstandings
- “เครื่อง Class 1 ให้ผลถูกต้องเสมอ” ชั้นความแม่นยำบอกความสามารถของเครื่อง แต่ตำแหน่ง สภาพอากาศ และเสียงพื้นหลังที่ผิด ทำให้ผลผิดได้เท่ากัน“A Class 1 meter always gives correct results.” The class describes the instrument; a wrong position, weather or background noise spoils the result just the same.
- “สอบเทียบแล้วปีนี้ ไม่ต้องใช้เครื่องสอบเทียบภาคสนาม” การสอบเทียบในห้องปฏิบัติการไม่ได้บอกว่าไมโครโฟนยังปกติในวันที่วัด การตรวจก่อนและหลังวัดจึงยังจำเป็น“It was calibrated this year, so no field check is needed.” Laboratory calibration does not show the microphone is fine on the day; the before/after check is still needed.
- “ยิ่งอยู่ใกล้แหล่งเสียงยิ่งแม่น” ใกล้เกินไปอาจได้ค่าที่ไม่เป็นตัวแทน และตำแหน่งที่ถูกต้องคือตำแหน่งที่มาตรฐานหรือคำถามของงานกำหนด“Closer to the source is more accurate.” Too close can give unrepresentative values; the right position is the one the standard or the question requires.
- “ฉากกันลมทำให้วัดในลมแรงได้” ช่วยลดเสียงลม แต่ไม่ได้ทำให้ข้อมูลในลมแรงเชื่อถือได้เสมอ“With a windscreen you can measure in strong wind.” It reduces wind noise but does not make strong-wind data reliable.