QUICK STARTเริ่มใช้งานใน 10–15 นาทีUp and running in 10–15 minutes
เริ่ม Monitoring ครั้งแรกใน 10–15 นาทีYour first monitoring in 10–15 minutes
เป้าหมายคือ 5GV ยึดแน่นอยู่บนโครงสร้าง ต่อเครือข่ายได้ อยู่ในสถานะ MONITORING และคุณเห็นค่า PPV ทั้ง 3 แกนเข้ามาใน MeasurEye เวลา 10–15 นาทีไม่รวมการเจาะยึดและรอลงทะเบียนเครือข่ายครั้งแรก ซึ่งอาจนานหลายนาทีตามผู้ให้บริการ SIMThe goal: the 5GV fixed firmly to the structure, on the network, in the MONITORING state, and PPV on all three axes arriving in MeasurEye. The 10–15 minutes exclude drilling and the first network registration, which can take several minutes depending on the SIM provider.
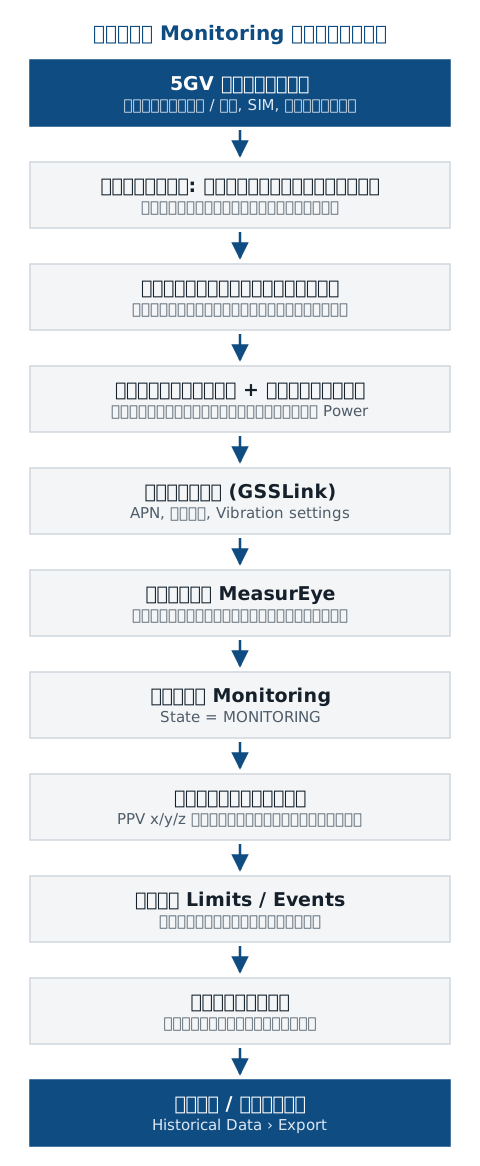
ต้องมีอะไรบ้างก่อนเริ่มWhat you need before you start
- 5GV พร้อมแหล่งไฟ: ถ่าน D-cell ลิเธียม 4 ก้อนแบบกระแสสูง (ER34615M หรือรุ่นที่ GSS รับรอง) สำหรับรุ่นถ่าน, ฐานแบตเตอรี่ที่ชาร์จเต็มสำหรับรุ่นชาร์จได้ หรือไฟภายนอกA 5GV with power: four high-current lithium D cells (ER34615M or a GSS-approved model) for the primary-cell version, a fully charged base for the rechargeable version, or external power
- Nano SIM ที่มีแพ็กเกจข้อมูล และค่า APN จากผู้ให้บริการ (สำหรับโมดูล 3G/4G/LTE)A nano SIM with data and the APN from your operator (for the 3G/4G/LTE module)
- มือถือ Android ที่ติดตั้งแอป GSSLink (Google Play) และแม่เหล็กเปิด/ปิดเครื่องAn Android phone with the GSSLink app (Google Play) and the on/off magnet
- อุปกรณ์ยึด: Anchor Bolt M8 + แหวนโลหะ, Mounting Plate หรือ Ground Mounting Plate ตามหน้างานMounting parts: M8 anchor bolt + metal washer, mounting plate or ground mounting plate as the site needs
- บัญชี MeasurEye ของคุณเอง (เข้าสู่ระบบด้วยตัวเองที่ app.measureye.com) และข้อมูลโครงการ: จุดวัด เกณฑ์ และผู้รับแจ้งเตือนYour own MeasurEye account (you sign in yourself at app.measureye.com) and the project data: positions, criteria and alert recipients
- STEP1
ตรวจชุด 5GVCheck the 5GV set
เปิดกล่องแล้วตรวจตัวเครื่อง เสาอากาศ 2 ต้น (3G/4G และ Bluetooth) แผ่นยึด สาย USB และแม่เหล็ก สำหรับรุ่นถ่าน: GSS ส่งเครื่องโดย ไม่ใส่ถ่าน ต้องใส่ถ่าน D-cell ลิเธียม 4 ก้อน ขั้วบวกขึ้น แล้วกดปุ่มบนแผงยึดถ่าน ไฟแดงต้องติดครบ 4 ดวง SIM อยู่ในโมดูลโมเด็มภายในเครื่อง (ดูบทไฟและการสื่อสาร)Unpack and check the unit, two antennas (3G/4G and Bluetooth), mounting plate, USB cable and magnet. Primary-cell version: GSS ships the unit without batteries; fit four lithium D cells positive end up, then press the button on the battery board: all four red LEDs must light. The SIM goes in the modem module inside the unit (see the power and communication chapter).
ข้อควรระวังWatch outถ่านต้องเป็นรุ่นกระแสสูง ER34615M ไม่ใช่ ER34615 หรือ ER34615H มิฉะนั้นโมเด็ม 4G อาจได้กระแสไม่พอUse high-current ER34615M cells, not ER34615 or ER34615H, or the 4G modem may not get enough current
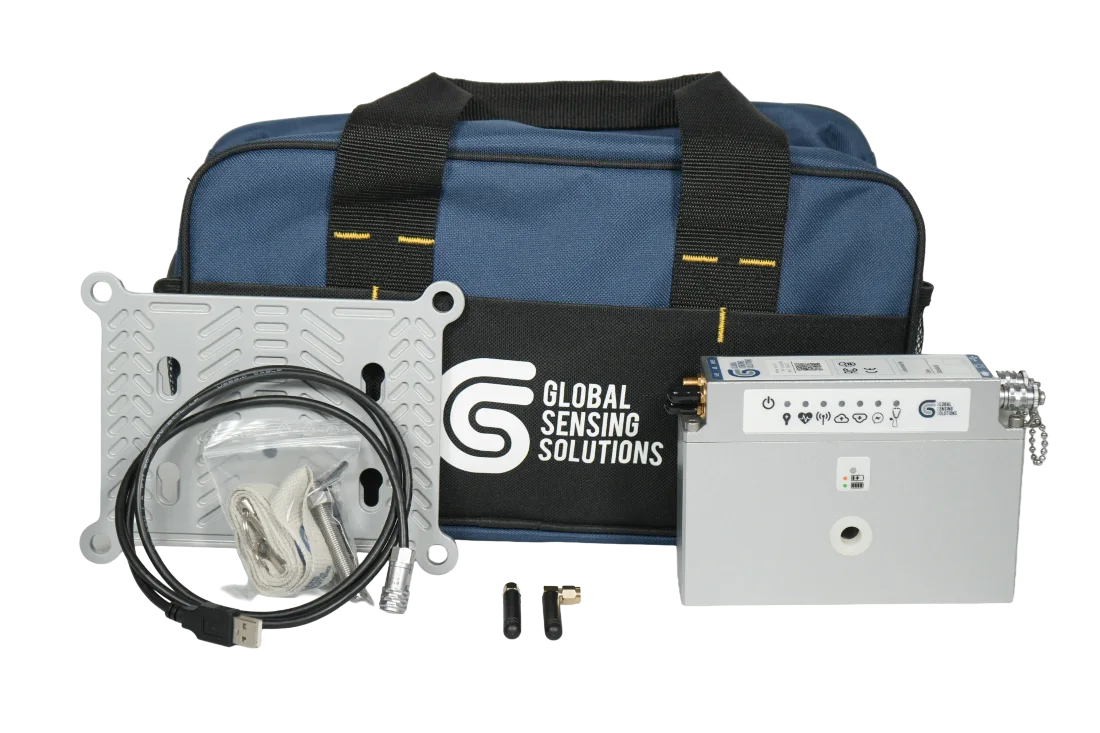
รูปที่ 2Figure 2 ชุด 5GV ตามข่าว NTi (24 ก.ย. 2026): ตัวเครื่อง ฐานแบตเตอรี่แบบชาร์จได้ ขายึด สาย USB เสาอากาศ และกระเป๋า — เปิดกล่องแล้วตรวจให้ครบก่อนออกหน้างานThe 5GV set in NTi's news of 24 Sep 2026: unit, rechargeable battery base, mounting bracket, USB cable, antennas and bag. Check everything is there before you go to site. ภาพ: NTi Audio (ภาพชุดสินค้าจากข่าว MeasurEye Vibration Mode)Image: NTi Audio (set photo from the MeasurEye Vibration Mode news item) - STEP2
เซนเซอร์: อยู่ในตัวเครื่องแล้วSensor: already built in
5GV มีเซนเซอร์ MEMS 3 แกนอยู่ภายใน ไม่มีเซนเซอร์หรือสายเซนเซอร์ให้ต่อ ขั้นนี้คือขันเสาอากาศทั้ง 2 ต้นให้แน่น และตรวจว่าฝาโลหะของขั้วต่อ LEMO ที่ไม่ได้ใช้ปิดแน่น ขั้ว AUX ไม่ต้องใช้สำหรับงานวัดการสั่นสะเทือนThe 5GV has a three-axis MEMS sensor inside: there is no sensor or sensor cable to connect. This step is to screw on both antennas and check that the metal caps of unused LEMO connectors are pushed home. The AUX connector is not needed for vibration monitoring.
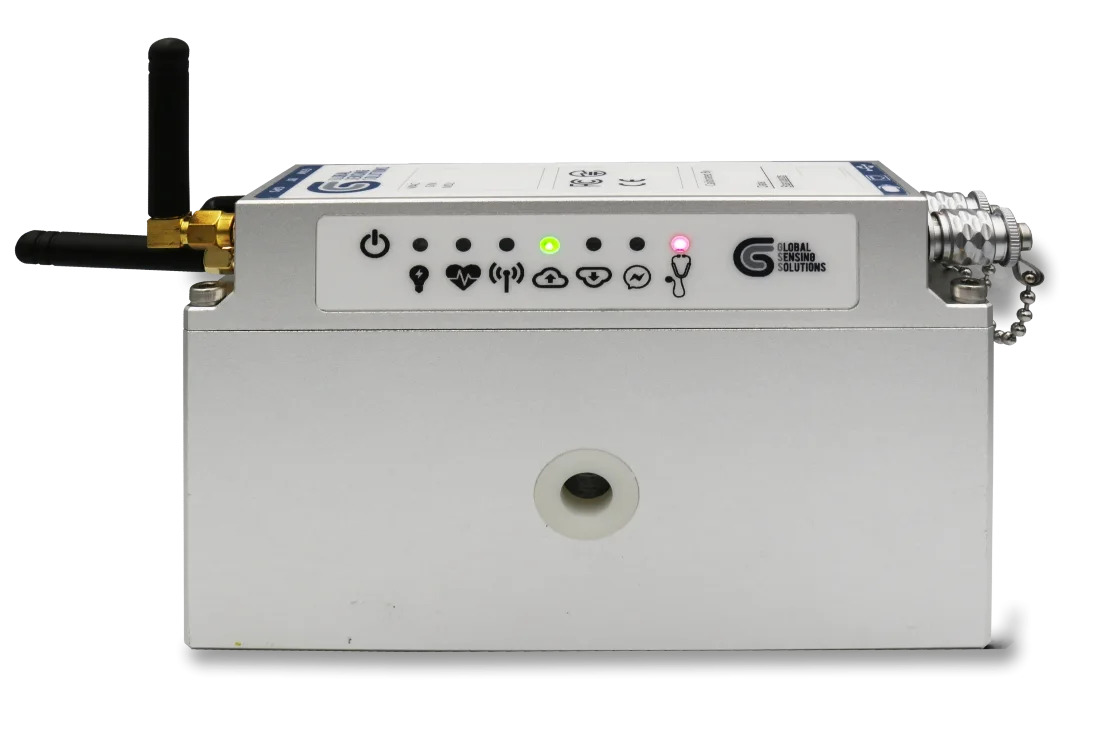
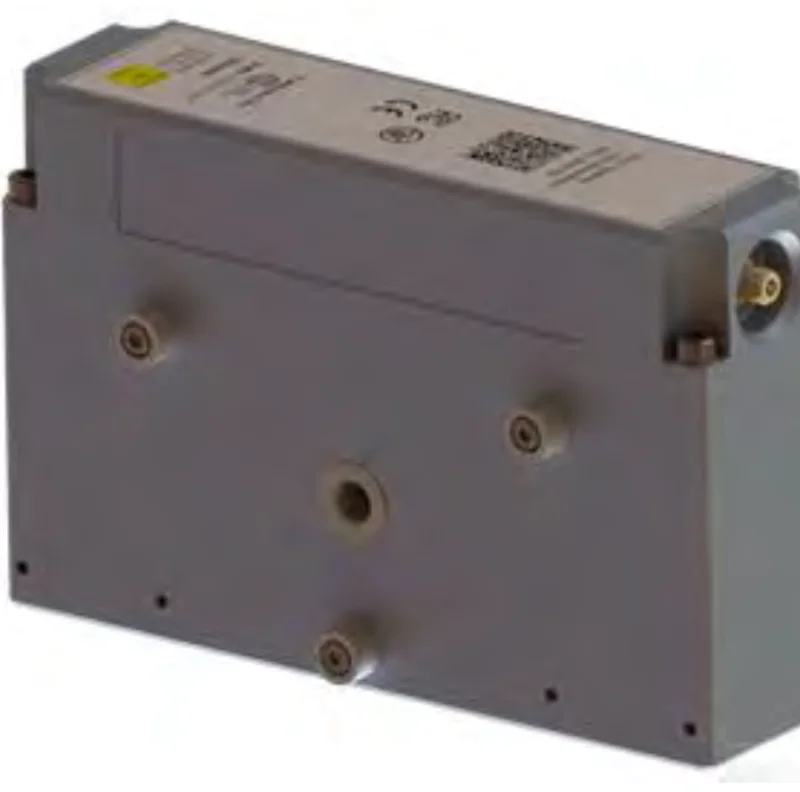
รูปที่ 3Figure 3 ตัวเครื่องจากด้านหน้า — จุดที่ต้องรู้ก่อนติดตั้งThe unit from the front: what to know before installing - เสาอากาศ: 3G/4G (GSM) และ Bluetooth ขันให้แน่นก่อนเปิดเครื่องAntennas: 3G/4G (GSM) and Bluetooth; screw them on before power-up
- แผงไฟแสดงสถานะ (ความหมายของแต่ละดวงดูรูปถัดไป)Status indicator label (meaning of each LED in the next figure)
- ขั้วต่อ LEMO: 6 ขา (USB / ไฟภายนอก) และ AUX มีฝาโลหะปิดกันน้ำLEMO connectors: 6-pin (USB / external power) and AUX, with metal caps against water
- รูกลางฐานสำหรับ Anchor Bolt M8 / ยึดกับ Mounting PlateCentre hole in the base for an M8 anchor bolt / the mounting plate
- STEP3
ติดตั้งให้แน่นกับโครงสร้างFix it firmly to the structure
ยึดเครื่องกับโครงสร้างที่ต้องการประเมินด้วยวิธีที่คู่มือรองรับ เช่น Anchor Bolt M8 ผ่านรูกลางฐาน (รูเจาะโดยทั่วไป M10 สำหรับปลอก) มีแหวนโลหะรองใต้นัท ผิวไม่เรียบใช้ Standoffs หรือ Mounting Plate จดทิศทางที่ติดตั้งและถ่ายภาพไว้Fix the unit to the structure you are assessing with a method the manual supports, e.g. an M8 anchor bolt through the centre hole (generally an M10 hole for the sleeve) with a metal washer under the nut. On uneven surfaces use standoffs or the mounting plate. Record and photograph the installed direction.
ข้อควรระวังWatch outอย่าวางเครื่องไว้เฉย ๆ โดยไม่ยึด NTi ระบุว่าการวางหลวมทำให้เกิดเรโซแนนซ์ที่จุดสัมผัสและยอดปลอมในสเปกตรัมNever just set the unit down: NTi notes that a loose contact creates contact resonances and false spectral peaks
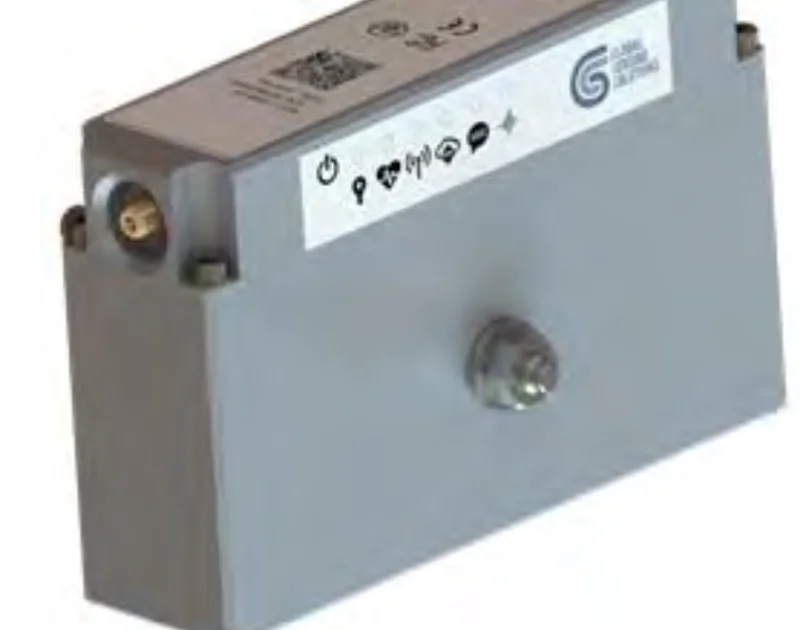
รูปที่ 4Figure 4 ยึดตรงด้วย Anchor Bolt M8 ผ่านรูกลางฐานแบตเตอรี่ (รูปที่ 18 ของคู่มือ)Fixed directly with an M8 anchor bolt through the battery-base hole (manual figure 18) ภาพ: Global Sensing Solutions — Vibration Monitor User Manual Release 6.0 (เอกสารดาวน์โหลดของ NTi Audio) หน้า 90Image: Global Sensing Solutions — Vibration Monitor User Manual Release 6.0 (NTi Audio download), p. 90 - STEP4
เปิดเครื่องและรอเครือข่ายPower on and wait for the network
แตะแม่เหล็กที่สัญลักษณ์ Power ค้างประมาณ 1 วินาที ไฟ Power จะเป็นสีแดง เมื่อเอาแม่เหล็กออกจะเปลี่ยนเป็นเขียว = เริ่มเปิดเครื่อง เครื่องจะตรวจตัวเอง (ไฟกะพริบเป็นรหัสขั้นตอน) เมื่อต่อเครือข่ายและเริ่มวัดได้ ไฟ Power และ Heartbeat กะพริบเขียวพร้อมกันทุก 5 วินาทีHold the magnet at the power symbol for about 1 second: the Power indicator turns red, and green when you remove the magnet = power-up has started. The unit runs its self-diagnostics (LEDs show the step code). Once on the network and monitoring, Power and Heartbeat flash green together every 5 seconds.
ข้อควรระวังWatch outถ้าไฟ Power ไม่เริ่มกะพริบเขียว แปลว่าเปิดไม่ติด ให้ทำซ้ำโดยจับแม่เหล็กค้างนานขึ้นเล็กน้อยIf Power does not start blinking green, power-on failed: repeat, holding the magnet a little longer
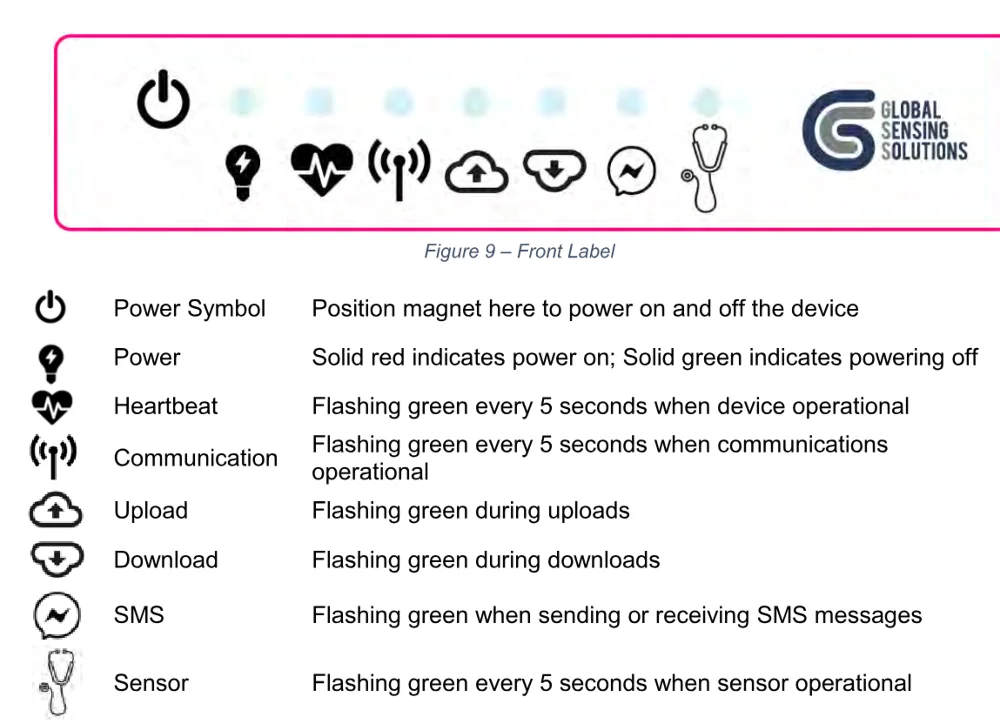
รูปที่ 5Figure 5 ป้ายด้านหน้าและความหมายของไฟ — เมื่อเครื่องเชื่อมเครือข่ายและเริ่มวัดแล้ว ไฟ Power และ Heartbeat จะกะพริบเขียวพร้อมกันทุก 5 วินาที และไฟ Sensor กะพริบสั้น ๆ ทุก 5 วินาทีFront label and indicator meanings. Once the unit is on the network and monitoring, Power and Heartbeat flash green together every 5 seconds and Sensor blinks briefly every 5 seconds. ภาพ: Global Sensing Solutions — Vibration Monitor User Manual Release 6.0 (เอกสารดาวน์โหลดของ NTi Audio) หน้า 17Image: Global Sensing Solutions — Vibration Monitor User Manual Release 6.0 (NTi Audio download), p. 17 - STEP5
ตั้งค่าด้วยแอป GSSLinkConfigure with the GSSLink app
เปิด Bluetooth บนมือถือ Android เปิด GSSLink อยู่ห่างเครื่องไม่เกินราว 10 m เลือกเครื่องจากรายการ (ดูจาก MAC) แล้วเข้า Configuration Menu ตรวจอย่างน้อย: 3G/4G (APN ของ SIM), Main (เวลาและ Time Zone), Vibration (ช่วงรายงาน PPV ขีดเตือนต่อแกน ย่าน g และ Filter ตามเกณฑ์โครงการ) และ SMS (เบอร์รับแจ้งเตือน) บันทึกค่ากลับลงเครื่องให้เรียบร้อยSwitch on Bluetooth on the Android phone, open GSSLink within about 10 m, pick the unit from the list (by MAC) and open the Configuration Menu. Check at least: 3G/4G (your SIM's APN), Main (time and time zone), Vibration (PPV interval, per-axis thresholds, g range and filter for the project criteria) and SMS (alert numbers). Save the settings back to the unit.
ข้อควรระวังWatch outAPN ค่าเริ่มต้นเป็นของผู้ให้บริการในฮ่องกง (CSL) ถ้าไม่แก้ SIM ไทยจะใช้ข้อมูลไม่ได้ ถ้าตั้งค่าด้วยคำสั่งต้องส่ง CFG APPLY ทุกครั้ง ไม่เช่นนั้นค่าใหม่จะหายเมื่อเครื่องรีบูตThe default APN belongs to a Hong Kong operator (CSL): a Thai SIM will not get data until you change it. When you configure by command, always send CFG APPLY or the new values are lost at the next reboot
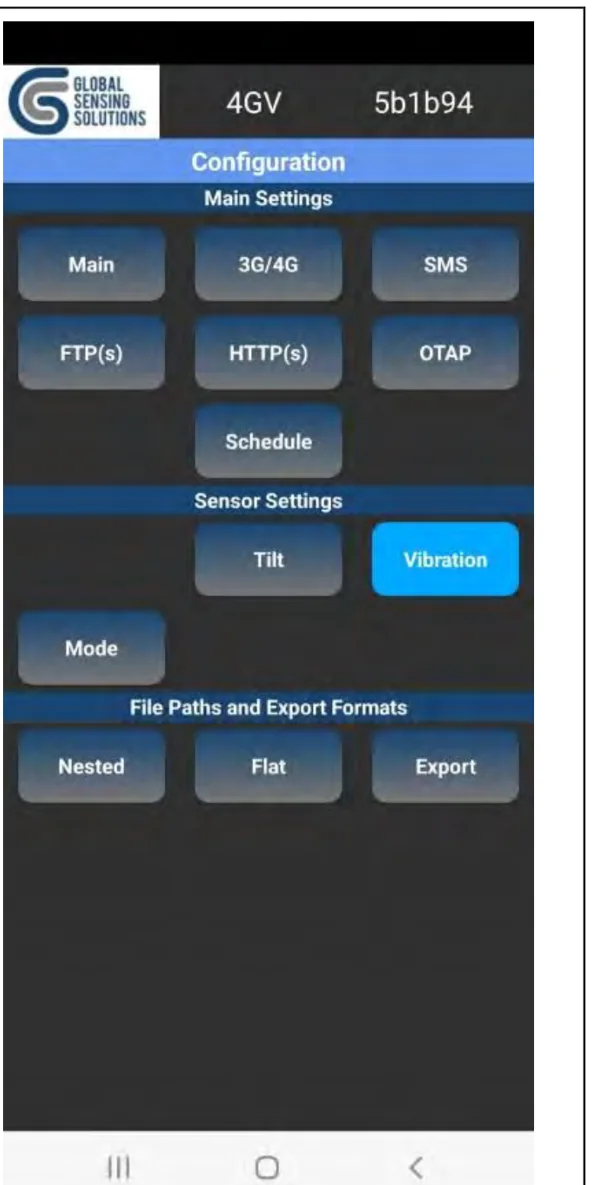
รูปที่ 6Figure 6 แอป GSSLink หน้า Configuration (ภาพจากคู่มือ Release 6.0 — หน้าจอในแอปเวอร์ชันปัจจุบันอาจต่างเล็กน้อย)GSSLink Configuration screen (from the Release 6.0 manual; the current app may look slightly different) - Main — เวลา (NTP / เครือข่าย), Time Zone, ระดับ Log, เตือนแบตเตอรี่Main: time (NTP / network), time zone, log level, battery warning
- 3G/4G — APN ของ SIM ที่ใช้ (ค่าเริ่มต้นเป็นของผู้ให้บริการในฮ่องกง ต้องแก้)3G/4G: the APN of your SIM (the default is a Hong Kong operator: change it)
- SMS — เบอร์รับแจ้งเตือนได้ถึง 5 เบอร์SMS: up to 5 alert numbers
- Schedule — รอบส่งไฟล์และเวลาทำงานSchedule: upload intervals and active hours
- Vibration — อัตราสุ่ม ช่วงรายงาน PPV ขีดเตือนต่อแกน ย่าน g และ FilterVibration: sample rate, PPV interval, per-axis thresholds, g range and filter
- Export — รูปแบบไฟล์ (CSV / JSON / BIN) และหน่วยExport: file formats (CSV / JSON / BIN) and units
- STEP6
เชื่อมกับ MeasurEyeConnect to MeasurEye
เข้าสู่ระบบ MeasurEye ด้วยบัญชีของคุณเองที่ app.measureye.com สร้างหรือเลือก Project แล้วเพิ่ม 5GV เป็น Monitor ของโปรเจกต์ (NTi ระบุว่า 5GV ส่งข้อมูลเข้า MeasurEye ผ่าน MQTT และตั้งค่าจากระยะไกลผ่าน MeasurEye ได้) ขั้นตอนเพิ่มเครื่องแต่ละช่องยังไม่มีในเอกสารสาธารณะของ NTi หากหน้าจอไม่ตรงกับที่คาด ให้ติดต่อ NTi หรือ GET BEST SOUNDSign in to MeasurEye with your own account at app.measureye.com, create or pick a Project and add the 5GV as a Monitor of the project (NTi states that the 5GV sends data to MeasurEye over MQTT and can be configured remotely through MeasurEye). The field-by-field procedure for adding the device is not in NTi's public documents: if the screen differs from what you expect, contact NTi or GET BEST SOUND.
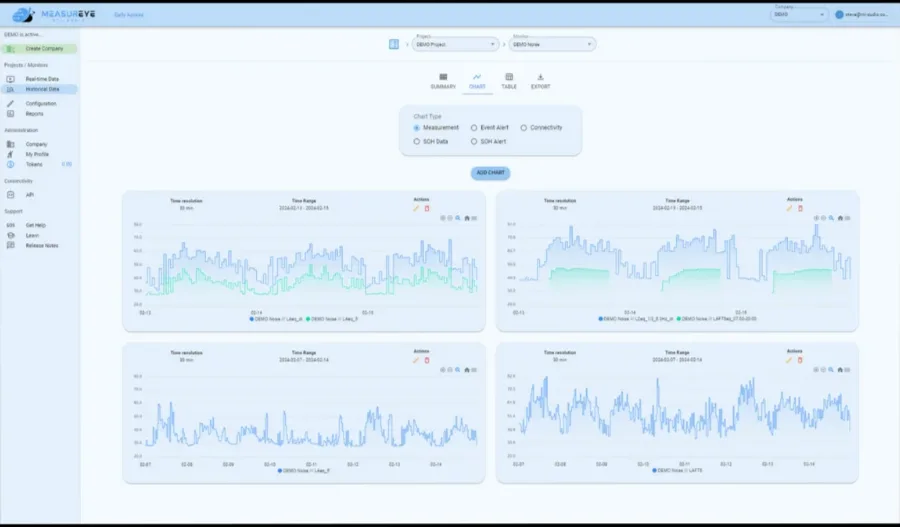
รูปที่ 7Figure 7 โครงสร้างหน้าจอ MeasurEye (ภาพจากเว็บ NTi, โปรเจกต์ DEMO ข้อมูลเสียง): เมนูซ้ายมี Real-time Data, Historical Data, Configuration, Reports ด้านบนเลือก Project และ Monitor และมีแท็บ SUMMARY · CHART · TABLE · EXPORTMeasurEye layout (NTi web image, DEMO project with noise data): the left menu has Real-time Data, Historical Data, Configuration and Reports; the top selects Project and Monitor; tabs SUMMARY · CHART · TABLE · EXPORT. ภาพ: NTi Audio (ภาพ MeasurEye-Laptop-5 จากหน้า MeasurEye (ครอปเฉพาะหน้าจอ))Image: NTi Audio (MeasurEye-Laptop-5 image from the MeasurEye page (screen area cropped)) - STEP7
เริ่ม MonitoringStart monitoring
ตรวจว่าเซนเซอร์อยู่ในสถานะ MONITORING (ใน GSSLink หรือคำสั่ง stat get ต้องได้ Mode: VIBR และ State: Monitor) ถ้าคุณสั่ง sensor idle ไว้ตอนย้ายเครื่อง ให้สั่ง sensor run เพื่อกลับมาวัด ไฟ Sensor ต้องกะพริบเขียวทุก 5 วินาทีCheck that the sensor is in the MONITORING state (in GSSLink, or the stat get command must return Mode: VIBR and State: Monitor). If you sent sensor idle while moving the unit, send sensor run to resume. The Sensor LED must blink green every 5 seconds.
- STEP8
ตรวจข้อมูลสดVerify live data
ใน MeasurEye เปิด Real-time Data หรือ Historical Data › CHART ของ Monitor นี้ ต้องเห็น PPVx, PPVy, PPVz เข้ามาตามรอบที่ตั้ง ค่าพื้นหลังควรต่ำและสม่ำเสมอ และสูงขึ้นเมื่อมีกิจกรรมจริงใกล้จุดวัด (เช่น รถผ่าน หรือเครื่องจักรเริ่มทำงาน)In MeasurEye open Real-time Data or Historical Data › CHART for this monitor. PPVx, PPVy and PPVz must arrive at the set interval: the background should be low and steady, and rise when real activity happens near the point (a passing vehicle, machinery starting).
ข้อควรระวังWatch outรอบส่งข้อมูลขึ้นกับการตั้งค่า: ถ้าส่งเป็นไฟล์ทุก 4 ชั่วโมง (ค่าเริ่มต้น PEAK ของ Schedule) ข้อมูลจะไม่ขึ้นทันทีData arrival depends on the settings: with file uploads every 4 hours (the default PEAK schedule) the data will not appear straight away
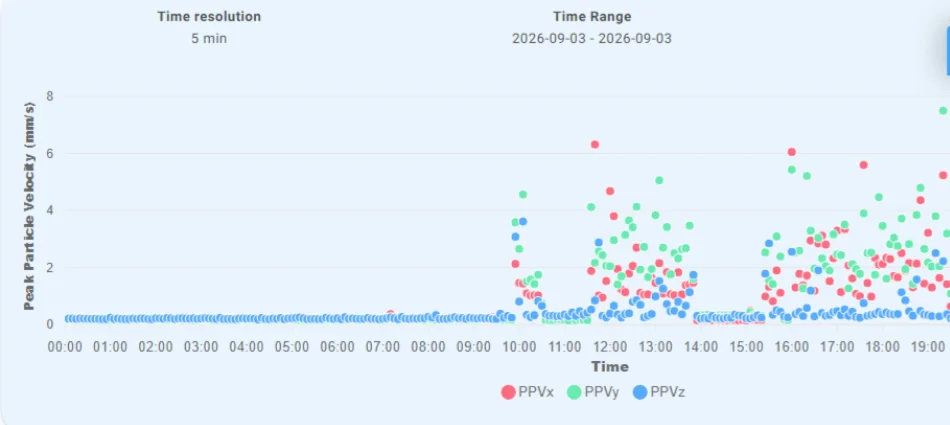
รูปที่ 8Figure 8 กราฟ Peak Particle Velocity ตามเวลา (Time resolution 5 min): ค่าพื้นหลังเรียบต่ำตอนกลางคืน และกลุ่มจุดสูงขึ้นช่วงทำงาน — แบบนี้คือภาพที่ควรเห็นเมื่อระบบทำงานปกติPeak Particle Velocity over time (time resolution 5 min): a low, steady background at night and clusters of higher points during working hours. This is what a healthy system looks like. ภาพ: NTi Audio (ครอปจากภาพหัวข่าว MeasurEye Vibration Mode)Image: NTi Audio (crop of the MeasurEye Vibration Mode news header) - STEP9
ตั้ง Limits / EventsSet limits / events
ขีดเตือนมี 2 ชั้น: ในตัว 5GV (PPV_MAX_X / Y / Z ต่อแกน หน่วย mm/s) และ Events ของ Monitor ใน MeasurEye ที่ส่งอีเมลแจ้งเตือน ใช้ค่าจากเกณฑ์ของโครงการเท่านั้น ค่าเริ่มต้น 5.0 mm/s ในเครื่องเป็นค่าจากโรงงาน ไม่ใช่เกณฑ์มาตรฐานThresholds sit on two layers: in the 5GV (PPV_MAX_X / Y / Z per axis, in mm/s) and the monitor's Events in MeasurEye, which send e-mail alerts. Use values from the project criteria only: the unit's default of 5.0 mm/s is a factory default, not a standard limit.
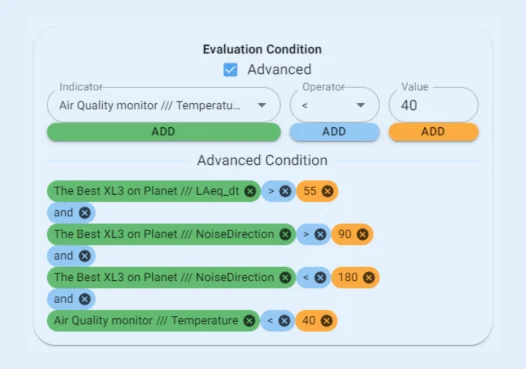
รูปที่ 9Figure 9 Evaluation Condition ของ Event ใน MeasurEye: เลือก Indicator › Operator › Value แล้วกด ADD เปิด Advanced เพื่อรวมหลายเงื่อนไข (ตัวอย่างของ NTi เป็นข้อมูลเสียงและอุณหภูมิ ใช้หลักเดียวกันกับ Indicator การสั่นสะเทือน)An event's Evaluation Condition in MeasurEye: pick Indicator › Operator › Value and press ADD; tick Advanced to combine conditions (NTi's example uses noise and temperature; vibration indicators work the same way). ภาพ: NTi Audio (ภาพ Combined Event Evaluation จากหน้า MeasurEye)Image: NTi Audio (Combined Event Evaluation image from the MeasurEye page) - STEP10
เฝ้าระวังMonitor
ทดสอบว่าการแจ้งเตือนถึงผู้รับจริงก่อนออกจากพื้นที่ จากนั้นตรวจสถานะเป็นระยะ: ข้อมูลเข้าต่อเนื่อง แบตเตอรี่ (State of Health) และเหตุการณ์ใหม่ ดู Checklist ท้ายคู่มือTest that alerts really reach the recipients before you leave the site, then check regularly: continuous data, battery (State of Health) and new events. See the checklists at the end.
- STEP11
ดูผลและส่งออกReview and export
เปิด Historical Data แล้วใช้แท็บ SUMMARY หาช่วงเวลาที่มีค่าสูง CHART ดูกราฟ TABLE ดูตัวเลข และ EXPORT ดึงข้อมูลออก รายงานตามรอบส่งทางอีเมลได้จากเมนู ReportsOpen Historical Data and use SUMMARY to find periods with high values, CHART for graphs, TABLE for numbers and EXPORT to take the data out. Periodic reports can be e-mailed from Reports.
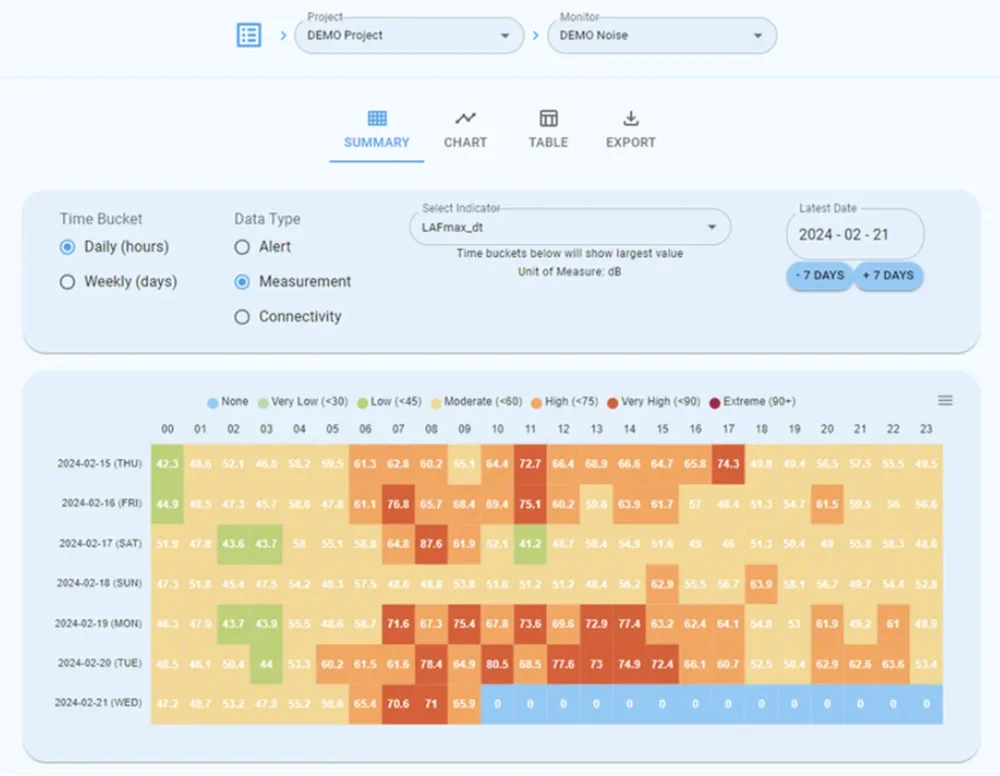
รูปที่ 10Figure 10 แท็บ SUMMARY (ภาพจากข่าว NTi, โปรเจกต์ DEMO ข้อมูลเสียง): เลือก Time Bucket (Daily / Weekly) Data Type (Alert / Measurement / Connectivity) และ Select Indicator แล้วดูค่าสูงสุดของแต่ละชั่วโมงเป็นตารางสี — ใช้หาช่วงเวลาที่มีเหตุการณ์ได้เร็วThe SUMMARY tab (NTi news image, DEMO project with noise data): choose Time Bucket (Daily / Weekly), Data Type (Alert / Measurement / Connectivity) and Select Indicator, then read each hour's highest value in a colour table: a fast way to find when events happened. ภาพ: NTi Audio (ภาพ NTiAudio-MeasurEye-Summary จากข่าวเปิดตัว MeasurEye)Image: NTi Audio (NTiAudio-MeasurEye-Summary image from the MeasurEye launch news)
5GV ยึดแน่นบนโครงสร้าง อยู่ในสถานะ MONITORING ข้อมูล PPV 3 แกนเข้า MeasurEye และการแจ้งเตือนถึงผู้รับแล้ว ก่อนปล่อยระบบทำงานยาว ให้ไล่ Checklist "ก่อนออกจากพื้นที่" อีกครั้งThe 5GV is fixed to the structure, in MONITORING, three-axis PPV is arriving in MeasurEye and alerts reach the recipients. Before leaving it to run long-term, go through the "before leaving site" checklist once more.
ต่อไป: 5GV คืออะไร และทำงานร่วมกับ MeasurEye อย่างไร → · Checklist หน้างาน →Next: what the 5GV is and how it works with MeasurEye → · field checklists →
01รู้จักเครื่องGET TO KNOW
5GV คืออะไรWhat is the 5GV?
5GV เป็นเครื่องเฝ้าระวังการสั่นสะเทือนแบบติดตั้งค้างหน้างาน มีเซนเซอร์ 3 แกนและเกตเวย์สื่อสารในตัว ส่วน MeasurEye คือที่เก็บ แสดงผล และแจ้งเตือนบนคลาวด์ ต้องเข้าใจทั้งสองส่วนจึงจะวางระบบได้ถูกThe 5GV is a vibration monitor that stays installed on site, with a three-axis sensor and a communication gateway built in. MeasurEye is where the data is stored, shown and alerted on in the cloud. You need to understand both parts to set the system up correctly.
5GV (GSS 5GV Vibration Monitor ผลิตโดย Global Sensing Solutions จำหน่ายโดย NTi Audio) วัดการสั่นสะเทือนทั้ง 3 แกนด้วยเซนเซอร์ MEMS ในตัว คำนวณค่าในตัวเครื่อง เช่น PPV ต่อแกน ผลรวมเวกเตอร์ (PVS) และความถี่เด่น (DF) เก็บผลลง microSD และส่งออกผ่านเครือข่ายมือถือ 4G/LTE หรือ Wi-Fi (โมดูลสื่อสารเปลี่ยนได้) มีโหมดวัดการเอียง (Tilt) ซึ่งต้องมี License เพิ่ม และเครื่องทำงานได้ครั้งละหนึ่งโหมดThe 5GV (GSS 5GV Vibration Monitor, made by Global Sensing Solutions and sold by NTi Audio) measures vibration on three axes with its built-in MEMS sensor, calculates values on board such as PPV per axis, the peak vector sum (PVS) and the dominant frequency (DF), stores results on its microSD card and sends them over 4G/LTE or Wi-Fi (the communication module is interchangeable). A tilt mode needs an extra licence, and the unit runs one mode at a time.
ใช้กับงานอะไรWhat it is used for
- ความเสียหายของโครงสร้าง — การสั่นจากงานก่อสร้าง ตอกเสาเข็ม ระเบิด เครื่องจักรหนัก ถึงอาคาร สะพาน อุโมงค์ และฐานรากข้างเคียง (NTi)Structural damage: vibration from construction, piling, blasting and heavy plant reaching nearby buildings, bridges, tunnels and foundations (NTi)
- ความสบายของผู้อยู่อาศัย — การสั่นที่คนในอาคารรู้สึกได้ เช่น VDV, KB, ความเร่งถ่วงน้ำหนัก (NTi)Occupant comfort: vibration people feel inside buildings, e.g. VDV, KB, weighted acceleration (NTi)
- อุปกรณ์ที่ไวต่อการสั่น — เทียบ VC curves สำหรับห้องแล็บ โรงพยาบาล และการผลิตความแม่นยำสูง (NTi)Sensitive equipment: VC-curve checks for labs, hospitals and precision manufacturing (NTi)
- NTi ยังระบุโรงงานอุตสาหกรรม (การสั่นจากเครื่องจักรหนักเพื่อบริหารความเสี่ยง) และโครงสร้างพื้นฐานการขนส่ง (ราง ถนน รถไฟฟ้า) ส่วนการวัดสภาพเครื่องจักร (Machine Condition) ไม่ใช่งานที่ NTi ระบุไว้NTi also names industrial sites (vibration from heavy plant, for risk management) and transport infrastructure (rail, road, metro). Machine condition monitoring is not an application NTi lists.
ระยะสั้นหรือระยะยาวShort-term or long-term
งานหลักของ 5GV คือ เฝ้าระวังระยะยาวแบบไม่มีคนเฝ้า: ติดตั้งครั้งเดียว วัดต่อเนื่องหลายวันถึงหลายเดือน ส่งข้อมูลและแจ้งเตือนเอง สำหรับการวัดสั้น ๆ คู่มือมีคำสั่ง samp เก็บตัวอย่างแบบแมนนวล (สูงสุด 120 วินาทีที่ 1000 samples/s) เหมาะกับวัดค่าพื้นหลัง หรือย้ายเครื่องวัดทีละจุดThe 5GV's main job is unattended long-term monitoring: install once, measure for days to months, send data and alerts by itself. For short measurements the manual provides the samp manual-sample command (up to 120 seconds at 1000 samples/s), useful for background readings or moving the unit from point to point.
| ส่วนPart | หน้าที่Role |
|---|---|
| 5GV (หน้างาน)5GV (on site) | หน้าที่Roleวัด คำนวณ ตรวจขีดเตือนในตัว เก็บไฟล์ ส่งข้อความ SMS / MQTT และทำงานต่อได้แม้เครือข่ายขาดMeasures, calculates, checks its own thresholds, stores files, sends SMS / MQTT and keeps working when the network drops |
| MeasurEye (คลาวด์)MeasurEye (cloud) | หน้าที่Roleรวมข้อมูลหลายเครื่องในโปรเจกต์ แสดงผลสดและย้อนหลัง ประเมิน Event ส่งอีเมลแจ้งเตือนและรายงานCollects several devices in a project, shows live and historical data, evaluates events, e-mails alerts and reports |
MeasurEye เป็นเว็บแอป (app.measureye.com) NTi ระบุว่าใช้ฟรีและมีโปรเจกต์ DEMO ให้ลอง นอกจาก 5GV ยังรับข้อมูลจาก XL3, NL1, สถานีตรวจอากาศ และเครื่องวัดฝุ่นได้ในโปรเจกต์เดียวกันMeasurEye is a web app (app.measureye.com); NTi states it is free to use, with a DEMO project to try. Besides the 5GV it takes data from the XL3, NL1, weather stations and a particulate monitor in the same project.
02รู้จักเครื่องGET TO KNOW
ตัวเครื่อง ขั้วต่อ ไฟ LED และอุปกรณ์Hardware, connectors, indicators and accessories
ตัวเครื่องปิดผนึก IP67 ไม่มีจอและปุ่ม ทุกอย่างสื่อสารผ่านไฟ LED แม่เหล็ก Bluetooth และเครือข่าย รู้จักแต่ละจุดก่อนออกหน้างานจะช่วยลดความผิดพลาดThe sealed IP67 housing has no screen and no keys: everything happens through LEDs, the magnet, Bluetooth and the network. Knowing each part before you go to site prevents mistakes.
ดูรูปที่ 3: ตัวเครื่องจากด้านหน้าSee figure 3: The unit from the front
ตัวเครื่องแบ่งเป็น 2 ส่วน: ส่วนบน มีวงจร โมดูลสื่อสาร และไฟแสดงสถานะ ส่วนล่าง (ฐานแบตเตอรี่) มีแบตเตอรี่และวงจรป้องกัน และมีรูกลางสำหรับยึดกับโครงสร้างหรือแผ่นยึด ขนาด 152 × 98 × 41 mm น้ำหนัก 1.15 kg รวมฐานแบตเตอรี่ ใช้งานได้ −40 °C ถึง +85 °C (Product Data)The unit has two sections: the top section holds the electronics, communication module and indicators; the bottom section (battery base) holds the batteries and protection circuitry and has a centre hole for fixing to the structure or a plate. 152 × 98 × 41 mm, 1.15 kg with battery base, −40 °C to +85 °C (Product Data).
ขั้วต่อ: ต่ออะไร เมื่อไร และอะไรห้ามต่อConnectors: what, when, and what not
| ขั้วต่อConnector | ใช้อย่างไรHow to use it |
|---|---|
| LEMO 6 ขา (USB / ไฟภายนอก)6-pin LEMO (USB / external power) | ใช้อย่างไรHow to use itสาย USB-LEMO ของ GSS ต่อ PC (Serial) หรือจ่ายไฟ มีตัวเลือกแจ็กสำหรับแบตเตอรี่ภายนอก / โซลาร์ ขั้วมีร่องบังคับ ต่อได้เฉพาะสายที่ถูกGSS USB-LEMO cable to a PC (serial) or for power; a barrel-jack option for external batteries / solar. Keyed: only the right cable fits |
| AUXAUX | ใช้อย่างไรHow to use itสำหรับไมโครโฟนและ GSS Pods ของ GSS เท่านั้น ไม่ต้องใช้กับงานวัดการสั่นสะเทือนFor GSS's microphone and GSS Pods only; not needed for vibration monitoring |
| เสาอากาศ GSM (3G/4G)GSM antenna (3G/4G) | ใช้อย่างไรHow to use itขันก่อนเปิดเครื่อง สัญญาณอ่อนเปลี่ยนเสาหรือย้ายเสาด้วยสาย Coax แบบ low-lossFit before power-up; weak signal: change the antenna or move it with low-loss coax |
| เสาอากาศ BluetoothBluetooth antenna | ใช้อย่างไรHow to use itสำหรับ GSSLink ระยะราว 10 mFor GSSLink, about 10 m range |
| ขั้ว GPSGPS connector | ใช้อย่างไรHow to use itเตรียมไว้สำหรับ GPS ในอนาคต (Option) ไม่ใช่ของมาตรฐานReserved for future GPS (option), not standard |
ขั้ว LEMO และฝาโลหะเป็นแบบ ดัน-ดึง ห้ามบิด จับที่ปลอกแล้วดึงตรง ๆ ปลายฝามี O-ring กันน้ำ ต้องดันฝาให้แน่นทุกครั้งที่ไม่ได้ต่อสาย และห้ามถอดโมดูลอื่นนอกจากโมดูลสื่อสาร (GSS ระบุว่าทำให้การรับประกันสิ้นสุด)LEMO connectors and metal caps are push-pull: never twist them. Grip the sleeve and pull straight. The cap end has a water-sealing O-ring: push each cap home whenever no cable is fitted. Do not remove any module other than the communication module (GSS: it voids the warranty).
ไฟแสดงสถานะStatus indicators
ดูรูปที่ 5: ป้ายด้านหน้าและความหมายของไฟSee figure 5: Front label and indicator meanings. Once the unit is on the network and monitoring, Power and Heartbeat flash green together every 5 seconds and Sensor blinks briefly every 5 seconds.
ไฟคือเครื่องมือตรวจหน้างานที่เร็วที่สุด: Power + Heartbeat กะพริบพร้อมกันทุก 5 วินาที = เครื่องทำงานและต่อเครือข่ายแล้ว, Communication กะพริบ = สื่อสารได้, Sensor กะพริบ = เซนเซอร์ทำงานThe LEDs are your fastest field check: Power + Heartbeat flashing together every 5 s = running and on the network; Communication flashing = communicating; Sensor flashing = sensor running
แหล่งไฟ: 2 แบบในตลาดตอนนี้Power: two versions on the market
| แบบVersion | สิ่งที่ต้องรู้What to know |
|---|---|
| ถ่านลิเธียม D-cell (คู่มือ Release 6.0, NTi 600 070 000)Lithium D cells (manual Release 6.0, NTi 600 070 000) | สิ่งที่ต้องรู้What to knowถ่านปฐมภูมิ 4 ก้อน ER34615M หรือรุ่นที่ GSS รับรอง ส่งมาไม่ใส่ถ่าน ใช้ได้สูงสุด 6 เดือนในโหมดประหยัดพลังงาน (ส่ง PPV/DF ทุก 4 ชั่วโมง) หรือ 3 เดือนในโหมด MQTT เรียลไทม์ (Product Data)Four primary ER34615M cells or GSS-approved models, shipped without batteries; up to 6 months in low-power mode (PPV/DF every 4 h) or 3 months in real-time MQTT mode (Product Data) |
| ฐานแบตเตอรี่ชาร์จได้ (NTi 600 070 001, ข่าว 24 ก.ย. 2026)Rechargeable base (NTi 600 070 001, news 24 Sep 2026) | สิ่งที่ต้องรู้What to knowLi-ion 18650 12 ก้อน รวม 48,000 mAh / 173 Wh: ราว 20 วัน (Occupant Comfort บันทึกทุก 1 s) ถึง 100 วัน (Structural Damage ทุก 15 นาที + ประหยัดพลังงาน) ส่งเฉพาะเหตุการณ์ได้นานกว่า 6 เดือน12 × 18650 Li-ion, 48,000 mAh / 173 Wh: about 20 days (occupant comfort, 1 s logging) to 100 days (structural damage, every 15 min + power saving); event-only publishing over 6 months |
| ไฟภายนอกExternal power | สิ่งที่ต้องรู้What to knowผ่านสาย USB-LEMO หรือแจ็กสำหรับแบตเตอรี่ภายนอก / โซลาร์ ทำงานได้โดยไม่ใส่ถ่าน (Product Data)Via the USB-LEMO cable or the barrel jack for external batteries / solar; runs with no batteries installed (Product Data) |
คู่มือ Release 6.0 ยังไม่มีขั้นตอนชาร์จฐานแบตเตอรี่แบบชาร์จได้ ให้ใช้คำแนะนำที่มากับฐานหรือสอบถาม NTi / GET BEST SOUND ตรวจรหัสสินค้าบนเครื่องว่าเป็นรุ่นไหนก่อนเตรียมไฟManual Release 6.0 has no charging procedure for the rechargeable base: follow the instructions supplied with it or ask NTi / GET BEST SOUND. Check the article number on your unit before planning the power.
อุปกรณ์ในชุดและอุปกรณ์เสริมSupplied and optional accessories
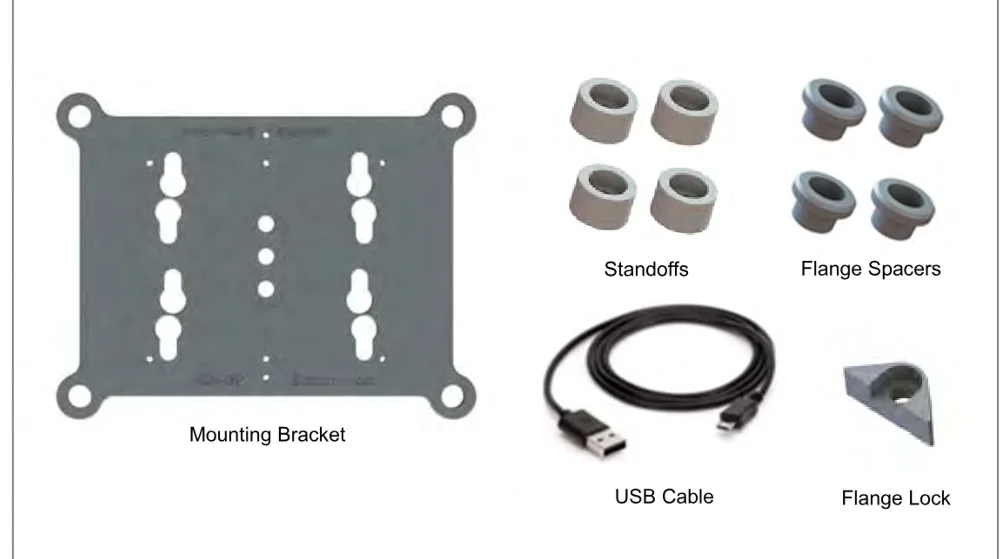
Product Data ของ NTi ระบุของในชุด: ขายึด (Mounting Bracket) สาย USB กระเป๋าภาคสนาม แม่เหล็กและสายคล้อง ส่วนคู่มือ GSS เรียก Standoffs, Flange Spacers, Flange Lock และสาย USB-LEMO ว่าเป็นอุปกรณ์เสริม ตรวจของที่ได้รับจริงกับใบส่งของ NTi มี Ground Mounting Plate (600 070 016) เป็นอุปกรณ์เสริมใหม่สำหรับติดตั้งบนพื้นNTi's Product Data lists the set as: mounting bracket, USB cable, field carry bag, magnet and lanyard. The GSS manual calls standoffs, flange spacers, the flange lock and the USB-LEMO cable optional accessories. Check what you received against the delivery note. NTi also offers the new Ground Mounting Plate (600 070 016) for ground installations.
03รู้จักเครื่องGET TO KNOW
เซนเซอร์ แกน และการตั้งค่าเซนเซอร์Sensor, axes and sensor settings
5GV ไม่ได้ใช้ Accelerometer ภายนอก เซนเซอร์อยู่ในตัวเครื่อง จึงไม่มีค่าความไว (Sensitivity) ให้ป้อนเอง แต่ยังมีสามเรื่องที่ทำให้ผลผิดได้: ทิศทางแกน การยึด และย่านวัดThe 5GV does not use an external accelerometer: the sensor is inside, so there is no sensitivity value to enter. Three things can still make results wrong: axis direction, mounting and the measuring range.
เซนเซอร์ในตัวThe built-in sensor
ภายในมี Accelerometer แบบ MEMS 2 ตัว: ADXL355 (ย่าน 2, 4, 8 g) และ ADXL357 (ย่าน 10, 20, 40 g) เครื่องเลือกใช้ตามค่า ACC_SCALE (ค่าเริ่มต้น 8 g) ความเร็วอนุภาคคำนวณจากสัญญาณนี้ในตัวเครื่อง ย่านความถี่ตอบสนอง 1 Hz – 1 kHz ความแม่นยำ ±2 % และสอดคล้อง DIN 45669-1 (Product Data) NTi ระบุว่า 5GV ตรวจสอบตัวเองด้วยแรงโน้มถ่วง ได้ที่หน้างาน โดยไม่ต้องใช้ Calibrator หรือถอดเครื่องInside are two MEMS accelerometers: ADXL355 (2, 4, 8 g ranges) and ADXL357 (10, 20, 40 g). The unit uses them according to ACC_SCALE (default 8 g), and particle velocity is calculated on board. Frequency response 1 Hz – 1 kHz, accuracy ±2 %, conformance with DIN 45669-1 (Product Data). NTi states that the 5GV performs an on-site gravity self-check without a calibrator or disassembly.
แกนและทิศทางAxes and orientation
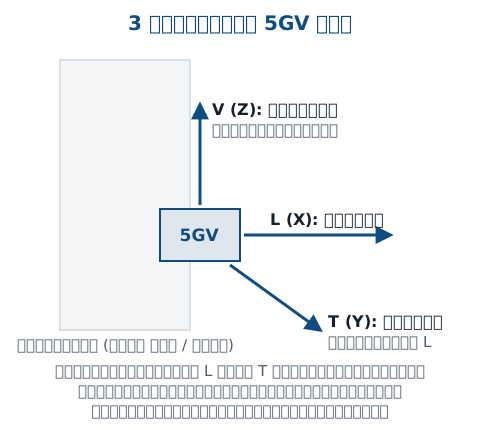
ในค่าตั้งและผลวัด แกน X, Y, Z ของเซนเซอร์ถูกเรียกเป็น L (Longitudinal), T (Transverse) และ V (Vertical) เมื่อเปิด FLG_ORIENT (ค่าเริ่มต้นเปิด) เครื่องจะจัดแกนตามทิศที่ติดตั้ง โดย แกน Z ตามแรงโน้มถ่วง เสมอ จึงติดบนพื้นหรือบนผนังก็ได้ค่าแนวดิ่งที่แกน VIn the settings and results the sensor's X, Y and Z axes are called L (longitudinal), T (transverse) and V (vertical). With FLG_ORIENT on (default) the unit maps the axes to the installed orientation, with Z always following gravity, so a floor or a wall installation both give the vertical component on V.
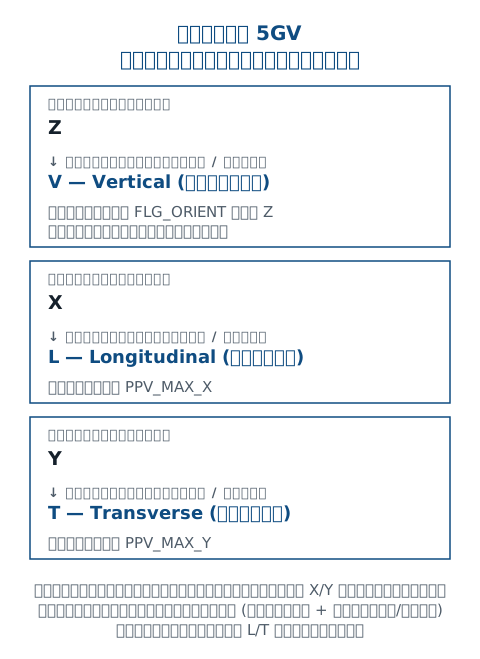
ถอดเครื่องแล้วใส่คืนหันคนละทิศ แกน L และ T จะสลับกัน กราฟก่อนและหลังเทียบกันไม่ได้ และขีดเตือนต่อแกนอาจไม่ตรงกับทิศที่ตั้งใจ ใช้ Mounting Plate ถ้าต้องถอด-ใส่บ่อย เพราะคู่มือระบุว่าไม่ต้องจัดแนวแกนใหม่เมื่อใส่คืนRe-fitting the unit facing another way swaps L and T: before and after data no longer compare, and per-axis thresholds may no longer match the intended direction. Use the mounting plate if the unit must come off often: the manual says it avoids re-aligning the axis on re-attachment.
ค่าตั้งของเซนเซอร์ที่ต้องรู้Sensor settings to know
| ค่าตั้ง (Vibration)Setting (Vibration) | ความหมาย / ค่าเริ่มต้นMeaning / default |
|---|---|
| SAMP_FREQSAMP_FREQ | ความหมาย / ค่าเริ่มต้นMeaning / defaultอัตราสุ่ม 1000 / 2000 / 4000 Hz (ค่าเริ่มต้น 1000)Sample rate 1000 / 2000 / 4000 Hz (default 1000) |
| ACC_SCALEACC_SCALE | ความหมาย / ค่าเริ่มต้นMeaning / defaultย่านวัด 2, 4, 8, 10, 20, 40 g (ค่าเริ่มต้น 8) ย่านสูงกันสัญญาณเกินย่านRange 2, 4, 8, 10, 20, 40 g (default 8); higher ranges avoid over-range |
| PEAK_SPANPEAK_SPAN | ความหมาย / ค่าเริ่มต้นMeaning / defaultช่วงรายงาน PPV 30–3600 s (ค่าเริ่มต้น 300 s) เริ่มตรงนาฬิกา เช่น xx:00, xx:05PPV interval 30–3600 s (default 300 s), aligned to the clock, e.g. xx:00, xx:05 |
| PPV_MAX_X / Y / ZPPV_MAX_X / Y / Z | ความหมาย / ค่าเริ่มต้นMeaning / defaultขีดเตือนต่อแกน L / T / V ในหน่วย mm/s (0.01–254, ค่าโรงงาน 5.0 — ไม่ใช่เกณฑ์มาตรฐาน)Per-axis threshold L / T / V in mm/s (0.01–254, factory 5.0: not a standard limit) |
| FILTERFILTER | ความหมาย / ค่าเริ่มต้นMeaning / defaultตัวกรองตามมาตรฐาน 1–16 (ค่าเริ่มต้น 1 = ISEE) ดูบทมาตรฐานStandard filter 1–16 (default 1 = ISEE); see the standards chapter |
| FLG_RAWFLG_RAW | ความหมาย / ค่าเริ่มต้นMeaning / defaultเก็บ Waveform ดิบของเหตุการณ์ (ค่าเริ่มต้นเปิด)Capture raw event waveforms (default on) |
| FLG_ORIENTFLG_ORIENT | ความหมาย / ค่าเริ่มต้นMeaning / defaultจัดแกน XYZ → LTV ตามการติดตั้ง Z ตามแรงโน้มถ่วง (ค่าเริ่มต้นเปิด)Map XYZ → LTV to the installation, Z follows gravity (default on) |
คู่มือแนะนำย่าน 2 g เมื่อวัดการสั่นพื้นหลังที่คาดว่าต่ำ และย่าน 8 g เมื่อต้องกันสัญญาณเกินย่าน Product Data ระบุขีดเตือน 1–150 mm/s ที่ย่าน 2 g เลือกย่านให้เหมาะกับแหล่งสั่นที่คาดไว้ ถ้าไม่แน่ใจให้ปรึกษาวิศวกรThe manual recommends the 2 g range for low-level ambient vibration and 8 g to avoid over-ranging. The Product Data gives alert thresholds of 1–150 mm/s at the 2 g range. Choose the range for the vibration you expect; if unsure, ask an engineer.
ตรวจว่าเซนเซอร์ทำงานChecking the sensor works
- ไฟ Sensor กะพริบเขียวทุก 5 วินาทีThe Sensor LED blinks green every 5 seconds
- คำสั่ง stat get ตอบ Mode: VIBR, State: Monitor และ Opts: ADXL355 ADXL357stat get returns Mode: VIBR, State: Monitor and Opts: ADXL355 ADXL357
- ผลตรวจตัวเองตอนเปิดเครื่อง (ดูผ่าน Serial terminal) ขึ้น [PASS] ที่ ADXL355 Sensor และ ADXL357 SensorThe power-up self-diagnostics (shown in a serial terminal) read [PASS] for ADXL355 Sensor and ADXL357 Sensor
- ค่าพื้นหลังใน MeasurEye ต่ำ สม่ำเสมอ และทั้ง 3 แกนมีค่า ไม่มีแกนใดเป็นศูนย์ตลอดThe background in MeasurEye is low and steady, with values on all three axes and no axis stuck at zero
ถ้าสถานะค้างที่ INITIALISING นาน คู่มือแนะนำสั่ง reset sensor ส่วนขั้นตอนตรวจสอบด้วยแรงโน้มถ่วงที่ NTi กล่าวถึงยังไม่มีรายละเอียดในคู่มือ Release 6.0If the state stays at INITIALISING, the manual suggests reset sensor. The gravity self-check NTi mentions is not described step by step in manual Release 6.0.
04ติดตั้งและเตรียมSET UP
การติดตั้งเซนเซอร์ (ตัวเครื่อง) บนโครงสร้างInstalling the sensor (the unit) on the structure
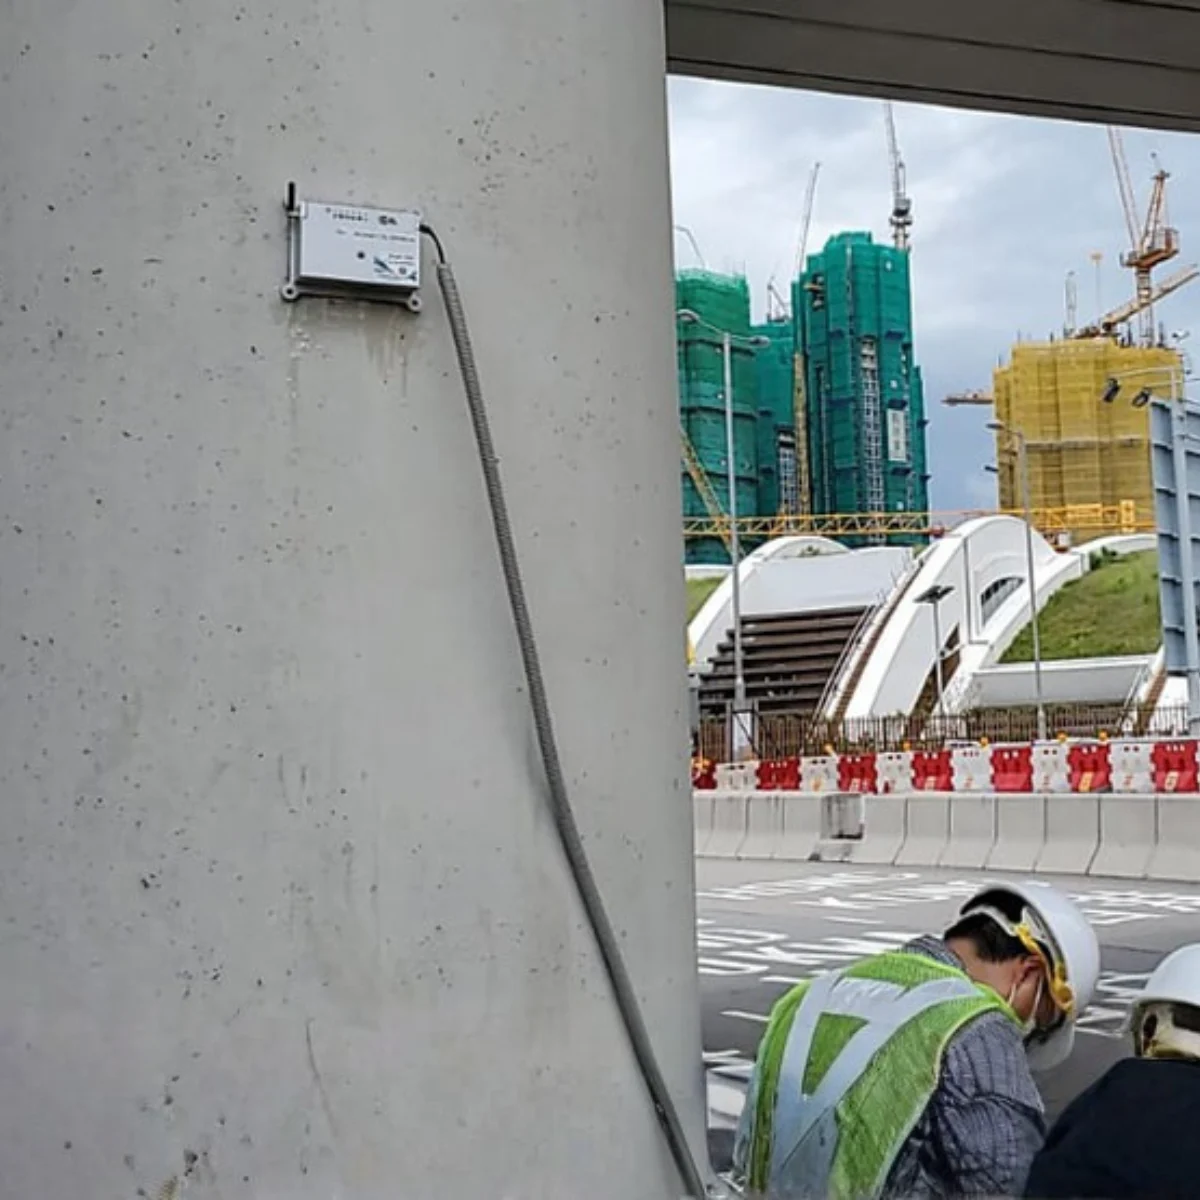
เพราะเซนเซอร์อยู่ในตัวเครื่อง การยึดตัวเครื่องคือการยึดเซนเซอร์ ถ้าเครื่องขยับหรือโยกได้ ค่าที่วัดคือการสั่นของตัวเครื่อง ไม่ใช่ของโครงสร้างBecause the sensor is inside, fixing the unit is fixing the sensor. If the unit can move or rock, you measure the unit's own motion, not the structure's.
เลือกจุดติดตั้งChoosing the position
NTi แนะนำให้วางจุดวัดตามวัตถุประสงค์: ที่ฐานราก องค์อาคารรับน้ำหนัก หรือตามเส้นทางที่การสั่นเดินทาง และเก็บค่าพื้นหลังก่อนเริ่มงานเพื่อบันทึกสภาพเดิม มาตรฐานแต่ละฉบับกำหนดตำแหน่งวัดของตัวเอง (เช่น DIN 4150-3 ฉบับ 2016-12 กล่าวถึงฐานรากและพื้นชั้นบนสุด) ให้ใช้ตามมาตรฐานหรือข้อกำหนดของโครงการ คู่มือนี้ไม่กำหนดตำแหน่งแทนNTi recommends placing sensors to match the objective: at foundations, on load-bearing elements or along the transmission path, and recording the background before work starts to document the existing condition. Each standard sets its own measuring positions (e.g. DIN 4150-3, edition 2016-12, refers to the foundation and the topmost floor): follow the standard or the project specification; this guide does not choose positions for you.
วิธียึดที่คู่มือรองรับMounting methods the manual supports
- STEP1
Anchor Bolt M8 (ไม่มี Standoffs)M8 anchor bolt (no standoffs)
เจาะรูตามสเปกของ Anchor Bolt M8 (โดยทั่วไปรู M10 สำหรับปลอก) ลึกพอให้ปลอกจมทั้งหมดและเหลือเกลียวพอสวมเครื่องและนัท ถ้าเกลียวยาวเกินให้เจาะลึกขึ้นหรือตัดเกลียวส่วนเกิน ต้องมี แหวนโลหะใต้นัท ไม่ให้นัทกดตัวเครื่องโดยตรง และตรวจว่าแหวนไนลอนที่รูของเครื่องไม่หลุดหาย (ดูรูปที่ 4)Drill to the M8 anchor bolt specification (generally an M10 hole for the sleeve), deep enough for the whole sleeve with enough thread left for the unit and a nut; if too much thread sticks out, drill deeper or cut it. Always put a metal washer under the nut so it never bears on the housing, and check the nylon shoulder washers in the unit's hole are in place. (See figure 4)
- STEP2
Standoffs สำหรับผิวโค้งหรือไม่เรียบStandoffs for curved or uneven surfaces
ติด Standoffs อย่างน้อย 3 ตัวที่ด้านหลังเครื่องด้วยสกรู M3 × 6 mm (ได้ระยะห่างจากผิว 6 mm) แล้วยึดด้วย Anchor Bolt เพื่อให้เครื่องนั่งบน 3 จุดอย่างมั่นคงไม่โยกFit at least three standoffs to the back with M3 × 6 mm screws (6 mm clearance), then fix with the anchor bolt so the unit sits steadily on three points without rocking.
รูปที่ 16Figure 16 Standoffs 3 ตัวที่ด้านหลังเครื่อง ให้เครื่องนั่งมั่นบนผิวโค้งหรือไม่เรียบ (ระยะห่างจากผิว 6 mm)Three standoffs on the back so the unit sits firmly on a curved or uneven surface (6 mm clearance) ภาพ: Global Sensing Solutions — Vibration Monitor User Manual Release 6.0 (เอกสารดาวน์โหลดของ NTi Audio) หน้า 91Image: Global Sensing Solutions — Vibration Monitor User Manual Release 6.0 (NTi Audio download), p. 91 - STEP3
Mounting PlateMounting plate
ยึด Plate กับผิวด้วยรู 4 มุม (น็อต M8 + นัทบนผิวบาง หรือ Anchor Bolt M8 บนผิวแข็ง) หรือด้วย Epoxy ที่ด้านหลัง แล้วล็อกเครื่องบน Plate ด้วย Flange Spacers 4 ตัว (เลือกใส่ Flange Lock กันถอด) หรือด้วยน็อต M8 ที่รูกลาง ผิวไม่เรียบใส่ Standoffs ที่หลัง Plate ได้Fix the plate through its four corner holes (M8 bolts and nuts on a thin surface, M8 anchor bolts on a solid one) or with epoxy on the back, then lock the unit on the plate with the four flange spacers (optional flange lock against removal) or an M8 bolt in the centre. On uneven surfaces fit standoffs behind the plate.
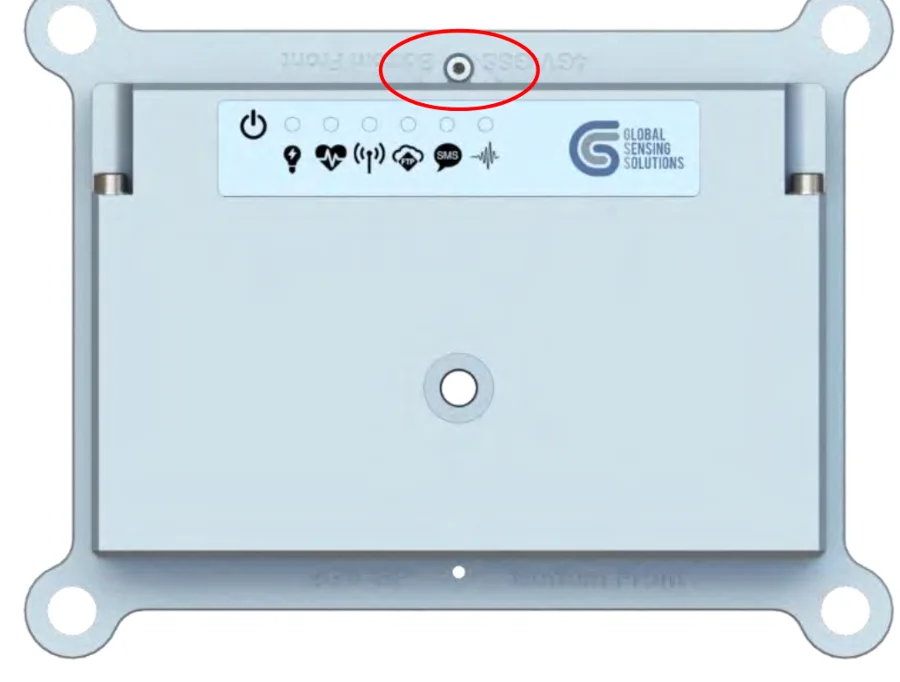
รูปที่ 17Figure 17 5GV ล็อกบน Mounting Plate — วงสีแดงของคู่มือชี้ตำแหน่ง Flange Lock (อุปกรณ์เสริม) ที่ทำให้ถอดเครื่องออกยากขึ้น5GV locked on the mounting plate; the manual's red circle marks the optional flange lock that makes removal harder ภาพ: Global Sensing Solutions — Vibration Monitor User Manual Release 6.0 (เอกสารดาวน์โหลดของ NTi Audio) หน้า 93Image: Global Sensing Solutions — Vibration Monitor User Manual Release 6.0 (NTi Audio download), p. 93 - STEP4
Single Bolt กับ Mounting PlateSingle bolt with the mounting plate
ขันเหล็กเกลียว M8 เข้ากับ Plate สวมเครื่อง แล้วล็อกด้วยนัทและแหวนด้านบน ใส่ Flange Spacers หรือ Flange Lock กันเครื่องหมุนได้ถ้าจำเป็นScrew an M8 threaded rod into the plate, fit the unit and lock it with a nut and washer on top; flange spacers or the flange lock stop it turning if needed.
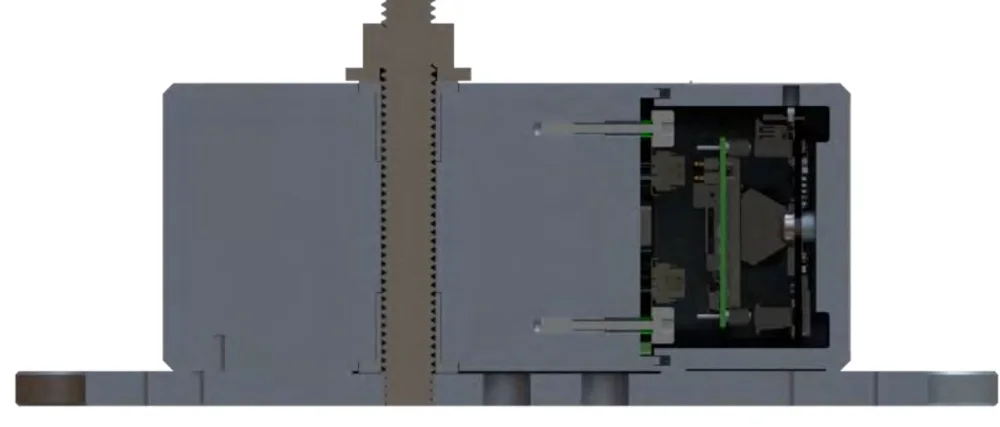
รูปที่ 18Figure 18 ภาพตัดขวางวิธี Single Bolt: เหล็กเกลียว M8 ขันเข้ากับ Plate แล้วล็อกเครื่องด้วยนัทและแหวนด้านบนSingle-bolt method in cut-away: an M8 threaded rod screwed into the plate, the unit locked with a nut and washer on top ภาพ: Global Sensing Solutions — Vibration Monitor User Manual Release 6.0 (เอกสารดาวน์โหลดของ NTi Audio) หน้า 94Image: Global Sensing Solutions — Vibration Monitor User Manual Release 6.0 (NTi Audio download), p. 94 - STEP5
บนพื้นดินหรือพื้นปู: Ground Mounting PlateOn ground or paving: ground mounting plate
NTi ออก Ground Mounting Plate (600 070 016) ที่ให้การยึดแบบ force-locked ตาม DIN 45669-2: ขาแหลมเหล็กแข็งแทงผ่านพรมหรือวัสดุปิดผิวถึงพื้นแข็ง และขามนสำหรับคอนกรีต ก่ออิฐ ยางมะตอย หรือบล็อกปูบนทราย ใช้ระดับน้ำในตัวจัดระดับNTi's Ground Mounting Plate (600 070 016) gives a force-locked connection per DIN 45669-2: hardened spikes go through carpet or floor coverings to the solid floor, rounded feet sit on concrete, masonry, asphalt or paving on sand; level it with the built-in bubble level.
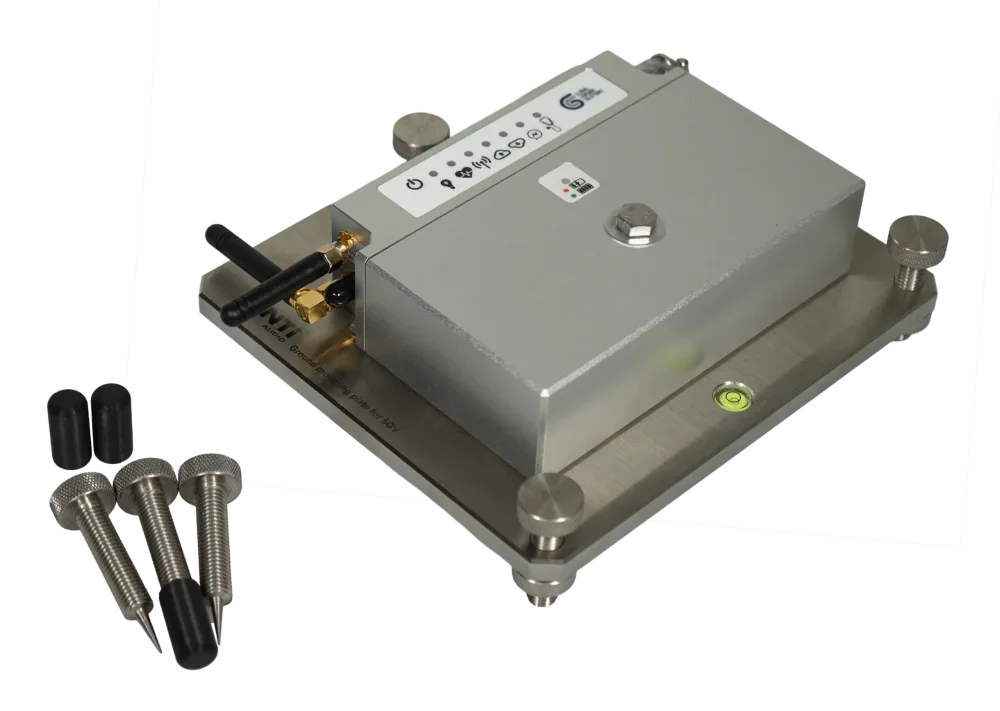
รูปที่ 19Figure 19 Ground Mounting Plate (NTi 600 070 016) สำหรับพื้นดิน พื้นปู หรือพื้นที่มีวัสดุปิดผิว: ขาแหลมแทงผ่านพรมถึงพื้นแข็ง ขามนสำหรับคอนกรีต ก่ออิฐ ยางมะตอย หรือบล็อกปูบนทราย มีระดับน้ำในตัวGround Mounting Plate (NTi 600 070 016) for ground, paving or covered floors: spikes go through carpet to the solid floor, rounded feet for concrete, masonry, asphalt or paving on sand; built-in bubble level. ภาพ: NTi Audio (ภาพจากข่าว MeasurEye Vibration Mode, 24 ก.ย. 2026)Image: NTi Audio (image from the MeasurEye Vibration Mode news, 24 Sep 2026)
ติดตั้งดี กับความผิดพลาดที่พบบ่อยGood installation and common mistakes
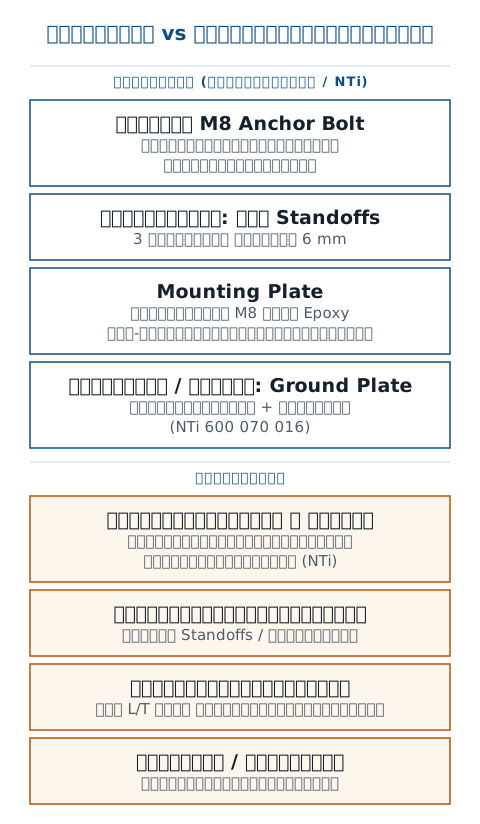
การยึดไม่แน่นทำให้เครื่องมีเรโซแนนซ์ของตัวเองที่จุดสัมผัส ค่า PPV และความถี่เด่นที่ได้อาจสูงหรือต่ำกว่าความจริง และเกิดยอดปลอมในสเปกตรัม ผลแบบนี้แก้ทีหลังไม่ได้ ต้องติดตั้งใหม่แล้ววัดใหม่A loose fixing gives the unit its own contact resonance: PPV and dominant frequency can read high or low and the spectrum shows false peaks. This cannot be corrected afterwards: you must re-install and measure again.
หลังขันแน่น: ผลักเครื่องด้วยมือเบา ๆ ต้องไม่ขยับหรือโยก ถ่ายภาพการติดตั้งพร้อมทิศทาง จดตำแหน่ง (ชั้น เสา ผนัง) และเวลาติดตั้งAfter tightening: push the unit gently by hand, it must not move or rock. Photograph the installation with its direction, and note the position (floor, column, wall) and installation time.
ก่อนยก ย้าย หรือถอดเครื่องที่กำลังวัด ให้สั่ง sensor idle ก่อน (คู่มือ §13.16) มิฉะนั้นการขยับเครื่องจะถูกบันทึกเป็นเหตุการณ์และส่งแจ้งเตือน ติดตั้งเสร็จแล้วสั่ง sensor runBefore lifting, moving or removing a unit that is monitoring, send sensor idle first (manual §13.16); otherwise handling is recorded as an event and alerts go out. Send sensor run when the unit is installed again.
05ติดตั้งและเตรียมSET UP
ไฟ การสื่อสาร และการเตรียมงานระยะยาวPower, communication and long-term preparation
ระบบเฝ้าระวังที่ดีต้องทำงานได้เองหลายสัปดาห์ ไฟ SIM สัญญาณ และเวลาที่ถูกต้องสำคัญพอ ๆ กับเซนเซอร์A good monitoring system must run on its own for weeks. Power, SIM, signal and correct time matter as much as the sensor.
ใส่ SIMFitting the SIM
- คลายสกรูหกเหลี่ยม M4 ที่ 4 มุม ตามลำดับที่คู่มือกำหนด (คลายก่อนทั้งหมด แล้วค่อยถอดออกตามลำดับเดิม) เพื่อแยกฝาบนกับฐานLoosen the four corner M4 hex screws in the sequence the manual shows (loosen all first, then remove them in the same order) to separate the top and base
- ถอดสายแพระหว่างส่วนบนกับแผงยึดแบตเตอรี่Disconnect the ribbon cable between the top section and the battery retainer
- ดัน Nano SIM เข้าช่องแบบ push-push บนโมดูลโมเด็ม (EG25) จนล็อก — ดันอีกครั้งเพื่อถอดPush the nano SIM into the push-push holder on the modem module (EG25) until it locks; push again to release it
- ต่อสายแพกลับ ตรวจว่า O-ring ของฝาอยู่ครบไม่เสียหาย รอยบากของฐานตรงกับตัวนำร่อง แล้วขันสกรู M4 ทั้ง 4 ให้แน่นReconnect the ribbon cable, check the lid O-ring is in place and undamaged and the base notches line up with the guides, then tighten all four M4 screws firmly
ถ้ารอยบากไม่ตรงหรือ O-ring เสียหาย น้ำอาจเข้าเครื่องได้ ถ้า SIM ตั้ง PIN ไว้ต้องใส่ PIN ในค่าตั้ง ใส่ผิด 3 ครั้ง SIM จะล็อกและต้องขอรหัส PUK จากผู้ให้บริการ คู่มือแนะนำไม่ตั้ง PIN ถ้าต้องสลับ SIM ระหว่างเครื่องบ่อยMisaligned notches or a damaged O-ring can let water in. If the SIM has a PIN, set it in the configuration: three wrong attempts lock the SIM until you get the PUK from the operator. The manual advises no PIN if you swap SIMs between units often.
เปิดและปิดเครื่องSwitching on and off
เปิด: จับแม่เหล็กที่สัญลักษณ์ Power ประมาณ 1 วินาที (ไฟแดง → เอาออก → ไฟเขียว) เครื่องตรวจตัวเองแล้วลงทะเบียนเครือข่าย ปิด: จับแม่เหล็กค้าง 3–5 วินาที เอาออกเมื่อไฟเปลี่ยนจากแดงเป็นแดงปนเขียว เครื่องจะปิดแบบมีลำดับ: หยุดคิวไฟล์ใหม่ อัปโหลดไฟล์ที่ค้างให้เสร็จ เขียน Log ลงการ์ด แล้วจึงดับ สั่งปิดทางไกลได้ด้วยคำสั่ง pwroff ผ่าน SMS, MQTT, Bluetooth หรือ USBOn: hold the magnet at the power symbol for about 1 second (red → remove → green); the unit self-tests and registers on the network. Off: hold the magnet 3–5 seconds and remove it when the indicator changes from red to mixed red and green. The unit shuts down in order: stops queuing new files, finishes the current upload, writes the log to the card, then switches off. Remote power-off: pwroff via SMS, MQTT, Bluetooth or USB.
เครือข่ายและอินเทอร์เน็ตNetwork and internet
- โมดูลมาตรฐาน 3G/4G/LTE (รองรับ LTE-M1 / NB1) ใช้ APN ของ SIM ที่ใช้จริง ค่าเริ่มต้นเป็นของ CSL ฮ่องกง ต้องแก้ทุกครั้งThe standard 3G/4G/LTE module (LTE-M1 / NB1 supported) needs your SIM's APN; the default is CSL Hong Kong and must always be changed
- การลงทะเบียนเครือข่ายอาจใช้เวลาตั้งแต่ 30 วินาทีถึงหลายนาที ถ้าไม่สำเร็จเครื่องรีเซ็ตโมเด็มได้ถึง 3 ครั้ง แล้วปิดโมเด็ม 30 นาทีก่อนลองใหม่Registration can take 30 seconds to many minutes; if it fails the unit resets the modem up to 3 times, then powers the modem down for 30 minutes before retrying
- เลือกผู้ให้บริการและย่านความถี่ได้ด้วยคำสั่ง net scanoper 4g, net scanband และ net switch (คู่มือ §9)Operator and band can be steered with net scanoper 4g, net scanband and net switch (manual §9)
- รุ่นโมดูล Wi-Fi ตั้ง SSID ในค่าตั้ง [WIFI] และส่งข้อความได้ทาง MQTT เท่านั้น (ไม่มี SMS)With the Wi-Fi module, set the SSID in [WIFI]; messages go via MQTT only (no SMS)
- ตั้งค่าในพื้นที่ได้โดยไม่ต้องมีอินเทอร์เน็ต: GSSLink ผ่าน Bluetooth หรือ Serial terminal ผ่านสาย USB (8 data bits, 1 stop bit, no parity, ไม่มี flow control)Local set-up needs no internet: GSSLink over Bluetooth, or a serial terminal over USB (8 data bits, 1 stop bit, no parity, no flow control)
เมื่อการสื่อสารขาดWhen communication is interrupted
5GV วัดต่อแบบ Standalone ตามค่าตั้งใน microSD และเก็บไฟล์ Alert, Interval และ Waveform ทั้งหมดไว้ในการ์ดจนเครือข่ายกลับมา เครื่องลบไฟล์ออกจากการ์ดหลังอัปโหลดสำเร็จแล้วเท่านั้น ตรวจจำนวนไฟล์ค้างด้วย files peak / files vibr และสั่งส่งด้วย send peak / send vibr ถ้าเครื่องเคยลงทะเบียนเครือข่ายสำเร็จอย่างน้อยหนึ่งครั้งก่อนติดตั้ง นาฬิกาภายในควรยังถูกต้อง (นาฬิกาเก็บเวลาได้ถึง 3 เดือน, Product Data)The 5GV keeps measuring standalone on the settings in its microSD and keeps every alert, interval and waveform file on the card until the network returns; a file is removed only after a successful upload. Check pending files with files peak / files vibr and push them with send peak / send vibr. If the unit registered on the network at least once before installation, its clock should still be correct (the clock holds time for up to 3 months, Product Data).
เวลาต้องถูกเสมอ เพราะคุณจะเทียบเหตุการณ์กับบันทึกหน้างาน: ค่าเริ่มต้นเครื่องรับเวลาจากเครือข่ายมือถือ (NITZ) และตั้ง Time Zone เอง ถ้าใช้ NTP ต้องตั้ง NTP_TZ เป็นจำนวนช่วง 15 นาทีจาก UTC (ประเทศไทย UTC+7 = 28)Time must always be right, because you will compare events with site records: by default the unit takes time from the mobile network (NITZ) and sets the time zone itself. With NTP, set NTP_TZ in 15-minute steps from UTC (Thailand, UTC+7 = 28).
เตรียมงานระยะยาวPreparing for long-term use
| เรื่องTopic | สิ่งที่ต้องเตรียมWhat to prepare |
|---|---|
| ไฟPower | สิ่งที่ต้องเตรียมWhat to prepareประเมินอายุแบตเตอรี่ตามโหมดส่งข้อมูล ส่ง PEAK แบบ MQTT เรียลไทม์ผ่าน 4G กินไฟมาก คู่มือแนะนำเมื่อมีไฟภายนอก ตั้ง BAT_WARN ให้แจ้งก่อนหมดEstimate battery life for your reporting mode: real-time PEAK over MQTT on 4G drains fast, the manual advises it only with external power. Set BAT_WARN to warn in time |
| เครือข่ายNetwork | สิ่งที่ต้องเตรียมWhat to prepareตรวจสัญญาณที่จุดติดตั้งจริง (RSSI จาก stat 3g ยิ่งสูงยิ่งดี)Check the signal at the actual spot (RSSI from stat 3g, higher is better) |
| เซนเซอร์Sensor | สิ่งที่ต้องเตรียมWhat to prepareยึดแน่น จดทิศ ตั้งย่าน g และขีดเตือนตามเกณฑ์Firm fixing, direction recorded, g range and thresholds from the criteria |
| ข้อมูลData | สิ่งที่ต้องเตรียมWhat to preparemicroSD 512 MB (อัปเกรด 2 GB ได้) ตั้ง LOG เป็น W ในงานจริง ระดับ I ทำให้ Log เต็มเร็วและกินแบตเตอรี่512 MB microSD (2 GB option); set LOG to W in the field, level I fills logs fast and drains the battery |
| สภาพแวดล้อมEnvironment | สิ่งที่ต้องเตรียมWhat to prepareตัวเครื่อง IP67 −40 ถึง +85 °C ขั้ว LEMO ต้องปิดฝาแน่นIP67 housing, −40 to +85 °C; LEMO caps pushed home |
| ความปลอดภัยSecurity | สิ่งที่ต้องเตรียมWhat to prepareใช้ Flange Lock กันถอด เลือกจุดที่คนทั่วไปเข้าถึงยาก ติดป้ายบอกว่าเป็นเครื่องวัดUse the flange lock, choose a spot the public cannot easily reach, label the unit as a measuring device |
06ติดตั้งและเตรียมSET UP
การตั้งค่าครั้งแรกInitial configuration
ค่าตั้งทั้งหมดของ 5GV อยู่ในไฟล์ INI บน microSD แก้ได้หลายทาง วิธีที่ง่ายที่สุดหน้างานคือแอป GSSLink บนมือถือ AndroidAll 5GV settings live in an INI file on the microSD and can be changed several ways. The easiest on site is the GSSLink app on an Android phone.
| วิธีตั้งค่าMethod | ใช้เมื่อไรWhen |
|---|---|
| GSSLink (Bluetooth)GSSLink (Bluetooth) | ใช้เมื่อไรWhenหน้างาน อ่านค่าปัจจุบัน แก้ แล้วบันทึกกลับ มีปุ่มโหลดค่าเริ่มต้นOn site: read, edit and save back; load-defaults buttons |
| Serial terminal (USB)Serial terminal (USB) | ใช้เมื่อไรWhenพิมพ์คำสั่ง cfg ดูผลตรวจตัวเองตอนเปิดเครื่องType cfg commands; see the power-up diagnostics |
| SMSSMS | ใช้เมื่อไรWhenสั่งทางไกลเมื่อมี SIM ข้อความตอบกลับยาวได้ไม่เกิน 160 ตัวอักษรRemote, with a SIM; replies limited to 160 characters |
| MQTTMQTT | ใช้เมื่อไรWhenสั่งผ่าน COMMAND topic ตอบใน REPLY topic ผ่าน 4G อาจรอถึง 5 นาทีCOMMAND topic, REPLY topic; over 4G a reply can take up to 5 minutes |
| ไฟล์ .new ผ่าน FTPA .new file via FTP | ใช้เมื่อไรWhenแก้ค่าจำนวนมาก แล้วสั่ง cfg downloadBulk changes, then cfg download |
| MeasurEyeMeasurEye | ใช้เมื่อไรWhenNTi ระบุว่าตั้งค่าจากระยะไกลได้ (ขั้นตอนไม่มีในเอกสารสาธารณะ)NTi states remote configuration is possible (steps not publicly documented) |
โปรแกรม PC ของ GSS (3GV Console) ใช้ดู Alert, Waveform และไฟล์ Peak ได้ แต่คู่มือระบุว่าใช้ ตั้งค่า 5GV ไม่ได้ นอกจากพิมพ์คำสั่งในแท็บ ConsoleGSS's PC program (3GV Console) can view alerts, waveforms and peak files, but the manual says it cannot reconfigure the 5GV, apart from typing commands in its Console tab.
ลำดับการตั้งค่าConfiguration sequence
- STEP1
เปิดเครื่องและเชื่อม GSSLinkPower on and connect GSSLink
เปิดเครื่องด้วยแม่เหล็ก เปิด GSSLink หน้า GSS Devices in Range แสดงชื่อ MAC และความแรงสัญญาณ (RSSI) เลือกเครื่องที่ MAC ตรงกับป้ายบนตัวเครื่องSwitch on with the magnet and open GSSLink: GSS Devices in Range lists name, MAC and signal (RSSI). Pick the unit whose MAC matches its label.
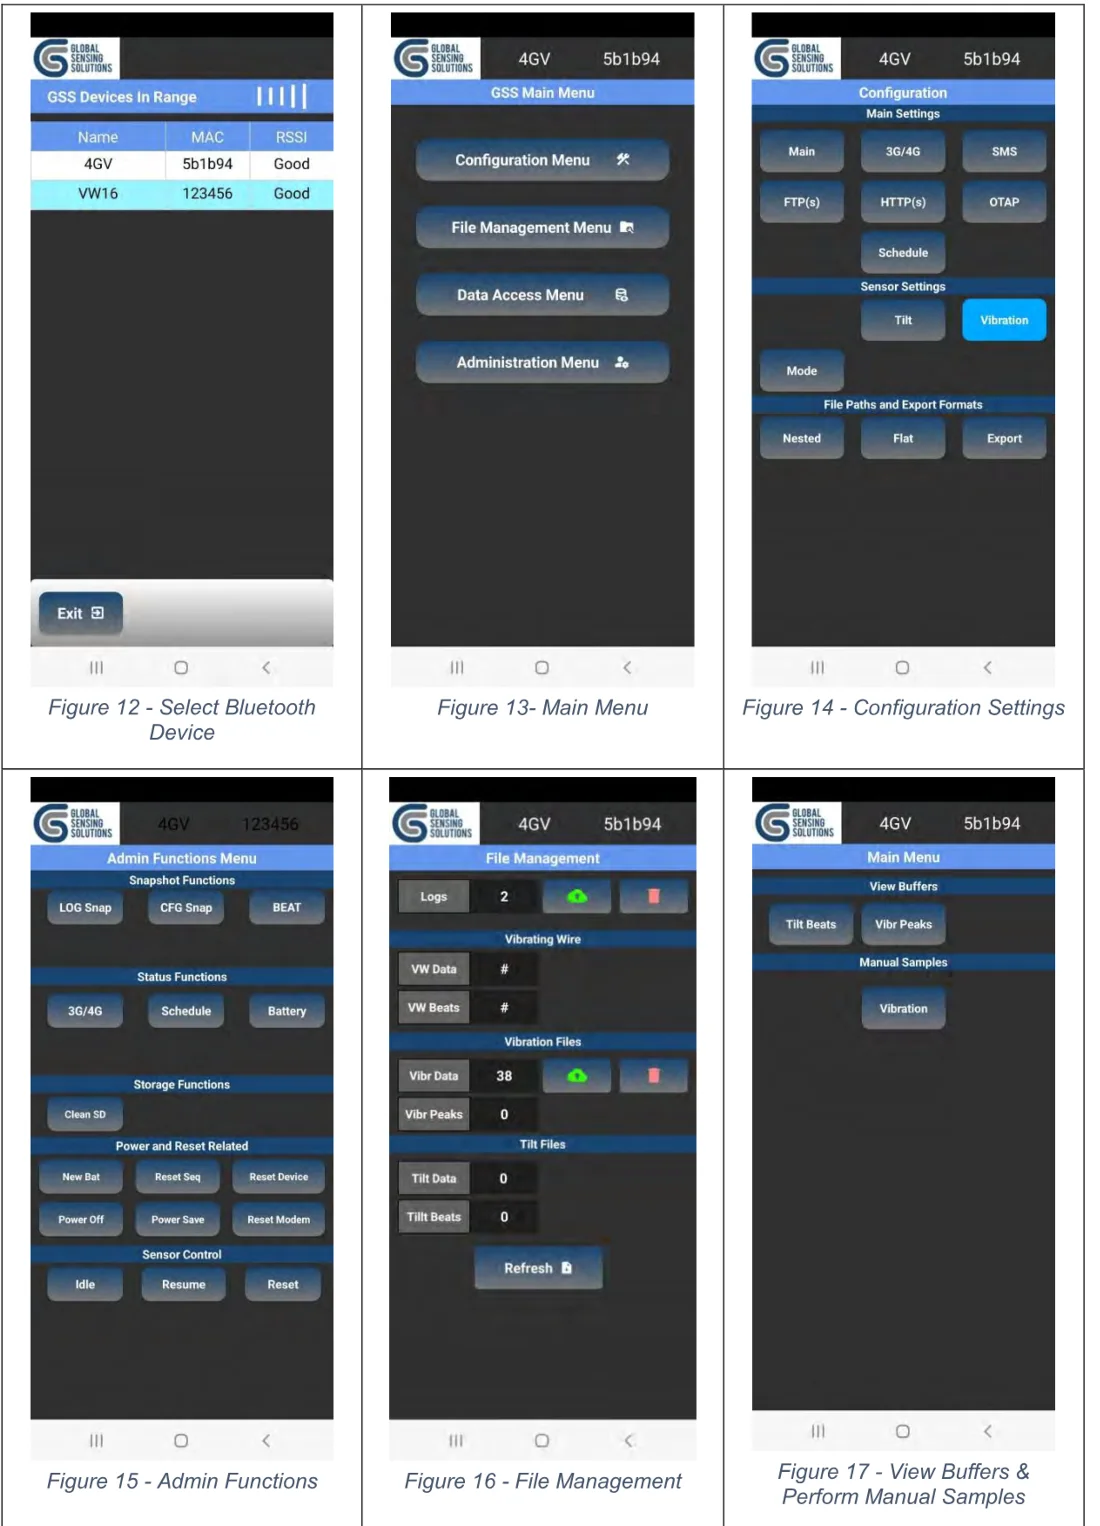
รูปที่ 21Figure 21 แอป GSSLink (Android, Bluetooth): เลือกเครื่องจากรายการ GSS Devices in Range → GSS Main Menu → Configuration / File Management / Data Access / AdministrationGSSLink (Android, Bluetooth): pick the unit under GSS Devices in Range → GSS Main Menu → Configuration / File Management / Data Access / Administration ภาพ: Global Sensing Solutions — Vibration Monitor User Manual Release 6.0 (เอกสารดาวน์โหลดของ NTi Audio) หน้า 62Image: Global Sensing Solutions — Vibration Monitor User Manual Release 6.0 (NTi Audio download), p. 62 - STEP2
ระบุเครื่องIdentify the unit
ใช้ MAC เป็นชื่ออ้างอิงของเครื่อง (เป็นชื่อโฟลเดอร์บนเซิร์ฟเวอร์ FTP ด้วย) ใส่ LOCATION ในค่าตั้ง Main เป็นชื่อจุดวัดหรือพิกัด เพื่อไม่สับสนเมื่อมีหลายเครื่องUse the MAC as the unit's reference (it is also its FTP folder name). Put the measuring point name or coordinates in LOCATION under Main so several units never get mixed up.
- STEP3
ตั้งเครือข่ายและเวลาSet network and time
3G/4G: APN (และชื่อผู้ใช้/รหัสถ้าผู้ให้บริการกำหนด) Main: ให้เวลามาจากเครือข่าย (ค่าเริ่มต้น) หรือ NTP พร้อม Time Zone3G/4G: the APN (plus user/password if the operator needs them). Main: time from the network (default) or NTP with the time zone.
- STEP4
ตั้งเซนเซอร์ (Vibration)Set the sensor (Vibration)
เลือก Mode เป็น Vibration แล้วตั้ง SAMP_FREQ, ACC_SCALE, PEAK_SPAN, FILTER และ PPV_MAX ต่อแกนจากเกณฑ์โครงการ ไม่มีค่าความไวให้ป้อน เพราะเซนเซอร์อยู่ในเครื่องSet Mode to Vibration, then SAMP_FREQ, ACC_SCALE, PEAK_SPAN, FILTER and the per-axis PPV_MAX from the project criteria. There is no sensitivity to enter: the sensor is built in.
- STEP5
ตั้งแกนและทิศSet axes and orientation
ปล่อย FLG_ORIENT เปิดไว้ (ค่าเริ่มต้น) เพื่อให้แกน V ตามแรงโน้มถ่วง จดว่าแกน L และ T ชี้ไปทางไหนของโครงสร้างLeave FLG_ORIENT on (default) so V follows gravity, and note which way L and T point on the structure.
- STEP6
ตั้งการสื่อสารและแจ้งเตือนSet communication and alerts
SMS: เบอร์ 1–5 (พร้อม + และรหัสประเทศ เช่น +66…) และเปิด EN1–EN5 เบอร์ 1 ได้รับข้อความ Up ด้วย Schedule: รอบส่งไฟล์ PEAK และช่วงเวลาทำงาน (ACTIVE) เส้นทางข้อความ (ROUTE_MSG) EVENT / ALARM เป็น SMS หรือ MQTTSMS: numbers 1–5 (with + and country code, e.g. +66…) and enable EN1–EN5; number 1 also gets the Up message. Schedule: PEAK upload interval and active hours (ACTIVE). Message routing (ROUTE_MSG) EVENT / ALARM to SMS or MQTT.
- STEP7
ตรวจการวัดสดVerify live measurement
ใน GSSLink เมนู View Buffers › Vibr Peaks ดูค่า PPV ล่าสุด หรือสั่ง peak snap เพื่ออัปโหลดค่า PPV ที่เก็บไว้ทันที แทนการรอรอบถัดไปIn GSSLink use View Buffers › Vibr Peaks to see the latest PPV, or send peak snap to upload the stored PPV readings immediately instead of waiting for the next schedule.
- STEP8
บันทึกค่าตั้งSave the configuration
บันทึกกลับลงเครื่องใน GSSLink ถ้าใช้คำสั่งต้องส่ง CFG APPLY ค่าเซนเซอร์บางค่าจะมีผลหลัง reset sensor สั่ง cfg snap เพื่อเก็บสำเนาค่าตั้งไว้เป็นหลักฐานSave back to the unit in GSSLink. By command, send CFG APPLY; some sensor values take effect only after reset sensor. Send cfg snap to keep a copy of the configuration as a record.
แก้ค่าด้วยคำสั่งแล้วลืม CFG APPLY เครื่องทำงานด้วยค่าใหม่ไปได้สักพัก แต่พอรีบูต (รวมถึงรีเซ็ตโมเด็มตามรอบ) ค่าจะกลับเป็นค่าเดิมโดยไม่มีใครรู้Changing values by command and forgetting CFG APPLY: the unit runs on the new values for a while, then silently reverts after a reboot.
ตัวอย่างคำสั่งที่ใช้บ่อย (Serial / SMS / MQTT)Common commands (serial / SMS / MQTT)
| คำสั่งCommand | ผลResult |
|---|---|
| cfg main apn {APN}cfg main apn {APN} | ผลResultตั้ง APNSets the APN |
| cfg vibr peak_span 300cfg vibr peak_span 300 | ผลResultช่วงรายงาน PPV 300 sPPV interval 300 s |
| cfg applycfg apply | ผลResultบันทึกค่าตั้งถาวรSaves the settings permanently |
| stat 3g / stat get / stat batstat 3g / stat get / stat bat | ผลResultสถานะเครือข่าย / เซนเซอร์ / แบตเตอรี่Network / sensor / battery status |
| sensor idle / sensor runsensor idle / sensor run | ผลResultหยุดวัดก่อนย้าย / กลับมาวัดPause before moving / resume |
| peak snap / cfg snap / log snappeak snap / cfg snap / log snap | ผลResultอัปโหลด PPV / ค่าตั้ง / Log ทันทีUpload PPV / configuration / log now |
| newbat {mAh}newbat {mAh} | ผลResultตั้งความจุถ่านใหม่ (เช่น 4 × 14 Ah = 56000)Set new battery capacity (e.g. 4 × 14 Ah = 56000) |
คำสั่งพิมพ์ตัวเล็กหรือตัวใหญ่ก็ได้ รายการครบอยู่ในคู่มือ §13–14Commands are not case-sensitive; the full list is in manual §13–14.
07โอนข้อมูลTRANSFER
MeasurEye: ดูข้อมูล แจ้งเตือน และรายงานบนคลาวด์MeasurEye: data, alerts and reports in the cloud
MeasurEye คือหน้าที่คุณจะเปิดดูทุกวัน บทนี้อธิบายโครงสร้างและเมนูตามภาพหน้าจอทางการของ NTi เฉพาะฟีเจอร์ที่ NTi ระบุว่ามีอยู่ในปัจจุบันMeasurEye is the screen you will open every day. This chapter explains its structure and menus from NTi's official screenshots, covering only features NTi currently states.
MeasurEye (สะกดตามที่ NTi ใช้) เป็นเว็บแอปที่ app.measureye.com ไม่ต้องติดตั้งโปรแกรม ต้องมีบัญชีและเข้าสู่ระบบด้วยตัวเอง NTi ระบุว่าใช้ฟรีและมีโปรเจกต์ DEMO ข้อมูลจัดเป็นลำดับ Company › Project › Monitor: หนึ่งโปรเจกต์มีหลาย Monitor (เครื่องวัด) ได้ และกำหนดสิทธิ์ผู้ใช้ได้ (User Management)MeasurEye (spelt as NTi writes it) is a web app at app.measureye.com with nothing to install. You need an account and sign in yourself; NTi says it is free, with a DEMO project. Data is organised as Company › Project › Monitor: one project holds several monitors (instruments), and user access can be managed (User Management).
ดูรูปที่ 7: โครงสร้างหน้าจอ MeasurEye See figure 7: MeasurEye layout
เมนูหลักMain menus
| เมนูMenu | ใช้ทำอะไรWhat for |
|---|---|
| Real-time DataReal-time Data | ใช้ทำอะไรWhat forค่าล่าสุดแบบสด (มุมมอง Grid, Chart, Map, SOH, Alerts)Latest values live (grid, chart, map, SOH, alerts views) |
| Historical DataHistorical Data | ใช้ทำอะไรWhat forข้อมูลย้อนหลัง แท็บ SUMMARY / CHART / TABLE / EXPORTHistory: SUMMARY / CHART / TABLE / EXPORT tabs |
| ConfigurationConfiguration | ใช้ทำอะไรWhat forตั้ง Monitor: MONITOR INFO, INDICATORS, SCHEDULE, EVENTS, SOH, PHOTOSMonitor settings: MONITOR INFO, INDICATORS, SCHEDULE, EVENTS, SOH, PHOTOS |
| ReportsReports | ใช้ทำอะไรWhat forรายงานตามรอบส่งทางอีเมลPeriodic reports by e-mail |
เพิ่ม 5GV เข้าโปรเจกต์Adding a 5GV to a project
ภาพหน้าจอทางการของขั้นตอนเพิ่ม 5GV เป็น Monitor ใน MeasurEye (ช่องที่ต้องกรอก เช่น หมายเลขเครื่อง / คีย์เชื่อมต่อ) — ยังไม่มีในเอกสารสาธารณะของ NTi ต้องขอจาก NTi หรือถ่ายจากบัญชีจริงของเจ้าของOfficial screenshot of adding a 5GV as a monitor in MeasurEye (fields such as serial / connection key). Not in NTi's public documents: request it from NTi or capture it from the owner's real account.
NTi Audio / MeasurEye · MeasurEye help / NTi (not yet public)NTi ระบุว่าเมื่อลิงก์เครื่องเข้ากับโปรเจกต์แล้วข้อมูลจะเริ่มเก็บเข้าระบบ และ 5GV ส่งข้อมูลผ่าน MQTT หน้าตั้งค่า Monitor ของ NTi มีสวิตช์ Should MeasurEye connect to device? และสถานะ Online ให้ดูว่าระบบเห็นเครื่องแล้ว ช่องข้อมูลเฉพาะของ 5GV ยังไม่มีภาพทางการNTi states that once a device is linked to a project, data collection starts, and the 5GV sends its data over MQTT. NTi's monitor settings screen has a Should MeasurEye connect to device? switch and an Online status showing that the platform sees the device. There is no official screenshot yet of the 5GV-specific fields.
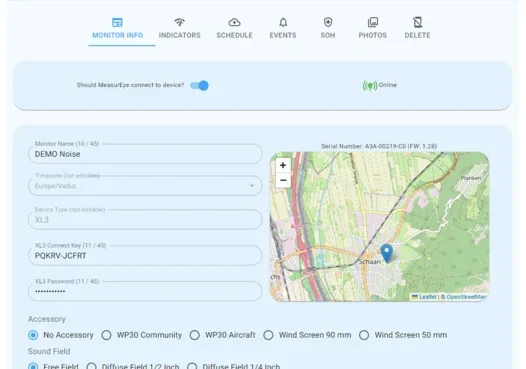
ข้อมูลการสั่นสะเทือนใน MeasurEyeVibration data in MeasurEye
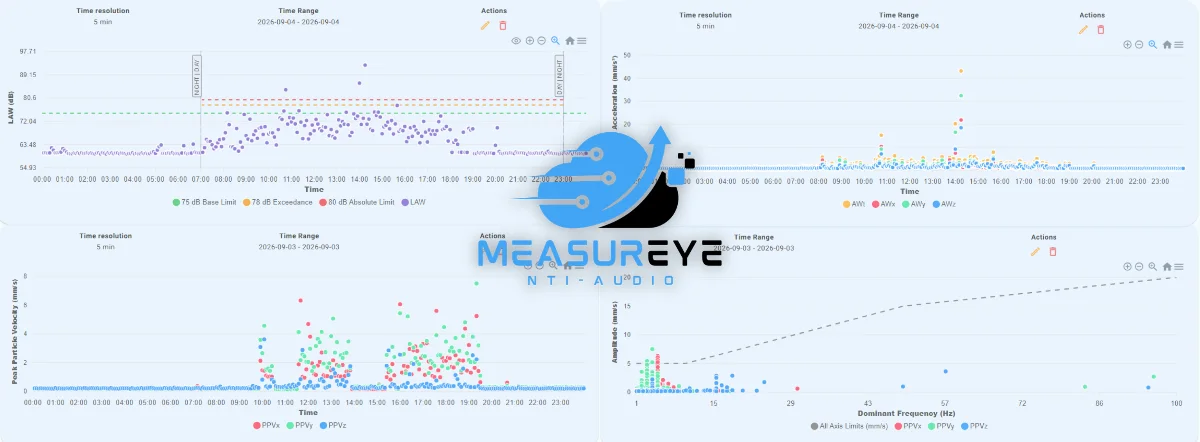
| ข้อมูลData | รอบที่เข้าระบบ (NTi)Interval (NTi) |
|---|---|
| โครงสร้าง: PPV, Dominant Frequency, Peak Vector SumStructural: PPV, dominant frequency, peak vector sum | รอบที่เข้าระบบ (NTi)Interval (NTi)60 s60 s |
| ความสบาย: AWk, AWm, VDV, สเปกตรัม 1/3 ออกเตฟความเร่ง 2.5–400 HzOccupant: AWk, AWm, VDV, 1/3-octave acceleration 2.5–400 Hz | รอบที่เข้าระบบ (NTi)Interval (NTi)10 s10 s |
| State of Health: แบตเตอรี่ พื้นที่เก็บ ไฟ GPSState of Health: battery, storage, power, GPS | รอบที่เข้าระบบ (NTi)Interval (NTi)60 s60 s |
NTi ประกาศ (24 ก.ย. 2026) ว่า MeasurEye รองรับ Vibration Mode ของ 5GV เต็มรูปแบบแล้ว ครอบคลุมมาตรฐานความเสียหายของโครงสร้าง 8 ฉบับและความสบาย 6 ฉบับ (รายชื่อในบทมาตรฐาน) รอบข้อมูลจริงยังขึ้นกับค่าตั้งของเครื่องด้วยNTi announced (24 Sep 2026) full Vibration Mode support for the 5GV in MeasurEye, covering 8 structural-damage and 6 comfort standards (listed in the standards chapter). Actual data intervals also depend on the device settings.
Events, Alerts และ ReportsEvents, alerts and reports
- Events: ตั้งเงื่อนไข (Indicator, Operator, Value) ที่เมื่อเป็นจริงจะสร้าง Event และส่งอีเมลแจ้งเตือน รวมหลายเงื่อนไขข้ามเซนเซอร์ได้ และจำกัดเฉพาะวันและชั่วโมงที่กำหนดได้Events: conditions (indicator, operator, value) that create an event and send an e-mail alert when true; conditions can combine several sensors and be limited to set days and hours
- Indicators: ค่าพื้นฐานที่เครื่องส่ง (Basic) และค่าที่ MeasurEye คำนวณต่อ เช่น Gliding, Period และ Aggregation (min, max, average, percentile)Indicators: basic values sent by the device and values MeasurEye derives, e.g. gliding, period and aggregation (min, max, average, percentile)
- State of Health alerts: แจ้งเมื่อแบตเตอรี่ ไฟ หรือ GPS ผิดปกติState of Health alerts: battery, power supply or GPS problems
- Reports: รายงานตามรอบที่เลือกส่งถึงอีเมลอัตโนมัติ NTi ระบุ PDF รายวัน/สัปดาห์/เดือนสำหรับโครงสร้างและความสบายReports: periodic reports e-mailed automatically; NTi states daily/weekly/monthly PDFs for structural and comfort monitoring
การแจ้งเตือนของ 5GV มาได้หลายทาง: จาก MeasurEye (อีเมล) และจากตัวเครื่องเอง (SMS สูงสุด 5 เบอร์ หรือ MQTT) ตกลงในทีมให้ชัดว่าช่องทางไหนเป็นช่องทางหลัก5GV alerts can come several ways: from MeasurEye (e-mail) and from the unit itself (SMS to up to 5 numbers, or MQTT). Agree within the team which channel is the primary one.
08อ้างอิงREFERENCE
เข้าใจค่าที่วัดUnderstanding the measured values
5GV ให้ค่าหลายตัว แต่ละตัวตอบคำถามต่างกัน เลือกค่าที่ตรงกับคำถามของโครงการ ไม่ใช่ค่าที่ตัวเลขดูน่ากังวลที่สุดThe 5GV reports many values and each answers a different question. Use the one that matches the project's question, not the one with the most alarming number.
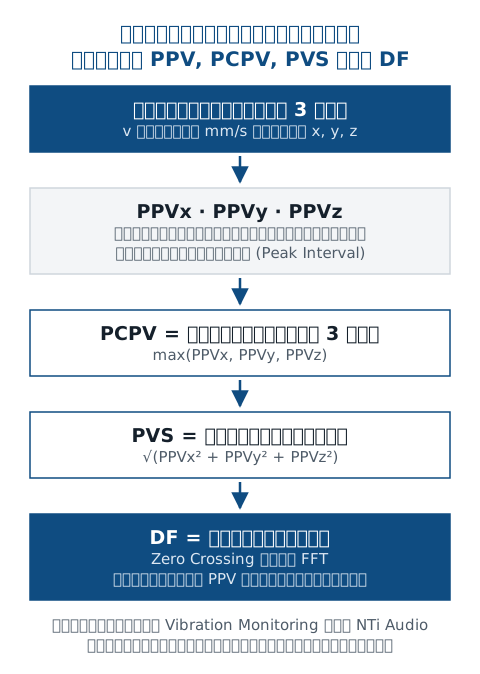
ความเร็วอนุภาคสูงสุดPeak particle velocity PPV · mm/s
- คืออะไรWhat it is
- ค่าสัมบูรณ์สูงสุดของความเร็วอนุภาคในแต่ละแกน ในช่วงเวลาหนึ่ง (ไม่ถ่วงน้ำหนัก)The largest absolute particle velocity on one axis in an interval (unweighted)
- ทำไมต้องสนใจWhy it matters
- ค่าหลักของการประเมินความเสียหายของโครงสร้างในหลายมาตรฐานThe main value for structural-damage assessment in many standards
- เข้าใจผิดบ่อยCommon misunderstanding
- PPV ค่าเดียวบอกไม่ได้ว่าปลอดภัย ต้องอ่านคู่กับความถี่และชนิดอาคารOne PPV alone cannot say "safe": read it with frequency and building type
PPV ของแกนที่มากที่สุดPeak component particle velocity PCPV · mm/s
- คืออะไรWhat it is
- ค่ามากที่สุดของ PPVx, PPVy, PPVzThe largest of PPVx, PPVy and PPVz
- ทำไมต้องสนใจWhy it matters
- บางมาตรฐานใช้ค่านี้ เช่น BS 5228-2 ใน MeasurEyeUsed by some standards, e.g. BS 5228-2 in MeasurEye
ผลรวมเวกเตอร์Peak vector sum PVS · mm/s
- คืออะไรWhat it is
- รากที่สองของผลรวมกำลังสองของ PPV ทั้ง 3 แกนSquare root of the sum of the squares of the three PPVs
- ทำไมต้องสนใจWhy it matters
- มาตรฐานบางฉบับใช้ เช่น ÖNORM S 9020 ใน MeasurEyeUsed by some standards, e.g. ÖNORM S 9020 in MeasurEye
- เข้าใจผิดบ่อยCommon misunderstanding
- PVS สูงกว่า PPV รายแกนเสมอหรือเท่ากัน อย่าเทียบ PVS กับเกณฑ์ที่เขียนไว้สำหรับ PPV รายแกนPVS is always equal to or above the per-axis PPV: never compare it with a criterion written for per-axis PPV
ความถี่เด่นDominant frequency DF · Hz
- คืออะไรWhat it is
- ความถี่หลักของการสั่นในแกนนั้น หาด้วย Zero Crossing หรือ FFTThe main frequency of the vibration on that axis, by zero crossing or FFT
- ทำไมต้องสนใจWhy it matters
- เกณฑ์ความเสียหายหลายฉบับเปลี่ยนตามความถี่Many damage criteria change with frequency
ความเร่งAcceleration a · g หรือ m/s²
- คืออะไรWhat it is
- สิ่งที่เซนเซอร์ MEMS วัดโดยตรง ค่าส่งออกตั้งหน่วยได้ (g ค่าเริ่มต้น หรือ m/s²)What the MEMS sensor measures directly; export unit g (default) or m/s²
- ทำไมต้องสนใจWhy it matters
- ใช้เลือกย่านวัด (ACC_SCALE) และเป็นฐานของค่าความสบายDrives the range choice (ACC_SCALE) and underlies comfort values
ค่าความสบายComfort values VDV · KB · AW
- คืออะไรWhat it is
- VDV (BS 6472), KBFmax / KBFTm (DIN 4150-2), ความเร่งถ่วงน้ำหนัก AWt / AWm (ISO 2631, UNI 9614, Real Decreto)VDV (BS 6472), KBFmax / KBFTm (DIN 4150-2), weighted acceleration AWt / AWm (ISO 2631, UNI 9614, Real Decreto)
- ทำไมต้องสนใจWhy it matters
- ประเมินว่าคนในอาคารรู้สึกหรือถูกรบกวนแค่ไหน ไม่ใช่ความเสียหายของอาคารAssess how people inside feel or are disturbed, not building damage
สเปกตรัม 1/3 ออกเตฟ และ VC curves1/3-octave spectrum and VC curves mm/s · m/s² · dBV
- คืออะไรWhat it is
- แยกพลังงานการสั่นตามย่านความถี่ ใช้เทียบ VC-A ถึง VC-C สำหรับอุปกรณ์ที่ไวต่อการสั่นVibration energy by frequency band; compared with VC-A to VC-C for sensitive equipment
- ทำไมต้องสนใจWhy it matters
- เห็นว่าพลังงานกระจุกที่ย่านไหน เมื่อค่าตัวเลขเดียวไม่พอShows where the energy sits when a single number is not enough
การเอียงTilt Pitch · Roll · °
- คืออะไรWhat it is
- การเปลี่ยนมุมของโครงสร้าง (ต้องมี License Tilt และเครื่องทำงานได้ทีละโหมด)Change of structural angle (needs the tilt licence; one mode at a time)
- ทำไมต้องสนใจWhy it matters
- ติดตามการทรุดหรือเอียง ต้องสั่ง base ตั้งค่าอ้างอิงตอนติดตั้งTracks settlement or tilting; send base at installation to set the reference
ค่าความสบายและสเปกตรัม Product Data (Mar 24) ยังเขียนว่า "coming soon" แต่หน้าเว็บและข่าว NTi (ก.ย. 2026) ระบุว่ารองรับแล้วใน MeasurEye Vibration Mode ตรวจว่าเฟิร์มแวร์และบัญชีของคุณเปิดใช้แล้วFor comfort values and spectra the Product Data (Mar 24) still says "coming soon", while NTi's web page and news (Sep 2026) say they are now supported in MeasurEye Vibration Mode. Check that your firmware and account have them.
09อ้างอิงREFERENCE
PPV สำหรับผู้เริ่มต้นPPV for beginners
ถ้าเข้าใจ PPV ข้อเดียว คุณจะอ่านผลการสั่นสะเทือนจากงานก่อสร้างได้เกินครึ่งUnderstand PPV and you can read more than half of any construction vibration result.
เมื่อโครงสร้างสั่น อนุภาคของวัสดุเคลื่อนไปมารอบตำแหน่งเดิม ความเร็วอนุภาค คือความเร็วของการเคลื่อนนั้น (ระยะที่เคลื่อน ÷ เวลา) มีหน่วยเป็น mm/s เช่น 2 mm/s คืออนุภาคเคลื่อนเร็ว 2 มิลลิเมตรต่อวินาทีในขณะนั้น ไม่ใช่ระยะที่โครงสร้างขยับ PPV คือค่าสูงสุดของความเร็วนี้ (ไม่สนเครื่องหมายบวกลบ) ในแต่ละแกน ในช่วงเวลาหนึ่งWhen a structure vibrates, particles of the material move back and forth about their position. Particle velocity is how fast they move (distance moved ÷ time), in mm/s: 2 mm/s means the particles move at 2 millimetres per second at that instant; it is not how far the structure moves. PPV is the highest value of that velocity (ignoring the sign) on each axis in an interval.
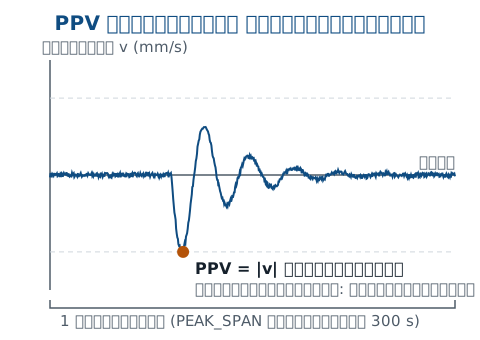
ทำไมงานก่อสร้างใช้ PPVWhy construction work uses PPV
ความเร็วอนุภาคสัมพันธ์กับความเครียดที่เกิดในวัสดุ มาตรฐานด้านความเสียหายของโครงสร้างหลายฉบับจึงกำหนดค่าอ้างอิงเป็นความเร็ว (mm/s) และส่วนใหญ่แยกตามความถี่ ชนิดอาคาร และตำแหน่งวัด 5GV รายงาน PPV แยก 3 แกน พร้อมความถี่เด่นของแต่ละแกน ให้คุณเลือกใช้ตามที่มาตรฐานกำหนดParticle velocity relates to the strain induced in the material, so many structural-damage standards give guideline values as velocity (mm/s), mostly split by frequency, building type and measuring position. The 5GV reports PPV on three axes with each axis' dominant frequency, so you can use what the standard requires.
ขนาด ความถี่ และแกนMagnitude, frequency and axis
- ขนาด (mm/s) บอกว่าแรงแค่ไหนMagnitude (mm/s) tells how strong
- ความถี่ (Hz) บอกว่าสั่นเร็วหรือช้า โครงสร้างตอบสนองต่อแต่ละความถี่ไม่เท่ากันFrequency (Hz) tells how fast it oscillates; structures respond differently at different frequencies
- แกน (L, T, V) บอกทิศทาง แกนที่สูงสุดชี้ว่าแรงมาทางไหน และบางเกณฑ์ใช้แกนต่างกันAxis (L, T, V) tells the direction; the highest axis hints where the energy comes from, and some criteria treat axes differently
ช่วงตอกเสาเข็ม กราฟ PPV ใน MeasurEye ขึ้นเป็นกลุ่มตรงเวลาทำงาน แกน V สูงสุดที่ 3.1 mm/s ความถี่เด่น 14 Hz ส่วน L และ T ราว 1 mm/s ข้อมูลที่ต้องจดคือ แกน ขนาด ความถี่ และเวลา จากนั้นจึงนำ (14 Hz, 3.1 mm/s) ไปเทียบเกณฑ์ที่โครงการกำหนด ตัวเลขนี้เป็นตัวอย่างประกอบเท่านั้น — ILLUSTRATIVE EXAMPLE — NOT A STANDARD LIMITDuring piling, the PPV chart in MeasurEye rises in clusters during working hours: V highest at 3.1 mm/s with a dominant frequency of 14 Hz, L and T about 1 mm/s. Record the axis, magnitude, frequency and time, then compare (14 Hz, 3.1 mm/s) with the criterion the project specifies. These numbers are for illustration only — ILLUSTRATIVE EXAMPLE — NOT A STANDARD LIMIT
10อ้างอิงREFERENCE
ความถี่: ทำไม 5 mm/s ไม่เท่ากับ 5 mm/s เสมอไปFrequency: why 5 mm/s is not always 5 mm/s
เกณฑ์ความเสียหายของโครงสร้างส่วนใหญ่พิจารณาทั้งขนาดและความถี่ PPV เท่ากันที่ความถี่ต่างกันจึงอาจได้ผลประเมินต่างกันMost structural-damage criteria consider magnitude and frequency together, so the same PPV at different frequencies can give different verdicts.
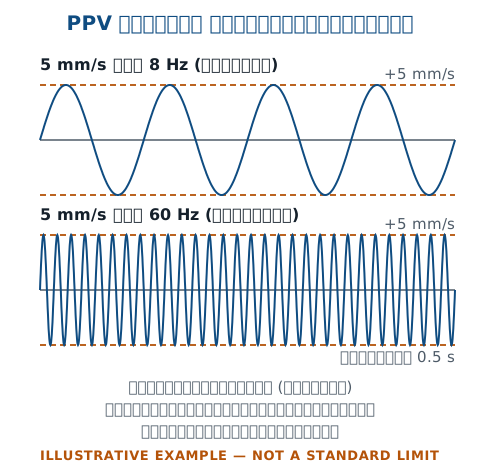
โครงสร้างและองค์อาคารมีความถี่ธรรมชาติของตัวเอง การสั่นที่ความถี่ต่ำใกล้ความถี่ธรรมชาติของอาคารทั่วไปมีแนวโน้มทำให้อาคารตอบสนองมากกว่า มาตรฐานอย่าง DIN 4150-3 จึงให้ค่าอ้างอิงที่เปลี่ยนตามย่านความถี่ NTi อธิบายว่าเกณฑ์ PPV "ขึ้นกับความถี่และชนิดอาคาร" และตัวเลขเดียวไม่พอ ต้องอ่านคู่กับความถี่และชนิดอาคารเสมอStructures and building elements have their own natural frequencies, and vibration at low frequencies near typical building natural frequencies tends to make buildings respond more. Standards such as DIN 4150-3 therefore give guideline values that change with frequency band. NTi describes PPV limits as frequency- and building-dependent: a single number is never enough and must be read with frequency and building type.
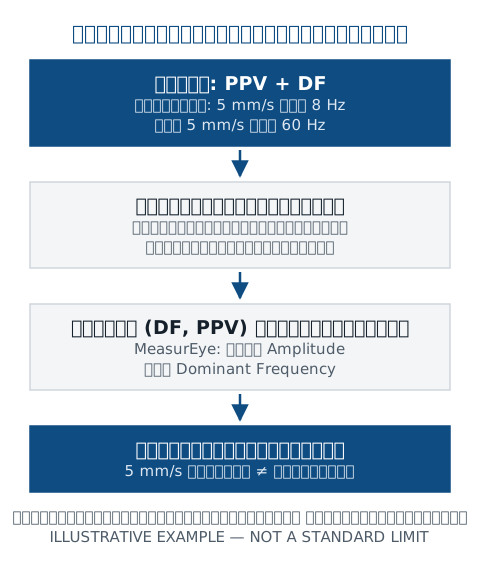
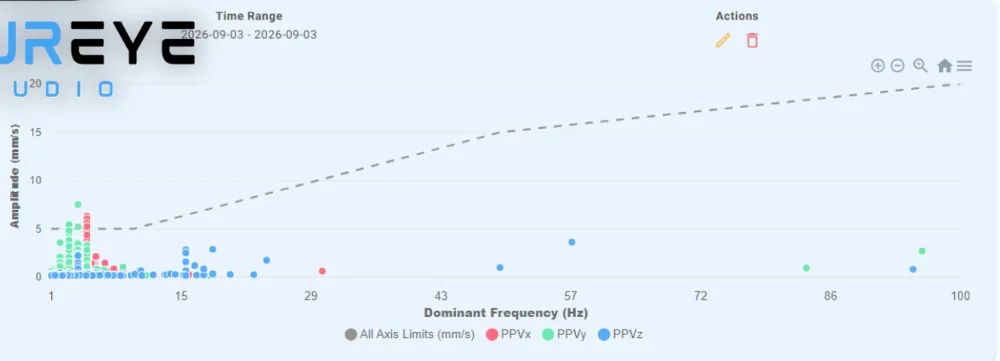
เวลาอ่านกราฟ Amplitude กับ Dominant Frequency ใน MeasurEye: ดูว่าจุดของแต่ละแกนอยู่ใต้เส้นเกณฑ์ที่ความถี่ของมันหรือไม่ ไม่ใช่ดูแค่ว่าจุดสูงสุดสูงกี่ mm/s และตรวจว่าเส้นเกณฑ์ที่แสดงเป็นมาตรฐานและชนิดอาคารที่โครงการใช้จริงWhen reading MeasurEye's amplitude vs dominant frequency chart, check whether each axis' dots sit below the criterion line at their own frequency, not just how many mm/s the top dot reaches, and confirm the line shown is the standard and building class the project really uses.
นำค่า PPV สูงสุดของวันไปเทียบกับตัวเลขค่าเดียวที่จำมาจากที่อื่น โดยไม่ดูความถี่ ชนิดอาคาร ตำแหน่งวัด และชนิดการสั่น (ระยะสั้น/ต่อเนื่อง)Comparing the day's highest PPV with a single number remembered from elsewhere, ignoring frequency, building type, measuring position and vibration type (short-term / continuous).
11อ้างอิงREFERENCE
มาตรฐานและเกณฑ์ประเมินStandards and assessment criteria
ส่วนนี้บอกว่า 5GV และ MeasurEye รองรับมาตรฐานอะไร ไม่ได้บอกว่าโครงการของคุณต้องใช้ค่าเท่าไร เกณฑ์ที่ใช้จริงขึ้นกับวัตถุประสงค์ ชนิดโครงสร้าง แหล่งสั่น ความถี่ ระยะเวลา กฎหมาย และข้อกำหนดของโครงการThis chapter says which standards the 5GV and MeasurEye support, not what value your project must use. The actual criterion depends on the purpose, structure type, source, frequency, duration, regulation and project specification.
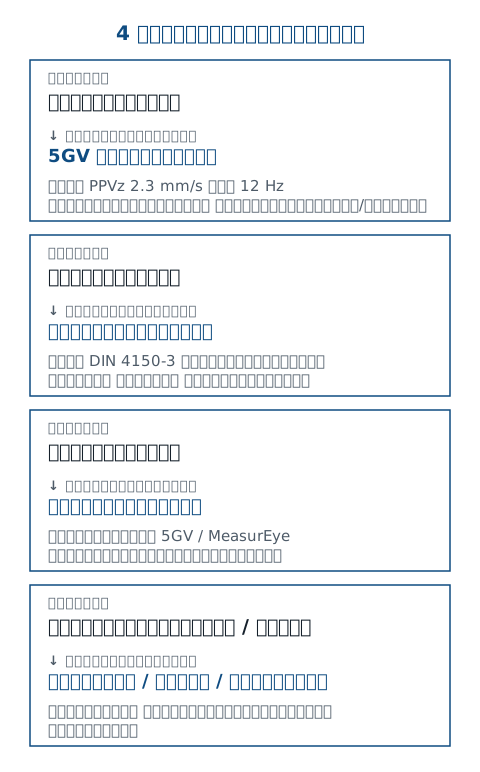
ไม่มีค่า PPV ค่าเดียวที่ "ปลอดภัย" สำหรับทุกอาคาร คู่มือนี้จึงไม่ให้ตัวเลขเกณฑ์ ใช้ค่าจากมาตรฐานฉบับที่ระบุในข้อกำหนดโครงการ (พร้อมปีที่ออก) หรือจากวิศวกรผู้รับผิดชอบThere is no single "safe" PPV for all buildings, so this guide gives no criterion values. Use values from the standard named in the project specification (with its edition) or from the responsible engineer.
มาตรฐานใน MeasurEye Vibration Mode (NTi, ก.ย. 2026)Standards in MeasurEye Vibration Mode (NTi, Sep 2026)
| ความเสียหายของโครงสร้างStructural damage | ค่าที่ใช้Values used |
|---|---|
| DIN 4150-3 (เยอรมนี)DIN 4150-3 (Germany) | ค่าที่ใช้Values usedPPV / DFPPV / DF |
| BS 5228-2 (สหราชอาณาจักร)BS 5228-2 (UK) | ค่าที่ใช้Values usedPCPVPCPV |
| SBR-A (เนเธอร์แลนด์)SBR-A (Netherlands) | ค่าที่ใช้Values usedPPV / DFPPV / DF |
| ÖNORM S 9020 (ออสเตรีย)ÖNORM S 9020 (Austria) | ค่าที่ใช้Values usedPVSPVS |
| RI8507 / OSM (สหรัฐฯ)RI8507 / OSM (USA) | ค่าที่ใช้Values usedPPV / DFPPV / DF |
| SNCF IN1226 (ฝรั่งเศส)SNCF IN1226 (France) | ค่าที่ใช้Values usedPPV / DFPPV / DF |
| Circular 23 July 1986 (ฝรั่งเศส)Circular 23 July 1986 (France) | ค่าที่ใช้Values usedPPV / DFPPV / DF |
| Custom (ผู้ใช้กำหนด)Custom (user-defined) | ค่าที่ใช้Values usedPPV / DFPPV / DF |
| ความสบายของผู้อยู่อาศัยOccupant comfort | ค่าที่ใช้Values used |
|---|---|
| DIN 4150-2:2025-08 และ DIN 4150-2:1999DIN 4150-2:2025-08 and DIN 4150-2:1999 | ค่าที่ใช้Values usedKBFTi · KBFmax · KBFTmKBFTi · KBFmax · KBFTm |
| BS 6472-1BS 6472-1 | ค่าที่ใช้Values usedVDVVDV |
| Real Decreto (สเปน)Real Decreto (Spain) | ค่าที่ใช้Values usedAWm_x · AWm_y · AWm_z · L_AWAWm_x · AWm_y · AWm_z · L_AW |
| UNI 9614 (อิตาลี)UNI 9614 (Italy) | ค่าที่ใช้Values usedAWm_x · AWm_y · AWm_zAWm_x · AWm_y · AWm_z |
| สเปกตรัม 1/3 ออกเตฟ (รวมถึงงานอุปกรณ์ไวต่อการสั่น)1/3-octave spectrum (also for sensitive equipment) | ค่าที่ใช้Values usedความเร็ว ความเร่ง dBVVelocity, acceleration, dBV |
ฉบับของมาตรฐานที่ตรวจแล้วEditions checked
- DIN 4150-3:2016-12 — การสั่นสะเทือนในงานก่อสร้าง ผลต่อโครงสร้าง (แทนฉบับ 1999-02) ฉบับ 2016 ระบุ PPV และตำแหน่งวัดที่พื้นชั้นบนสุดเพิ่มเติมDIN 4150-3:2016-12: vibration in buildings, effects on structures (replaces 1999-02); the 2016 edition adds peak velocity and the topmost floor as a measuring location
- DIN 4150-2:2025-08 — ผลต่อคนในอาคาร ย่าน 1–80 Hz (MeasurEye มีทั้งฉบับ 2025 และ 1999)DIN 4150-2:2025-08: effects on people in buildings, 1–80 Hz (MeasurEye offers both the 2025 and 1999 editions)
- BS 5228-2:2009+A1:2014 — Code of practice ควบคุมการสั่นในงานก่อสร้างBS 5228-2:2009+A1:2014: code of practice for vibration control on construction sites
- BS 7385-2:1993 — แนวทางระดับความเสียหายจากการสั่นผ่านพื้นดิน มีเป็นตัวกรองความถี่ในตัว 5GV (FILTER 4) แต่ไม่อยู่ในรายชื่อ MeasurEye Vibration Mode ของ NTiBS 7385-2:1993: guide to damage levels from groundborne vibration; available as a frequency filter in the 5GV (FILTER 4) but not in NTi's MeasurEye Vibration Mode list
ตัวกรองมาตรฐานในตัวเครื่อง (FILTER 1–16)Standard filters in the unit (FILTER 1–16)
ค่า FILTER ในค่าตั้ง Vibration เลือกย่านความถี่ตามมาตรฐานที่ใช้คำนวณในเครื่อง (คู่มือ §10): 1 ISEE (ค่าเริ่มต้น), 2 DIN 4150-3, 3 DIN 4150-2, 4 BS 7385, 5 AS 2187-2, 6 ÖNORM 9012, 7 ISO 8569, 8 IN1226, 9 NS 8176, 10 NS 8141, 11 NS 8141-1, 12 SS 4604866, 13 SS 025211, 14 SS 4604861, 15 Geophone, 16 ICPE 86The FILTER value in the Vibration settings selects the standard's frequency range used on board (manual §10): 1 ISEE (default), 2 DIN 4150-3, 3 DIN 4150-2, 4 BS 7385, 5 AS 2187-2, 6 ÖNORM 9012, 7 ISO 8569, 8 IN1226, 9 NS 8176, 10 NS 8141, 11 NS 8141-1, 12 SS 4604866, 13 SS 025211, 14 SS 4604861, 15 geophone, 16 ICPE 86.
ชื่อในคู่มือ Product Data และข่าว MeasurEye เขียนต่างกันเล็กน้อย (เช่น AS 2187-2 / AS 2817.2, ÖNORM S 9012 ในเครื่อง กับ ÖNORM S 9020 ใน MeasurEye) คู่มือนี้คงชื่อตามต้นฉบับแต่ละแหล่ง ตัวกรองในเครื่องกับมาตรฐานใน MeasurEye จึงควรเลือกให้สอดคล้องกันNames differ slightly between the manual, the Product Data and the MeasurEye news (e.g. AS 2187-2 / AS 2817.2; ÖNORM S 9012 in the unit, ÖNORM S 9020 in MeasurEye). This guide keeps each source's spelling; choose the unit filter and the MeasurEye standard so they match.
ในไทยยังไม่มีมาตรฐานการสั่นสะเทือนจากงานก่อสร้างที่ 5GV หรือ MeasurEye ตั้งไว้ในตัว ถ้าข้อกำหนดโครงการอ้างมาตรฐานต่างประเทศ ให้ระบุฉบับและชนิดอาคารให้ชัดก่อนตั้งค่าNeither the 5GV nor MeasurEye has a Thai construction-vibration standard built in. If the specification refers to a foreign standard, pin down the edition and building class before configuring.
12ใช้งานUSE
การแจ้งเตือนและขีดจำกัดAlarms and limits
การแจ้งเตือนที่ดีทำให้ทีมรู้ตัวก่อนเกินเกณฑ์ และไม่ดังจนคนเลิกสนใจ ตั้งจากเกณฑ์ของโครงการ แล้วทดสอบว่าถึงคนจริงGood alerts warn the team before a criterion is reached without sounding so often that people stop listening. Set them from the project criteria, then test that they reach real people.
ศัพท์ที่ใช้ในคู่มือนี้Terms used in this guide
| คำTerm | ความหมายMeaning |
|---|---|
| ระดับเฝ้าระวัง (Warning level)Warning level | ความหมายMeaningขีดต่ำกว่าเกณฑ์ ให้เริ่มตรวจสอบหน้างานA threshold below the criterion: start checking on site |
| ระดับขีดจำกัด (Limit level)Limit level | ความหมายMeaningค่าตามเกณฑ์ที่โครงการยอมรับ เกินแล้วต้องทำตามแผนThe criterion the project accepts: exceeding it triggers the response plan |
| Event (เหตุการณ์)Event | ความหมายMeaningบันทึกเมื่อเงื่อนไขเป็นจริง ใน 5GV มีไฟล์ Alert + Waveform ใน MeasurEye มี Event AlertRecorded when a condition is met: in the 5GV an alert file + waveform, in MeasurEye an event alert |
| Notification (แจ้งเตือน)Notification | ความหมายMeaningข้อความที่ส่งถึงคน: อีเมลจาก MeasurEye, SMS / MQTT จาก 5GVMessage to people: e-mail from MeasurEye, SMS / MQTT from the 5GV |
"Warning level" และ "Limit level" เป็นคำอธิบายของคู่มือนี้ ไม่ใช่ชื่อช่องในโปรแกรม ในตัว 5GV มีขีดเตือนต่อแกน (PPV_MAX_X/Y/Z) ชั้นเดียว ส่วนหลายระดับทำได้ด้วยหลาย Event ใน MeasurEye (ชื่อช่องสำหรับ 5GV ยังไม่มีภาพทางการ)"Warning level" and "limit level" are this guide's words, not field names. The 5GV itself has one per-axis threshold (PPV_MAX_X/Y/Z); several levels are made with several events in MeasurEye (no official screenshot yet of the 5GV fields).
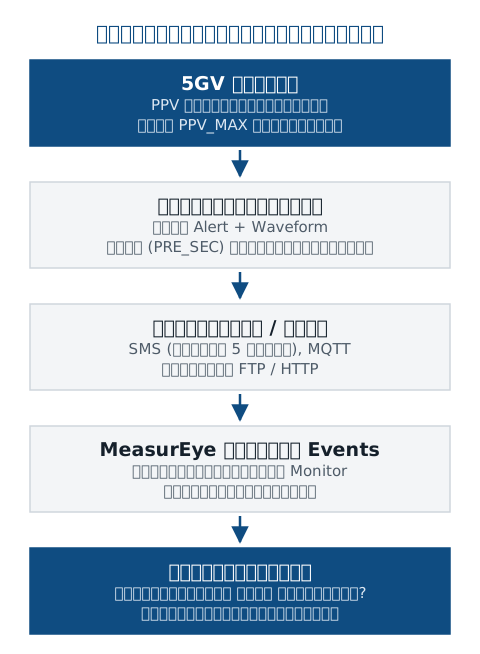
ค่าตั้งการแจ้งเตือนในตัว 5GVAlert settings in the 5GV
- PPV_MAX_X / Y / Z: ขีดต่อแกน L / T / V (mm/s) และ FLG_ALT_X / Y / Z เปิด-ปิดการแจ้งเตือนแต่ละแกนPPV_MAX_X / Y / Z: per-axis thresholds L / T / V (mm/s); FLG_ALT_X / Y / Z switch each axis' alert on or off
- PRE_SEC (ค่าเริ่มต้น 1 s) บันทึกก่อนเหตุการณ์, MIN_SEC (2 s) หลังเหตุการณ์ ต่อเวลาเองถ้ามีเหตุการณ์ซ้ำ, MAX_SEC (10 s) สูงสุดPRE_SEC (default 1 s) before the event, MIN_SEC (2 s) after it, auto-extended on further alerts, MAX_SEC (10 s) maximum
- REA_SEC (ค่าเริ่มต้น 2 s) เวลาห่างขั้นต่ำระหว่างการแจ้งเตือนREA_SEC (default 2 s): minimum time between alerts
- SMS 1–5 + EN1–EN5 และเส้นทางข้อความ ROUTE_MSG (EVENT, ALARM = SMS หรือ MQTT) ข้อความ ALARM รวมการเตือนแบตเตอรี่ต่ำSMS 1–5 + EN1–EN5 and message routing ROUTE_MSG (EVENT, ALARM = SMS or MQTT); ALARM messages include low-battery warnings
สมมติข้อกำหนดโครงการ (ไม่ใช่มาตรฐาน) ให้ขีดจำกัด 10 mm/s สำหรับอาคารข้างเคียง ทีมตกลงระดับเฝ้าระวังที่ 7 mm/s: ตั้ง PPV_MAX ทั้ง 3 แกนใน 5GV = 7 mm/s ให้ SMS ถึงหัวหน้างาน และตั้ง Event ใน MeasurEye 2 ชั้นที่ 7 และ 10 mm/s ส่งอีเมลถึงวิศวกรและเจ้าของโครงการ — ILLUSTRATIVE EXAMPLE — NOT A STANDARD LIMITSuppose the project specification (not a standard) gives a 10 mm/s limit for the neighbouring building and the team agrees a 7 mm/s warning level: set PPV_MAX on all three axes in the 5GV to 7 mm/s with SMS to the site supervisor, and two MeasurEye events at 7 and 10 mm/s e-mailing the engineer and the client — ILLUSTRATIVE EXAMPLE — NOT A STANDARD LIMIT
หลังจากค่าเกินAfter an exceedance
- ดูเวลาและแกนของเหตุการณ์ใน MeasurEye (Event Alert) และ Waveform ถ้ามีCheck the time and axis of the event in MeasurEye (event alert) and the waveform if available
- ถามหน้างานว่าเวลานั้นมีกิจกรรมอะไร (ตอกเข็ม รถบดอัด ระเบิด)Ask the site what was happening at that moment (piling, compaction, blasting)
- แยกให้ออกว่าเป็นเหตุการณ์จริงหรือปัญหาระบบ (ดูบทอ่านผล)Decide whether it is a real event or a system problem (see the reading-results chapter)
- ทำตามแผนรับมือของโครงการ และบันทึกสิ่งที่ทำFollow the project's response plan and record what was done
ตั้งขีดเตือนต่ำเกินหรือใกล้ค่าพื้นหลัง แจ้งเตือนดังทั้งวันจนทีมเลิกอ่าน หรือทิ้งค่าโรงงาน 5.0 mm/s ไว้โดยไม่รู้ว่าไม่ใช่เกณฑ์ของโครงการThresholds set too low or near the background: alerts all day until the team stops reading them. Or leaving the 5.0 mm/s factory value without realising it is not the project criterion.
ทดสอบก่อนออกจากพื้นที่: ส่งข้อความทดสอบถึงทุกเบอร์และอีเมลในรายชื่อ ยืนยันว่าทุกคนได้รับ และรู้ว่าต้องทำอะไรเมื่อได้รับ ถ้าต้องทดสอบด้วยการสั่นจริง ให้ใช้วิธีที่ไม่ทำให้โครงสร้างหรือเครื่องเสียหายTest before leaving: send a test message to every number and address on the list, confirm everyone received it and knows what to do. If you test with real vibration, use a method that cannot harm the structure or the unit.
13วัดMEASURE
Monitoring ระยะยาวLong-term monitoring
งานระยะยาวสำเร็จหรือล้มเหลวที่การเตรียมและการตรวจเป็นระยะ ไม่ใช่ที่วันติดตั้งLong-term monitoring succeeds or fails on preparation and regular checks, not on installation day.
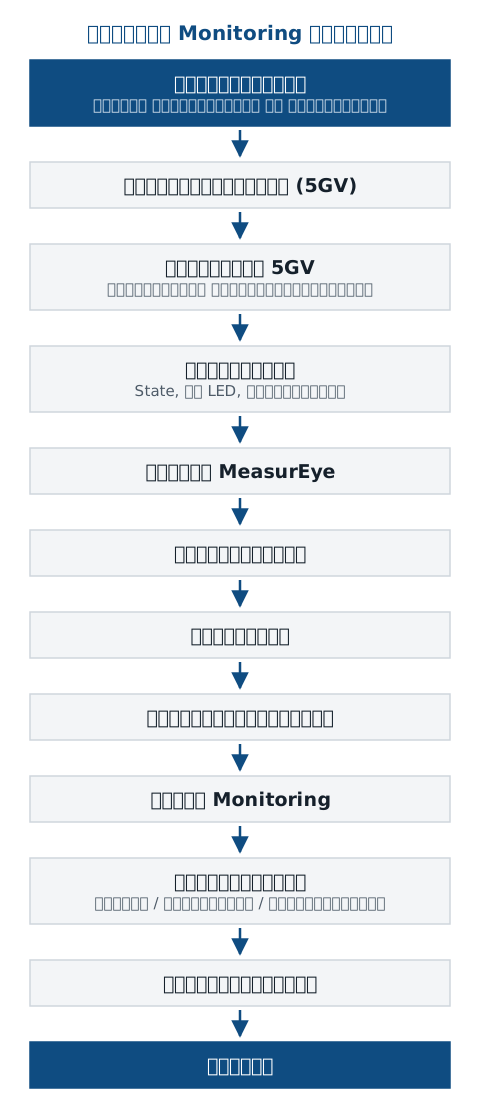
NTi แนะนำให้ เก็บค่าพื้นหลังก่อนเริ่มงาน เพื่อใช้ตั้งขีดเตือนที่สมจริงและบันทึกสภาพเดิม และวางจุดวัดให้ตรงวัตถุประสงค์ ช่วงวัดพื้นหลังใช้ค่าตั้งและตำแหน่งเดียวกับงานจริง จะได้เทียบกันได้NTi recommends recording the background before work starts, to set realistic thresholds and document the existing condition, and placing sensors to match the objective. Measure the background with the same settings and position as the real monitoring so the two compare.
ตรวจเป็นระยะPeriodic checks
| เมื่อไรWhen | ตรวจอะไรWhat to check |
|---|---|
| ทุกวันDaily | ตรวจอะไรWhat to checkข้อมูลเข้า MeasurEye ต่อเนื่องไม่มีช่วงหาย เหตุการณ์ใหม่ SOH (แบตเตอรี่ ไฟ) และอีเมล/SMS ที่เข้ามาData arriving without gaps, new events, SOH (battery, power), incoming e-mails / SMS |
| ทุกสัปดาห์Weekly | ตรวจอะไรWhat to checkแนวโน้มแบตเตอรี่ (stat bat หรือ SOH) ค่าพื้นหลังยังเหมือนเดิม เทียบกิจกรรมหน้างานกับกราฟ และรายงานตามรอบส่งถึงผู้รับBattery trend (stat bat or SOH), background unchanged, site activities vs the chart, periodic report delivered |
| หลังเหตุการณ์After an event | ตรวจอะไรWhat to checkเวลา แกน ความถี่ Waveform บันทึกกิจกรรมหน้างาน และตรวจว่าเครื่องยังยึดแน่น ไม่ถูกชนหรือขยับTime, axis, frequency, waveform, site activity log, and that the unit is still firmly fixed, not hit or moved |
| เมื่อเข้าหน้างานOn a site visit | ตรวจอะไรWhat to checkไฟ LED ปกติ การยึด ฝา LEMO เสาอากาศ และความเสียหายภายนอกNormal LEDs, fixing, LEMO caps, antennas and any visible damage |
เก็บบันทึกหน้างาน (Site log) คู่กับข้อมูลเสมอ: เวลาเริ่ม-หยุดงานที่สั่นมาก การเข้าไปใกล้เครื่อง และการเปลี่ยนค่าตั้ง เวลาทบทวนเหตุการณ์คุณจะรู้ทันทีว่าค่าไหนมาจากอะไรKeep a site log alongside the data: start and stop times of high-vibration work, visits near the unit and setting changes. When you review events you will know at once what caused what.
ถ้าเครื่องใช้เวลาทำงานบางช่วง (ACTIVE ใน Schedule) นอกช่วงนั้นเครื่องจะหลับประหยัดไฟและ ไม่วัด ตั้งให้ครอบคลุมทุกช่วงที่ต้องเฝ้าระวัง ("00:00,00:00" = ทำงานตลอด)If an active window is set (ACTIVE in Schedule), the unit sleeps outside it and does not measure. Make it cover every period you must monitor ("00:00,00:00" = always active).
14วิเคราะห์ANALYZE
การอ่านผลReading the results
เริ่มจากภาพรวม หาเหตุการณ์ แล้วดูรายละเอียดแกนและความถี่ ก่อนสรุปว่าเกินเกณฑ์ ต้องตัดความเป็นไปได้ว่าเป็นปัญหาของระบบก่อนStart with the overview, find the events, then look at axis and frequency. Before concluding there was an exceedance, rule out a system problem.
- STEP1
ดูค่าพื้นหลังปกติKnow the normal background
ในกราฟ PPV ตามเวลา ค่าช่วงไม่มีกิจกรรม (เช่น กลางคืน) คือพื้นหลังของจุดนั้น ควรต่ำและเรียบ ใช้เป็นฐานเทียบ (ดูรูปที่ 8)In the PPV-over-time chart, quiet periods (e.g. night) show that position's background: low and flat. Use it as your reference. (See figure 8)
- STEP2
หาเวลาเหตุการณ์Find when events happened
ใช้แท็บ SUMMARY ตั้ง Data Type เป็น Alert หรือ Measurement และเลือก Indicator ตารางสีรายชั่วโมงจะชี้ช่วงที่ค่าสูงให้ แล้วเปิด CHART ช่วงนั้นดูละเอียด หรือเลือก Chart Type Event Alert (ดูรูปที่ 10)Use SUMMARY with Data Type Alert or Measurement and pick an indicator: the hourly colour table points to high periods; then open CHART for that period, or Chart Type Event Alert. (See figure 10)
- STEP3
ดูแต่ละแกนInspect each axis
เทียบ PPVx (L), PPVy (T), PPVz (V) แกนไหนสูงสุด สอดคล้องกับแหล่งสั่นไหม เช่น งานบดอัดมักเห็นแกนดิ่งเด่น แต่ให้ตัดสินจากข้อมูลจริงของหน้างานCompare PPVx (L), PPVy (T) and PPVz (V): which is highest and does it fit the source? Judge from the site's own data.
- STEP4
ดูความถี่Look at frequency
ในกราฟ Amplitude กับ Dominant Frequency ดูว่าเหตุการณ์อยู่ย่านความถี่ไหน และอยู่ใต้หรือเหนือเส้นเกณฑ์ที่ความถี่นั้น (ดูรูปที่ 29)In the amplitude vs dominant frequency chart, see which frequency range the events fall in and whether they sit below or above the criterion line there. (See figure 29)
เหตุการณ์จริง หรือปัญหาระบบ?Real event or system problem?
| สิ่งที่เห็นWhat you see | น่าจะเป็นLikely |
|---|---|
| ค่าสูงตรงกับเวลางานในบันทึกหน้างาน ขึ้นลงต่อเนื่องเป็นกลุ่มHigh values match work times in the site log, rising and falling in clusters | น่าจะเป็นLikelyเหตุการณ์จริงจากแหล่งสั่นA real event from the source |
| ค่ากระโดดสูงครั้งเดียวตอนมีคนเข้าไปที่เครื่อง ไม่มีงานอื่นOne spike when someone was at the unit, no other work | น่าจะเป็นLikelyการสัมผัส/ขยับเครื่อง (ควรสั่ง sensor idle ก่อน)The unit was touched / moved (sensor idle should have been used) |
| ค่าพื้นหลังเปลี่ยนระดับถาวรหลังเหตุการณ์ หรือยอดความถี่แปลกซ้ำ ๆBackground shifts permanently after an event, or odd repeated frequency peaks | น่าจะเป็นLikelyการยึดหลวม เรโซแนนซ์ที่จุดสัมผัส — ตรวจการติดตั้งLoosened fixing, contact resonance: inspect the installation |
| แกนหนึ่งเป็นศูนย์หรือค่าคงที่ผิดธรรมชาติOne axis at zero or an unnaturally constant value | น่าจะเป็นLikelyปัญหาเซนเซอร์/ค่าตั้ง — ตรวจ stat get และผลตรวจตัวเองSensor / settings problem: check stat get and the self-test |
| ช่วงไม่มีข้อมูลเลย แล้วข้อมูลกลับมาทีเดียวA gap with no data, then everything arrives at once | น่าจะเป็นLikelyเครือข่ายขาดชั่วคราว ข้อมูลเก็บในการ์ดแล้วส่งภายหลังA temporary network outage; data was stored and sent later |
สรุปว่า "เกินเกณฑ์" จากตัวเลขสูงสุดโดยไม่ดูแกน ความถี่ เวลา และบันทึกหน้างานConcluding "exceeded" from the top number without checking axis, frequency, time and the site log.
15รายงานREPORT
ข้อมูล การส่งออก และรายงานData, export and reports
ข้อมูลของ 5GV ไปได้ 2 เส้นทาง: เข้า MeasurEye เพื่อดูและทำรายงาน หรือเป็นไฟล์เข้าเซิร์ฟเวอร์ของคุณเองผ่าน FTP / HTTP ทั้งสองทางเริ่มจากไฟล์ใน microSD เดียวกัน5GV data takes two routes: into MeasurEye for viewing and reports, or as files to your own server via FTP / HTTP. Both start from the same files on the microSD.
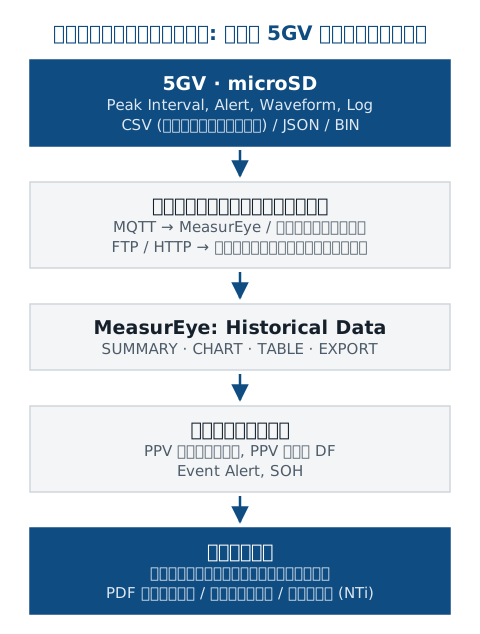
ไฟล์ในตัวเครื่องFiles in the unit
| ไฟล์File | รูปแบบ (ค่าเริ่มต้น)Format (default) |
|---|---|
| Peak Interval (PPV ตามช่วง)Peak interval (PPV per interval) | รูปแบบ (ค่าเริ่มต้น)Format (default)CSV หรือ JSON (CSV)CSV or JSON (CSV) |
| Vibration Alert (เหตุการณ์)Vibration alert (event) | รูปแบบ (ค่าเริ่มต้น)Format (default)CSV หรือ JSON (CSV)CSV or JSON (CSV) |
| Waveform ของเหตุการณ์Event waveform | รูปแบบ (ค่าเริ่มต้น)Format (default)CSV, JSON หรือ Binary (Binary ส่งเร็วและประหยัดไฟ)CSV, JSON or binary (binary: fast and battery-saving) |
| หน่วยUnits | รูปแบบ (ค่าเริ่มต้น)Format (default)PPV mm/s (หรือ in/s), ความเร่ง g (หรือ m/s²), ระยะ mmPPV mm/s (or in/s), acceleration g (or m/s²), displacement mm |
ไฟล์อยู่ในโฟลเดอร์ /FILES (PEAKS, VIBR, BEATS) บน microSD ระบบไฟล์ FAT16 แต่ GSS แนะนำให้ดึงไฟล์ผ่านโปรแกรม PC Console แทนการถอดการ์ด เพราะต้องถอดสกรูหลายตัวและอาจทำให้เสียหาย ชื่อไฟล์และโฟลเดอร์บนเซิร์ฟเวอร์ตั้งด้วย Macro เช่น MAC วันเวลา และเลขลำดับ ไฟล์ .$$$ ในโฟลเดอร์ PEAKS/BEATS คือไฟล์ปัจจุบันที่ยังไม่ปิด เป็นเรื่องปกติFiles sit in /FILES (PEAKS, VIBR, BEATS) on the FAT16 microSD, but GSS recommends retrieving them with the PC Console rather than removing the card, which means undoing several screws and risking damage. Server file and folder names use macros such as MAC, date/time and sequence number. .$$$ files in PEAKS/BEATS are the current, not-yet-closed files: normal.
ส่งออกจาก MeasurEyeExporting from MeasurEye
ใน Historical Data ใช้แท็บ TABLE ดูตัวเลข และแท็บ EXPORT ดึงข้อมูลออก ส่วน Reports ตั้งรายงานตามรอบให้ส่งถึงอีเมลอัตโนมัติ พร้อมข้อมูลวัดและการแจ้งเตือนของช่วงนั้น NTi ระบุว่ามีรายงาน PDF รายวัน รายสัปดาห์ และรายเดือนสำหรับงานโครงสร้างและความสบายIn Historical Data use TABLE for numbers and EXPORT to take the data out. Reports sets periodic reports e-mailed automatically, with the measurements and alerts of the period. NTi states daily, weekly and monthly PDF reports for structural and comfort monitoring.
ภาพหน้าจอทางการของแท็บ EXPORT และตัวอย่างรายงาน PDF การสั่นสะเทือนจาก MeasurEye (รูปแบบไฟล์ที่ส่งออกได้ ช่วงเวลา และ Indicator) — ยังไม่มีในเอกสารสาธารณะของ NTiOfficial screenshot of the EXPORT tab and a sample MeasurEye vibration PDF report (export formats, period and indicators). Not in NTi's public documents yet.
NTi Audio / MeasurEye · MeasurEye (not yet public)ก่อนส่งรายงาน: ตรวจช่วงเวลา Time Zone จุดวัด (ชื่อ Monitor) มาตรฐานและชนิดอาคารที่ใช้ แกน และหน่วยให้ตรงกับข้อกำหนดโครงการBefore issuing a report, check the period, time zone, measuring point (monitor name), standard and building class, axes and units against the project specification.
NTi ระบุว่าการส่งไฟล์ผ่าน FTP ของ 5GV ใช้เป็นระบบสำรองหรือทำงานแบบ Standalone ได้ โดยไม่ขึ้นกับการสมัครใช้คลาวด์ ถ้าโครงการต้องเก็บข้อมูลดิบเอง ให้ตั้ง FTP / HTTP ไปยังเซิร์ฟเวอร์ขององค์กรNTi states the 5GV's FTP push works as a backup or standalone path independent of any cloud subscription. If the project must keep its own raw data, route FTP / HTTP to your organisation's server.
16แก้ปัญหาTROUBLESHOOT
แก้ปัญหาTroubleshooting
แต่ละปัญหามีสาเหตุที่เป็นไปได้ สิ่งที่ต้องตรวจ และสิ่งที่ทำได้ตามคู่มือ ถ้าทำตามแล้วยังไม่หาย ส่งผล stat 3g / stat get / stat bat และไฟล์ Log ให้ผู้เชี่ยวชาญดูEach problem lists possible causes, what to check and what the manual lets you do. If it persists, send the stat 3g / stat get / stat bat output and the log file to a specialist.
ไม่มีสัญญาณจากเซนเซอร์ / แกนใดแกนหนึ่งไม่มีค่าNo sensor signal / one axis has no value
สาเหตุ: เซนเซอร์อยู่สถานะ IDLE หรือค้าง INITIALISING, เครื่องอยู่ในโหมด TILT ตรวจ: ไฟ Sensor, stat get (Mode ต้อง VIBR, State ต้อง Monitor) ทำ: sensor run, cfg mode vibr หรือ reset sensor ถ้ายังไม่หายให้ดูผลตรวจตัวเอง (ADXL355/ADXL357 ต้อง PASS)Cause: sensor IDLE or stuck in INITIALISING, unit in TILT mode. Check: Sensor LED, stat get (Mode VIBR, State Monitor). Do: sensor run, cfg mode vibr or reset sensor; if not solved, read the self-test (ADXL355/ADXL357 must PASS).
ค่าสูงผิดคาดUnexpectedly high vibration
สาเหตุ: มีคนสัมผัส/ขยับเครื่อง, ยึดหลวมจนเกิดเรโซแนนซ์, แหล่งสั่นใกล้เครื่องที่ไม่เกี่ยวกับงาน (ประตู เครื่องจักรในอาคาร) ตรวจ: บันทึกหน้างาน เวลาเหตุการณ์ การยึด ทำ: แก้การติดตั้ง ใช้ sensor idle ทุกครั้งที่ทำงานใกล้เครื่องCause: the unit was touched/moved, a loose fixing resonating, a nearby source unrelated to the works (doors, building plant). Check: site log, event time, fixing. Do: fix the installation; use sensor idle whenever working at the unit.
ค่าต่ำผิดคาดUnexpectedly low vibration
สาเหตุ: ติดตั้งบนส่วนที่ไม่ได้รับการสั่น (เช่น วัสดุปิดผิว พรม ฉนวน), ช่วงรายงานยาวแต่ดูค่าเฉลี่ยแทนค่าสูงสุด ตรวจ: ตำแหน่งและพื้นผิวติดตั้ง Indicator ที่เลือก ทำ: ยึดกับองค์อาคารโดยตรง บนพื้นมีวัสดุปิดใช้ Ground Mounting Plate แบบขาแหลมCause: mounted on something that does not carry the vibration (covering, carpet, insulation), or an aggregated average viewed instead of the peak. Check: position, mounting surface, selected indicator. Do: fix to the structural element; on covered floors use the ground plate with spikes.
แกนผิด / L กับ T สลับWrong axis / L and T swapped
สาเหตุ: ใส่เครื่องคืนหันคนละทิศ, ปิด FLG_ORIENT ตรวจ: ภาพถ่ายการติดตั้งเดิม ค่า FLG_ORIENT ทำ: ติดตั้งตามทิศเดิม (ใช้ Mounting Plate ถ้าถอดบ่อย) บันทึกการเปลี่ยนทิศในรายงานCause: refitted facing another way, FLG_ORIENT off. Check: original installation photos, FLG_ORIENT. Do: reinstall in the original direction (mounting plate if removed often) and record any change in the report.
"ความไว" ไม่ถูกต้อง / สงสัยค่าเพี้ยน"Sensitivity" wrong / suspected drift
5GV ไม่มีค่าความไวให้ผู้ใช้ป้อน ตรวจ: ย่าน ACC_SCALE เหมาะกับระดับสั่นไหม (ต่ำเกินอาจเกินย่าน สูงเกินลดความละเอียดที่ระดับต่ำ), หน่วยส่งออก (mm/s หรือ in/s, g หรือ m/s²), Filter ทำ: แก้ค่าตั้งแล้ว CFG APPLY + reset sensor หากสงสัยความแม่นยำของเซนเซอร์ ให้ติดต่อ NTi / GET BEST SOUND เรื่องการตรวจสอบและสอบเทียบThe 5GV has no user sensitivity value. Check: is ACC_SCALE right for the level (too low can over-range, too high loses resolution at low levels), export units (mm/s or in/s, g or m/s²), filter. Do: correct the settings, CFG APPLY + reset sensor. If you doubt the sensor's accuracy, contact NTi / GET BEST SOUND about verification and calibration.
เครือข่ายไม่เชื่อมต่อ / 5GV ออฟไลน์Network disconnected / 5GV offline
สาเหตุ: APN ผิด (ค่าเริ่มต้นเป็นของฮ่องกง), SIM ไม่มีแพ็กเกจหรือถูกล็อก PIN, สัญญาณอ่อน, ถ่านกระแสไม่พอสำหรับโมเด็ม ตรวจ: ไฟ Communication, stat 3g (Oper, RSSI, Net) ทำ: แก้ APN, net scanoper 4g / net scanband / net switch เลือกผู้ให้บริการ, เปลี่ยนหรือย้ายเสาอากาศด้วยสาย low-loss, ใช้ถ่าน ER34615M ระหว่างนี้เครื่องยังวัดและเก็บข้อมูลไว้Cause: wrong APN (default is Hong Kong), SIM without data or PIN-locked, weak signal, cells unable to supply the modem. Check: Communication LED, stat 3g (Oper, RSSI, Net). Do: fix the APN, steer with net scanoper 4g / net scanband / net switch, change or relocate the antenna on low-loss coax, use ER34615M cells. Meanwhile the unit keeps measuring and storing.
MeasurEye ไม่ได้รับข้อมูลMeasurEye not receiving data
สาเหตุ: เครื่องออฟไลน์, Monitor ไม่ได้ลิงก์หรือปิดการเชื่อมต่อ, รอบส่งยาว (เช่น PEAK ทุก 4 ชั่วโมง), ส่งข้อความ PEAK ไม่ได้ตั้งเป็น MQTT ตรวจ: สถานะ Online ของ Monitor, ค่าตั้ง Schedule / ROUTE_MSG, files peak ทำ: สั่ง peak snap / send peak เพื่อส่งทันที ถ้ายังไม่เห็นข้อมูล ติดต่อ NTi / GET BEST SOUND พร้อม MAC ของเครื่องCause: unit offline, monitor not linked or connection switched off, long upload interval (e.g. PEAK every 4 h), PEAK messages not routed to MQTT. Check: the monitor's Online status, Schedule / ROUTE_MSG, files peak. Do: peak snap / send peak to push now; if still nothing, contact NTi / GET BEST SOUND with the unit's MAC.
ไม่มีการแจ้งเตือนทั้งที่ค่าเกินNo alarm although the value was exceeded
สาเหตุ: FLG_ALT ของแกนนั้นปิด, SMS ไม่ได้เปิด EN, ROUTE_MSG EVENT เป็น None, Event ใน MeasurEye ใช้ Indicator หรือช่วงวัน/เวลาไม่ตรง, อีเมลเข้า Spam ตรวจ: ค่าตั้งแต่ละชั้นตามลำดับในแผนภาพการแจ้งเตือน ทำ: แก้แล้วทดสอบซ้ำจนผู้รับได้จริงCause: that axis' FLG_ALT off, SMS EN not enabled, ROUTE_MSG EVENT = None, the MeasurEye event uses the wrong indicator or day/time window, e-mails in spam. Check: each layer in the order of the alert diagram. Do: fix and re-test until recipients really get it.
แจ้งเตือนมากเกินไปToo many alarms
สาเหตุ: ขีดเตือนใกล้ค่าพื้นหลัง (หรือค่าโรงงาน 5.0 mm/s ไม่เหมาะกับหน้างาน), เครื่องถูกสัมผัสบ่อย, ยึดหลวม ทำ: ทบทวนขีดกับทีมโครงการตามเกณฑ์และค่าพื้นหลัง, ใช้ sensor idle ตอนทำงานใกล้เครื่อง, จำกัด Event ใน MeasurEye ตามวันและเวลาที่เกี่ยวข้องCause: thresholds near the background (or the 5.0 mm/s factory value unsuited to the site), frequent touching, loose fixing. Do: review thresholds with the project team against the criteria and background, use sensor idle when working at the unit, limit MeasurEye events to relevant days and hours.
ไฟดับ / แบตเตอรี่หมดเร็วPower interruption / battery drains fast
สาเหตุ: ส่ง PEAK / BEAT แบบ MQTT เรียลไทม์ผ่าน 4G, LOG ตั้งเป็น I, เครือข่ายบางรายสื่อสารกับเครื่องตลอด, ถ่านผิดรุ่น ตรวจ: stat bat, ค่าตั้ง LOG และ ROUTE_MSG ทำ: ใช้ไฟภายนอกถ้าต้องการเรียลไทม์, ตั้ง LOG = W, cfg pwrsave on (ปิดวิทยุ ตื่นทุก 5 นาทีเพื่อรับคำสั่ง) และตั้ง newbat ทุกครั้งที่เปลี่ยนถ่านCause: real-time PEAK / BEAT over MQTT on 4G, LOG = I, a network that keeps talking to the unit, wrong cells. Check: stat bat, LOG and ROUTE_MSG. Do: external power for real-time use, LOG = W, cfg pwrsave on (radio off, wakes every 5 minutes for commands), and set newbat whenever you change cells.
ข้อมูลหายบางช่วงMissing data
สาเหตุ: เครือข่ายขาด (ข้อมูลยังอยู่ในการ์ด), ช่วงนอกเวลา ACTIVE (เครื่องไม่วัด), sensor idle ค้างไว้, ไฟหมด ตรวจ: files peak / files vibr, Schedule ACTIVE, สถานะเซนเซอร์ ทำ: send peak / send vibr เพื่อส่งไฟล์ค้าง ช่วงที่เครื่องไม่ได้วัดกู้คืนไม่ได้ ต้องระบุในรายงานCause: network outage (data still on the card), outside the ACTIVE window (not measured), sensor left idle, power loss. Check: files peak / files vibr, Schedule ACTIVE, sensor state. Do: send peak / send vibr for pending files. Periods not measured cannot be recovered: state them in the report.
ส่งออกข้อมูลไม่ได้Unable to export
ตรวจ: ช่วงเวลาและ Monitor ที่เลือกมีข้อมูลจริง (ดูใน CHART / TABLE ก่อน), สิทธิ์ผู้ใช้ของบัญชี ทำ: ลดช่วงเวลาให้สั้นลงแล้วลองใหม่ ถ้าต้องการไฟล์ดิบ ดึงจากเครื่องผ่าน FTP หรือ PC Console ขั้นตอนแก้ไขภายใน MeasurEye อื่น ๆ ยังไม่มีในเอกสารสาธารณะ ติดต่อ NTi / GET BEST SOUNDCheck: the selected period and monitor really hold data (look in CHART / TABLE first), and the account's user rights. Do: try a shorter period; for raw files retrieve them from the unit via FTP or the PC Console. Other MeasurEye fixes are not publicly documented: contact NTi / GET BEST SOUND.
ค่าตั้งหายหลังเครื่องรีบูตSettings lost after a reboot
ลืมส่ง CFG APPLY หลังแก้ด้วยคำสั่ง ตั้งใหม่แล้วส่ง CFG APPLY และสั่ง cfg snap เก็บสำเนาไว้CFG APPLY was not sent after a command change. Set again, send CFG APPLY and keep a copy with cfg snap.
17ตรวจสอบCHECK
Checklist หน้างานField checklists
เปิดบทนี้บนมือถือแล้วไล่ทีละข้อ ข้อที่ยังไม่ผ่านอย่าข้ามOpen this chapter on your phone and go line by line. Do not skip a line that has not passed.
ก่อนออกหน้างานBefore going to site
- 5GV + เสาอากาศ 2 ต้น5GV + two antennas
- แม่เหล็กเปิด/ปิดOn/off magnet
- ถ่าน ER34615M 4 ก้อน / ฐานชาร์จเต็ม / ไฟภายนอก4 × ER34615M / charged base / external power
- SIM มีแพ็กเกจข้อมูล + รู้ APNSIM with data + APN known
- สาย USB-LEMO (ตั้งค่า / ไฟ)USB-LEMO cable (set-up / power)
- อุปกรณ์ยึด: Anchor Bolt M8, แหวนโลหะ, Plate, Standoffs, สว่านMounting: M8 anchor bolt, metal washer, plate, standoffs, drill
- มือถือ Android + GSSLink ชาร์จเต็มAndroid phone + GSSLink, charged
- ทดสอบเครือข่ายที่ออฟฟิศแล้วNetwork tested at the office
- บัญชี MeasurEye เข้าสู่ระบบได้MeasurEye account signs in
- ข้อมูลโครงการ: จุดวัด เกณฑ์ (มาตรฐาน + ฉบับ) ผู้รับแจ้งเตือนProject data: positions, criteria (standard + edition), alert recipients
ก่อนเริ่ม MonitoringBefore monitoring
- เครื่องยึดแน่น ผลักแล้วไม่ขยับUnit fixed firmly, does not move when pushed
- จดทิศ L / T และถ่ายภาพแล้วL / T direction recorded and photographed
- ย่าน g, Filter, PEAK_SPAN ถูกต้องg range, filter, PEAK_SPAN correct
- ไม่มีค่าความไวให้ป้อน — ตรวจหน่วยแทนNo sensitivity to enter: check units instead
- State = MONITORING, ไฟ Sensor กะพริบState = MONITORING, Sensor LED blinking
- ค่าพื้นหลังสมเหตุสมผลทั้ง 3 แกนBackground plausible on all three axes
- เวลาและ Time Zone ถูกต้องTime and time zone correct
- เครือข่ายออนไลน์ (Power + Heartbeat กะพริบพร้อมกัน)Network online (Power + Heartbeat flashing together)
- MeasurEye เห็น Monitor Online และข้อมูลเข้าMeasurEye shows the monitor Online with data arriving
- ขีดเตือนและ Events ตรงกับเกณฑ์โครงการThresholds and events match the project criteria
- ทดสอบการแจ้งเตือนแล้ว ทุกคนได้รับAlert tested, everyone received it
ก่อนออกจากพื้นที่ (สำคัญที่สุด)Before leaving site (most important)
- สั่ง sensor run แล้ว (ถ้าเคยสั่ง idle)sensor run sent (if you used idle)
- ค่าตั้งบันทึกแล้ว (CFG APPLY / cfg snap)Settings saved (CFG APPLY / cfg snap)
- ฝา LEMO ปิดแน่น เสาอากาศแน่นLEMO caps pushed home, antennas tight
- สกรูฝาครบ O-ring เข้าที่Lid screws all in, O-ring seated
- Flange Lock / กันขโมยติดตั้งแล้วFlange lock / anti-theft fitted
- ป้ายบอกว่าเป็นเครื่องวัด + ติดต่อใครLabel: measuring device + who to call
- ข้อมูลล่าสุดเข้า MeasurEye หลังปิดฝาแล้วLatest data in MeasurEye after closing up
- ถ่ายภาพจุดติดตั้งสุดท้ายFinal photo of the installation
- บันทึกเวลาเริ่มวัดและผู้ติดตั้งStart time and installer recorded
- แจ้งทีมว่าใครตรวจรายวันและรับแจ้งเตือนTeam told who checks daily and receives alerts
ข้อสุดท้ายที่มักลืม: ยืนยันว่าข้อมูลยังเข้า MeasurEye หลัง ปิดฝาและเก็บของเสร็จแล้ว ไม่ใช่แค่ตอนตั้งค่าThe line people forget: confirm data is still arriving in MeasurEye after closing up and packing, not only during set-up.
GET BEST SOUND ช่วยอะไรได้บ้างHow GET BEST SOUND can help
ถ้าต้องการผู้ช่วย ทีมวิศวกร GET BEST SOUND ช่วยตั้งค่า 5GV และ MeasurEye ติดตั้งหน้างาน วางแผนจุดวัด เลือกเกณฑ์ประเมินให้ตรงกับข้อกำหนดโครงการ อ่านและตีความข้อมูล และจัดทำรายงานได้ ส่งภาพการติดตั้ง ผล stat 3g / stat get หรือภาพหน้าจอ MeasurEye มาให้ดูได้If you want help, GET BEST SOUND engineers can configure the 5GV and MeasurEye, install on site, plan measuring positions, choose assessment criteria that match the project specification, interpret the data and prepare reports. Send us installation photos, the stat 3g / stat get output or MeasurEye screenshots.