QUICK STARTเริ่มใช้งานใน 5–10 นาทีUp and running in 5–10 minutes
ส่งโทน 1 kHz ที่ระดับรู้ค่า เข้าระบบเสียงSend a known 1 kHz tone into a sound system
งานแรกที่ควรทำเป็นคือส่งสัญญาณไซน์ 1 kHz ที่ 0 dBu เข้าช่อง Line ของมิกเซอร์หรือแอมป์ เพราะเกือบทุกงานตรวจระบบเริ่มจาก "รู้ว่าสัญญาณเข้าเท่าไร" ก่อนThe first skill to learn is sending a 1 kHz sine at 0 dBu into a mixer or amplifier line input, because almost every system check starts from knowing exactly what goes in.
ต้องมีอะไรบ้างก่อนเริ่มWhat you need before you start
- MR-PRO พร้อมถ่าน AA 3 ก้อน (ถ่านอัลคาไลน์หรือถ่านชาร์จได้)The MR-PRO with three AA cells (alkaline or rechargeable)
- สาย XLR ที่ดี หนึ่งเส้นOne good XLR cable
- มิกเซอร์ แอมป์ หรือระบบเสียงที่มีอินพุตระดับ LineA mixer, amplifier or system with a line-level input
- STEP1
ใส่ถ่านและเปิดเครื่องInsert the batteries and switch on
ใส่ถ่าน AA 3 ก้อนให้ตรงขั้ว ใช้ถ่านยี่ห้อเดียวกันและระดับไฟเท่ากัน แล้วกดปุ่ม On/Off (ปิดเครื่อง: กดค้าง 1 วินาที)Insert three AA cells observing polarity, all of the same make and charge, then press On/Off (to switch off, hold it for one second).
ข้อควรระวังWatch outถ้าสัญลักษณ์แบตเตอรี่บนจอติดขึ้นมา แปลว่าถ่านใกล้หมด ให้เปลี่ยนทั้งชุดIf the battery symbol lights up, the cells are nearly empty: replace the whole set.
- STEP2
ตรวจว่าอยู่ในโหมดสร้างสัญญาณMake sure the generator is active
ด้านซ้ายของแถบเมนูบนจอควรแสดง GENERATOR ถ้าไม่ใช่ หมุนวงล้อไปที่ด้านซ้ายของแถบเมนู กด Enter แล้วเลือก GENERATORThe left side of the menu bar should read GENERATOR. If not, turn the wheel to the left side of the menu bar, press Enter and choose GENERATOR.
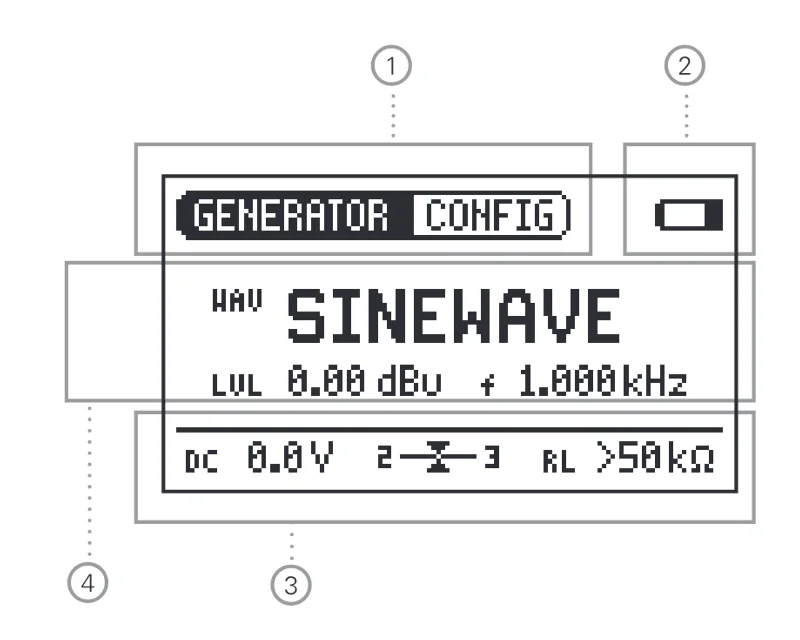
รูปที่ 1Figure 1 หน้าจอหลัก (หมายเลขตามคู่มือ NTi) — ด้านซ้ายของแถบเมนู (1) ต้องเป็น GENERATORThe main screen (numbers as in NTi's manual): the left side of the menu bar (1) must read GENERATOR - แถบเมนู: ฟังก์ชัน (GENERATOR) และ CONFIGMenu bar: function (GENERATOR) and CONFIG
- สัญลักษณ์แบตเตอรี่ — ถ้าติดขึ้นมาให้เปลี่ยนถ่านBattery symbol: if it lights up, replace the batteries
- บรรทัดค่าที่วัด: DC (ไฟ Phantom), บาลานซ์, RL (อิมพีแดนซ์โหลด)Readings line: DC (phantom), balance, RL (load impedance)
- การตั้งค่าสัญญาณ: ชื่อสัญญาณ ระดับ LVL และความถี่ fSignal settings: signal name, level LVL and frequency f
- STEP3
เลือกสัญญาณไซน์Choose the sine wave
กดปุ่ม Wave หมุนวงล้อไปที่ SINEWAVE แล้วกด EnterPress Wave, turn the wheel to SINEWAVE and press Enter.
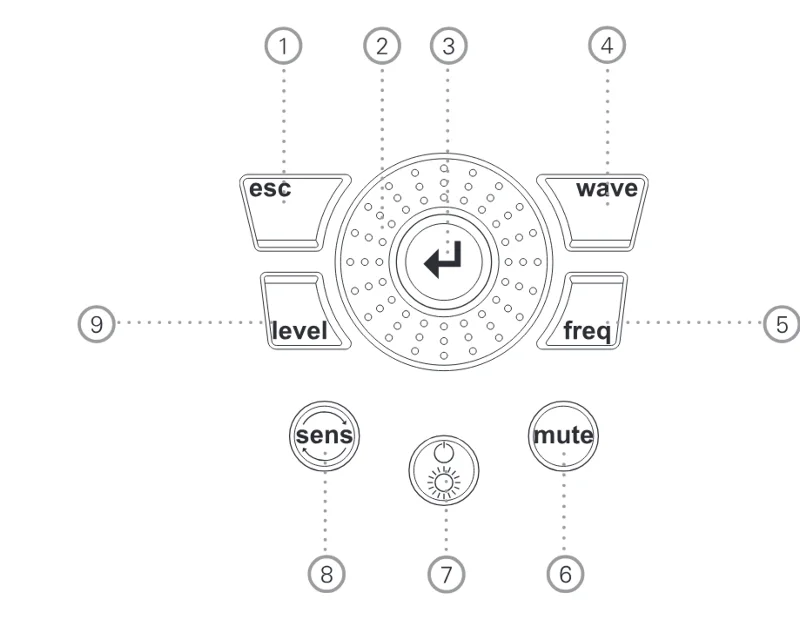
รูปที่ 2Figure 2 ปุ่มของ MR-PRO (หมายเลขตามคู่มือ NTi) — ขั้นนี้ใช้ wave (4) วงล้อ (2) และ Enter (3)MR-PRO keys (numbers as in NTi's manual): this step uses wave (4), the wheel (2) and Enter (3) - ESC จบการป้อนค่า กลับเมนูบน ปิดหน้าต่างESC: end entry, top menu, close window
- วงล้อ: หมุนช้า = ละเอียด หมุนเร็ว = ขั้นใหญ่Wheel: slow = fine, fast = large steps
- Enter ยืนยันEnter confirms
- wave เลือกสัญญาณwave: choose the signal
- freq ตั้งความถี่ (SWEEP/CHIRP ไปเมนู PARAM)freq: frequency (SWEEP/CHIRP open PARAM)
- mute ปิด/เปิดสัญญาณmute: output off/on
- On/Off กดค้าง 1 วินาที = ปิด และเปิด/ปิดไฟจอOn/Off: hold 1 s = off; also the backlight
- sens ขนาดขั้นการปรับsens: step size
- level ตั้งระดับ (dBu, dBV, V)level: output level (dBu, dBV, V)
- STEP4
ตั้งความถี่และระดับSet the frequency and the level
กด Freq หมุนไปที่ 1.000 kHz แล้วกด Enter จากนั้นกด Level หมุนไปที่ 0.00 dBu แล้วกด Enter (หน่วยเลือกได้ dBu, dBV หรือ V)Press Freq, turn to 1.000 kHz and press Enter; then press Level, turn to 0.00 dBu and press Enter (units: dBu, dBV or V).
ข้อควรระวังWatch outอยากปรับเร็วหรือละเอียดขึ้น: เลือก LVL หรือ f แล้วกดค้าง Sens พร้อมหมุนวงล้อเพื่อเปลี่ยนขนาดขั้น หรือหมุนวงล้อเร็วขึ้นFor faster or finer steps: select LVL or f, hold Sens and turn the wheel to change the step size, or simply turn the wheel faster.
- STEP5
ปิดเสียงไว้ก่อน แล้วต่อสายMute first, then connect
กด Mute ให้สัญญาณหยุด (จอแสดงสถานะ Mute และปุ่มกะพริบ) ต่อสายจากช่อง XLR output เข้าอินพุต Line ของระบบ โดยให้เดือยล็อกของปลั๊กอยู่ด้านล่างของตัวเครื่องPress Mute so the output stops (the display shows mute and the key flashes). Connect the XLR output to the system's line input, with the plug's locking pin on the lower side of the instrument.
ข้อควรระวังWatch outใช้ XLR หรือ RCA อย่างใดอย่างหนึ่งเท่านั้น ห้ามใช้สองช่องพร้อมกัน และห้ามใช้หัวแปลง XLR เป็น RCA ทั่วไป เพราะหัวแปลงแบบนั้นช็อต pin 1 กับ 3Use XLR or RCA, never both at once, and never a generic XLR-to-RCA adapter: those short pins 1 and 3.
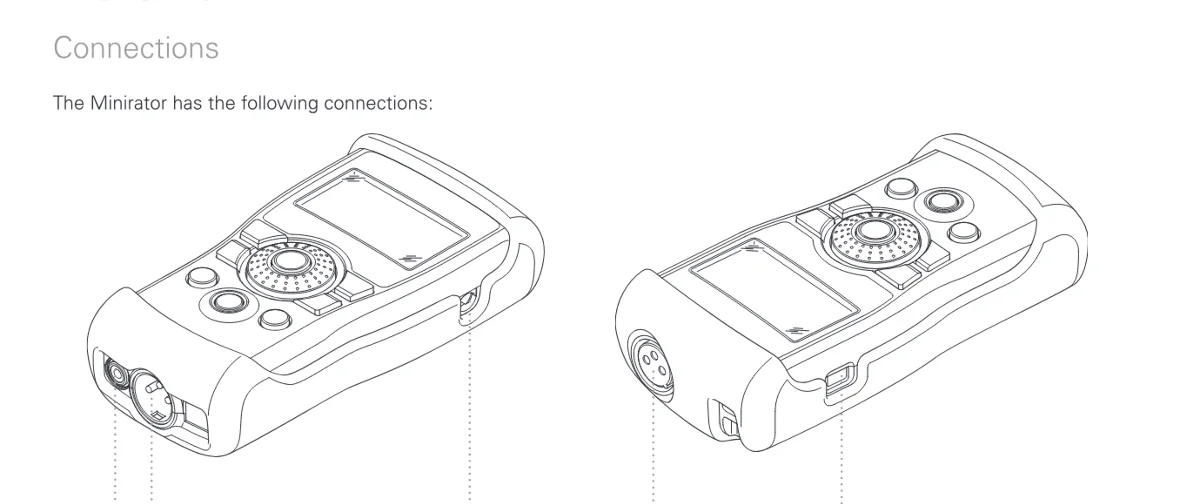
รูปที่ 3Figure 3 ช่องต่อ (หมายเลขตามคู่มือ NTi) — ขั้นนี้ใช้ XLR output (2) ห้ามใช้ RCA (1) พร้อมกันConnectors (numbers as in NTi's manual): this step uses the XLR output (2); never use the RCA output (1) at the same time - RCA output (ไม่บาลานซ์)RCA output (unbalanced)
- XLR output (บาลานซ์)XLR output (balanced)
- ช่องไฟ DCDC power socket
- XLR input สำหรับทดสอบสายเท่านั้นXLR input, for the cable test only
- USB (Mini-B)USB (Mini-B)
- STEP6
ปล่อยสัญญาณและตรวจที่ปลายทางRelease the signal and check at the far end
ลด Gain ของระบบลงก่อน กด Mute อีกครั้งเพื่อปล่อยสัญญาณ แล้วค่อย ๆ เพิ่ม Gain จนได้ยินโทน 1 kHz หรือเห็นมิเตอร์ของมิกเซอร์ขึ้นTurn the system gain down, press Mute again to release the signal, then raise the gain gradually until you hear the 1 kHz tone or see the mixer meter move.
คุณมีสัญญาณอ้างอิงที่รู้ค่าแน่นอน (1 kHz, 0 dBu) อยู่ในระบบแล้ว จากจุดนี้จะวัดอัตราขยายของระบบด้วย XL2 เทียบระดับซ้ายขวา หรือไล่หาจุดที่สัญญาณหายได้ บทต่อไปอธิบายว่าเมื่อไรต้องใช้สัญญาณอื่นYou now have a reference of known value (1 kHz, 0 dBu) in the system. From here you can measure the system gain with an XL2, compare left and right, or trace where the signal disappears. The next chapters explain when to use the other signals.
ต่อไป: รู้จักปุ่มและช่องต่อ →Next: the keys and connectors →
01รู้จักเครื่องGET TO KNOW
รู้จักปุ่ม ช่องต่อ และหน้าจอThe keys, connectors and display
MR-PRO ใช้งานด้วยวงล้อกับปุ่มลัดไม่กี่ปุ่ม เมื่อรู้ว่าแต่ละปุ่มพาไปไหน การตั้งค่าทุกอย่างจะเหลือแค่ "กดปุ่มลัด หมุน แล้วกด Enter"The MR-PRO works with a wheel and a few shortcut keys. Once you know where each key takes you, every setting becomes "press the shortcut, turn, press Enter".
| ปุ่มKey | หน้าที่What it does |
|---|---|
| วงล้อWheel | หน้าที่What it doesหมุนช้า = ปรับละเอียด หมุนเร็ว = ปรับทีละขั้นใหญ่Slow turn = fine; fast turn = larger steps |
| EnterEnter | หน้าที่What it doesยืนยันการเลือกConfirms a selection |
| ESCESC | หน้าที่What it doesจบการป้อนค่า กลับเมนูบนสุด หรือปิดหน้าต่างEnds an entry, jumps to the top menu level or closes a window |
| WaveWave | หน้าที่What it doesเลือกสัญญาณทดสอบSelects the test signal |
| LevelLevel | หน้าที่What it doesตั้งระดับเอาต์พุตSets the output level |
| FreqFreq | หน้าที่What it doesตั้งความถี่ สำหรับ SWEEP และ CHIRP จะพาไปเมนู PARAM โดยตรงSets the frequency; with SWEEP and CHIRP it opens the PARAM menu directly |
| SensSens | หน้าที่What it doesเปลี่ยนขนาดขั้นของการปรับความถี่และระดับChanges the step size for frequency and level |
| MuteMute | หน้าที่What it doesปิด/เปิดสัญญาณเอาต์พุตSwitches the output signal off and on |
| On/OffOn/Off | หน้าที่What it doesเปิดเครื่อง กดค้าง 1 วินาทีเพื่อปิด และเปิด/ปิดไฟหน้าจอSwitches on; hold 1 s to switch off; also toggles the backlight |
| ช่องต่อConnector | ใช้ทำอะไรUsed for |
|---|---|
| XLR output (balanced)XLR output (balanced) | ใช้ทำอะไรUsed forช่องหลักสำหรับส่งสัญญาณ ใช้ช่องนี้ทุกครั้งที่ทำได้ เพราะทนสัญญาณรบกวนได้ดีกว่าThe main output: use it whenever you can, because it rejects interference better |
| RCA output (unbalanced)RCA output (unbalanced) | ใช้ทำอะไรUsed forสำหรับอุปกรณ์ที่มีแต่ช่อง RCA ต่ออยู่ขนานกับ XLR ภายในเครื่องFor equipment with RCA inputs only; wired in parallel with the XLR inside |
| XLR inputXLR input | ใช้ทำอะไรUsed forใช้เฉพาะการทดสอบสาย (Cable test) ไม่ใช่อินพุตวัดระดับเสียงOnly for the cable test; it is not a level-measurement input |
| USB (Mini-B)USB (Mini-B) | ใช้ทำอะไรUsed forคัดลอกไฟล์ WAV, Config และภาพหน้าจอ และอัปเดตเฟิร์มแวร์Copying WAV files, configurations and screenshots, and firmware updates |
| DC powerDC power | ใช้ทำอะไรUsed forอะแดปเตอร์ไฟ ใช้ได้โดยใส่ถ่านค้างไว้Mains adapter; leave the batteries inside |
บนจอ แถวบนสุดคือแถบเมนู ด้านซ้ายเลือกฟังก์ชัน (GENERATOR, CABLETEST, IMPEDANCE, SYSTEM) ด้านขวาคือ CONFIG สำหรับเก็บและเรียกการตั้งค่า ด้านล่างเป็นค่าที่ตั้ง เช่น ชื่อสัญญาณ ความถี่ f และระดับ LVL ส่วนบรรทัดค่าที่วัดได้แสดงไฟ Phantom (DC) สัญลักษณ์บาลานซ์ และอิมพีแดนซ์ของโหลด (RL)On the display the top row is the menu bar: the left side selects the function (GENERATOR, CABLETEST, IMPEDANCE, SYSTEM), the right side is CONFIG for storing and recalling setups. Below are the settings (signal name, frequency f, level LVL) and a readings line with phantom voltage (DC), the balance symbol and the load impedance (RL).
MR-PRO เป็นเครื่องกำเนิดสัญญาณ ไม่ใช่เครื่องวัดระดับเสียง ค่าที่เครื่องวัดเองได้คืออิมพีแดนซ์ บาลานซ์ ไฟ Phantom และผลทดสอบสาย ส่วนการวัดเสียงจากลำโพงต้องใช้เครื่องวิเคราะห์ เช่น XL2 หรือ XL3The MR-PRO is a signal generator, not a sound level meter. What it measures itself is impedance, balance, phantom voltage and cable faults; measuring the sound from loudspeakers needs an analyzer such as the XL2 or XL3.
02ติดตั้งและเตรียมSET UP
เตรียมเครื่องก่อนใช้งานPrepare the instrument
- STEP1
ถ่านและไฟเลี้ยงBatteries and power
ใช้ถ่าน AA 3 ก้อน ถ่านชาร์จได้ก็ใช้ได้ อายุถ่านประมาณ 8 ชั่วโมง (ที่ 0 dBu ไม่มีโหลด) ระดับสัญญาณสูงและโหลดหนักจะกินไฟมากขึ้น ถ่านอาจอุ่นขึ้นซึ่งเป็นเรื่องปกติThree AA cells; rechargeable cells are fine. Typical life is about 8 hours (0 dBu, no load); higher levels and heavier loads use more power, and warm cells are normal.
ข้อควรระวังWatch outอะแดปเตอร์ไฟของ NTi เป็นแบบสวิตชิง ทำให้ช่อง RCA มีสัญญาณรบกวนมากขึ้น งานสัญญาณไม่บาลานซ์ที่ต้องการความเงียบ ให้ใช้ถ่านหรืออะแดปเตอร์แบบ linear (NTi # 600 000 305)NTi's mains adapter is a switching supply and adds noise at the RCA output. For quiet unbalanced work use batteries or the linear adapter (NTi # 600 000 305).
- STEP2
ตั้งค่าระบบSystem settings
เลือก SYSTEM จากด้านซ้ายของแถบเมนูแล้วกด Enter ตั้ง Power Save (ปิดเครื่องอัตโนมัติเมื่อไม่มีการกดปุ่มตามเวลาที่ตั้ง) และ Backlight (Auto หรือ Manual) หน้านี้ยังแสดงเวอร์ชันเฟิร์มแวร์และหมายเลขเครื่องChoose SYSTEM on the left of the menu bar and press Enter. Set Power Save (switches off after the set time without a key press) and Backlight (Auto or Manual). This page also shows the firmware version and the serial number.
บนเครื่องOn the instrumentSYSTEM › Power Save / Backlight / FirmwareSYSTEM › Power Save / Backlight / Firmware
- STEP3
ความคมชัดของจอDisplay contrast
กด ESC ค้างไว้แล้วหมุนวงล้อHold ESC and turn the wheel.
ห้ามต่อ MR-PRO เข้ากับเอาต์พุตของเพาเวอร์แอมป์ หรือระบบลำโพง 70/100 V ที่เปิดใช้งานอยู่ ห้ามใช้ในที่ชื้น และห้ามเปิดตัวเครื่อง ถ้าใช้อะแดปเตอร์ของผู้ผลิตอื่น ต้องเป็นแบบแยกไฟ ไม่ต่อกราวด์ แบบ linear 5–9 V อย่างน้อย 500 mANever connect the MR-PRO to a power amplifier output or to a live 70/100 V speaker system; do not use it in damp places and never open it. A third-party DC supply must be isolated, non-earthed and linear, 5–9 V, at least 500 mA.
03ตรวจสอบCHECK
ตรวจก่อนต่อเข้าระบบจริงChecks before you connect to a real system
สามสิ่งที่วิศวกรตรวจเสมอก่อนเชื่อผล: สายดีไหม มีไฟ Phantom ค้างมาไหม และเครื่องจ่ายระดับได้ตามที่ตั้งไหมThree things engineers always check before trusting a result: is the cable good, is phantom power present, and is the instrument really delivering the level it shows.
- ทดสอบสายก่อนใช้ ด้วยโหมด CABLETEST (ดูบท ตรวจสายและไฟ Phantom) โดยเฉพาะสายที่ใช้ในงานมานานTest the cable first in CABLETEST (see cable and phantom checks), especially cables that have seen a lot of use
- ดูช่อง DC บนบรรทัดค่าที่วัดได้ ถ้าขึ้นตัวเลข แปลว่ามีไฟ Phantom จากปลายทางเข้ามา ถ้าตัวเลขกะพริบ แปลว่าไฟ pin 2 กับ pin 3 ไม่เท่ากัน ซึ่งเป็นจุดผิดปกติLook at the DC field on the readings line: a value means phantom power is present from the far end; a flashing value means pins 2 and 3 carry unequal voltages, which is a fault
- ถ้า LVL กะพริบ แปลว่าโหลดดึงกระแสเกิน 10 mA และเครื่องลดระดับลงเอง ระดับจริงจึงต่ำกว่าที่ตั้ง MR-PRO ออกแบบให้ใช้กับโหลดตั้งแต่ 600 ΩIf LVL flashes, the load draws more than 10 mA and the instrument has lowered the level, so the real level is below the setting. The MR-PRO is designed for loads down to 600 Ω
- สัญลักษณ์บาลานซ์ชี้ไปทาง pin ที่อิมพีแดนซ์สูงกว่า ถ้าอินพุตปลายทางบาลานซ์ดี สัญลักษณ์จะไม่เอียงไปข้างใดThe balance symbol points to the pin with the higher impedance; a well-balanced input does not lean either way
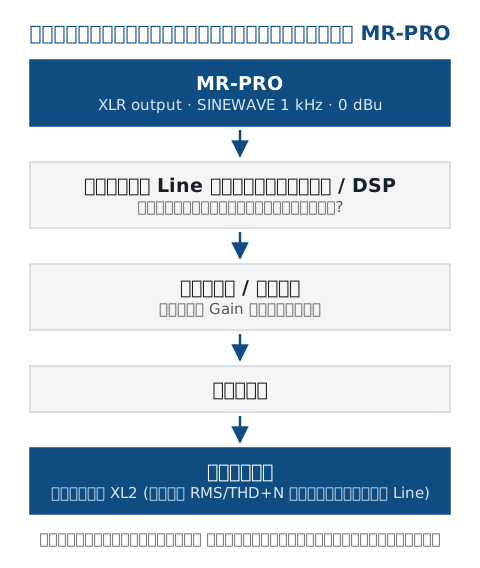
ใช้ MR-PRO ส่ง SINEWAVE 0.00 dBu / 1.000 kHz เข้าอินพุตของระบบ แล้วใช้ XL2 ฟังก์ชัน RMS/THD+N (ฟิลเตอร์ Z-WEIGHTING) วัดที่เอาต์พุต Line ถ้า XL2 อ่านได้ 0.0 dBu แปลว่าระบบไม่ขยายและไม่ลดทอนสัญญาณ ค่า THD+N บอกความเพี้ยนของทั้งเส้นทางSend SINEWAVE 0.00 dBu / 1.000 kHz from the MR-PRO into the system input and measure the line output with the XL2 RMS/THD+N function (filter Z-WEIGHTING). If the XL2 reads 0.0 dBu, the path has no gain or loss; the THD+N value tells you the distortion of the whole path.
MR-PRO ควรได้รับการสอบเทียบประจำปี และสามารถสั่ง Calibration Certificate ที่สอบกลับได้ตาม ISO/IEC 17025 พร้อมเครื่องใหม่ได้Annual calibration is recommended, and an ISO/IEC 17025-traceable calibration certificate can be ordered with a new instrument.
04ใช้งานUSE
เลือกสัญญาณให้ตรงงานChoose the right signal for the job
ทุกสัญญาณมีหน้าที่ของมัน เลือกผิดไม่ได้ทำให้เครื่องเสีย แต่ทำให้ผลที่ได้ตอบคำถามผิดข้อEach signal has its job. The wrong one will not damage anything, but the result will answer the wrong question.
| ชื่อบนจอOn screen | ใช้เมื่อUse it for | ช่วงระดับLevel range |
|---|---|---|
| SINEWAVESINEWAVE | ใช้เมื่อUse it forงานวัดทั่วไป ตรวจอัตราขยาย ความเพี้ยน และเป็นสัญญาณที่ใช้อ่านอิมพีแดนซ์/บาลานซ์/Phantom ในโหมด GENERATOR ความถี่ 10 Hz–20 kHzGeneral measurements, gain and distortion checks; also the signal for impedance/balance/phantom readings in GENERATOR mode; 10 Hz–20 kHz | ช่วงระดับLevel range−80 ถึง +18 dBu−80 to +18 dBu |
| SWEEPSWEEP | ใช้เมื่อUse it forไซน์แบบกวาดความถี่เป็นขั้น ละเอียดได้ถึง 1/12 ออกเตฟ สำหรับการตอบสนองความถี่Stepped sine sweep, resolution up to 1/12 octave, for frequency response | ช่วงระดับLevel range−80 ถึง +18 dBu−80 to +18 dBu |
| CHIRPCHIRP | ใช้เมื่อUse it forกวาดความถี่ต่อเนื่อง 1–99 s ต่อรอบ แบบ Linear หรือ Log สำหรับการตอบสนองความถี่ การตอบสนองต่ออิมพัลส์ และงานเสียงในห้องContinuous sweep, 1–99 s per cycle, linear or log, for frequency response, impulse response and room acoustics | ช่วงระดับLevel range−80 ถึง +18 dBu−80 to +18 dBu |
| PNOISEPNOISE | ใช้เมื่อUse it forPink noise สำหรับดูสเปกตรัมด้วย RTA และแบบเปิด-ปิดเป็นจังหวะ (MOD) สำหรับวัดเวลาเสียงก้องPink noise for RTA work; in intermittent mode (MOD) for reverberation time | ช่วงระดับLevel range−80 ถึง +8 dBu−80 to +8 dBu |
| WNOISEWNOISE | ใช้เมื่อUse it forWhite noise สำหรับเครื่องวิเคราะห์แบบ FFTWhite noise for FFT analyzers | ช่วงระดับLevel range−80 ถึง +10 dBu−80 to +10 dBu |
| POLARITYPOLARITY | ใช้เมื่อUse it forสัญญาณฟันเลื่อยที่เครื่องวิเคราะห์ของ NTi อ่านทิศขั้วได้A sawtooth that NTi analyzers read to determine polarity | ช่วงระดับLevel range−80 ถึง +16 dBu−80 to +16 dBu |
| DELAYTESTDELAYTEST | ใช้เมื่อUse it forChirp ที่ตั้งค่ามาเฉพาะสำหรับวัดเวลาหน่วงด้วยเครื่องวิเคราะห์ของ NTiA chirp configured for delay measurements with NTi analyzers | ช่วงระดับLevel range−80 ถึง +16 dBu−80 to +16 dBu |
| FILEFILE | ใช้เมื่อUse it forเล่นไฟล์ WAV จากหน่วยความจำ เช่น สัญญาณ NTi Audio STIPA ระดับตั้งเป็น dBF หรือ %Plays WAV files from memory, such as the NTi Audio STIPA signal; level in dBF or % | ช่วงระดับLevel range0 sc-camel-d-b-f-s = +18 dBu (ไซน์เต็มสเกล)0 sc-camel-d-b-f-s = +18 dBu (full-scale sine) |
การเลือกและตั้งค่าSelecting and setting
- เลือกสัญญาณ: กด Wave หมุนวงล้อ กด Enter (หรือหมุนไปที่ช่อง WAV กด Enter หมุน แล้วกด Enter)Choose a signal: press Wave, turn, press Enter (or move to the WAV field, Enter, turn, Enter)
- ตั้งค่า: กด Level หรือ Freq หมุน แล้วกด Enter หรือหมุนแถบเลือกไปที่ค่าที่ต้องการ กด Enter (ค่าจะกะพริบ) หมุน แล้วกด EnterSet a value: press Level or Freq, turn, Enter; or move the selection bar to the value, Enter (it flashes), turn, Enter
- SWEEP / CHIRP: ตั้งช่วงความถี่ เวลา และโหมด (ครั้งเดียวหรือต่อเนื่อง) ในเมนู PARAM แล้วสั่งเริ่ม/หยุดจากสัญลักษณ์ Start/StopSWEEP / CHIRP: set the range, timing and mode (once or continuous) in PARAM, then start/stop with the start/stop symbol
- PNOISE: MOD = CONT (ต่อเนื่อง) หรือเปิด-ปิดเป็นจังหวะ ส่วน CYC เช่น 3/3s คือเปิด 3 วินาที หยุด 3 วินาทีPNOISE: MOD = CONT (continuous) or intermittent; CYC, e.g. 3/3s = 3 s on, 3 s off
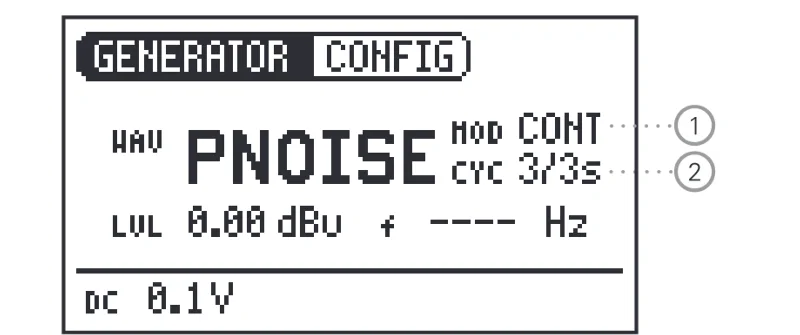
เก็บการตั้งค่าที่ใช้บ่อย (CONFIG)Store the setups you use often (CONFIG)
MR-PRO เก็บการตั้งค่าได้ 10 ชุด (Config_0 ถึง Config_9) เก็บ: CONFIG › STORE › เลือกช่อง › Enter เรียกใช้: CONFIG › RECALL › เลือกช่อง › Enter ถ้าต้องการตั้งชื่อ ให้เปลี่ยนชื่อไฟล์ในโฟลเดอร์ CONFIG ผ่าน USB และคัดลอกไฟล์ชุดเดียวกันไปใส่ MR-PRO เครื่องอื่นได้The MR-PRO stores 10 setups (Config_0 to Config_9). Store: CONFIG › STORE › pick a slot › Enter. Recall: CONFIG › RECALL › pick › Enter. To name them, rename the files in the CONFIG folder over USB; the same files can be copied to another MR-PRO.
ตั้งชุดประจำไว้ เช่น ไซน์ 1 kHz 0 dBu, Pink noise ต่อเนื่อง, Pink noise 3/3s สำหรับ RT60 และ STIPA หน้างานจะเปลี่ยนงานได้ในไม่กี่วินาทีKeep standard setups (e.g. 1 kHz sine at 0 dBu, continuous pink noise, 3/3s pink noise for RT60, STIPA) and you can switch jobs on site in seconds.
05ใช้ร่วมกับเครื่องมืออื่นWORKFLOWS
ใช้คู่กับ XL2 / XL3 ตรวจระบบเสียงWorking with an XL2 / XL3 on a sound system
MR-PRO ป้อนสัญญาณเข้าระบบ ส่วนเครื่องวิเคราะห์ฟังเสียงที่ออกจากลำโพง ขั้นตอนด้านล่างเป็นลำดับตาม Quick Guide ของ NTi ที่เขียนสำหรับ XL2 สำหรับ XL3 เอกสารของ NTi ระบุเฉพาะงาน STIPA ถ้าจะใช้ MR-PRO กับ XL3 วัด Polarity หรือเวลาหน่วง ปรึกษาเราก่อนThe MR-PRO feeds the system; the analyzer listens to what comes out of the loudspeakers. The steps below follow NTi's quick guide, which is written for the XL2. For the XL3, NTi's documents cover STIPA only: contact us before using the MR-PRO with an XL3 for polarity or delay.
| งานJob | MR-PRO | เครื่องวิเคราะห์Analyzer | ต้องมีเพิ่มAlso needed |
|---|---|---|---|
| อัตราขยาย / THD+NGain / THD+N | MR-PROSINEWAVESINEWAVE | เครื่องวิเคราะห์AnalyzerXL2 RMS/THD+NXL2 RMS/THD+N | ต้องมีเพิ่มAlso needed—— |
| PolarityPolarity | MR-PROPOLARITYPOLARITY | เครื่องวิเคราะห์AnalyzerXL2 PolarityXL2 Polarity | ต้องมีเพิ่มAlso neededไมโครโฟนวัดMeasurement microphone |
| สเปกตรัม RTARTA spectrum | MR-PROPNOISE (CONT)PNOISE (CONT) | เครื่องวิเคราะห์AnalyzerXL2 SLMeter/RTAXL2 SLMeter/RTA | ต้องมีเพิ่มAlso neededไมโครโฟนวัดMeasurement microphone |
| RT60RT60 | MR-PROPNOISE แบบเปิด-ปิดPNOISE, intermittent | เครื่องวิเคราะห์AnalyzerXL2 RT60XL2 RT60 | ต้องมีเพิ่มAlso neededไมโครโฟนวัดMeasurement microphone |
| เวลาหน่วงลำโพงDelay speakers | MR-PRODELAYTESTDELAYTEST | เครื่องวิเคราะห์AnalyzerXL2 Delay TimeXL2 Delay Time | ต้องมีเพิ่มAlso neededไมโครโฟนวัดMeasurement microphone |
| STIPASTIPA | MR-PROFILE › NTi Audio STIPAFILE › NTi Audio STIPA | เครื่องวิเคราะห์AnalyzerXL2 หรือ XL3XL2 or XL3 | ต้องมีเพิ่มAlso neededSTIPA Option บนเครื่องวิเคราะห์ และไมโครโฟนวัดSTIPA Option on the analyzer, measurement microphone |
Polarity (ขั้วลำโพง)Polarity
- ต่อ MR-PRO เข้าอินพุต Line ของระบบ เลือก POLARITYConnect the MR-PRO to a system line input and choose POLARITY.
- เพิ่ม Gain ของระบบและระดับ MR-PRO จนได้ยินสัญญาณชัดพอประมาณRaise the system gain and the MR-PRO level until the signal is clearly audible.
- บน XL2 เปิดฟังก์ชัน Polarity หน้า 123 เล็งไมโครโฟนไปกลางลำโพง ระยะประมาณเท่าเส้นผ่านศูนย์กลางลำโพงOn the XL2 open Polarity, page 123; aim the microphone at the centre of the loudspeaker at about one speaker diameter.
- อ่านผลขั้วรวม ลำโพงหลายทางหรือมีท่อ bass reflex ให้ดูหน้าแยกย่านออกเตฟของ XL2 แล้วเทียบรูปแบบระหว่างลำโพงแต่ละตัวRead the overall polarity; for multi-way or ported speakers use the XL2's octave-band page and compare the pattern between speakers.
เวลาหน่วงของลำโพงเสริม (Delay)Delay speakers
- เลือก DELAYTEST บน MR-PRO และ Delay Time บน XL2Choose DELAYTEST on the MR-PRO and Delay Time on the XL2.
- ต่อ MR-PRO เข้ากับ XL2 โดยตรงก่อน เพื่อซิงก์นาฬิกาของสองเครื่อง รอจน XL2 ขึ้นว่าพร้อมวัด หลังซิงก์มีเวลาวัดประมาณ 5 นาที จากนั้นต้องซิงก์ใหม่First connect the MR-PRO directly to the XL2 to synchronise the clocks; wait until the XL2 is ready to measure. After syncing you have about 5 minutes before a new sync is needed.
- ย้าย MR-PRO ไปต่อเข้าอินพุตของระบบ เปิดเฉพาะลำโพงหลัก แล้วกด STORE บน XL2Move the MR-PRO to the system input, play through the main speaker only and press STORE on the XL2.
- เปิดเฉพาะลำโพงเสริม XL2 แสดงผลต่างเวลา Quick Guide ของ NTi แนะนำให้ตั้ง delay = ผลต่าง + ประมาณ 15 ms (ตามหลัก Haas ช่วง 5–35 ms)Play through the delay speaker only: the XL2 shows the difference. NTi's quick guide suggests delay = difference + about 15 ms (Haas rule, 5–35 ms).
RT60 ด้วย Pink noise เปิด-ปิดRT60 with intermittent pink noise
- MR-PRO: PNOISE, MOD แบบเปิด-ปิด, CYC = 3/3s (ถ้าห้องก้องนานกว่า 3 วินาที ให้เพิ่มเวลารอบ)MR-PRO: PNOISE, intermittent MOD, CYC = 3/3s (lengthen the cycle if the room's RT is longer than 3 s).
- XL2: RT60 ตั้งพื้นเสียงในห้องที่เงียบ แล้วปรับ Gain ให้สัญญาณสูงกว่าพื้นเสียงตามเครื่องหมายบนจอXL2: RT60; set the noise floor in the quiet room, then adjust the gain until the signal reaches the markers above it.
- ให้ XL2 นับรอบอย่างน้อย 3 รอบ หยุดการวัด แล้วกด Mute บน MR-PRO ก่อนดูผลและบันทึกLet the XL2 average at least 3 cycles, stop, press Mute on the MR-PRO, then view and save the result.
สัญญาณ Pink noise สำหรับ RT60 ดังมาก สวมอุปกรณ์ป้องกันการได้ยินตลอดการวัดPink noise for RT60 is loud: wear hearing protection throughout.
STIPA ผ่านอินพุต Line ของระบบSTIPA through a system line input
MR-PRO มีไฟล์สัญญาณ NTi Audio STIPA มาจากโรงงานในโฟลเดอร์ Signals ของโหมด FILE ฝั่ง MR-PRO ไม่ต้องมี Option เพิ่ม แต่เครื่องวิเคราะห์ต้องมี STIPA Option (XL3 รองรับ STIPA ตั้งแต่เฟิร์มแวร์ V1.36) Application Note ของ NTi แยกว่า MR-PRO ใช้ฉีดสัญญาณเข้าระบบทางไฟฟ้า เช่น ระบบประกาศที่เล่นข้อความเสียงจากแหล่งบันทึก ส่วนระบบที่ใช้ไมโครโฟนพูด ให้ใช้ TalkBox เพื่อทดสอบทั้งเส้นทางรวมไมโครโฟนThe MR-PRO ships with the NTi Audio STIPA file in the Signals folder of FILE mode; no option is needed on the MR-PRO, but the analyzer needs the STIPA Option (the XL3 supports STIPA from firmware V1.36). NTi's application note separates the roles: the MR-PRO injects the signal electrically, e.g. into PA systems that play recorded messages; for systems with voice microphones use the TalkBox so the whole chain including the microphone is tested.
- ใช้เฉพาะสัญญาณ STIPA ต้นฉบับของ NTi ห้ามใช้ไฟล์ที่บีบอัด เช่น MP3Use only NTi's original STIPA signal; never a compressed format such as MP3
- ตั้งระดับตาม Application Note ของ NTi: วัด LAeq ของข้อความประกาศจริงอย่างน้อย 40 วินาที (หรือทั้งข้อความถ้าสั้นกว่า) บวก 3 dB แล้วเพิ่มระดับ STIPA จนได้ค่านั้นที่ตำแหน่งเดียวกันSet the level as in NTi's application note: measure the LAeq of the real announcement for at least 40 s (or its whole length if shorter), add 3 dB, then raise the STIPA signal until it reaches that level at the same position
- ไฟล์ WAV ที่ MR-PRO ให้มาเล่นได้กับเครื่องของ NTi เท่านั้นThe supplied WAV files may only be played on NTi instruments
06ใช้งานUSE
ตรวจสายลำโพง 70 V / 100 VChecking 70 V / 100 V speaker lines
ในระบบเสียงประกาศแบบ 70/100 V ค่าอิมพีแดนซ์และกำลังปรากฏของสายลำโพงบอกได้ทันทีว่าลำโพงต่อครบ ขาด หรือช็อต โดยไม่ต้องเปิดเสียงดังOn 70/100 V PA systems, the impedance and apparent power of a speaker line tell you straight away whether all speakers are connected, open or shorted, without playing anything loud.
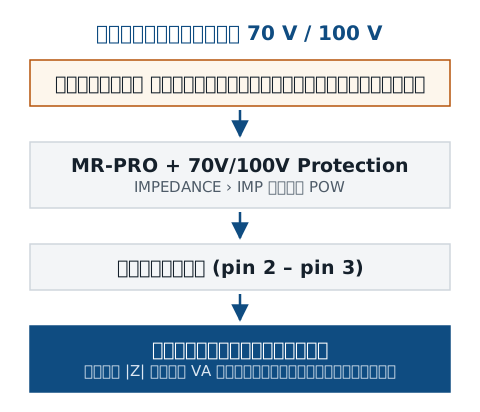
ปิดแอมป์และปลดสายลำโพงออกจากแอมป์ก่อนเสมอ ห้ามต่อ MR-PRO กับสายที่มีไฟอยู่ ใช้อุปกรณ์ 70V/100V Protection MR-PRO (NTi # 600 000 313) ทุกครั้ง เพราะช่วยป้องกันเครื่องเมื่อเผลอต่อกับสายที่มีแรงดันอยู่ ระบบที่มีแรงดันตั้งแต่ 50 V AC ขึ้นไปต้องใช้มาตรการป้องกันไฟฟ้าตามที่ Application Note ของ NTi ระบุAlways switch the amplifier off and disconnect it from the speaker line first; never connect the MR-PRO to a live line. Always use the 70V/100V Protection MR-PRO (NTi # 600 000 313), which protects the instrument if a line is accidentally live. Installations at 50 V AC or more need the electrical protective measures described in NTi's application note.
- STEP1
เตรียมและต่อสายPrepare and connect
ปิดแอมป์ ปลดสายลำโพงออก ใส่ 70V/100V Protection ที่ MR-PRO แล้วต่อเข้าสายลำโพง (โหลดอยู่ระหว่าง pin 2 และ 3 ของ XLR)Switch the amplifier off, disconnect the line, fit the 70V/100V Protection to the MR-PRO and connect it to the speaker line (the load sits between XLR pins 2 and 3).
- STEP2
เลือกโหมดวัดChoose the mode
เปิดเครื่อง กด Mute แล้วเลือก IMPEDANCE จากนั้นเลือก IMP (อิมพีแดนซ์และเฟส) หรือ POW (กำลังปรากฏ) สำหรับ POW ให้ตั้งแรงดันระบบที่ REF (25, 35, 50, 70.7, 100, 140 หรือ 200 V)Switch on, press Mute, choose IMPEDANCE, then IMP (impedance and phase) or POW (apparent power). For POW set the system voltage at REF (25, 35, 50, 70.7, 100, 140 or 200 V).
- STEP3
ตั้งระดับและความถี่ แล้ววัดSet level and frequency, then measure
เอกสารของ NTi ใช้ 1 kHz ที่ −20 dBu (Application Note ระบบเสียงอพยพ) หรือ 0 dBu (Quick Guide ระบบเสียงติดตั้ง) กด Mute เพื่อเริ่มวัด แล้วอ่านค่า เลื่อนเคอร์เซอร์ไปที่ RL เพื่อดูค่าของ pin 2 และ pin 3 แยกกันNTi's documents use 1 kHz at −20 dBu (evacuation-system application note) or 0 dBu (installed-sound quick guide). Press Mute to start, read the values, and move the cursor to RL to see pins 2 and 3 separately.
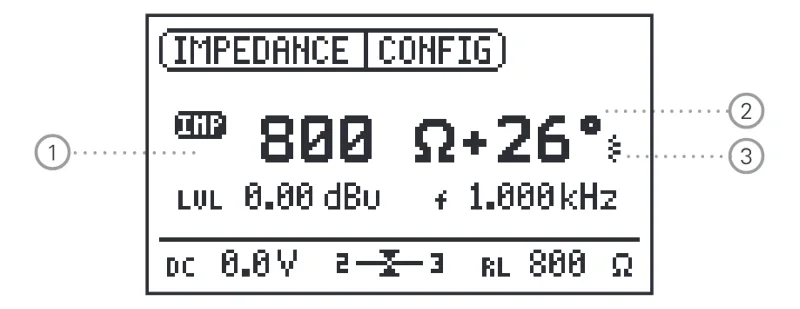
รูปที่ 7Figure 7 โหมด IMP: ค่าอิมพีแดนซ์ (1) มุมเฟส (2) และสัญลักษณ์บอกว่าโหลดเป็นแบบ inductive หรือ capacitive (3)IMP mode: impedance magnitude (1), phase (2) and whether the load is inductive or capacitive (3) ภาพ: NTi Audio — Operating Manual Minirator MR2 / MR-PRO (Jul 2021, เฟิร์มแวร์ 2.16) หน้า 41Image: NTi Audio — Operating Manual Minirator MR2 / MR-PRO (Version Jul 2021, firmware 2.16), p. 41
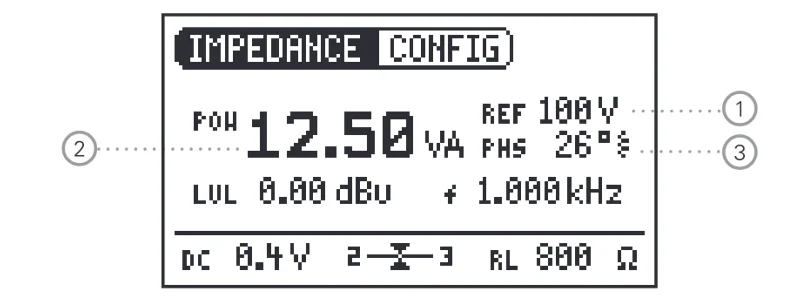
ลำโพง 3 ตัว ตัวละ 8 W ที่ 100 V ควรได้ประมาณ 24 VA NTi แสดงตัวอย่างที่วัดได้ 23.15 VA / 2.26 kΩ ซึ่งถือว่าปกติ ถ้าค่าลดลงเป็นราว 2 ใน 3 หรือ 1 ใน 3 ของค่าที่ควรได้ แปลว่ามีลำโพงหลุดจากสายหนึ่งหรือสองตัวThree 8 W speakers on a 100 V line should give about 24 VA; NTi's example reads 23.15 VA / 2.26 kΩ, which is fine. If the value drops to about two-thirds or one-third of what it should be, one or two speakers have dropped off the line.
อิมพีแดนซ์และกำลังขึ้นกับความถี่ บันทึกความถี่ที่ใช้คู่กับผลทุกครั้ง และเก็บค่าไว้เทียบกับการตรวจครั้งถัดไป NTi แนะนำให้แอมป์มีกำลังเผื่อ 10–20 % เหนือค่าที่คำนวณได้Impedance and power depend on frequency: always record the frequency with the result and keep the values to compare at the next check. NTi recommends 10–20 % amplifier headroom above the calculated need.
07ใช้งานUSE
ตรวจสาย XLR และไฟ PhantomXLR cable and phantom power checks
- STEP1
ทดสอบสาย XLRTest an XLR cable
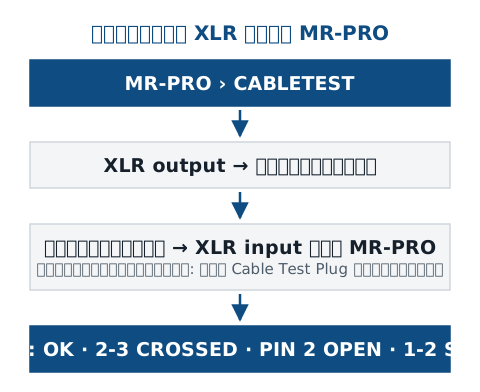
เลือก CABLETEST เสียบปลายหนึ่งของสายที่ XLR output และอีกปลายที่ XLR input ของ MR-PRO สายที่ติดตั้งแล้วและปลายอยู่ห่างกัน ให้ใส่ Cable Test Plug (NTi # 600 000 311) ที่ปลายไกลChoose CABLETEST, plug one end into the XLR output and the other into the MR-PRO's XLR input. For installed cables whose ends are far apart, fit the Cable Test Plug (NTi # 600 000 311) at the far end.
- STEP2
อ่านผลRead the result
OK = ต่อถูก 1:1, 2-3 CROSSED = สลับขา, PIN 2 OPEN = ขาขาด, 1-2 SHORT = ช็อต, NO XLR CABLE = ยังเสียบไม่ถูกต้องOK = wired 1:1, 2-3 CROSSED = pins swapped, PIN 2 OPEN = open wire, 1-2 SHORT = short, NO XLR CABLE = not plugged in correctly.
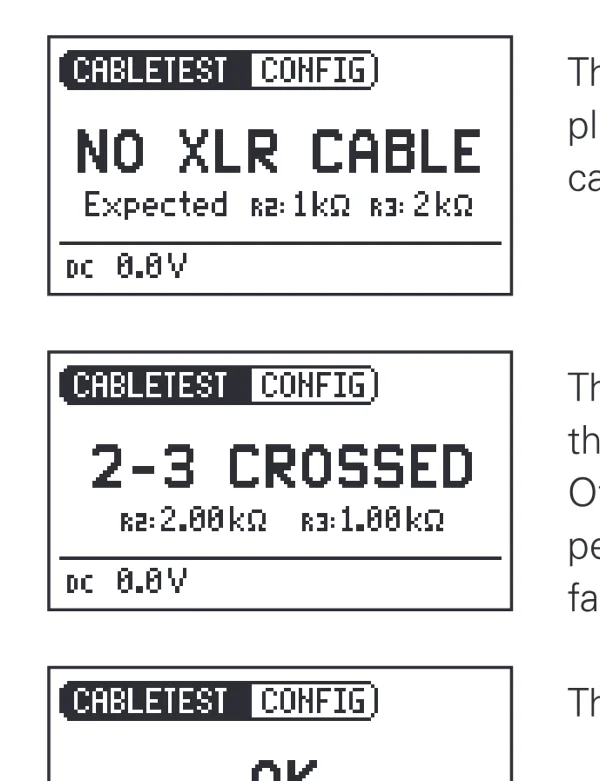
รูปที่ 10Figure 10 ตัวอย่างผล CABLETEST จากบนลงล่าง: เสียบไม่ถูก (NO XLR CABLE), ขา 2–3 สลับกัน (2-3 CROSSED), สายดี (OK, XLR connected 1:1)CABLETEST results, top to bottom: not plugged in correctly (NO XLR CABLE), pins 2–3 swapped (2-3 CROSSED), good cable (OK, XLR connected 1:1) ภาพ: NTi Audio — Operating Manual Minirator MR2 / MR-PRO (Jul 2021, เฟิร์มแวร์ 2.16) หน้า 39Image: NTi Audio — Operating Manual Minirator MR2 / MR-PRO (Version Jul 2021, firmware 2.16), p. 39 - STEP3
ตรวจไฟ PhantomCheck phantom power
ต่อช่องเอาต์พุต MR-PRO เข้าอินพุตไมโครโฟนด้วยสาย XLR แล้วเปิด Phantom ช่อง DC แสดงค่าเฉลี่ยของ pin 2 และ 3 เลื่อนเคอร์เซอร์ไปที่ DC เพื่อดูแยกแต่ละขา ถ้าค่ากะพริบแปลว่าสองขาไม่เท่ากัน ช่วงวัด 0–54 VConnect the MR-PRO output to a microphone input with an XLR cable and switch phantom on. DC shows the average of pins 2 and 3; move the cursor onto DC to see each pin. A flashing value means the pins differ. Range 0–54 V.
ขั้นสูง: หาจุดผิดที่ขา 1 / ชีลด์ของสายAdvanced: finding a pin 1 / shield fault
ตาม Application Note ของ NTi: ต่อสายที่ช่องเอาต์พุต ปล่อยปลายอีกด้านไว้ เลือก IMPEDANCE ที่ 0 dBu 10 kHz แล้วเลือก RL เทียบค่า pin 2 กับ pin 3 ถ้าต่างกันเกิน 10 % อาจมีการประกอบขา 1 ผิด (เกิน 25 % ยืนยันได้) วิธีนี้ใช้กับสายยาวกว่า 3 m สายสั้นให้ต่อสายดีที่รู้แน่ยาวราว 2 m เพิ่มPer NTi's application note: connect the cable to the output with the far end open, choose IMPEDANCE at 0 dBu, 10 kHz, select RL and compare pins 2 and 3. More than 10 % difference suggests a pin 1 assembly fault (more than 25 % confirms it). This works for cables longer than 3 m; for short cables add a known-good cable of about 2 m.
08บันทึกSAVE
เก็บผล โอนไฟล์ และอัปเดตเครื่องKeep results, transfer files and update
MR-PRO ไม่ได้เก็บผลวัดเป็นไฟล์ข้อมูล ผลของงานเสียง เช่น STIPA RT60 Polarity และ Delay ถูกบันทึกฝั่งเครื่องวิเคราะห์ ส่วนผลที่ MR-PRO อ่านเอง ให้เก็บด้วยการจดหรือภาพหน้าจอThe MR-PRO does not store results as data files. Acoustic results such as STIPA, RT60, polarity and delay are saved on the analyzer; for readings the MR-PRO makes itself, write them down or take a screenshot.
- STEP1
ภาพหน้าจอScreenshots
ต่อ USB แล้วสร้างโฟลเดอร์ชื่อ Screen ที่ไดรฟ์หลักของ MR-PRO ถอดสาย ตั้งค่าและวัดตามปกติ แล้วกด On/Off พร้อม Enter สั้น ๆ ภาพจะอยู่ในโฟลเดอร์นั้น ต่อ USB อีกครั้งเพื่อคัดลอกออกOver USB create a folder named Screen in the MR-PRO's root drive, disconnect, set up and measure as usual, then briefly press On/Off and Enter together. The picture goes to that folder; reconnect USB to copy it.
- STEP2
ไฟล์ WAV ของคุณเองYour own WAV files
เมื่อต่อ USB เครื่องจะขึ้นเป็นไดรฟ์ เปิดโฟลเดอร์ WAVE แล้วสร้างหรือเปิดโฟลเดอร์ย่อยเพื่อคัดลอกไฟล์ ไฟล์ต้องเป็น 48 kHz, 16 bit, Mono หรือ Stereo ถ้ารูปแบบไม่ถูก การเล่นจะหยุดและปุ่ม Mute ติดสีแดงค้างOver USB the instrument appears as a drive: open WAVE, create or open a subfolder and copy the files. Files must be 48 kHz, 16 bit, mono or stereo; a wrong format stops playback and Mute stays lit red.
- STEP3
อัปเดตเฟิร์มแวร์Firmware update
ดูเวอร์ชันปัจจุบันที่ SYSTEM การอัปเดตทำผ่าน USB ด้วยโปรแกรม MR-Update ของ NTi หลังลงทะเบียนเครื่องที่ my.nti-audio.com ซึ่งเป็นขั้นตอนที่เจ้าของเครื่องทำเองด้วยบัญชีของตัวเองCheck the current version under SYSTEM. Updates run over USB with NTi's MR-Update program after you register the instrument at my.nti-audio.com, which the owner does with their own account.
สำหรับงานส่งมอบระบบ ให้บันทึกผลเป็นตารางต่อสาย/ต่อโซน: สัญญาณและระดับที่ใช้ ความถี่ ค่าที่อ่านได้ และวันที่ เพื่อเทียบในการตรวจครั้งถัดไปFor handover work, record a table per line or zone: signal and level used, frequency, reading and date, so the next check can be compared.
09แก้ปัญหาTROUBLESHOOT
ปัญหาที่พบบ่อยและวิธีแก้Common problems and fixes
| อาการSymptom | สาเหตุCause | วิธีแก้Fix |
|---|---|---|
| ไม่มีสัญญาณออก ปุ่ม Mute กะพริบNo output, Mute flashing | สาเหตุCauseเครื่องถูก Mute อยู่The output is muted | วิธีแก้Fixกด MutePress Mute |
| ไม่มีสัญญาณออก ปุ่ม Mute ติดค้างNo output, Mute lit steadily | สาเหตุCauseอยู่ในช่วงหยุดของ PNOISE/CHIRP ไฟล์ WAV ไม่รองรับ หรือเสียบสายไม่ถูกA PNOISE/CHIRP pause, an unsupported WAV file, or a badly plugged cable | วิธีแก้Fixรอจบช่วงหยุดหรือสั่ง Start ใช้ไฟล์ที่ถูกรูปแบบ เสียบสายใหม่Wait for the pause or press Start; load a supported file; re-plug the cable |
| LVL กะพริบLVL flashing | สาเหตุCauseโหลดดึงกระแสเกิน 10 mA เครื่องลดระดับเองThe load draws more than 10 mA and the level has been reduced | วิธีแก้Fixลดระดับ หรือตรวจว่าโหลดต่ำกว่า 600 Ω หรือไม่Lower the level or check for a load below 600 Ω |
| ไม่แสดงอิมพีแดนซ์ (ขึ้น ---)No impedance shown (---) | สาเหตุCauseระดับต่ำเกินไป หรือไม่ได้ใช้ SINEWAVELevel too low, or not SINEWAVE | วิธีแก้Fixเพิ่มระดับ หรือเปลี่ยนเป็น SINEWAVERaise the level or switch to SINEWAVE |
| จอซีดหรือเข้มเกินPoor display contrast | สาเหตุCauseตั้งความคมชัดไม่เหมาะContrast setting | วิธีแก้Fixกด ESC ค้างแล้วหมุนวงล้อHold ESC and turn the wheel |
| มีเสียงฮัมที่ช่อง RCAHum at the RCA output | สาเหตุCauseใช้อะแดปเตอร์ไฟแบบสวิตชิงSwitching mains adapter | วิธีแก้Fixใช้ถ่าน หรืออะแดปเตอร์แบบ linearUse batteries or a linear adapter |
| อยากล้างการตั้งค่าทั้งหมดWant a clean start | สาเหตุCause—— | วิธีแก้Fixปิดเครื่อง กด ESC ค้างแล้วกด On/Off จะมีหน้ายืนยันการรีเซ็ตเป็นค่าโรงงานSwitch off, hold ESC and press On/Off; a factory-reset confirmation appears |