ทำไมเรื่องนี้สำคัญWhy this matters
ลำโพงที่ดีที่สุดก็ยังฟังไม่ดีได้ ถ้าติดตั้งแล้วไม่ได้วัดและปรับ เพราะห้องแต่ละห้องมีผนัง เพดาน พื้น และเฟอร์นิเจอร์ที่สะท้อนหรือดูดซับเสียงไม่เท่ากัน เสียงที่ออกจากลำโพงจึงถูกห้อง “แต่งเติม” ก่อนจะถึงหูผู้ฟังเสมอEven the best loudspeakers can sound poor if they are installed without being measured and adjusted. Every room has walls, a ceiling, a floor and furniture that reflect or absorb sound differently, so the room always “colours” the sound before it reaches the listener’s ears.
ผลที่พบบ่อยเมื่อไม่ได้จูน ได้แก่ เสียงทุ้มบวมจนพูดไม่ชัด เสียงแหลมบาดหู แถวหน้าดังมากแต่แถวหลังแทบไม่ได้ยิน ผู้ฟังได้ยินเสียงเดียวกันสองครั้งเหมือนเสียงสะท้อน หรือเสียงเบสหายไปอย่างไม่มีสาเหตุ ปัญหาเหล่านี้หลายอย่างแก้ได้ด้วยการวัดอย่างเป็นระบบ ไม่ต้องเปลี่ยนอุปกรณ์Typical results of an untuned system are boomy bass that muddies speech, harsh treble, front rows that are very loud while back rows can hardly hear, listeners who hear the same sound twice like an echo, or bass that disappears for no obvious reason. Many of these problems can be solved by measuring systematically, without replacing any equipment.
แนวคิดพื้นฐาน: เราต้องการอะไรจากระบบเสียงThe basic idea: what we want from a sound system
เป้าหมายของการจูนสรุปได้เป็นคำถามง่าย ๆ 4 ข้อ ซึ่งแต่ละข้อมีวิธีวัดของตัวเองThe goal of tuning can be summed up as four simple questions, each with its own measurement.
| คำถามQuestion | เรื่องที่วัดWhat is measured | เครื่องมือที่ใช้บ่อยTypical tools |
|---|---|---|
| เสียงสมดุลทุกย่านความถี่หรือไม่Is the sound balanced across frequencies? | เรื่องที่วัดWhat is measuredการตอบสนองความถี่ (Frequency response)Frequency response | เครื่องมือที่ใช้บ่อยTypical toolsPink noise จาก MR-PRO + RTA บน XL2Pink noise from the MR-PRO + RTA on the XL2 |
| ทุกที่นั่งได้ยินใกล้เคียงกันหรือไม่Does every seat hear something similar? | เรื่องที่วัดWhat is measuredความครอบคลุม (Coverage)Coverage | เครื่องมือที่ใช้บ่อยTypical toolsRTA วัดหลายจุด เทียบค่าสูงสุดกับต่ำสุดRTA at many positions, comparing maximum and minimum |
| เสียงจากลำโพงหลายตัวมาถึงพร้อมกันหรือไม่Does sound from several loudspeakers arrive together? | เรื่องที่วัดWhat is measuredเวลาหน่วง (Delay)Delay time | เครื่องมือที่ใช้บ่อยTypical toolsฟังก์ชันวัด Delay บน XL2Delay measurement on the XL2 |
| ลำโพงทุกตัวดันอากาศไปทางเดียวกันหรือไม่Do all loudspeakers push the air the same way? | เรื่องที่วัดWhat is measuredโพลาริตี (Polarity)Polarity | เครื่องมือที่ใช้บ่อยTypical toolsสัญญาณทดสอบโพลาริตีจาก MR-PRO + XL2Polarity test signal from the MR-PRO + XL2 |
ก่อนจะอ่านต่อ ควรเข้าใจเรื่องความถี่และย่าน 1/3 ออกเตฟก่อน เพราะการจูนเกือบทั้งหมดดูผลเป็นรายย่านความถี่ ไม่ใช่ตัวเลขเดียวBefore reading further it helps to understand frequency and 1/3 octave bands, because almost all tuning work looks at results band by band rather than as a single number.
การตอบสนองความถี่: Pink noise และ RTAFrequency response: pink noise and the RTA
การตอบสนองความถี่ (Frequency response) บอกว่าระบบเสียงทำให้แต่ละย่านความถี่ดังเท่าไร เมื่อป้อนสัญญาณที่มีทุกความถี่ในปริมาณเท่า ๆ กันเข้าไป ถ้าระบบ “เรียบ” ย่านทุ้ม กลาง และแหลม จะออกมาดังใกล้เคียงกันFrequency response tells us how loud the sound system makes each frequency range when we feed in a signal that contains all frequencies in equal amounts. If the system is “flat”, bass, mid and treble come out at similar levels.
สัญญาณที่ใช้กันมากคือ Pink noise ซึ่งฟังคล้ายเสียงซ่าของน้ำตก Pink noise มีพลังงานเท่ากันในทุกออกเตฟ จึงเข้าคู่กับเครื่อง RTA (Real-time analyzer) ที่แสดงระดับเสียงเป็นแท่งตามย่าน 1/3 ออกเตฟ ถ้าห้องและลำโพงไม่แต่งเสียงเลย แท่งทุกแท่งบนหน้าจอจะสูงใกล้เคียงกัน เมื่อแท่งไหนสูงหรือต่ำผิดปกติ เราก็รู้ทันทีว่าย่านนั้นต้องปรับThe most common test signal is pink noise, which sounds like the rush of a waterfall. Pink noise has equal energy in every octave, so it pairs naturally with an RTA (real-time analyzer), which shows the level as bars in 1/3 octave bands. If the room and loudspeakers did not colour the sound at all, every bar on the screen would be about the same height. When one bar is unusually high or low, we immediately know which range needs adjusting.
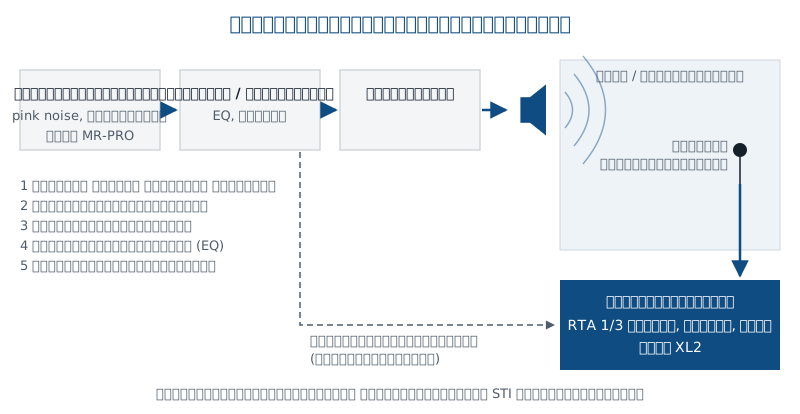
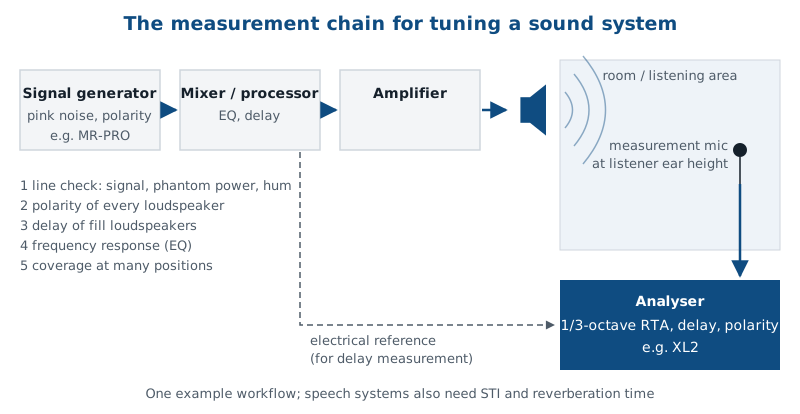
- ต่อเครื่องกำเนิดสัญญาณ เช่น Minirator MR-PRO เข้าอินพุตของมิกเซอร์หรือโปรเซสเซอร์ แล้วปล่อย Pink noise ที่ระดับพอเหมาะConnect a signal generator such as the Minirator MR-PRO to the mixer or processor input and play pink noise at a sensible level.
- ตั้งไมโครโฟนวัดเสียงที่ความสูงระดับหูของผู้ฟัง (นั่งหรือยืนตามการใช้งานจริง)Place the measurement microphone at the listeners’ ear height (seated or standing, as the space is actually used).
- ดูผลบน RTA ของ XL2 เป็นย่าน 1/3 ออกเตฟ แล้วมองหาย่านที่ยื่นขึ้นหรือยุบลงRead the result on the XL2 RTA in 1/3 octave bands and look for ranges that stick up or dip down.
- ปรับอีควอไลเซอร์ (equaliser หรือ EQ คืออุปกรณ์หรือฟังก์ชันที่เพิ่มหรือลดระดับของแต่ละช่วงความถี่) ทีละน้อย แล้ววัดซ้ำ จนผลอยู่ในเกณฑ์ที่กำหนดAdjust the equaliser (an equaliser, or EQ, is a device or function that turns individual frequency ranges up or down) in small steps and measure again until the result is within the agreed tolerance.
- วัดซ้ำที่ตำแหน่งผู้ฟังอื่น ๆ ด้วย ไม่ใช่แค่จุดเดียวRepeat at other listening positions, not just one.
เกณฑ์ที่ยอมรับได้ขึ้นกับสเปกของงานแต่ละงาน NTi Audio ยกตัวอย่างเกณฑ์สำหรับระบบเสียงประกาศไว้แบบหนึ่ง คือให้ผลอยู่ภายใน ±2 dB จากเส้นเรียบในช่วง 100 Hz ถึง 2 kHz แล้วยอมให้ลาดลง 3 dB ต่อออกเตฟจาก 2 kHz ถึง 10 kHz เครื่อง XL2 สามารถสร้างหน้ากากผ่าน/ไม่ผ่าน (Pass/Fail mask) จากเกณฑ์แบบนี้ และแสดงว่าย่านไหนตกThe acceptable tolerance depends on each project’s specification. NTi Audio gives one example for a PA system: stay within ±2 dB of flat from 100 Hz to 2 kHz, then allow a roll-off of 3 dB per octave from 2 kHz to 10 kHz. The XL2 can build a pass/fail mask from a tolerance like this and show which bands fail.
RTA บอกได้ว่าย่านไหนดังเกิน แต่บอกไม่ได้ว่าเกิดจากลำโพง ห้อง หรือการวางตำแหน่ง ถ้าปัญหาเกิดจากห้อง (เช่น เสียงก้องมาก หรือจุดที่เสียงหักล้างกัน) การดันอีควอไลเซอร์แรง ๆ มักไม่ช่วย และอาจทำให้ระบบเสียงเสี่ยงต่อการหอน (Feedback: เสียงหอนที่เกิดเมื่อไมโครโฟนรับเสียงจากลำโพงของระบบเองวนกลับเข้าไป) มากขึ้นAn RTA shows which range is too loud, but it cannot tell whether the cause is the loudspeaker, the room or the placement. If the problem comes from the room (for example strong reverberation or spots where sound cancels), pushing the equaliser hard rarely helps and can make the system more prone to feedback (the howl that occurs when a microphone picks up the system's own loudspeakers and the sound loops back).
หลักการทั่วไป: RTA กับ Pink noise เป็นวิธีที่ง่ายที่สุด ผู้ปรับจูนจำนวนมากยังใช้เครื่องวิเคราะห์ FFT แบบสองช่อง (transfer function) ที่เทียบสัญญาณขาออกของลำโพงกับสัญญาณต้นทาง ซึ่งแสดงทั้งขนาดและเฟส และแยกผลของเสียงรบกวนได้ดีกว่า ขั้นตอนในบทความนี้เป็นตัวอย่างการทำงานด้วย MR-PRO และ XL2General principle: pink noise with an RTA is the simplest approach. Many engineers also use dual-channel FFT (transfer-function) analysers that compare the loudspeaker output with the source signal, showing magnitude and phase and rejecting unrelated noise better. The steps in this article are one example workflow with the MR-PRO and the XL2.
ความครอบคลุม: ทุกที่นั่งได้ยินเท่ากันไหมCoverage: does every seat hear the same?
ความครอบคลุม (Coverage) หมายถึงความสม่ำเสมอของเสียงทั่วพื้นที่ผู้ฟัง แม้จุดกลางห้องจะเสียงดีมาก แต่ถ้าที่นั่งริมผนังหรือแถวหลังได้ยินเบากว่ามาก หรือเสียงแหลมหายไป ระบบก็ยังไม่ผ่านCoverage is how even the sound is across the listening area. Even if the centre of the room sounds excellent, the system still fails if seats near the walls or at the back hear much less level or lose the treble.
วิธีตรวจคือวัดสเปกตรัมหลายจุด หรือเดินถือไมโครโฟนช้า ๆ ไปทั่วพื้นที่ผู้ฟังขณะปล่อยสัญญาณทดสอบ แล้วให้เครื่องเก็บค่าสูงสุดและค่าต่ำสุดของแต่ละย่านไว้ ความต่างระหว่างสองค่านี้คือความไม่สม่ำเสมอ NTi Audio ยกตัวอย่างเกณฑ์ไว้ที่ ±6 dB ในช่วง 1 kHz ถึง 4 kHz ซึ่งเป็นย่านสำคัญของเสียงพูด เมื่อคิดเป็นค่าสูงสุดลบค่าต่ำสุด ก็คือต้องไม่เกิน 12 dBTo check it, measure the spectrum at many points, or walk slowly through the audience area holding the microphone while the test signal plays, and let the instrument keep the maximum and minimum of each band. The difference between the two is the unevenness. NTi Audio gives an example tolerance of ±6 dB from 1 kHz to 4 kHz, the key range for speech. Expressed as maximum minus minimum, the spread must not exceed 12 dB.
ห้องประชุมใหญ่ที่มีลำโพงเพดานหลายตัว วัดใต้ลำโพงได้ดี แต่ตรงกลางระหว่างลำโพงสองตัว ย่าน 2–4 kHz ตกลงไปมาก ผลการเดินวัดทำให้เห็นว่าต้องปรับระยะห่างหรือมุมลำโพง ไม่ใช่ปรับอีควอไลเซอร์ เพราะอีควอไลเซอร์จะเปลี่ยนเสียงทุกจุดพร้อมกันA large meeting room has several ceiling loudspeakers. The sound is fine directly under each one, but halfway between two loudspeakers the 2–4 kHz range drops a lot. The walk-through measurement shows that the spacing or aiming of the loudspeakers must change, not the equaliser, because the equaliser changes the sound at every seat at once.
ดีเลย์: ทำให้เสียงมาถึงพร้อมกันDelay: making sound arrive together
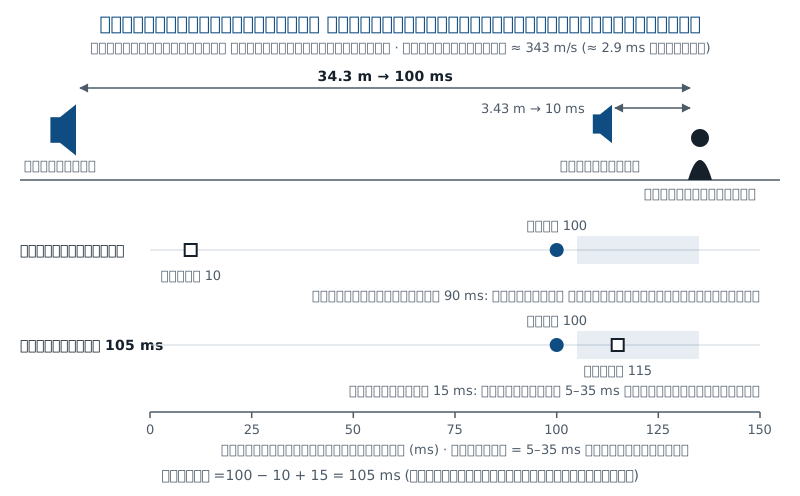
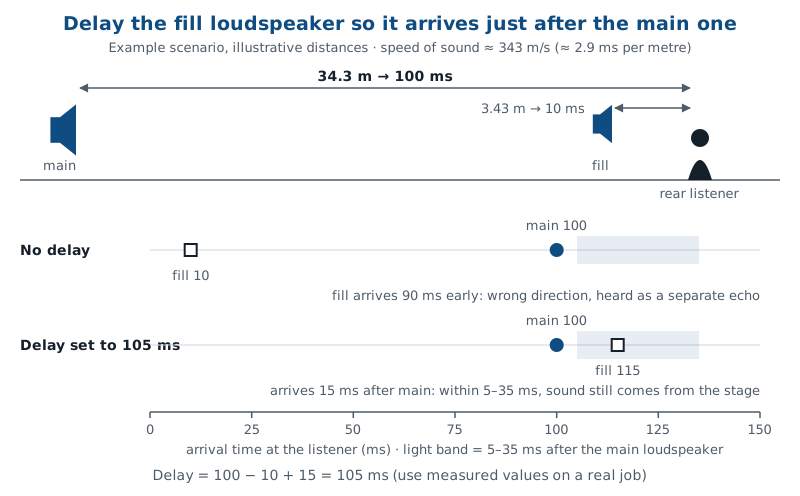
ในห้องยาวหรือหอประชุม มักติดลำโพงเสริม (Delay speaker) ไว้ใกล้ผู้ฟังแถวหลัง ปัญหาคือสัญญาณไฟฟ้าวิ่งถึงลำโพงทุกตัวแทบจะทันที แต่เสียงในอากาศเดินทางช้ากว่ามาก (ประมาณ 343 เมตรต่อวินาทีที่อุณหภูมิห้อง หรือราว 3 มิลลิวินาทีต่อเมตร) ผู้ฟังแถวหลังจึงได้ยินลำโพงเสริมที่อยู่ใกล้ก่อน แล้วค่อยได้ยินลำโพงหลักด้านหน้าตามมาIn long rooms and auditoriums, extra loudspeakers (delay speakers) are often installed close to the rear audience. The problem is that the electrical signal reaches every loudspeaker almost instantly, while sound in air travels much more slowly (about 343 metres per second at room temperature, or roughly 3 milliseconds per metre). Listeners at the back therefore hear the nearby delay speaker first and the main loudspeakers at the front afterwards.
หูของเรามีคุณสมบัติที่เรียกว่า ปรากฏการณ์ Haas (Haas effect หรือ Precedence effect) คือเรามักรับรู้ทิศทางของเสียงจากเสียงที่มาถึงก่อน NTi Audio อธิบายช่วงเวลาไว้ดังนี้Our hearing has a property called the Haas effect (precedence effect): we tend to perceive the direction of a sound from whichever arrival comes first. NTi Audio describes the time ranges as follows.
| เสียงที่สองมาช้ากว่าSecond arrival is later by | สิ่งที่ผู้ฟังรับรู้What the listener perceives |
|---|---|
| 0–5 ms0–5 ms | สิ่งที่ผู้ฟังรับรู้What the listener perceivesทิศทางของเสียงเลื่อนไปอยู่ระหว่างลำโพงสองตัวThe sound seems to come from somewhere between the two loudspeakers |
| 5–35 ms5–35 ms | สิ่งที่ผู้ฟังรับรู้What the listener perceivesเสียงที่สองกลืนเป็นเหมือนเสียงสะท้อนของเสียงแรก ทิศทางยังอยู่ที่เสียงแรกThe second arrival blends in like a reflection of the first; the direction stays with the first |
| มากกว่า 35 msMore than 35 ms | สิ่งที่ผู้ฟังรับรู้What the listener perceivesได้ยินเป็นเสียงก้องสะท้อน (Echo) แยกเป็นสองเสียงHeard as a separate echo, two distinct sounds |
หลักปฏิบัติจึงเป็นการหน่วงสัญญาณของลำโพงเสริมให้เสียงมาถึงหลังเสียงจากลำโพงหลักเล็กน้อย NTi Audio แนะนำประมาณ 15 ms ซึ่งอยู่ในช่วง 5–35 ms ผู้ฟังแถวหลังจะได้ความดังเพิ่มจากลำโพงเสริม แต่ยังรู้สึกว่าเสียงมาจากเวที เครื่อง XL2 วัดเวลาหน่วงได้โดยเทียบสัญญาณไฟฟ้าอ้างอิงกับเสียงที่ไมโครโฟนรับได้จากลำโพง แล้วแสดงค่าที่นำไปตั้งในเครื่องหน่วงเวลาได้โดยตรงThe practical rule is therefore to delay the fill loudspeaker so its sound arrives slightly after the sound from the main loudspeakers. NTi Audio recommends about 15 ms, which falls inside the 5–35 ms window. Rear listeners get extra level from the delay speaker but still feel that the sound comes from the stage. The XL2 measures the delay by comparing the electrical reference signal with the acoustic signal the microphone picks up from the loudspeaker, and shows a value that can be entered straight into the delay unit.
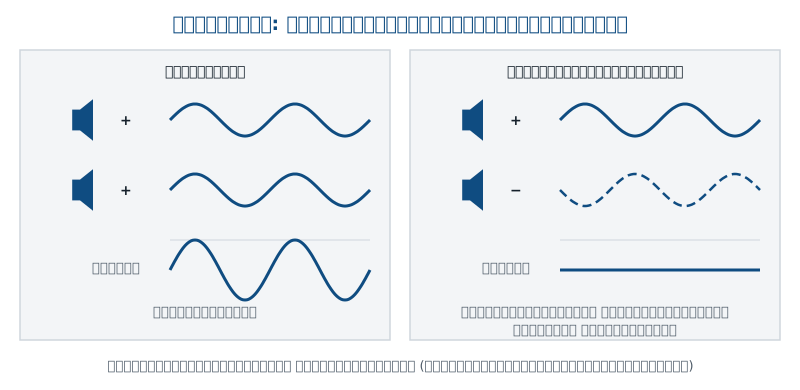
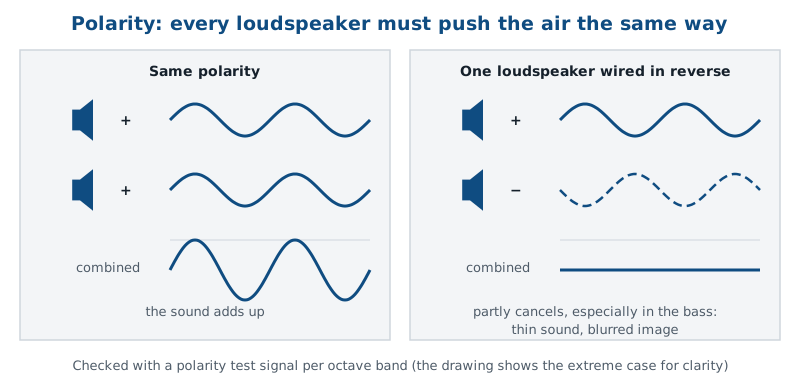
โพลาริตี: ลำโพงทุกตัวต้องดันไปทางเดียวกันPolarity: every loudspeaker must push the same way
เมื่อสัญญาณเป็นบวก กรวยลำโพงควรเคลื่อนออกมาข้างหน้าและดันอากาศ ถ้าสายต่อสลับขั้วแม้เพียงตัวเดียว ลำโพงตัวนั้นจะดึงอากาศกลับในขณะที่ตัวอื่นดันออก เรียกว่า โพลาริตีกลับ (Reversed polarity) ในจุดที่ได้ยินลำโพงทั้งสองตัวพร้อมกัน เสียงจะหักล้างกันบางส่วน โดยเฉพาะย่านทุ้ม เสียงจะบางและภาพเสียงสเตอริโอเลือนWhen the signal goes positive, the loudspeaker cone should move forward and push the air. If a cable is wired the wrong way round, even on a single loudspeaker, that unit pulls the air back while the others push. This is reversed polarity. Where both loudspeakers are heard together, their sound partly cancels, especially in the bass, so the sound becomes thin and the stereo image blurs.
การตรวจทำได้ด้วยสัญญาณทดสอบโพลาริตีจาก MR-PRO แล้วรับด้วย XL2 ซึ่งแสดงผลโพลาริตีแยกตามย่านออกเตฟตั้งแต่ 125 Hz ถึง 8 kHz จึงตรวจได้ทั้งตู้ลำโพงแบบหลายทาง (เช่น วูฟเฟอร์กับทวีตเตอร์) และระบบที่มีลำโพงหลายตู้ ในงานโรงภาพยนตร์และงาน Front of house ก็ถือเป็นขั้นตอนมาตรฐานที่ต้องยืนยันว่าลำโพงทุกตัวมีโพลาริตีเดียวกันIt can be checked with a polarity test signal from the MR-PRO received by the XL2, which shows polarity per octave band from 125 Hz to 8 kHz. This makes it possible to check both multi-way cabinets (for example woofer and tweeter) and systems with many cabinets. In cinemas and front-of-house work, confirming that all loudspeakers share the same polarity is a standard step.
ขั้นตอนการทำงานโดยรวมThe overall workflow
- ตรวจสาย สัญญาณ และระดับ (Line check) ก่อน: เช็กว่ามีสัญญาณครบทุกช่อง ไฟ Phantom สำหรับไมโครโฟนทำงาน และไม่มีเสียงฮัมStart with a line check: confirm every channel has signal, microphone phantom power works and there is no hum.
- ตรวจโพลาริตีของลำโพงทุกตัวCheck the polarity of every loudspeaker.
- ตั้งดีเลย์ของลำโพงเสริมให้สัมพันธ์กับลำโพงหลักSet the delay of fill speakers relative to the main loudspeakers.
- ปรับการตอบสนองความถี่ด้วย Pink noise และ RTA ที่ตำแหน่งผู้ฟังหลายจุดAdjust the frequency response with pink noise and the RTA at several listening positions.
- ตรวจความครอบคลุมทั่วพื้นที่ แล้วจัดระดับของแต่ละโซนให้สมดุลCheck coverage across the area and balance the level of each zone.
- ถ้าเป็นระบบเสียงพูดหรือเสียงประกาศ วัดความชัดของเสียงพูด (STI) และเวลาเสียงก้องของห้องประกอบด้วยFor speech or announcement systems, also measure speech intelligibility (STI) and the room’s reverberation time.
- บันทึกค่าที่ตั้งและผลวัดไว้ เพื่อใช้ตรวจซ้ำครั้งต่อไปRecord the settings and results so they can be re-checked next time.
ระบบลำโพงแบบแรงดันคงที่ 70 V / 100 V ในอาคาร ควรวัดอิมพีแดนซ์ของสายลำโพงด้วย MR-PRO ก่อนจูน ค่าที่ผิดจากที่คาดไว้ชี้ถึงจุดต่อหลวม การต่อแท็ปหม้อแปลงผิด หรือไฟฟ้าลัดวงจรIn buildings with 70 V / 100 V constant-voltage loudspeaker lines, measure the line impedance with the MR-PRO before tuning. A value that differs from the expected one points to loose connections, wrong transformer taps or short circuits.
คำศัพท์สำคัญKey terms
- Pink noise
- สัญญาณสุ่มที่มีพลังงานเท่ากันทุกออกเตฟ บน RTA แบบ 1/3 ออกเตฟจึงแสดงเป็นแท่งสูงเท่า ๆ กันเมื่อระบบเรียบA random signal with equal energy in every octave, so on a 1/3 octave RTA it shows as bars of equal height when the system is flat.
- RTA (Real-time analyzer)RTA (real-time analyzer)
- เครื่องหรือฟังก์ชันที่แสดงระดับเสียงแยกตามย่านความถี่แบบเรียลไทม์An instrument or function that shows the sound level per frequency band in real time.
- การตอบสนองความถี่ (Frequency response)Frequency response
- ความดังที่ระบบเสียงให้ในแต่ละย่านความถี่ เมื่อป้อนสัญญาณเท่ากันทุกความถี่How loud the system reproduces each frequency range when fed a signal with equal content at all frequencies.
- ความครอบคลุม (Coverage)Coverage
- ความสม่ำเสมอของระดับและสเปกตรัมเสียงทั่วพื้นที่ผู้ฟังHow even the level and spectrum are across the listening area.
- ดีเลย์ (Delay)Delay
- การหน่วงเวลาสัญญาณของลำโพงเสริม เพื่อให้เสียงมาถึงผู้ฟังในลำดับที่ถูกต้องHolding back the signal to a fill loudspeaker so sound reaches listeners in the right order.
- โพลาริตี (Polarity)Polarity
- ทิศทางการเคลื่อนของกรวยลำโพงเทียบกับสัญญาณ ลำโพงทุกตัวต้องตรงกันThe direction the loudspeaker cone moves relative to the signal; all loudspeakers must match.
- ปรากฏการณ์ Haas (Haas effect)Haas effect
- การที่หูรับรู้ทิศทางเสียงจากเสียงที่มาถึงก่อนThe tendency of hearing to take the direction of a sound from the first arrival.
ความเข้าใจผิดที่พบบ่อยCommon misunderstandings
- “วัดจุดเดียวกลางห้องก็พอ” ไม่จริง ห้องจริงเปลี่ยนเสียงไปตามตำแหน่ง ต้องวัดหลายจุดทั่วพื้นที่ผู้ฟัง“One measurement in the middle is enough.” Not true: a real room changes the sound with position, so measure at several points across the audience area.
- “อีควอไลเซอร์แก้ได้ทุกอย่าง” ไม่จริง ปัญหาจากตำแหน่งลำโพง ความครอบคลุม หรือเสียงก้องของห้อง ต้องแก้ที่ต้นเหตุ“The equaliser can fix everything.” Not true: problems caused by loudspeaker placement, coverage or room reverberation must be fixed at the cause.
- “เส้นกราฟต้องเรียบแบนเป๊ะ” ไม่จำเป็น เกณฑ์ขึ้นกับการใช้งาน เช่น ยอมให้ย่านแหลมลาดลงได้ และโรงภาพยนตร์ใช้เส้นเป้าหมายเฉพาะ (X-curve)“The curve must be perfectly flat.” Not necessary: the target depends on the use, for example a gentle treble roll-off is often allowed, and cinemas use their own target curve (the X-curve).
- “ดีเลย์ยิ่งตรงเป๊ะยิ่งดี” การหน่วงให้ลำโพงเสริมช้ากว่าลำโพงหลักเล็กน้อย ช่วยให้ผู้ฟังยังรู้สึกว่าเสียงมาจากเวที“Delay should match exactly.” Letting the fill speaker arrive slightly after the main system keeps the sound anchored to the stage.
- “จูนเสร็จแล้วแปลว่าฟังชัดและผ่านการตรวจรับ” ไม่เสมอไป กราฟที่เรียบไม่รับประกันความชัดเจนของเสียงพูด ซึ่งขึ้นกับเสียงก้องและเสียงรบกวนด้วย ต้องวัด STI แยก และระบบเสียงประกาศเหตุฉุกเฉินต้องตรวจรับตามเกณฑ์ของมาตรฐานความปลอดภัยที่ใช้ ส่วนการเฝ้าระดับเสียงในงานแสดงเป็นอีกงานหนึ่ง“A tuned system is intelligible and passes acceptance.” Not necessarily: a flat curve does not guarantee speech intelligibility, which also depends on reverberation and noise and must be measured separately as STI. A voice alarm system must be commissioned against the criteria of its life-safety standard, and live-event level monitoring is a different task again.
นำไปใช้ที่ไหนWhere it is used
- ห้องประชุม หอประชุม ห้องเรียน และห้องบรรยายที่มีระบบเสียงติดตั้งถาวรMeeting rooms, auditoriums, classrooms and lecture halls with installed sound systems
- ระบบเสียงประกาศและระบบเสียงอพยพฉุกเฉิน ร่วมกับการวัด STIPublic address and voice evacuation systems, together with STI measurement
- งานแสดงสดและคอนเสิร์ต: จับคู่ลำโพงซ้าย–ขวา ตั้งดีเลย์ และหาความถี่ที่เสี่ยงหอนLive events and concerts: matching left and right arrays, setting delays and finding feedback-prone frequencies
- โรงภาพยนตร์: ปรับตามเส้น X-curve จัดระดับลำโพงแต่ละช่อง ตรวจโพลาริตีและดีเลย์ ตามมาตรฐานเช่น ISO 2969 และ SMPTE ST 202Cinemas: aligning to the X-curve, setting channel levels, checking polarity and delay, following standards such as ISO 2969 and SMPTE ST 202